DIY Plans to Build a Doyle Cabinet
A Cabinet Created by Combining Two Different Plans
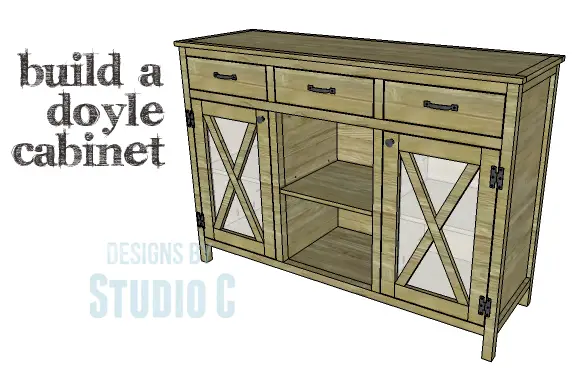
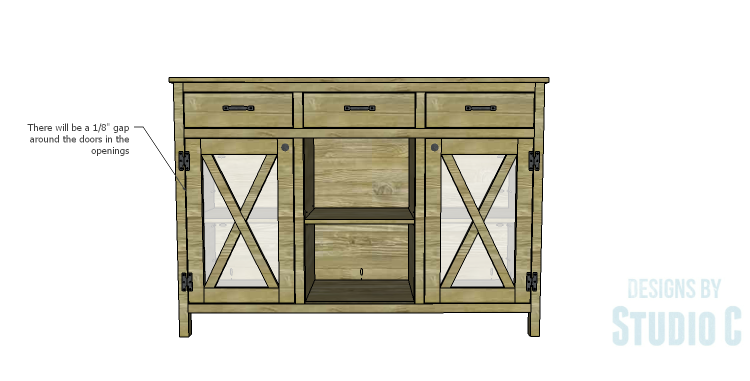
I was contacted by a reader who asked if I could create plans for a cabinet combining the Esmerelda Buffet and the Myron Sideboard. The reader liked the drawers on one cabinet and the doors on the other, so I combined the two to create the DIY plans to build a Doyle Cabinet! The cabinet features three drawers, two cabinets with doors and X detail, and an open center cabinet with an adjustable shelf. The top is a plywood panel with solid wood edges so that a decorative edge can be cut with a router.
Materials:
- 1-1/4″ pocket hole screws (<– affiliate link!)
- 2-1/2″ pocket hole screws
- 1-1/4″ brad nails
- 1-1/4″ screws
- Edge banding, optional
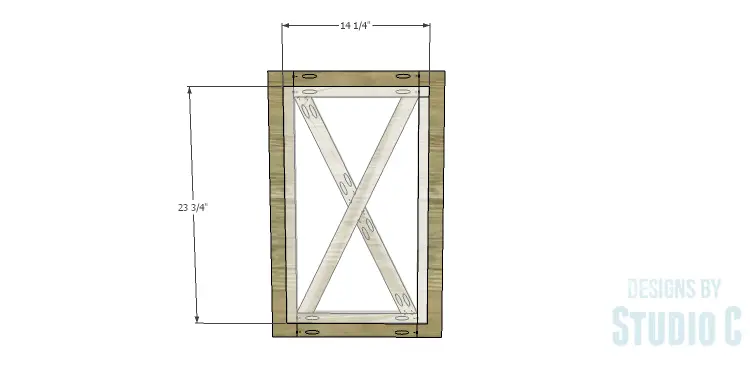
- 2 pieces of glass, Plexiglas or acrylic at 14-1/4″ x 23-3/4″
- Mirror clips
- 4 – 1/4″ shelf pins
- 3 sets of 16″ drawer slides
- 2 sets of hinges
- 2 magnetic catches
- Cabinet pulls
- Wood glue
- Sandpaper (100, 150, 220 grits)
- Finishing supplies (primer & paint, or stain, sealer)
Lumber:
- 1 – 1×2 at 4′
- 1 – 1×2 at 6′
- 2 – 1×2 at 8′
- 2 – 1×3 at 8′
- 2 – 2×2 at 6′
- 4 – 2×2 at 8′
- 3 – 4′ x 8′ sheets of 3/4″ plywood
Cut List:
- 4 – 2×2 at 41-1/4″ – Legs
- 4 – 2×2 at 16″ – Side Framing
- 2 – 3/4″ plywood at 16″ x 34-1/4″ – Side Panels
- 5 – 2×2 at 56″ – Back Framing & Front Stretchers
- 1 – 3/4″ plywood at 34-1/4″ x 56″ – Back Panel
- 1 – 3/4″ plywood at 16″ x 56″ – Bottom
- 2 – 2×2 at 5-3/4″ – Divider Framing
- 2 – 2×2 at 27″ – Divider Framing
- 2 – 3/4″ plywood at 16″ x 35-3/4″ – Divider Panels
- 1 – 3/4″ plywood at 16″ x 18″ – Center Drawer Shelf
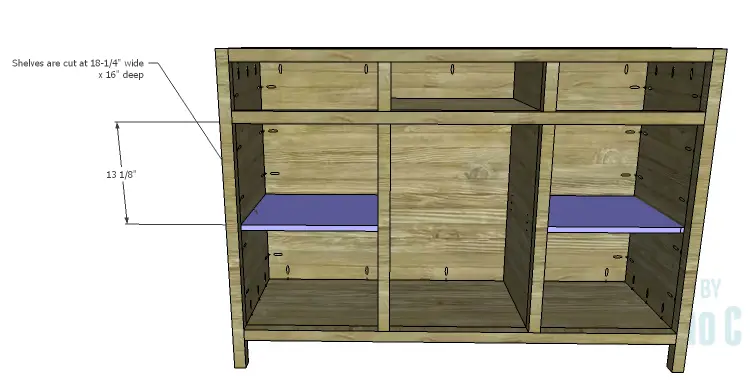
- 2 – 3/4″ plywood at 16″ x 18-1/4″ – Outer Shelves
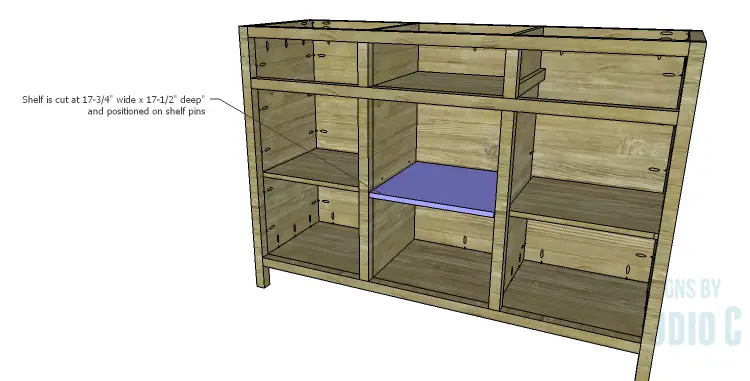
- 1 – 3/4″ plywood at 17-1/2″ x 17-3/4″ – Adjustable Center Shelf
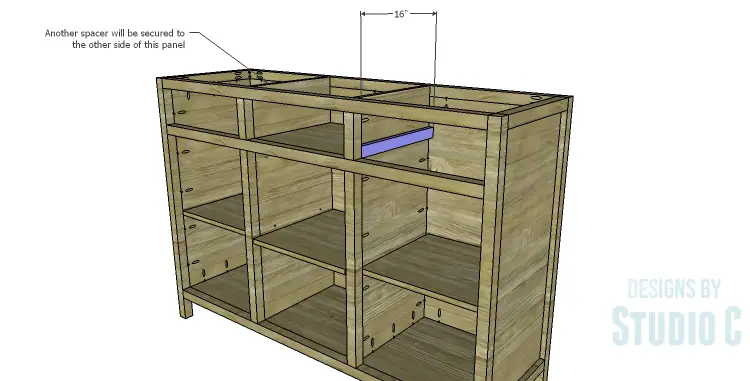
- 2 – 1×2 at 16″ – Drawer Slide Spacers
- 1 – 3/4″ plywood at 17″ x 57″ – Top Panel
- 2 – 1×2 at 17″ – Top Side Trim
- 2 – 1×2 at 60″ – Top Front & Back Trim
- 2 – 3/4″ plywood at 14-1/2″ x 15 – Outer Drawer Box Bottom
- 4 – 3/4″ plywood at 4″ x 14″ – Outer Drawer Box Sides
- 4 – 3/4″ plywood at 4″ x 16-1/2″ – Outer Drawer Box Front & Back
- 1 – 3/4″ plywood at 14-1/2″ x 15-1/2″ – Center Drawer Box Bottom
- 2 – 3/4″ plywood at 4″ x 14″ – Center Drawer Box Sides
- 2 – 3/4″ plywood at 4″ x 17″ – Center Drawer Box Front & Back
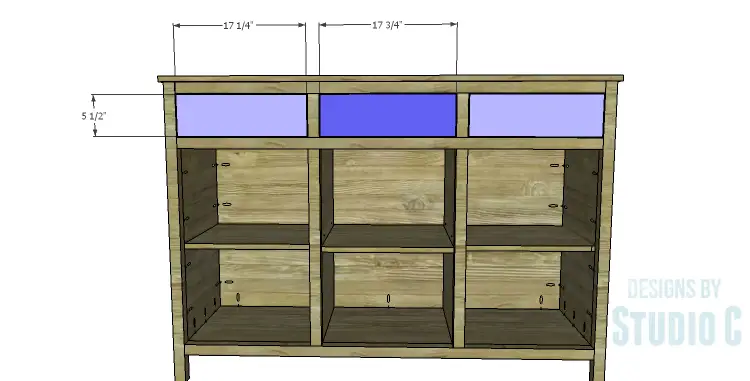
- 2 – 3/4″ plywood at 5-1/2″ x 17-1/4″ – Outer Drawer Fronts
- 1 – 3/4″ plywood at 5-1/2″ x 17-3/4″ – Center Drawer Front
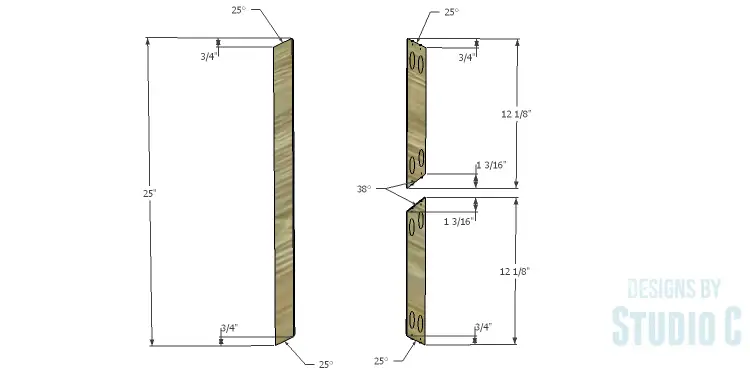
- 2 – 1×2 at 25″ – X Detail
- 4 – 1×2 at 12-1/8″ – X Detail
- 4 – 1×3 at 12-1/4″ – Door Frame
- 4 – 1×3 at 26-3/4″ – Door Frame
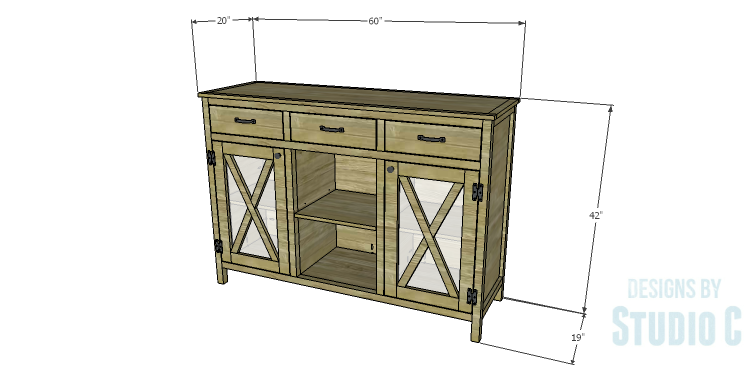
Click on the drawings for a larger view!
Step One
Edge banding will be applied to the exposed edges of the plywood prior to assembly.
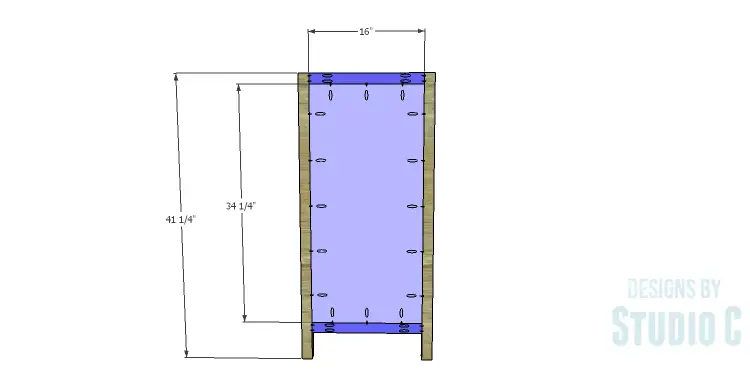
Cut the pieces for the legs, the side framing, and the side panels. With the pocket hole jig set for 1-1/2″ material, drill pocket holes in each end of the framing pieces. Secure the framing to the legs using glue and 2-1/2″ pocket hole screws.
Set the pocket hole jig for 3/4″ material, and drill pocket holes in all four edges of the side panels. Secure the panels to the framing using glue and 1-1/4″ pocket hole screws. The back face of the panel will be flush with the back face of the framing and legs.
Step Two
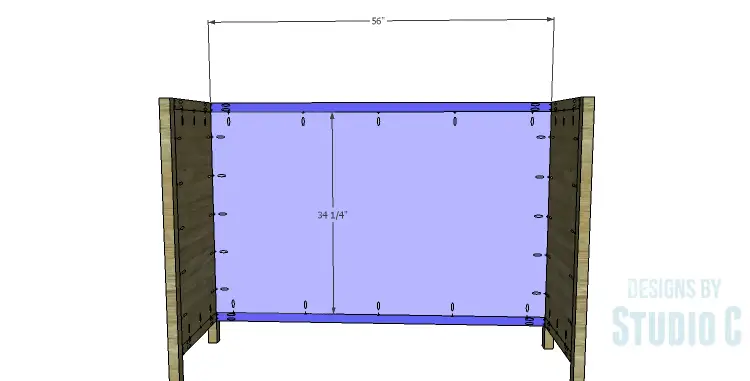
Cut the pieces for the back framing, the front stretchers, and the back panel. Set the pocket hole jig for 1-1/2″ material and drill pocket holes in each end of the framing and stretcher pieces. Secure the framing to the legs using glue and 2-1/2″ pocket hole screws.
Set the pocket hole jig for 3/4″ material, and drill pocket holes in all four edges of the back panel. Secure the panel to the framing using glue and 1-1/4″ pocket hole screws. The back face of the panel will be flush with the back face of the framing and legs.
Step Three
Secure the front stretchers to the legs using glue and 2-1/2″ pocket hole screws.
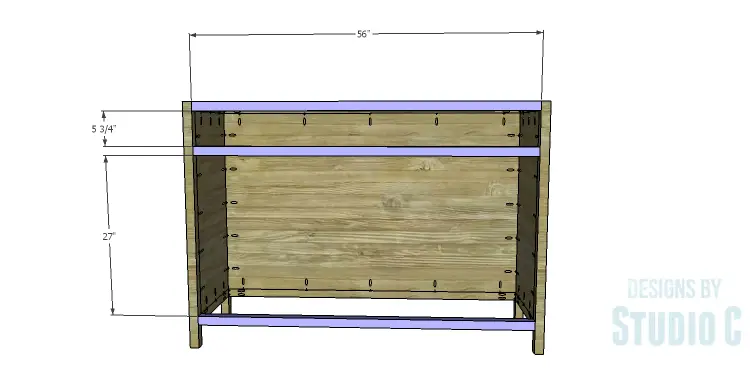
Step Four
Cut the piece for the bottom and drill pocket holes in all four edges. Secure the bottom as shown using glue and 1-1/4″ pocket hole screws. The top face of the bottom will be flush with the top face of the lowest stretcher.
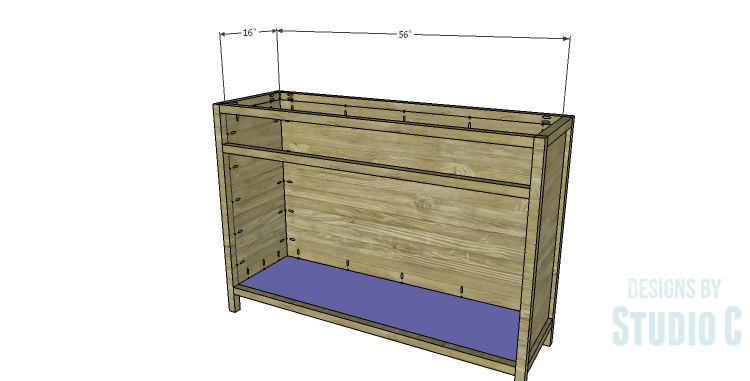
Step Five
Cut the pieces for the divider framing. Set the pocket hole jig for 1-1/2″ material and drill pocket holes in each end of the divider framing pieces. Secure the framing to the front stretchers using glue and 2-1/2″ pocket hole screws.
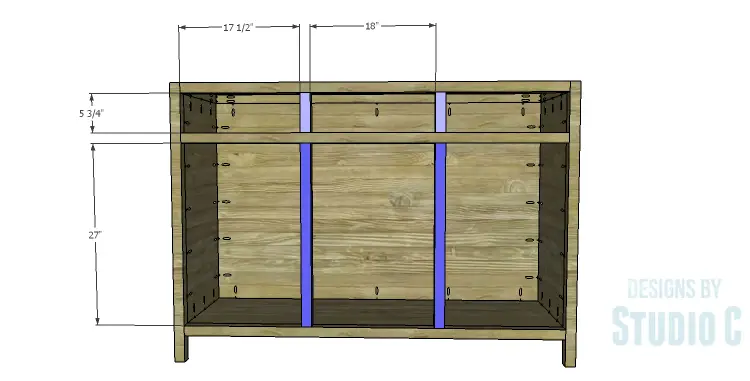
Step Six
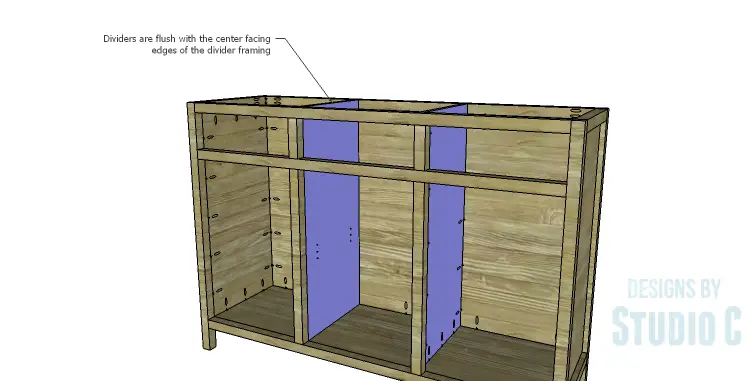
Cut the pieces for the dividers. Set the pocket hole jig for 3/4″ material, and drill pocket holes in the side and bottom edges of the divider panels. On the opposite side of the panels, mark the position of the shelf pins then use a shelf pin jig and a 1/4″ shelf pin drill bit to drill the holes. More holes can be drilled as desired.
Secure the divider panels to the center framing with the shelf pin holes facing the center of the cabinet. This face (of each panel) will also be flush with the center facing edge of the divider framing. Secure in place using glue and 1-1/4″ pocket hole screws.
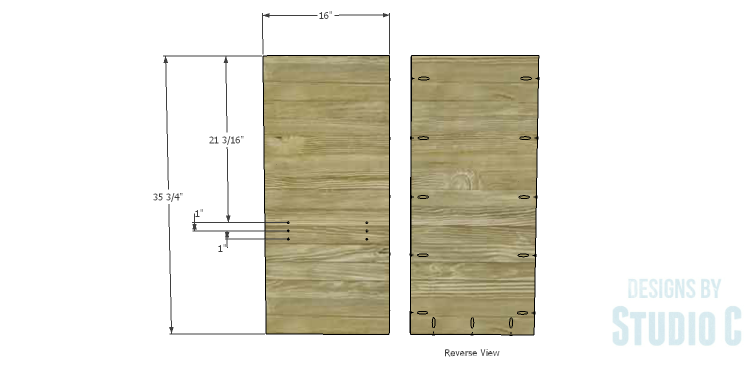
Step Seven
Cut the piece for the center drawer shelf and drill pocket holes in all four edges. Secure the shelf to the middle front stretcher, the dividers, and the back using glue and 1-1/4″ pocket hole screws.

Step Eight
Cut the pieces for the outer shelves. Drill pocket holes in the side edges, as well as the back edges. Secure the shelves to the sides and dividers using glue and 1-1/4″ pocket hole screws.
Step Nine
Cut the piece for the center shelf. Insert the shelf pins into the holes then place the shelf on the pins.
Step Ten
Cut the pieces for the drawer slide spacers. These pieces will be located just above the middle front stretcher, and will be secured to the divider panels using glue and 1-1/4″ brad nails.
Step Eleven
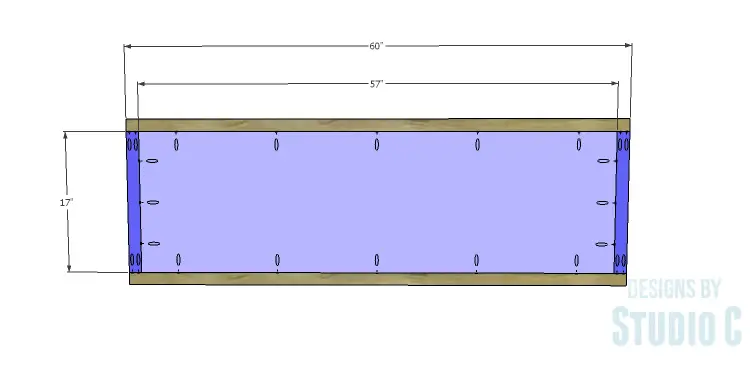
Cut the pieces for the top panel and the top trim. Drill pocket holes in each end of the top side trim pieces as well as all four edges of the top panel. Secure the side trim pieces to the panel first using glue and 1-1/4″ pocket hole screws, then secure the front and pack trim pieces using glue and 1-1/4″ pocket hole screws.
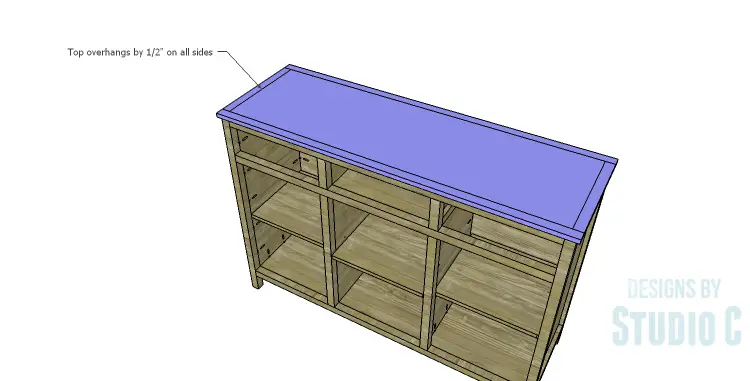
The top will overhang the cabinet by 1/2″ on all sides. Spread glue on the top of the framing pieces, the upper front stretcher, and the dividers the position the top. Secure in place using 1-1/4″ brad nails.
Step Twelve
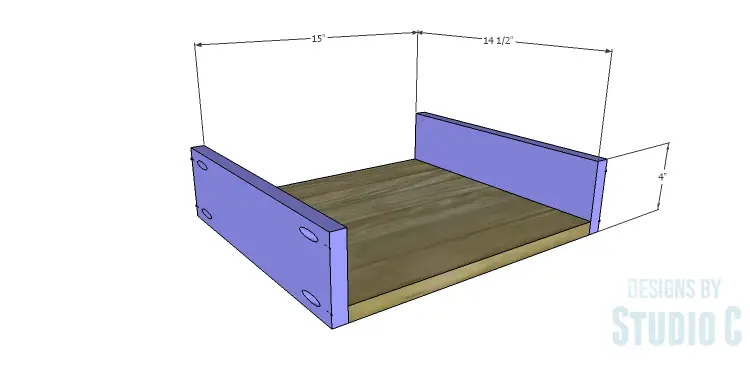
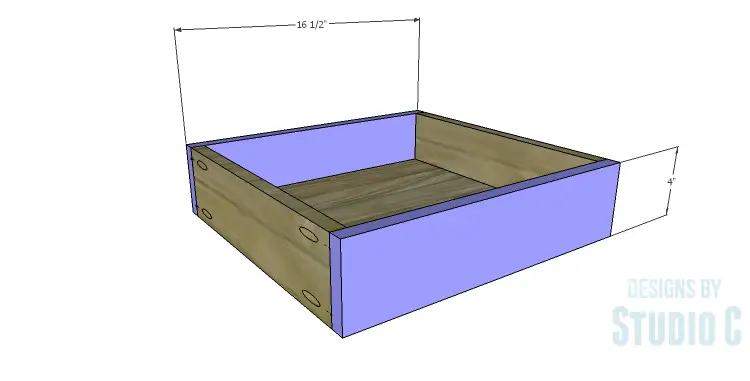
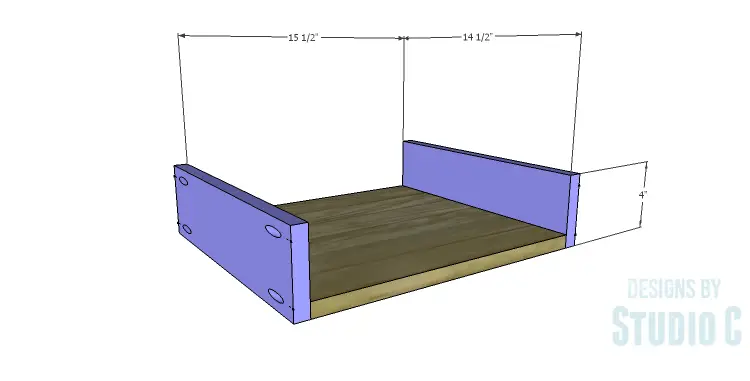
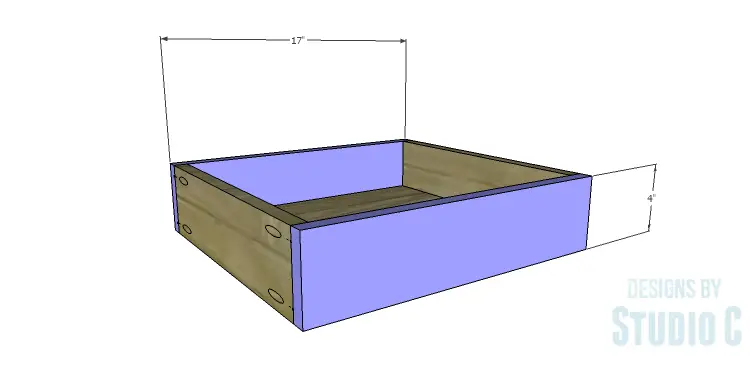
Cut the pieces for the drawer boxes. Drill pocket holes in all four edges of the bottom as well as each end of the sides. Assemble the drawer boxes as shown using glue and 1-1/4” pocket hole screws. Install the drawer slides according to the manufacturer’s installation instructions, locating them ¾” back from the front edge of the legs and divider framing. A tutorial on how to install drawer slides can help make installation foolproof! Make any necessary adjustments.
Step Thirteen
Cut the pieces for the drawer fronts. Mark the position for the drawer pulls and drill the holes. Shim the drawer front in the opening – there will be a 1/8” gap around all sides – then drive screws through the holes for the drawer pulls into the drawer box. Open the drawer, and secure the drawer front using countersunk 1-1/4” screws from the inside. Remove the screws from the holes for the drawer pull then finish drilling the holes. Install the drawer pull. A helpful tutorial on installing drawer fronts will make things so much easier!
Step Fourteen
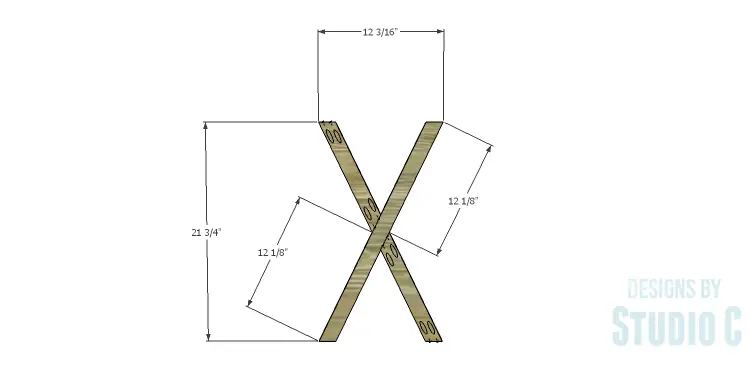
Cut the pieces for the X detail pieces. Cut the angles as shown in the drawing and drill pocket holes in the angled edges. One pocket hole in each angled edge will be sufficient if two pocket holes will not fit. Assemble the X detail pieces as shown using glue and 1-1/4″ pocket hole screws.
Step Fifteen
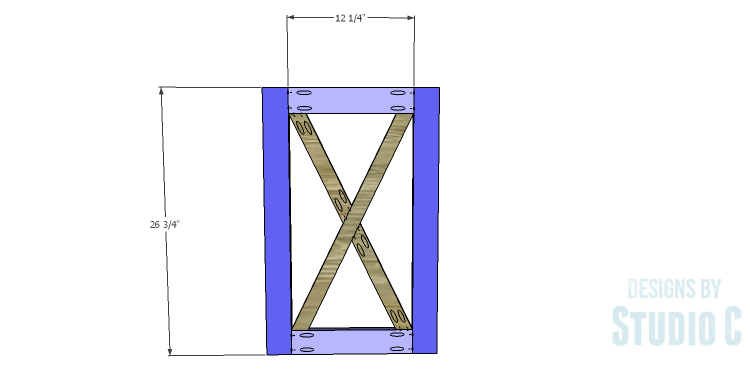
Cut the pieces for the door frames and drill pocket holes in each end of the shorter pieces. Assemble the frame using glue and 1-1/4″ pocket hole screws.
Insert the X detail pieces into the frame and make adjustments to the angles as necessary. Secure the X detail pieces in the center of the frame using glue and 1-1/4″ pocket hole screws.
Position the glass, Plexiglass or acrylic over the inside of the frame and secure in place with mirror clips.
Step Sixteen
Install the hinges on the doors, then install the doors in the cabinet. There will be a 1/8″ gap around all sides of the doors in the openings. Install the cabinet pulls, then install the magnetic catches to keep the doors closed.
Finish as desired.
This is a really great cabinet that will work well in any room. The DIY plans to build a Doyle cabinet are easy to follow and though the angles in the X detail may be intimidating for some, they are really easy to create! Have any questions about the Doyle Cabinet plans? Leave a comment below!
Originally posted 2015-01-05 08:00:11.


You always make things look so easy…
Thank you so much, Elaine! I really appreciate it!
Beautiful design … and you, as always, make it look so easy…
[…] Doyle Cabinet […]
[…] Doyle Cabinet […]