DIY Plans to Build a Storage Settee
A Bench Perfect for an Entryway or Mudroom
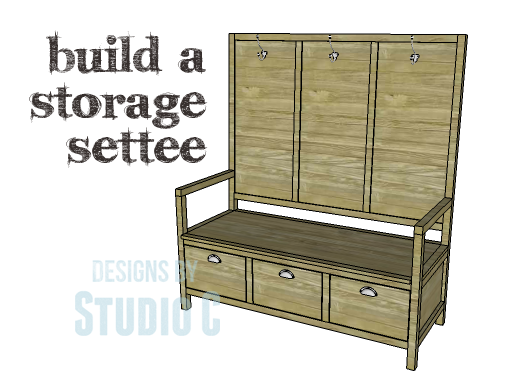
Hey there! Looking for the perfect storage solution for your entryway or mudroom? Look no further than this amazing settee! Our DIY plans for building a Storage Settee have got you covered. With its high back equipped with coat hooks and three convenient drawers under the seat, this settee is the ultimate storage dream. And the best part? The plans are super quick and easy to follow, not to mention budget-friendly. So why wait? Get started on your storage settee project today!
Materials:
- 1-1/4″ pocket hole screws (<– affiliate link!)
- 2-1/2″ pocket hole screws
- 1-1/2″ screws
- 3″ screws
- 1-1/4″ brad nails
- 3 sets of 18″ drawer slides
- Cabinet pulls
- Coat hooks
- Wood glue
- Sandpaper (100, 150, 220 grits)
- Finishing supplies (primer & paint, or stain, sealer)
Lumber:
- 2 – 1×2 at 6′
- 2 – 1×2 at 8′
- 7 – 2×2 at 8′
- 2 – 2×4 at 6′
- 2 – 4′ x 8′ sheets of 3/4″ plywood
Cut List:
- 2 – 2×4 at 60″ – Back Legs
- 4 – 2×2 at 18-1/2″ – Side Framing
- 2 – 3/4″ plywood at 10-1/4″ – x 18-1/2″ – Side Panels
- 4 – 2×2 at 51″ – Back Framing & Front Stretchers
- 1 – 3/4″ plywood at 10-1/4″ -x 51″ – Lower Back Panel
- 1 – 3/4″ plywood at 18-1/2″ x 51″ – Bottom
- 2 – 2×2 at 10-1/4″ – Front Dividers
- 2 – 2×2 at 18-1/2″ – Drawer Slide Spacers
- 2 – 2×2 at 18-1/2″ – Seat Supports
- 1 – 3/4″ plywood at 19-1/4″ x 51 – Seat Panel
- 2 – 1×2 at 18-1/2″ – Seat Side Trim
- 2 – 1×2 at 51″ – Seat Front & Back Trim
- 2 – 2×2 at 20-1/2″ – Arms
- 2 – 2×2 at 36″ – Upper Back Framing
- 2 – 2×2 at 51″ – Upper Back Framing
- 3 – 3/4″ plywood at 16″ x 36″ – Upper Back Panels
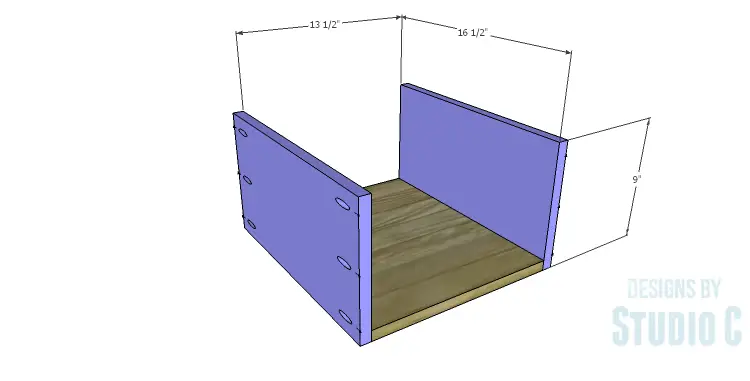
- 3 – 3/4″ plywood at 13-1/2″ x 16-1/2″ – Drawer Box Bottom
- 6 – 3/4″ plywood at 9″ x 16-1/2″ – Drawer Box Sides
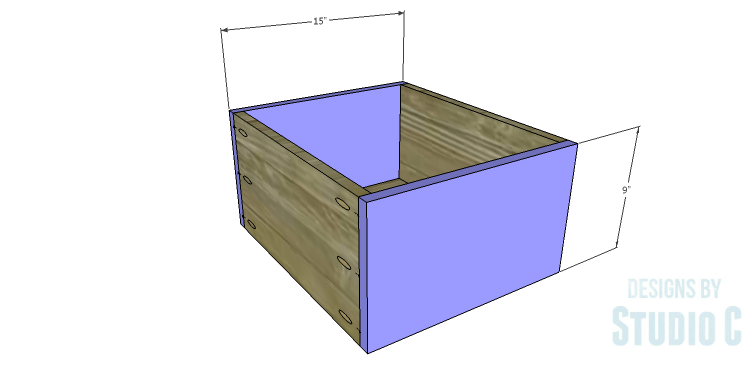
- 6 – 3/4″ plywood at 9″ x 15″ – Drawer Box Front & Back
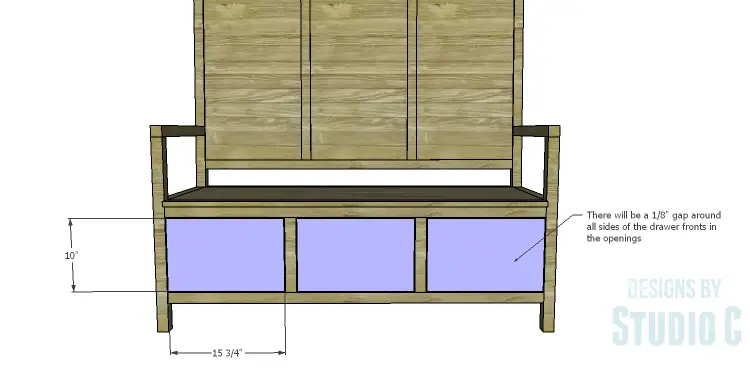
- 3 – 3/4″ plywood at 10″ x 15-3/4″ – Drawer Fronts
Step One
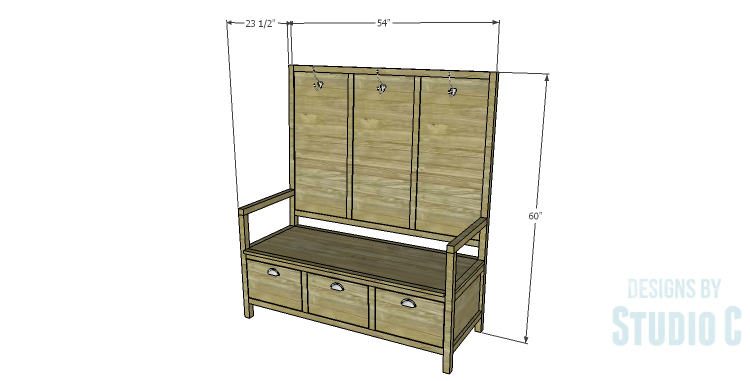
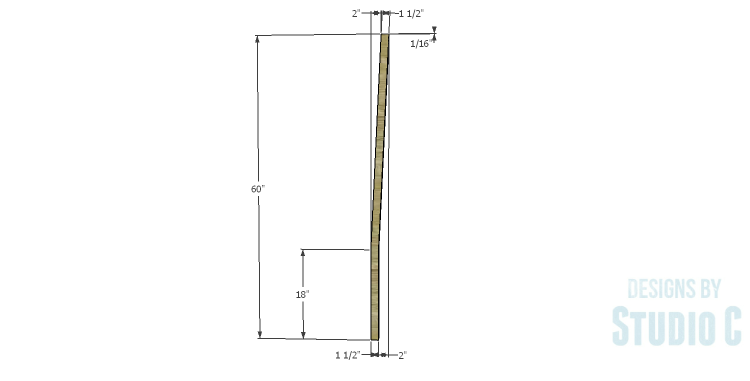
Cut the 2×4 pieces for the back legs to length. Draw the legs on the 2×4 pieces, then cut out using a jigsaw or a bandsaw.
Step Two
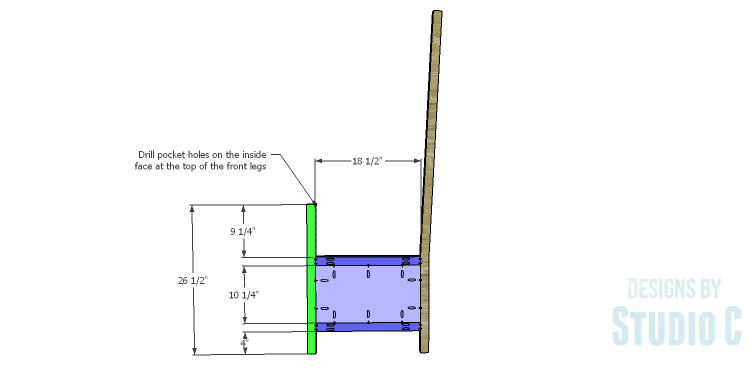
Cut the pieces for the side framing and the front legs. With the pocket hole jig set for 1-1/2″ material, drill pocket holes in each end of the framing pieces as well as one end of the front legs. Secure the framing pieces to the legs using glue and 2-1/2″ pocket hole screws. The pocket holes in the front legs will face the back legs. Remember – there will be a right side and a left side!
Cut the pieces for the side panels. Set the pocket hole jig for 3/4″ material and drill pocket holes in all four edges of the panels. Position the panels inside the framing securing with glue and 1-1/4″ pocket hole screws. The back face of the panels will be flush with the inside face of the side framing.
Step Three
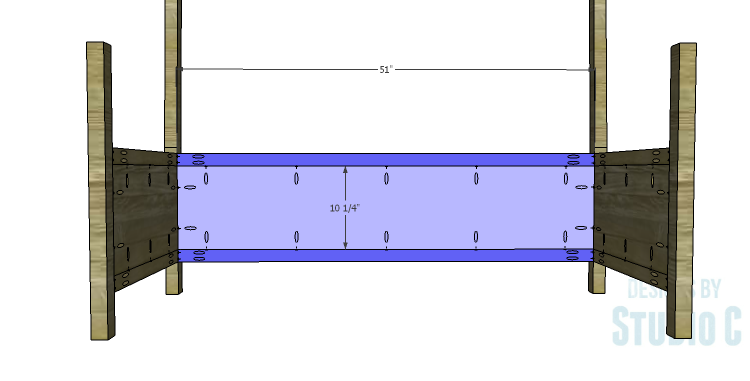
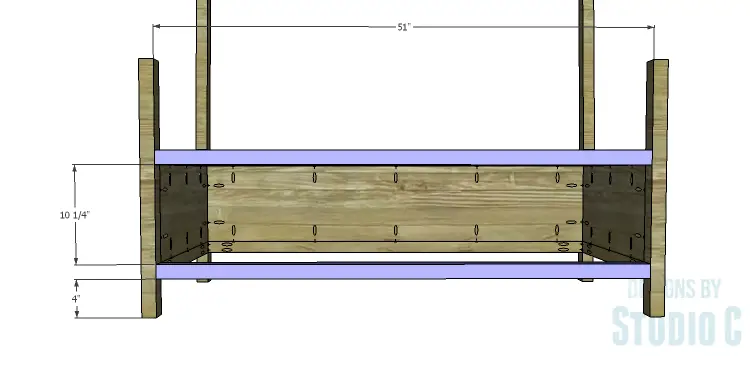
Cut the pieces for the front stretchers and the back framing. Set the pocket hole jig for 1-1/2″ material and drill pocket holes in each end of the stretchers and the framing pieces. Secure the back framing to the back legs as shown using glue and 2-1/2″ pocket hole screws.
Cut the pieces for the back panel. Set the pocket hole jig for 3/4″ material and drill pocket holes in all four edges of the panel. Position the panel inside the framing securing with glue and 1-1/4″ pocket hole screws. The back face of the panel will be flush with the inside face of the back framing.
Secure the front stretchers to the front legs using glue and 2-1/2″ pocket hole screws.
Step Four
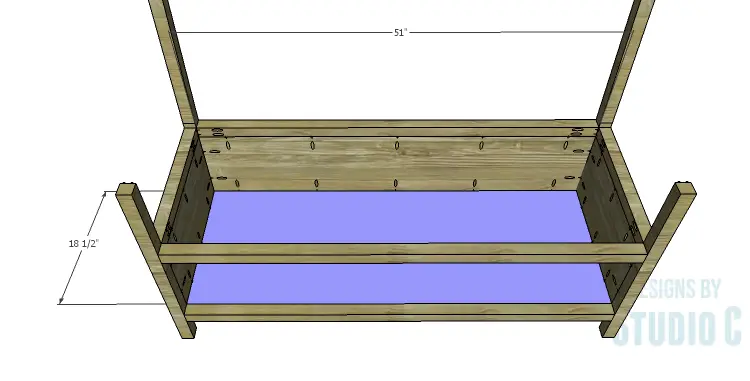
Cut the piece for the bottom and drill pocket holes in all four edges. Secure the bottom panel to the lower framing and lower front stretcher using glue and 1-1/4″ pocket hole screws.
Step Five
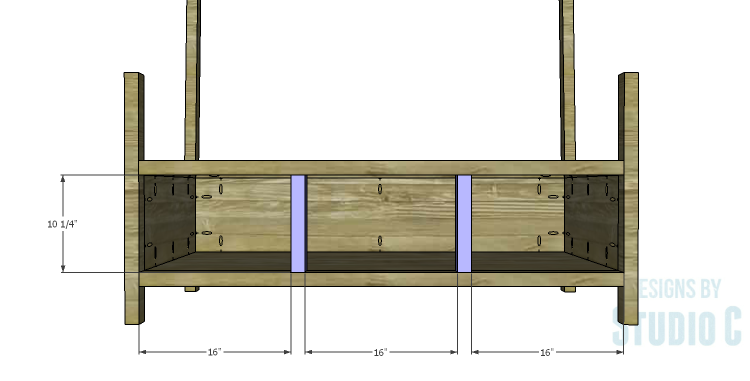
Cut the pieces for the front dividers. Set the pocket hole jig for 1-1/2″ material and drill pocket holes in each end of the dividers. Secure the dividers to the front stretchers using glue and 2-1/2″ pocket hole screws. A close-quarter drill or right angle attachment may be needed for the tight space.
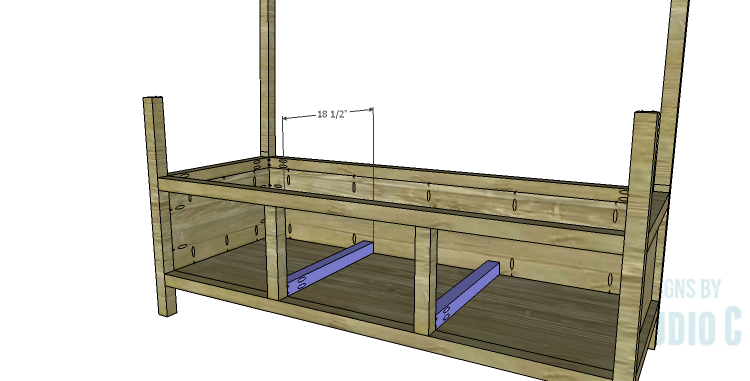
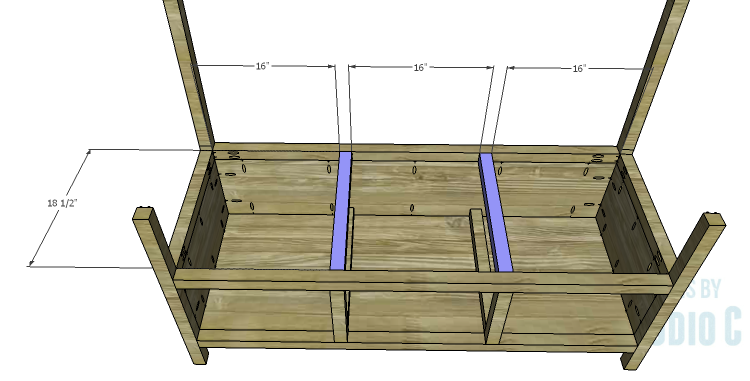
Cut the pieces for the drawer slide spacers and drill pocket holes in one end only. Secure the spacers to the front dividers using glue and 2-1/2″ pocket hole screws. Secure the back of the spacers using countersunk 1-1/2″ screws through the back panel.
Cut the pieces for the seat supports and drill pocket holes in each end. Secure the supports to the upper front stretcher and the upper back framing using glue and 2-1/2″ pocket hole screws.
Step Six
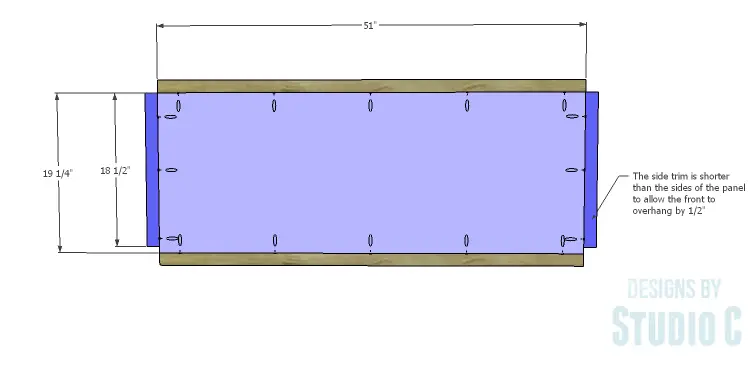
Cut the pieces for the seat panel and the seat trim. Set the pocket hole jig for 3/4″ material and drill pocket holes in all four edges of the panel. Secure the trim as shown using glue and 1-1/4″ pocket hole screws. Note that the side trim pieces are shorter than the seat panel. This will allow the front of the seat to overhang the frame.
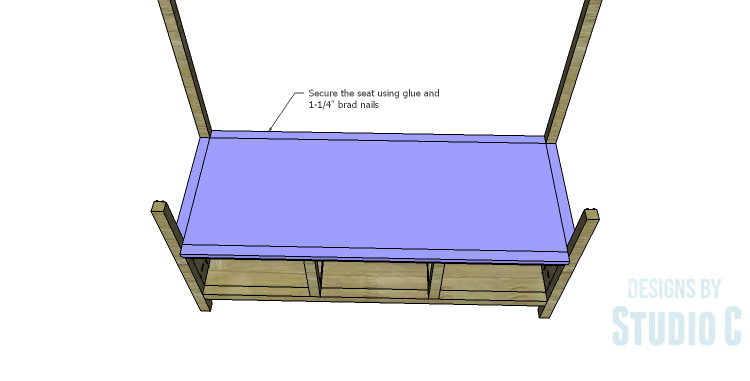
Position the seat as shown securing in place using glue and 1-1/4″ brad nails through the seat.
Step Seven
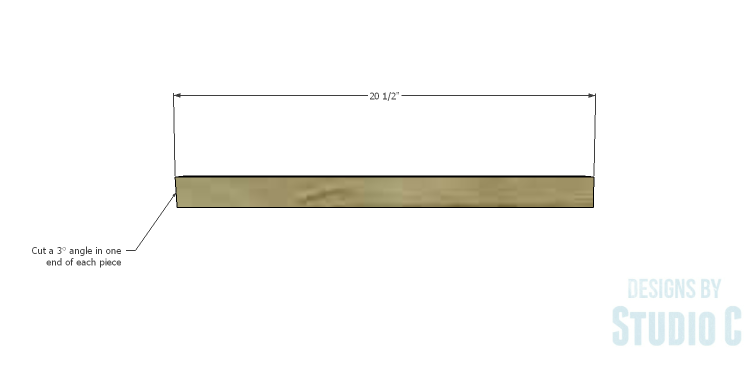
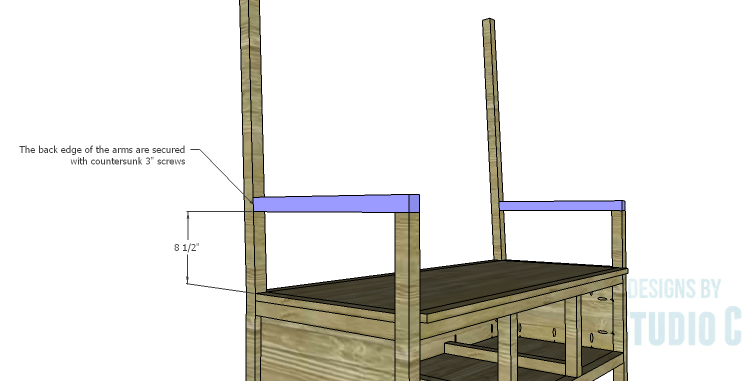
Cut the pieces for the arms. Cut a 3° angle in on end of each piece. This edge will be secured to the back legs using glue and countersunk 3″ screws through the back leg into the back of the arm. Secure the arm to the front legs using glue and 2-1/2″ pocket hole screws. A close-quarter drill or right angle attachment may be needed for the tight space.
Step Eight
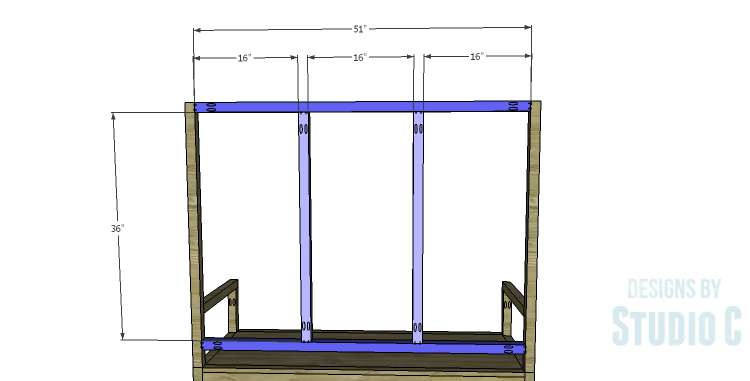
Cut the pieces for the back framing. Set the pocket hole jig for 1-1/2″ material and drill pocket holes in each end of the framing pieces. Secure the framing to the back legs using glue and 2-1/2″ pocket hole screws.
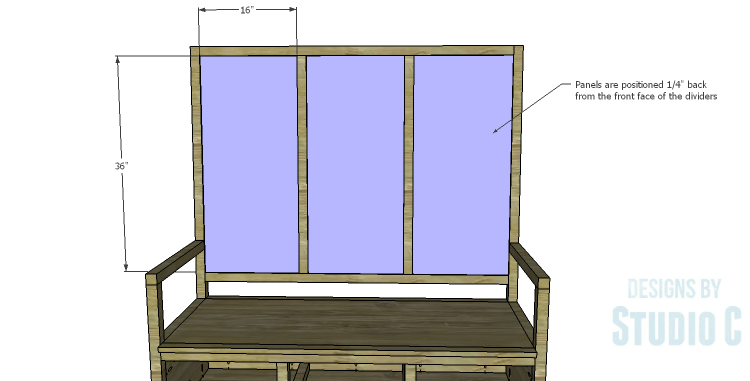
Cut the pieces for the upper back panels. Set the pocket hole jig for 3/4″ material and drill pocket holes in all four edges of the panels. Secure the panels to the back framing as shown using glue and 1-1/4″ pocket hole screws. The panels are positioned 1/4″ back from the front face of the back framing.
Step Nine
Cut the pieces for the drawer boxes. Drill pocket holes in all four edges of the bottom as well as each end of the sides. Assemble the drawer boxes as shown using glue and 1-1/4” pocket hole screws. Install the drawer slides according to the manufacturer’s installation instructions, locating them ¾” back from the front edge of the front legs and dividers. This easy tutorial on installing drawer slides will be quite helpful! Make any necessary adjustments.
Step Ten
Cut the pieces for the drawer fronts. Mark the position for the drawer pulls and drill the holes. Shim the drawer front in the opening – there will be a 1/8” gap around all sides – then drive screws through the holes for the drawer pulls into the drawer box. Open the drawer, and secure the drawer front using countersunk 1-1/4” screws from the inside. Remove the screws from the holes for the drawer pull then finish drilling the holes. Install the drawer pull. Take a look at this easy tutorial on installing drawer fronts.
Finish as desired. Install the coat hooks on the back panels. The hooks are completely optional!
The settee would look great in any room, in any finish! the hooks and drawers make the settee the perfect place to store coats, backpacks, and shoes! Have any questions about the DIY plans to build a Storage Settee? Leave a comment below!
Originally posted 2015-01-15 08:00:59.

