
DIY Roxbury Sideboard Plans
Build a Gorgeous Piece of Furniture with the DIY Sideboard Plans
Here is another piece of furniture that will be so easy construct… The cabinet features a shelf inside and plain door panels which can be customized however you choose – stenciled, fabric, or maybe replace the 1/2″ plywood with decorative punched aluminum! Whatever your choice, the Roxbury Sideboard Plans are easy to follow and very inexpensive to build!
Materials:
- 1″ pocket hole screws
- 1-1/4″ pocket hole screws
- 2-1/2″ pocket hole screws
- 1-1/4″ brad nails
- Edge banding (<– affiliate link!)
- 2 sets of hinges
- Cabinet pulls
- Wood glue
- Sandpaper (100, 150, 220 grits)
- Finishing supplies (primer & paint, or stain, sealer)
Lumber:
- 2 – 3/4″ square dowels at 3′ (or 3/4″ strips ripped off of 1x material)
- 3 – 1×2 at 8′
- 1 – 2×2 at 6′ (It may be more economical to rip 2x4s in half)
- 2 – 2×2 at 8′
- 1 – 2′ x 4′ sheet of 1/2″ plywood
- 1 – sheet of 3/4″ plywood
Cut List:
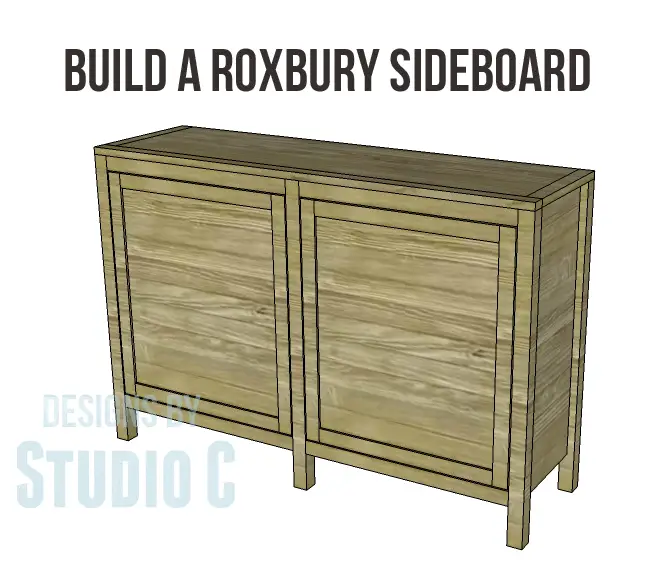
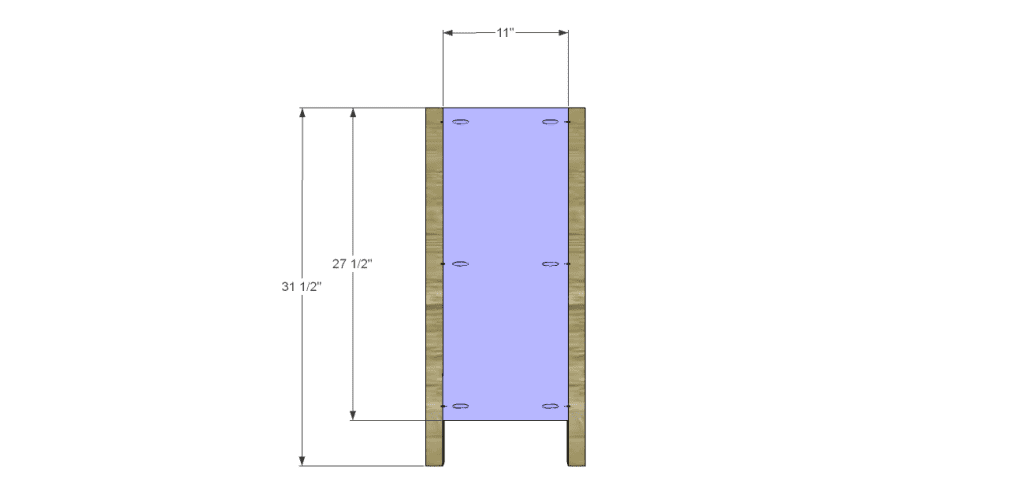
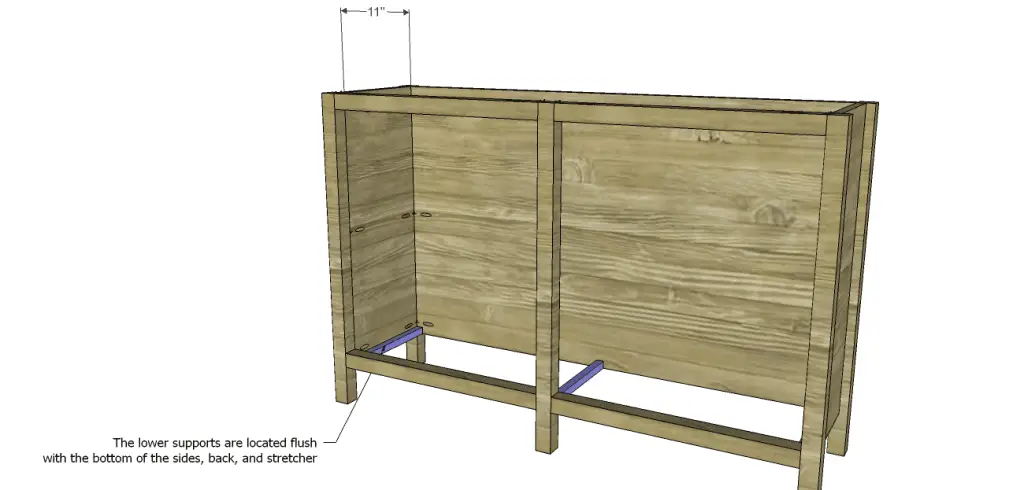
- 5 – 2×2 at 31-1/2″ – Legs
- 2 – 3/4″ plywood at 11″ x 27-1/2″ – Side Panels
- 1 – 3/4″ plywood at 27-1/2″ x 45″ – Back
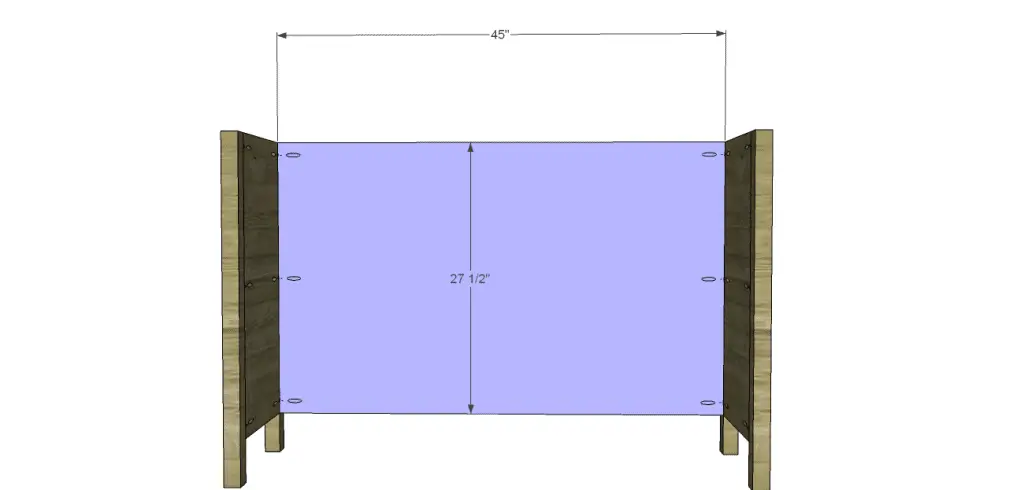
- 4 – 2×2 at 21-3/4″ – Front Stretchers
- 6 – 3/4″ dowels at 11″ – Shelf Supports
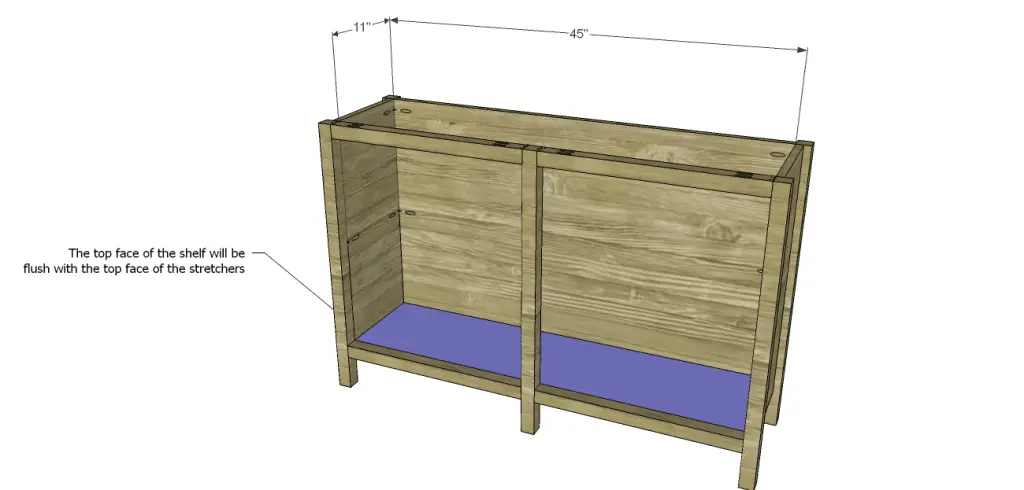
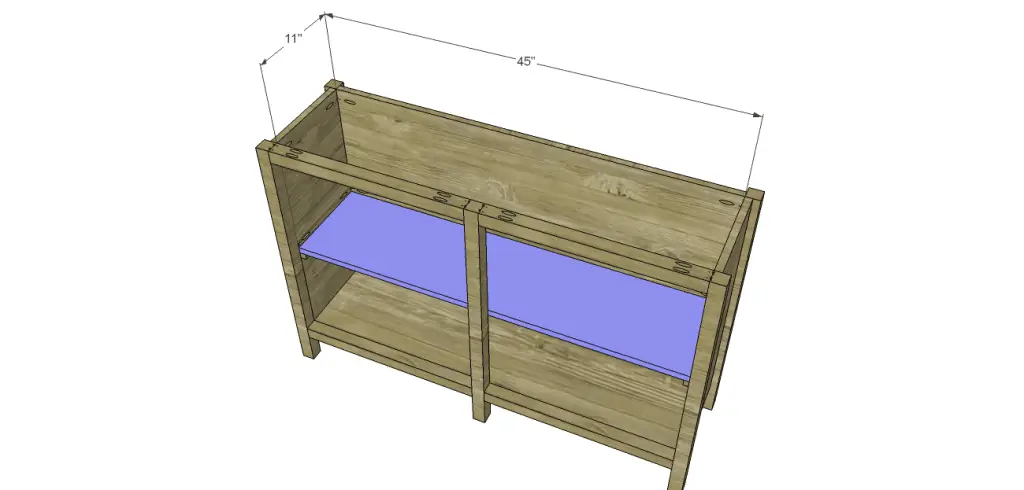
- 2 – 3/4″ plywood at 11″ x 45″ – Shelves
- 1 – 3/4″ plywood at 12-1/2″ x 45″ – Top
- 2 – 1×2 at 12-1/2″ – Top Side
- 1 – 1×2 at 48″ – Top Front
- 4 – 1×2 at 18-1/2″ – Door Rails
- 4 – 1×2 at 24-1/4″ – Door Stiles
- 2 – 1/2″ plywood at 18-1/2″ x 21-1/4″ – Door Panels

Notes:
Edge banding will be applied to the exposed edges of the plywood prior to assembly.
Step One
Cut the pieces for the legs and the side panels. With the pocket hole jig set for 3/4″ material, drill pocket holes along the long edges of each panel. Secure to the legs using glue and 1-1/4″ pocket hole screws. The back face of the panels will be flush with the inside face of the legs. Set the remaining leg off to the side.
Step Two
Cut the piece for the back and drill pocket holes along the side edges (the 27-1/2″ edges). Secure to the legs using glue and 1-1/4″ pocket hole screws. The back face of the panel will be flush with the inside face of the legs.
Step Three
Cut the pieces for the front stretchers. Set the pocket hole jig for 1-1/2″ material and drill pocket holes in each end. Secure the stretchers tot he remaining leg as shown using glue and 2-1/2″ pocket hole screws. Secure the leg and stretcher assembly to the cabinet as shown using glue and 2-1/2″ pocket hole screws.

Step Four
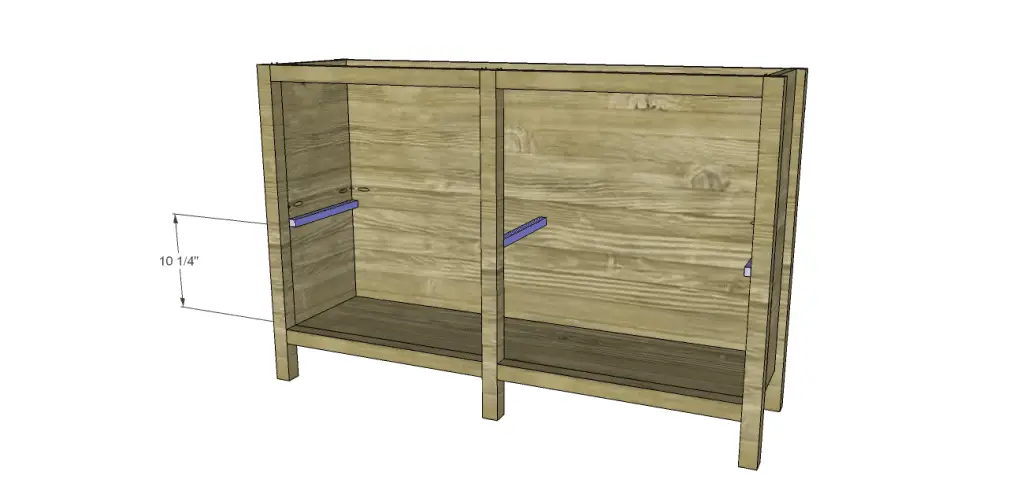
Cut the dowel pieces for the shelf supports. The side supports will be secured to the side panels using glue and 1-1/4″ brad nails. Install the lower supports first, flush with the bottom of the side panels. Set the pocket hole jig for 3/4″ material and drill one pocket hole in each end of the center supports. Secure the lower center support to the center leg (centered) and the back using glue and and 1-1/4″ pocket hole screws.
Cut the pieces for the shelves. Secure the lower shelf to the lower supports using glue and 1-1/4″ brad nails. The top face of the shelf will be flush with the top face of the lower stretchers.
Install the remaining supports in the same manner as the lower supports, then install the shelf.
Step Five
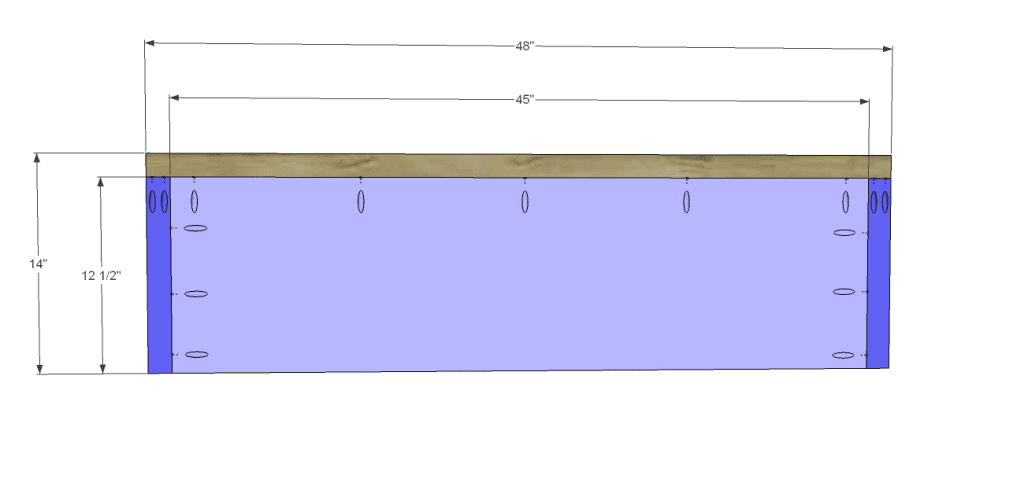
Cut the pieces for the top. Drill pocket holes in the sides and front edge, as well as on end of each top side piece. Secure the top side pieces using glue and 1-1/4″ pocket hole screws. Secure the front piece using glue and 1-1/4″ pocket hole screws.
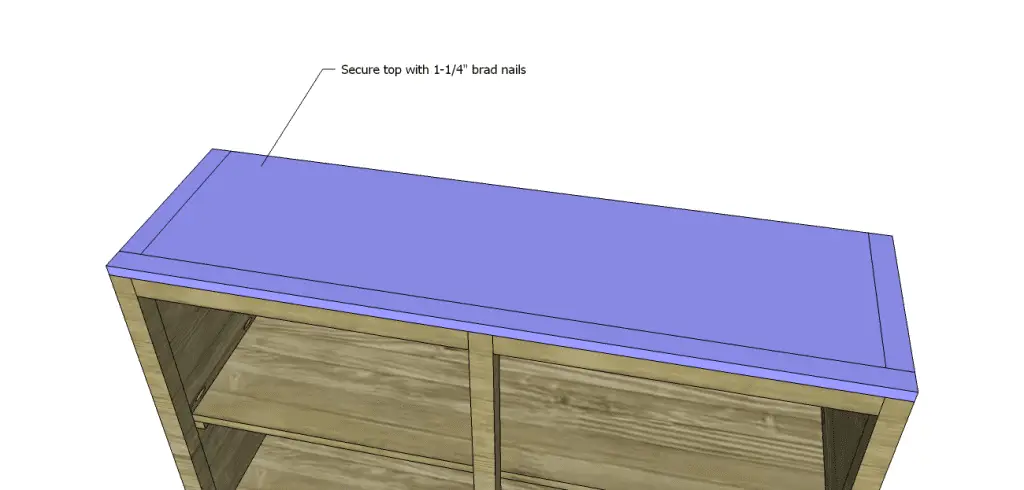
Secure the top to the cabinet using glue and 1-1/4″ brad nails.
Step Six
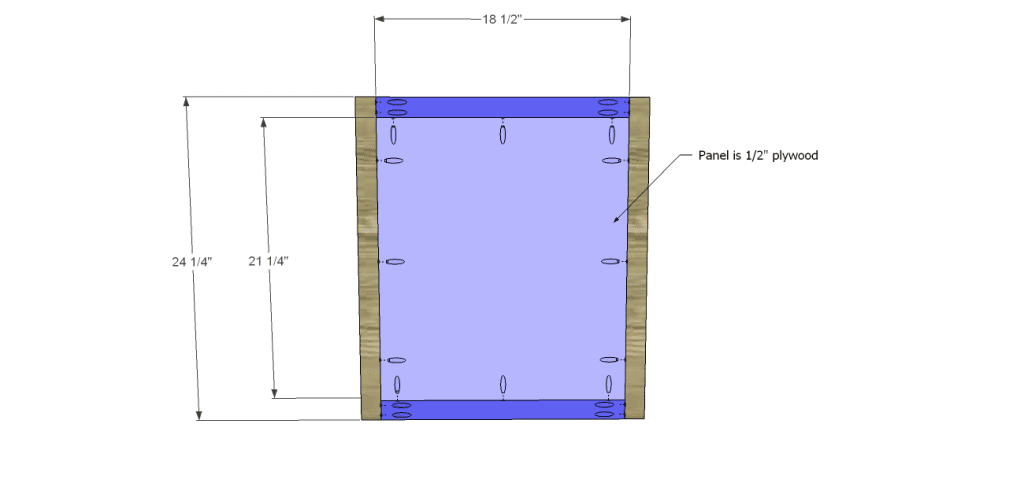
Cut the pieces for the doors. Drill pocket holes in each end of the rails. Set the pocket hole jig for 1/2″ material and drill pocket hole in all four edges. Assemble the doors as shown using glue and 1-1/4″ pocket hole screws through the rails into the stiles, and 1″ pocket holes through the panels into the door frames.
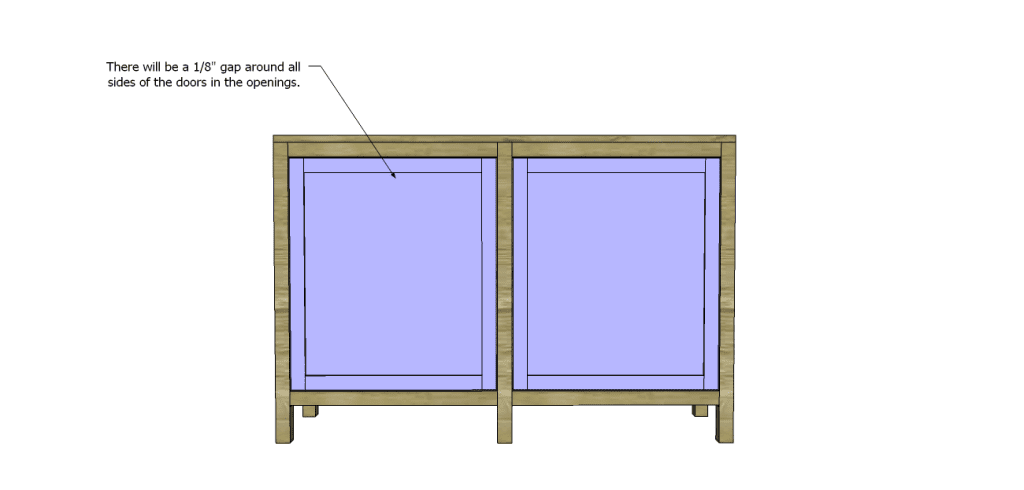
Install the hinges on the doors according to the manufacturer’s installation instructions, then install the doors in the cabinet. Install the cabinet pulls.
Finish as desired.
I think I might add the DIY Roxbury Sideboard plans to my to build list… I love being able to customize the doors! This piece would be fabulous for outdoor entertaining if finished for outdoor use with casters on the legs for portability! Any questions? Let me know at cher {at} designsbystudioc {dot} com!
Originally posted 2014-02-24 08:00:23.
