DIY Plans to Build a Space Saving Table and Stools
A Plan by Reader Request
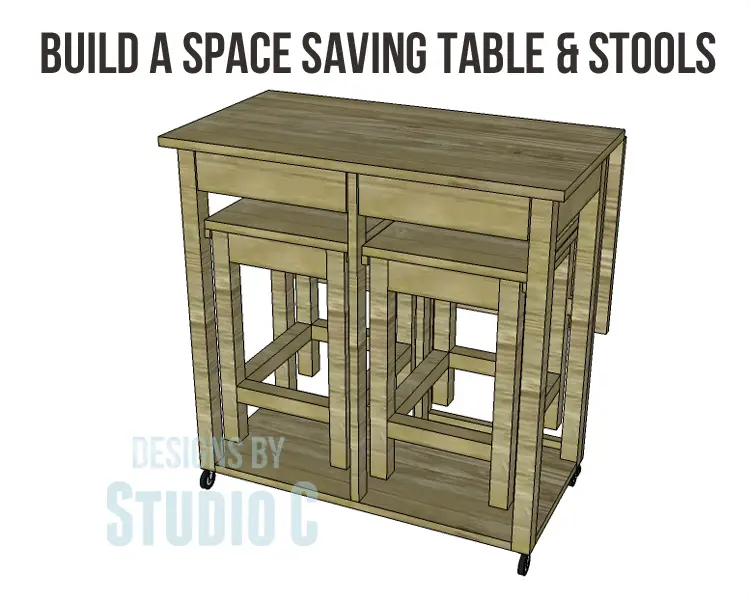
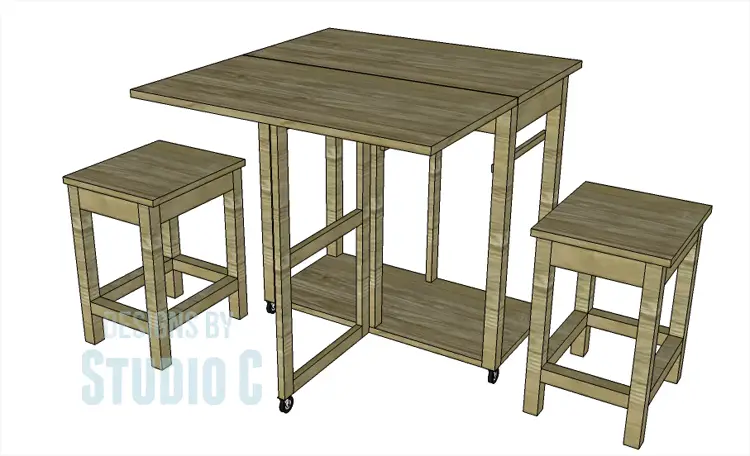
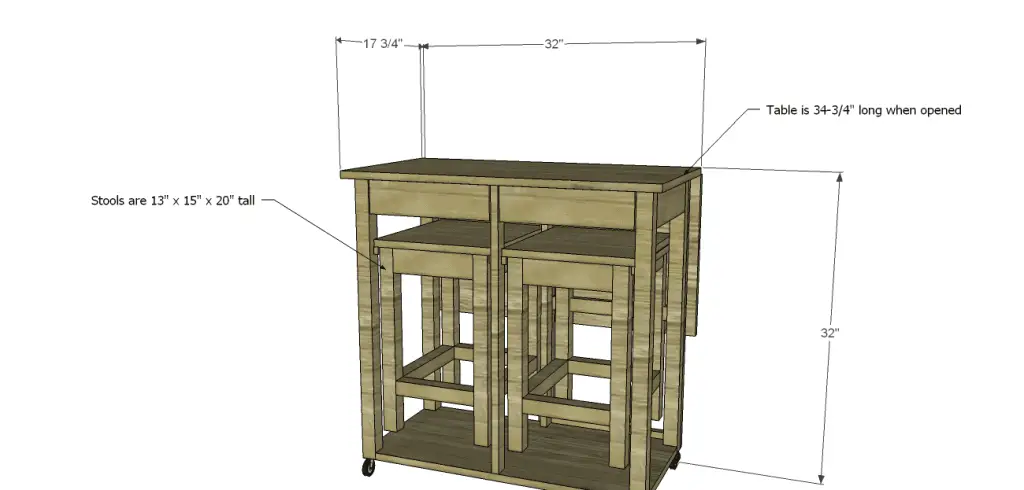
I was contacted by Kevin who asked me to create a plan based on a table with space underneath for storing the matching stools. The table is on casters, features a drop-leaf at the back edge of the top and an additional leg that swings out to support the leaf, as well as two drawers in the front for storage. Small towel bars can also be added the the sides. Kevin’s plans to build a space saving table and stools are easy to construct, and can be completed in a weekend!
Materials:
- 1-1/4″ pocket hole screws
- 2-1/2″ pocket hole screws.
- 1-1/4″ brad nails
- 1-1/4″ screws
- Edge banding, optional (<– affiliate link!)
- 5 hinges
- 2 sets of 12″ Drawer slides
- 2 Cabinet pulls
- 5 – 2″ casters
- Wood glue
- Sandpaper (100, 150, 220 grits)
- Finishing supplies (primer & paint, or stain, sealer)
Lumber:
- 2 – 1×2 at 8′
- 2 – 1×3 at 8′
- 1 – 1×3 at 6′
- 5 – 2×2 at 8′
- 1 sheet of 3/4″ plywood
Cut List:
- 5 – 2×2 at 29-1/4″ – Legs
- 2 – 1×4 at 12″ – Sides
- 2 – 1×2 at 12″ – Spacer
- 1 – 3/4″ plywood at 15″ x 30″ – Bottom
- 2 – 1×2 at 28-1/2″ – Divider Frame
- 1 – 1×2 at 12″ – Divider Frame
- 2 – 1×4 at 13-1/8″ – Back Stretchers
- 2 – 3/4″ x 3/4″ square strips* at 13-1/8″ – Front Stretchers
- 4 – 1/2″ x 3/4″ strips*** at 13-1/2″ – Seat Slides
- 2 – 3/4″ plywood at 17″ x 32″ – Top
- 2 – 1×2 at 29-1/4″ – Support Frame
- 3 – 1×2 at 13-1/8″ – Support Frame
- 2 – 3/4″ plywood at 10-1/2″ x 10-5/8″ – Drawer Box Bottoms
- 4 – 1×3 at 10-1/2″ – Drawer Box Sides
- 4 – 1×3 at 12-1/8″ – Drawer Box Front & Back
- 2 – 3/4″ plywood at 3-3/8″ x 12-7/8″ – Drawer Fronts
* These pieces can be scraps of plywood ripped on the table saw. They will be hidden by the top and the drawer fronts.
***These pieces should be ripped from solid wood and will not be hidden.
For the Stools:
Materials are listed to build two stools
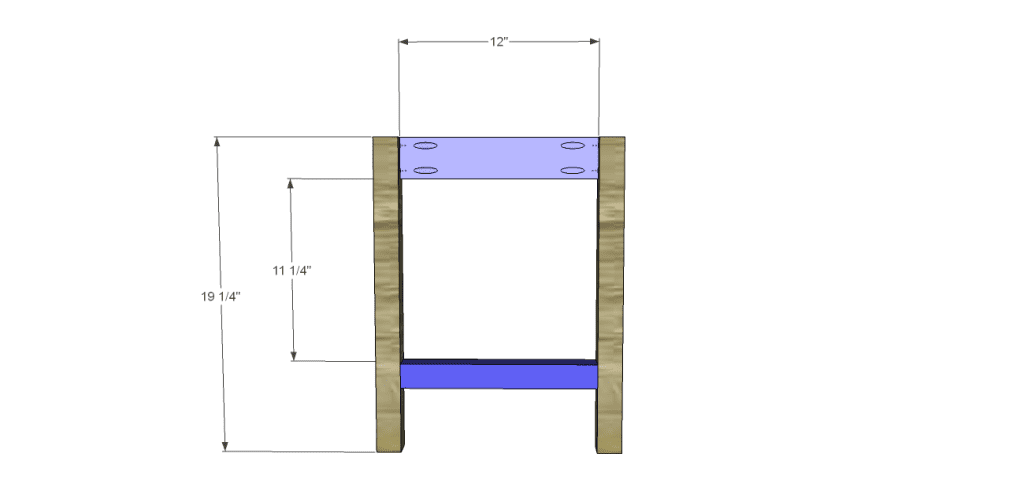
- 8 – 2×2 at 19-1/4″ – Legs
- 4 – 1×3 at 12″ – Side Frames
- 4 – 2×2 at 12″ – Side Frames
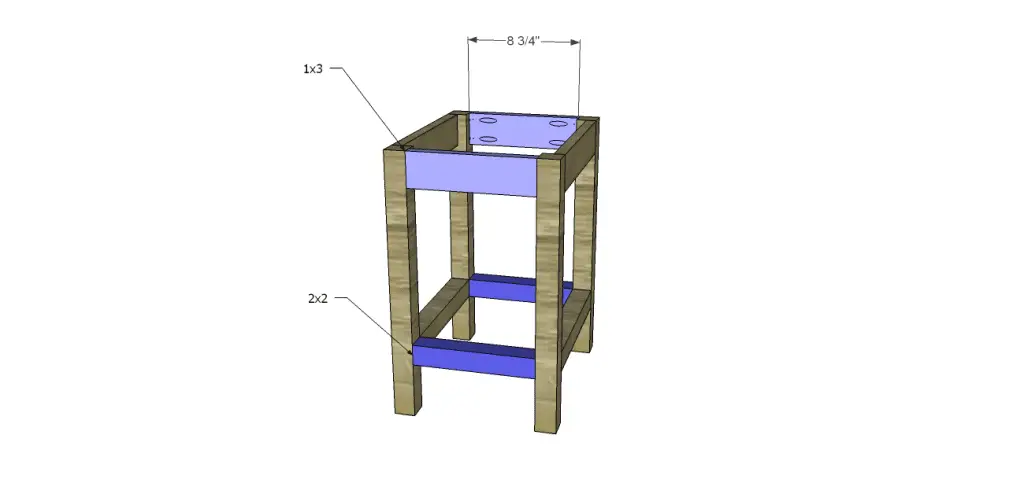
- 4 – 1×3 at 8-3/4″ – Side Stretchers
- 4 – 2×2 at 8-3/4″ – Side Stretchers
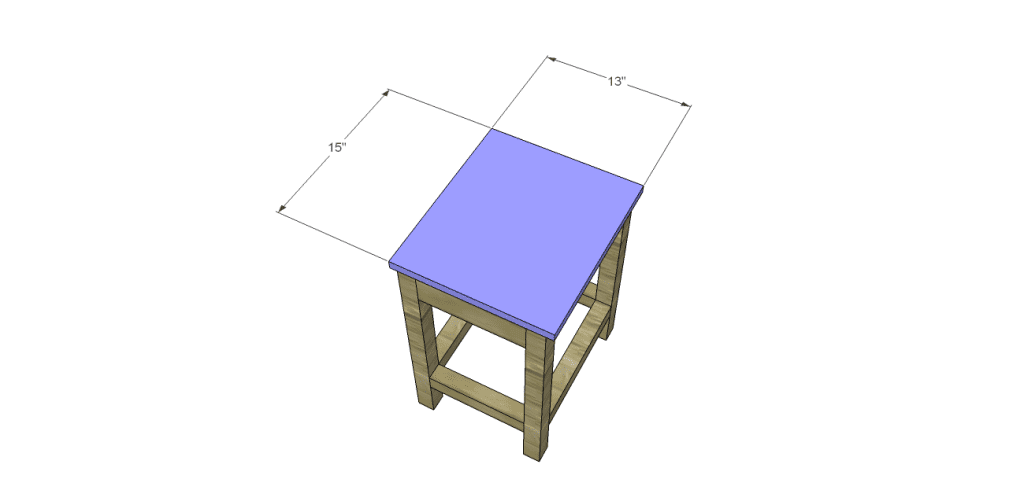
- 2 – 3/4″ plywood at 13″ x 15″ – Stool Seats
Step One
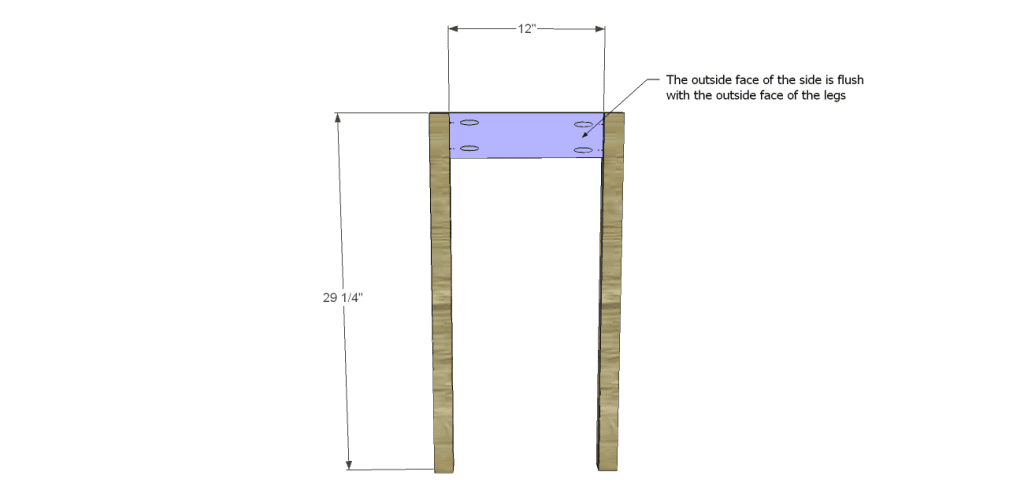
Cut the pieces for the table legs and side frames. With the pocket hole jig set for 3/4″ material, drill pocket holes in each end of the frame pieces. Secure to the legs using glue and 1-1/4″ pocket hole screws. The outside face of the frame pieces will be flush with the outside face of the legs.
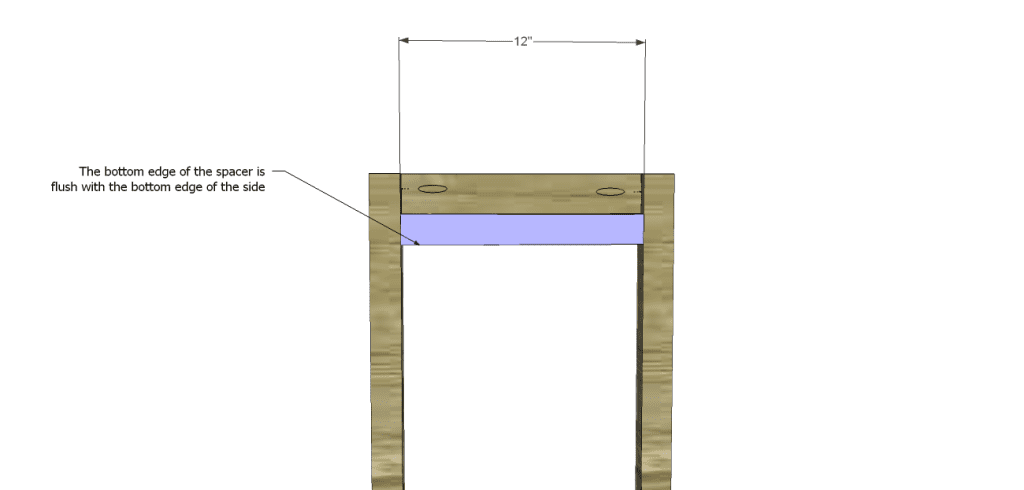
Cut the pieces for the spacers. Secure the spacers to the side frame pieces using glue and 1-1/4″ countersunk screws. The bottom edges of the supports will be flush with the bottom edges of the sides.
Step Two
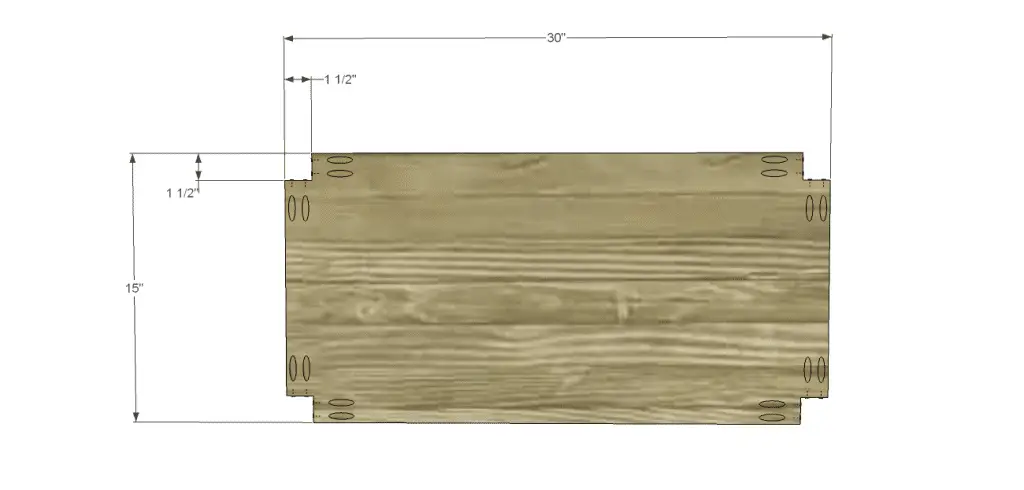
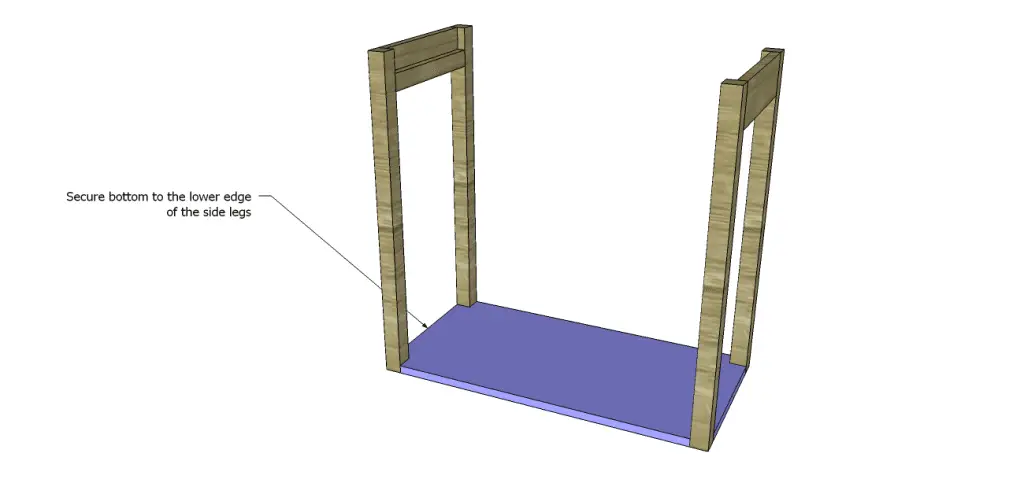
Cut the piece for the bottom and cut the notches as shown. Use a portable pocket hole jig to drill pocket holes in the notches as shown. Secure to the bottom edge of the legs using glue and 1-1/4″ pocket hole screws. The bottom face will be flush with the bottom of each leg.
 Step Three
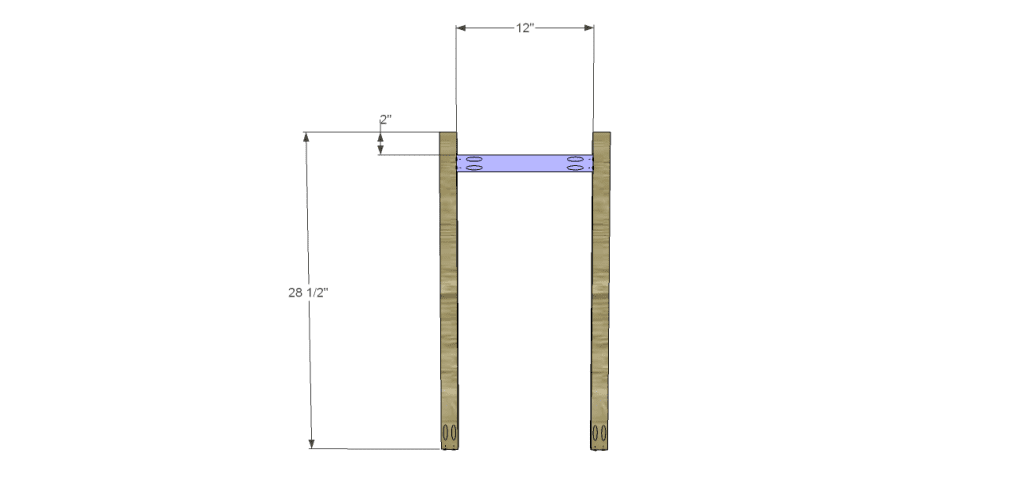
Cut the pieces for the divider frame. Drill pocket holes in each end of the frame piece. Set the pocket hole jig for 3/4″ material and drill pocket holes in the lower edge of each leg. Secure the frame piece to the legs as shown using glue and 1-1/4″ pocket hole screws. Secure the legs to the bottom using glue and 1-1/4″ pocket hole screws.
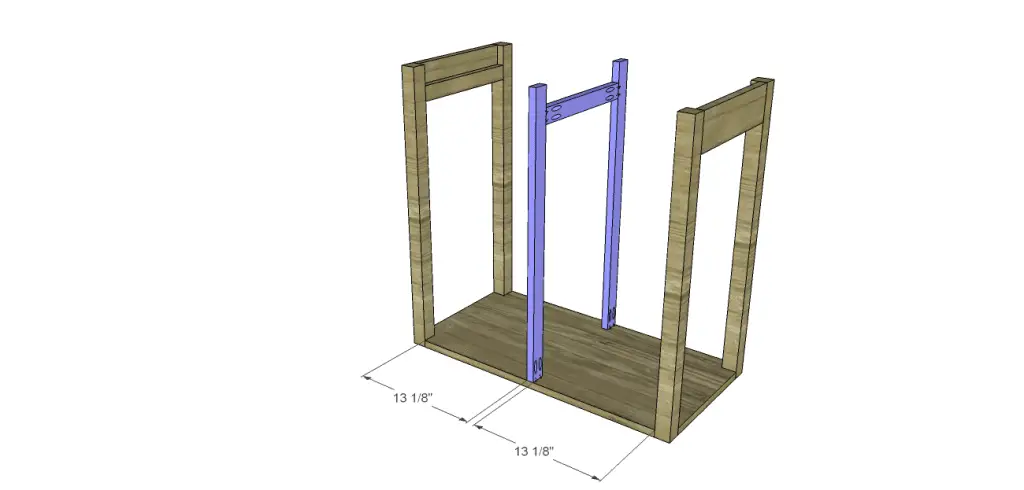 Step Four
Cut the pieces for the back stretchers. Set the pocket hole jig for 3/4″ material and drill pocket holes in each end. Secure to the legs and divider frame using glue and 1-1/4″ pocket hole screws.
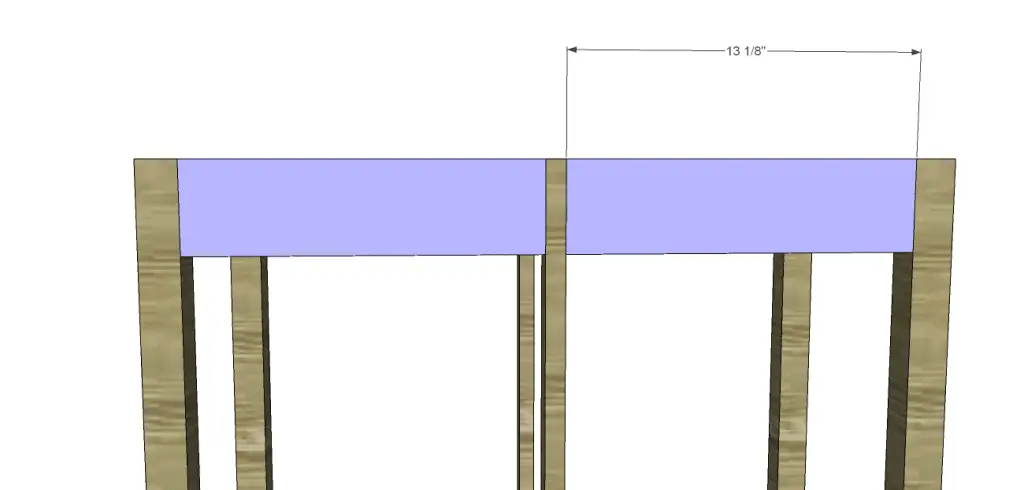
Step Five
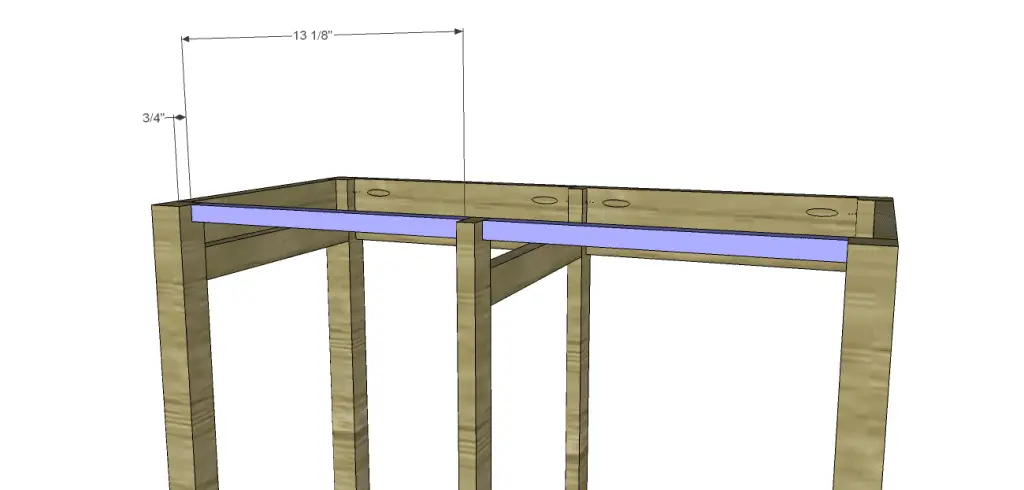
Cut the pieces for the front stretchers. Drill one pocket hole in each edge, and secure to the legs and divider as shown, locating the pieces 3/4″ back from the front edge, using glue and 1-1/4″ pocket hole screws.
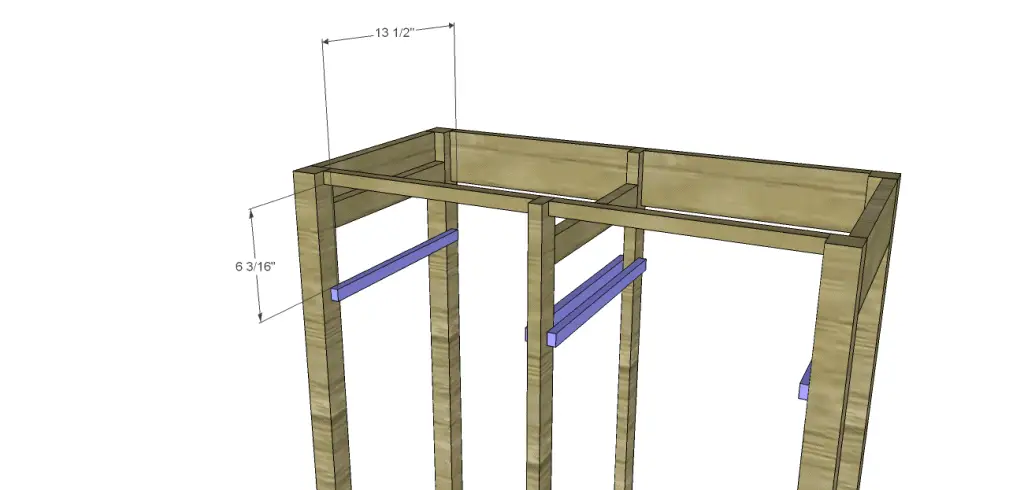
Cut the pieces for the seat slides. Secure to the legs and divider as shown using glue and countersunk 1-1/4″ screws. (The 1/2″ edge will be horizontal)
 Step Six
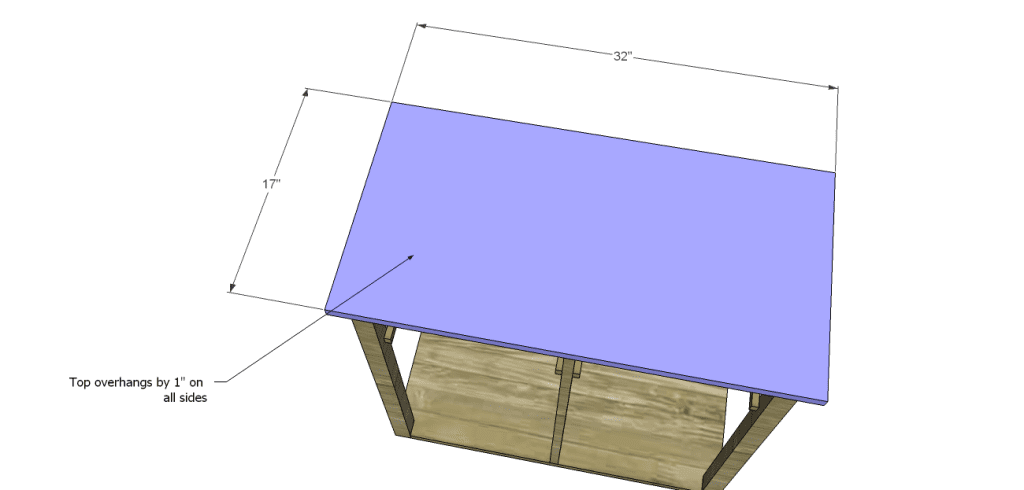
Cut the pieces for the top. The top on the frame will overhang all edges by 1″. Secure one piece to the frame using glue and 1-1/4″ brad nails.
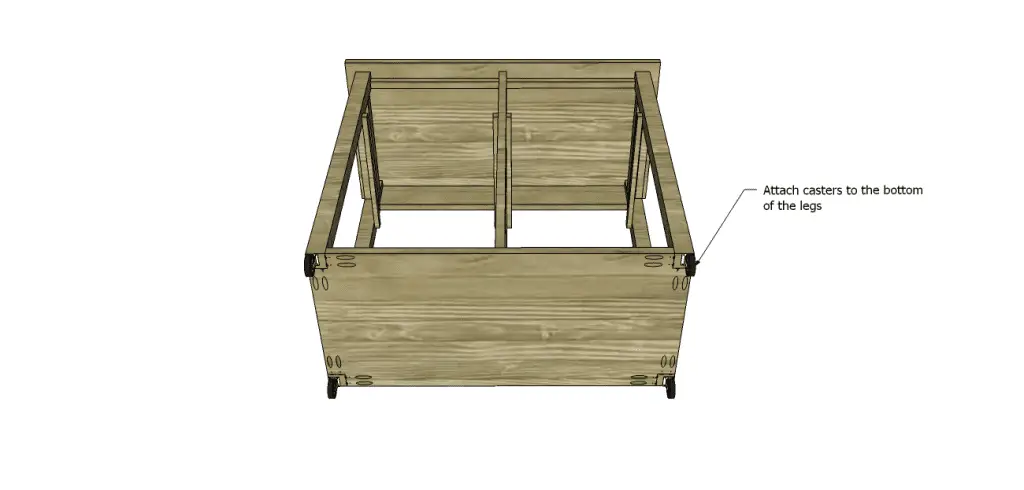
Install the casters on the bottom of the legs according to the manufacturer’s instructions. Set the remaining caster aside for the support frame.
 Step Seven
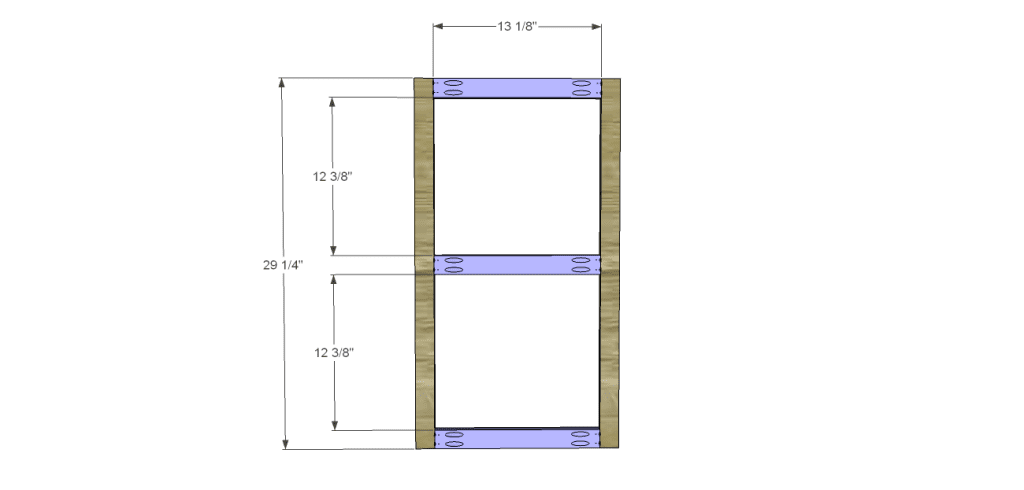
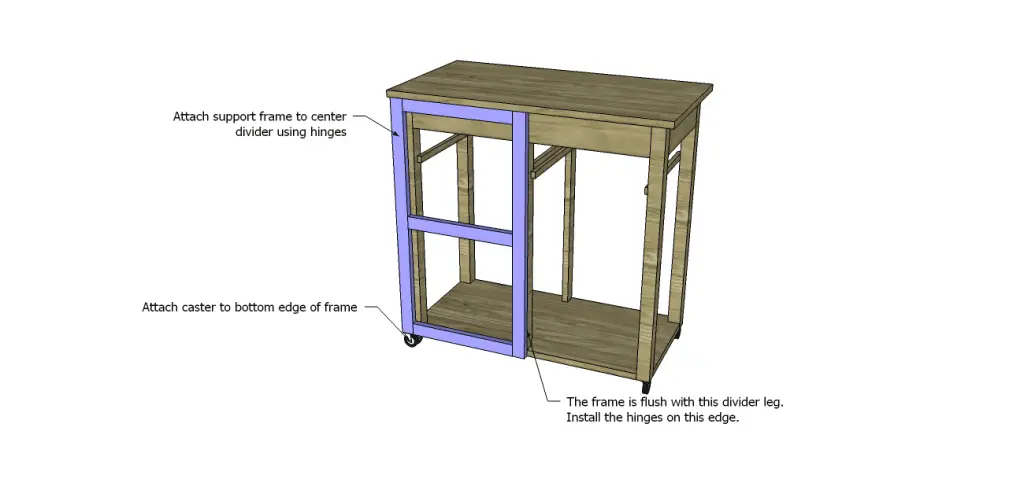
Cut the pieces for the support frame and drill pocket holes in each end of the shorter pieces. Assemble the frame as shown using glue and 1-1/4″ pocket hole screws. Install the remaining caster. Attach the frame to the divider frame using two of the hinges. The outside edge of the frame will be flush with the divider leg, which makes the frame approximately 3/4″ longer than the back when folded in.
Step Eight
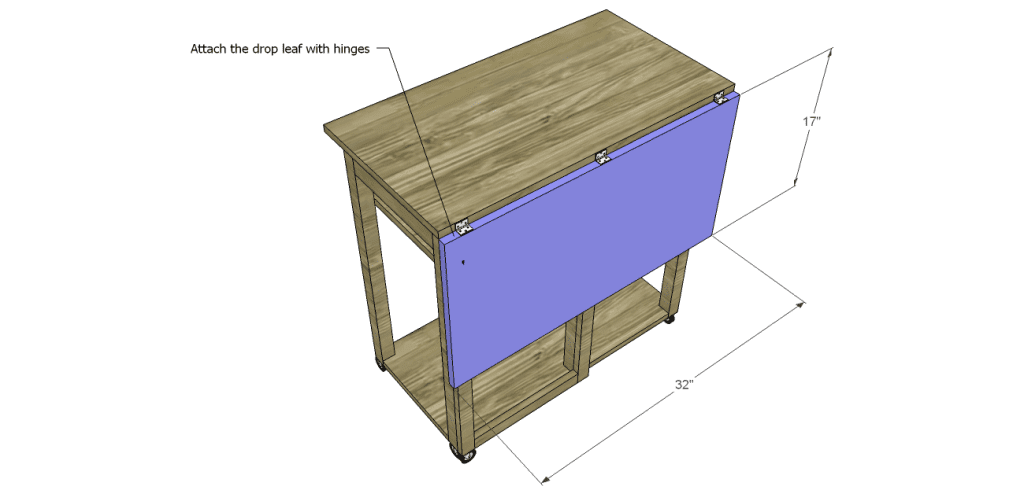
Install the hinges on the drop leaf, then install the drop leaf on the back edge of the top, over the support frame.
Step Nine
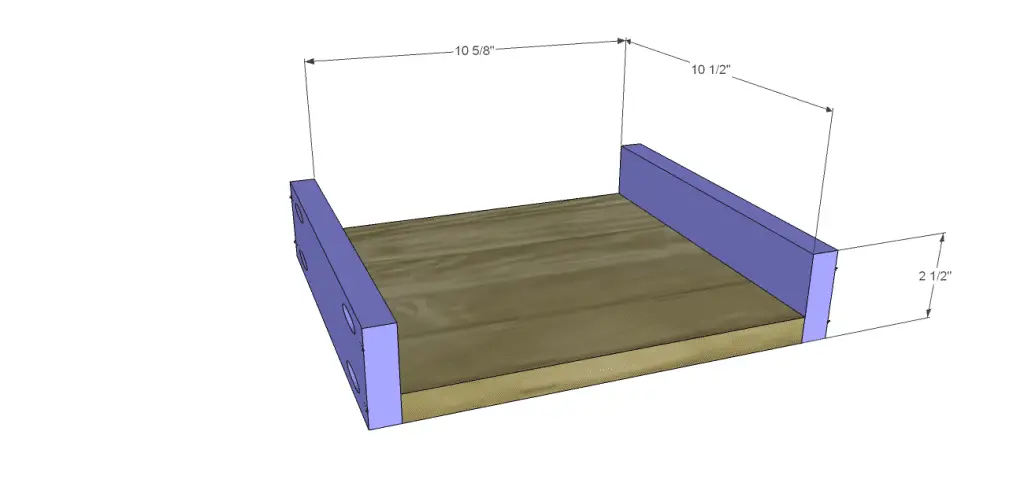
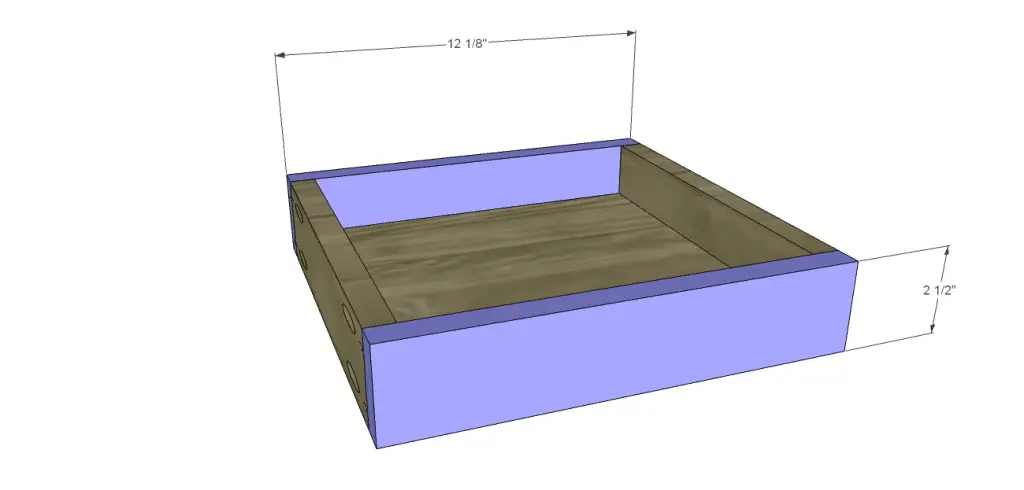
Cut the pieces for the drawer boxes. Drill pocket holes in all four edges of the bottom as well as each end of the sides. Assemble the drawer box as shown using glue and 1-1/4” pocket hole screws. Install the drawer slides according to the manufacturer’s installation instructions, locating them ¾” back from the front edge of the sides. This easy tutorial on installing drawer slides will help! Make any necessary adjustments.
 Step Ten
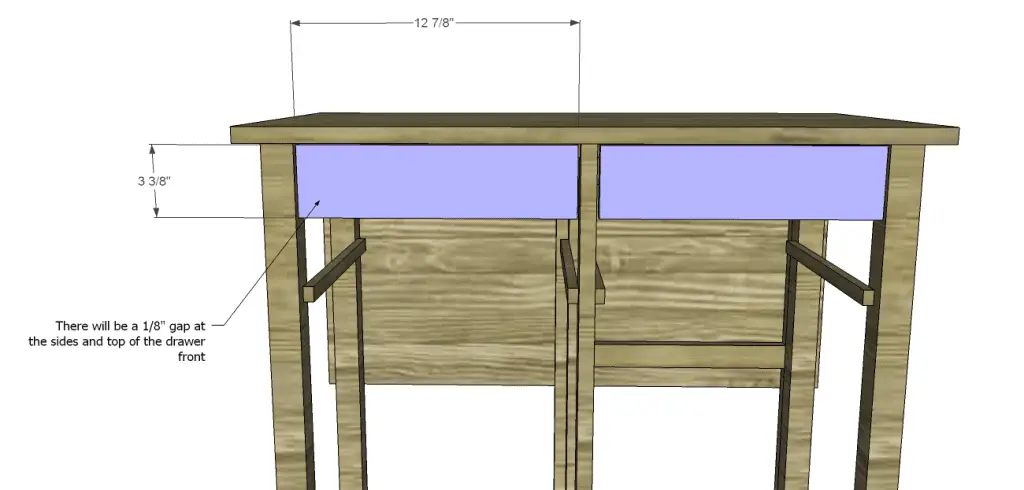
Cut the pieces for the drawer fronts. Mark the position for the drawer pulls and drill the holes. Shim the drawer front in the opening – there will be a 1/8” gap around all sides – then drive screws through the holes for the drawer pulls into the drawer box. Open the drawer, and secure the drawer front using countersunk 1-1/4” screws from the inside. Remove the screws from the holes for the drawer pull then finish drilling the holes. Install the drawer pull. Take a look at this easy tutorial on installing drawer fronts.
To Build the Stools:
Step One
Cut the pieces for the legs and side frames. With the pocket hole jig set for 3/4″ material, drill pocket holes in each end of the 1×3 frame pieces. Set the pocket hole jig for 1-1/2″ material and drill pocket holes in each end of the 2×2 pieces. Secure the frame pieces to the legs using glue and the appropriate screw for the material thickness – 1-1/4″ pocket hole screws for the 1x material and 2-1/2″ pocket hole screws for the 2x material.
Step Two
Cut the pieces for the stretchers. With the pocket hole jig set for 3/4″ material, drill pocket holes in each end of the 1×3 frame stretchers. Set the pocket hole jig for 1-1/2″ material and drill pocket holes in each end of the 2×2 stretchers. Secure the frame pieces to the legs using glue and the appropriate screw for the material thickness – 1-1/4″ pocket hole screws for the 1x material and 2-1/2″ pocket hole screws for the 2x material. A close quarter drill or right angle drill attachment may be required if the space is too tight.
Step Three
Cut the pieces for the seats. The seats will overhang each of the longer sides by 5/8″ so it can be hung on the seat slides on the table frame. Secure the seats in place using glue and 1-1/4″ brad nails.
Finish as desired.
This would be the perfect set not only for a small space, but for a time when extra seating and eating space is needed for guests! It would also be great in a finished basement or in a sunroom! Have any questions about the plans to build a space saving table and stools or have a request of your own? Contact me at cher {at} designsbystudioc {dot} com!


Wow, great job Cher,clear and easy to follow – 10/10! Can’t wait to build it
Kevin
Thank you so much, Kevin, it was my pleasure to create the plan for you! If you have any questions about it, please let me know!!
Very interesting project.It seems that the leaf will be in the way of the drawer opening unless the opening were in the back of sides. I’m going to make my drawers on the side with full extention drawer slides.
The ‘Cut List’ shows 2 x 2 at 28-1/2″ Divider Frame? I think its 1 x 2 x 28-1/2″
Thank you for your post. Looking forward for other projects.
Hi, there! The leaf would not interfere with the drawers because it is located on the opposite side of the drawer location. Thanks so much for the heads up on the divider frame – I have corrected it accordingly! 🙂
[…] Free Plans for Table and Stools.Build this space saving table on casters which features two drawers for storage as well as a drop-leaf at the back and an […]
[…] this space saving table on casters which features two drawers for storage as well as a drop-leaf at the back and an […]