Building a Shed with Old Doors – Part Two
Previously, I posted part one of the plans to build a shed using old doors as the walls. In this post, part two, the DIY plans to build a shed with old doors focuses on the platform and the frame. The platform is essential in giving the shed a solid base to secure the framing. I started with building the platform on cement blocks so that the lumber didn’t make contact with the ground. The cement blocks are placed directly on level ground.
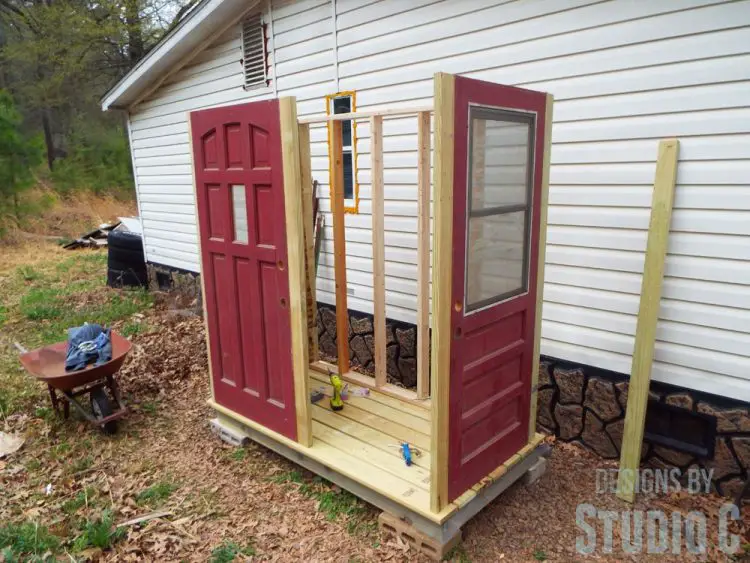
Once I built the frame for the platform, I placed a layer of window screen on the frame before securing the decking boards. I am deathly afraid of snakes and I believe that this will keep them from slithering between the deck boards and surprising me inside the shed!
So let’s get started with the platform, shall we? Check the cut list in Part One of this series for the dimensions of the boards needed!
To Build the Platform:
Step One
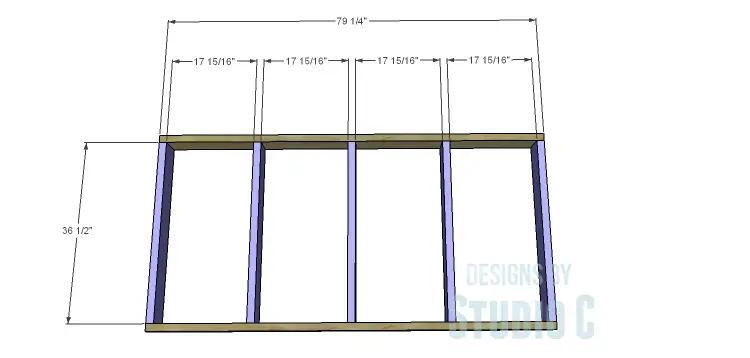
Cut the pieces for the platform frame. With the pocket hole jig set for 1-1/2” material, drill pocket holes in one end of each of the shorter frame pieces. Assemble the frame using glue and 2-1/2” pocket hole screws.
Step Two
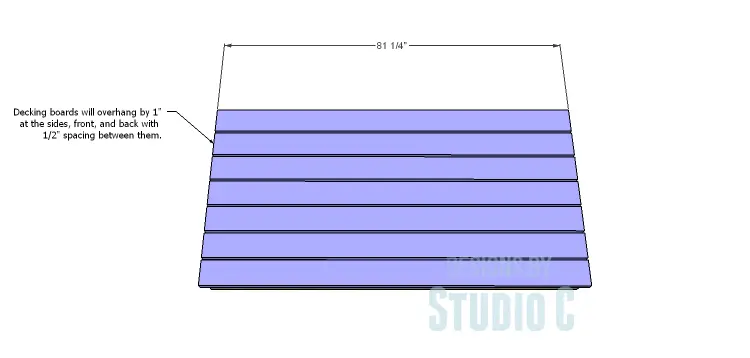
Cut the pieces for the decking boards. The decking boards will overhang by 1” at each end, as well as approximately 1” at the front and back, with ½” spacing between them. Secure the decking boards to the frame using 2-1/2” screws.
Remember, there is no cut list in Part One for the framing of the shed because it will depend on the height of the doors you choose (exterior doors will vary in size!). The plans outline in detail how to create the framing regardless of the size of the doors!
To Build the Frame:
Step One
Remove any door knobs, hinges, sweeps, or metal kick plates from the doors. Measure the overall length of the doors and use the shortest measurement. Use a circular saw to cut all of the doors to the same height.
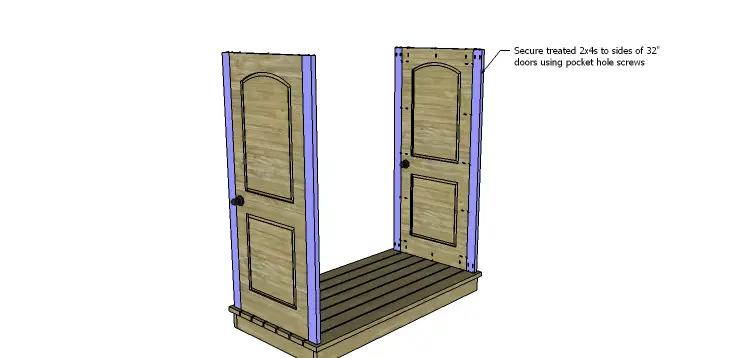
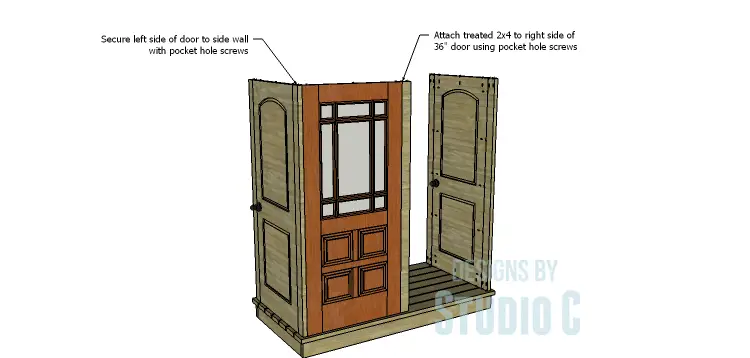
Cut five pressure treated 2×4 boards to the same measurement as the height of the doors. With the pocket hole jig set for 1-1/2” material, drill pocket holes in each end of the 2x4s as well as all four edges of both 32” doors and one 36” door. Secure 2x4s to each side of the 32” doors using glue and 2-1/2” pocket hole screws. Add the last 2×4 to the right side of the 36” door using glue and 2-1/2” pocket hole screws.
Secure the 36” door to one of the side wall assemblies using glue and 2-1/2” pocket hole screws.
Step Two
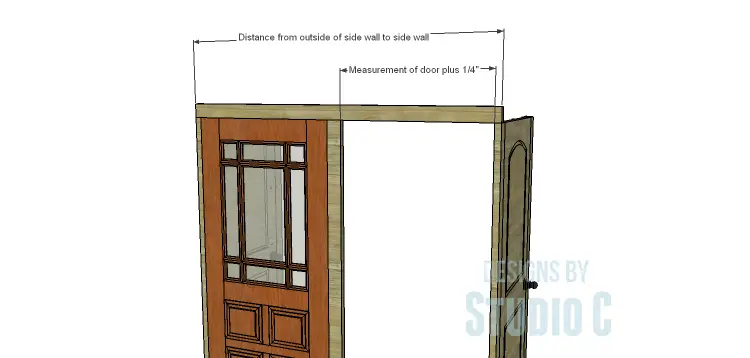
Position the side wall assemblies on the platform and measure across the front for the upper 2×4 board, allowing for the other 36” door to open and close (which will be the “front door”). Secure the board to the top of the side wall 2x4s and the stationary 36” door using glue and 2-1/2” pocket hole screws.
Step Three
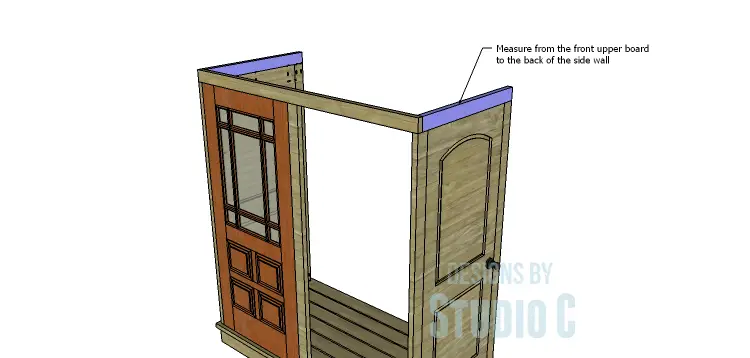
Cut two 2×4 pressure treated boards to secure to the top of each side wall assembly. Secure the 2x4s using glue and 2-1/2” pocket hole screws.
Step Four
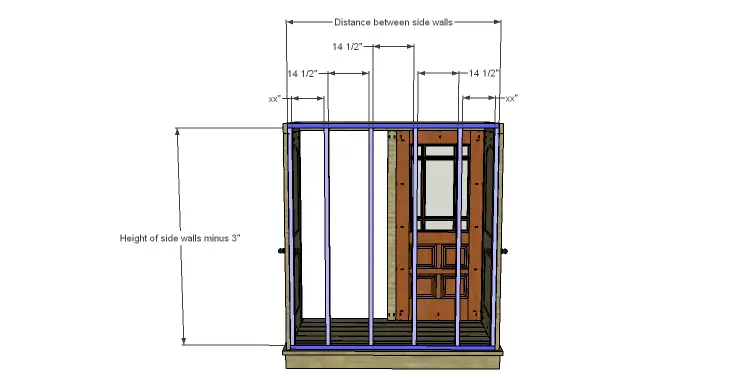
To build the back stud wall, measure between the side walls at the front, and cut two 2x4s (untreated) at this measurement. Drill pocket holes in each end and secure to the top of each side wall assembly and to the bottom of each side wall assembly as shown, locating them ¾” back from the outside edge of the side walls. This will allow for the back sheathing to rest in between the walls.. Cut six 2x4s to act as studs and drill pocket holes in each end. Space the studs evenly then secure the studs to the top and bottom frame pieces using glue and 2-1/2” pocket hole screws. Check the walls for square and adjust, if necessary. Secure the walls to the platform using 2-1/2” pocket hole screws through the pocket holes in the lower edge of the side walls, and 2-1/2” screws through the back stud wall frame.
The door shed is well on its way! In the next post in the series, Part Three, we’ll build the trusses and add the back siding, as well as the decking for the roof! Have questions about the DIY plans to build a shed with old doors (the platform and the frame)? Leave a comment below!


5 Comments
Hi this is teresaclayboswell@yahoo.com and there is not a link for the next post for the she shed from doors to build the trusses and back siding and then the next items. Could you please share this?You were posting it on Pinterest.
Hi,Teresa!
The post can be found here: https://designsbystudioc.com/diy-plans-build-shed-old-doors-trusses-roof/ . Entering the words “Door Shed” in the search bar under the header on the homepage will bring up all of the related posts for this project!
Pingback: Build a Shed with Old Doors, Part One | Designs by Studio C
Pingback: Build a Shed with Old Doors - Access Door and Shelving
Pingback: DIY Plans to Build a Shed with Old Doors - The Trusses and Roof