DIY Plans to Build a Greek Key Chest
A Roomy Chest with a Greek Key Design
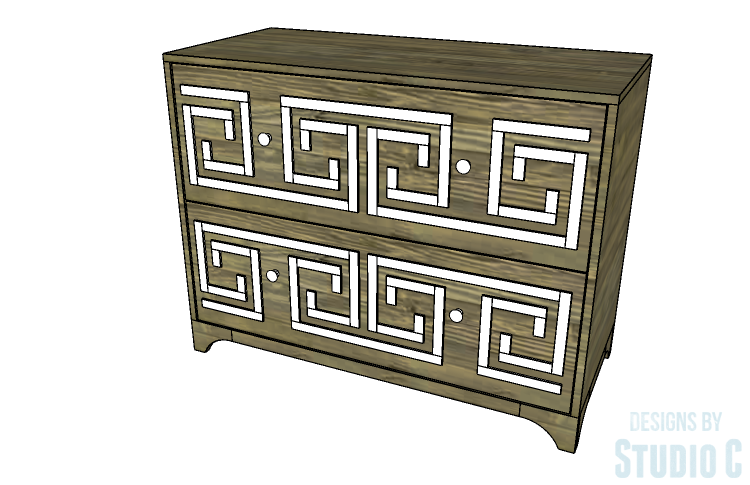
Previously, I posted plans to build a Greek Key Dresser. This chest would be the perfect companion! The DIY plans to build a Greek Key Chest feature two large and roomy drawers with a detailed Greek Key design on each drawer front. This chest would be the perfect place to store bulky sweaters or blankets, and would work well for storing china dinnerware as well as linens!
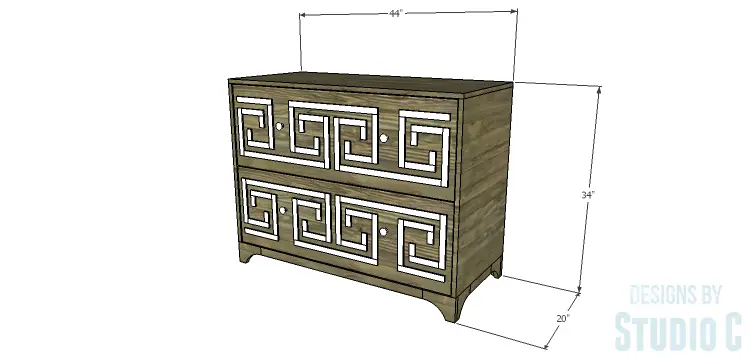
Materials:
- 1-1/4″ pocket hole screws (<– affiliate link!)
- 1-1/2″ screws
- 1-1/4″ brad nails
- Edge banding, optional (<– affiliate link!)
- 2 sets of 18″ Drawer slides (<– affiliate link!)
- Cabinet pulls
- Wood glue
- Sandpaper (100, 150, 220 grits)
- Finishing supplies (primer & paint, or stain, sealer)
Lumber:
- 1 – 1×2 at 4′
- 2 – 1×2 at 8′
- 1 – 1×6 at 4′
- 4 – 1×12 at 6′
- 1 – 4′ x 4′ sheet of 3/4″ plywood
- 1 – 4′ x 8′ sheet of 3/4″ plywood
- 5 – 1/4″ x 1″ Lattice strips at 8′
Cut List:
- 2 – 3/4″ plywood at 20″ x 29-1/4″ – Sides
- 1 – 3/4″ plywood at 29-1/4″ x 42-1/2″ – Back
- 1 – 3/4″ plywood at 18-1/2″ x 42-1/2″ – Bottom
- 4 – 1×6 (ripped to 4″ wide) at 5-1/2″ – Feet
- 4 – 1×6 (ripped to 4″ wide) at 4-3/4″ – Feet
- 2 – 1×2 at 9″ – Base Frame
- 2 – 1×2 at 33″ – Base Frame
- 2 – 1×2 at 18-1/2″ – Base Frame Supports
- 2 – 1×2 at 42-1/2″ – Front Stretchers
- 1 – 3/4″ plywood at 20″ x 44″ – Top
- 2 – 3/4″ plywood at 16-1/2″ x 40″ – Drawer Box Bottom
- 4 – 1×12 at 16-1/2″ – Drawer Box Sides
- 4 – 1×12 at 41-1/2″ – Drawer Box Front & Back
- 2 – 3/4″ plywood at 14-7/16″ x 42-1/4″ – Drawer Fronts
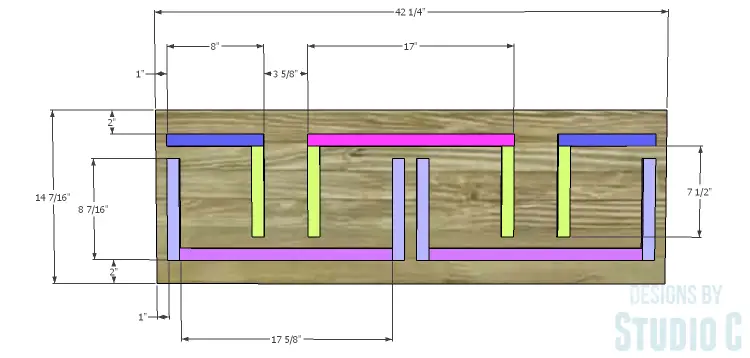
- 4 – 1/4″ x 1″ lattice strips at 17-5/8″ – Greek Key Design
- 2 – 1/4″ x 1″ lattice strips at 17″ – Greek Key Design
- 4 – 1/4″ x 1″ lattice strips at 8″ – Greek Key Design
- 8 – 1/4″ x 1″ lattice strips at 8-7/16″ – Greek Key Design
- 8 – 1/4″ x 1″ lattice strips at 7-1/2″ – Greek Key Design
- 16 – 1/4″ x 1″ lattice strips at 5″ – Greek Key Design
- 16 – 1/4″ x 1″ lattice strips at 2″ – Greek Key Design
Click on the drawings for a larger view!
Step One
Edge banding will be applied to the exposed edges of the plywood prior to assembly.
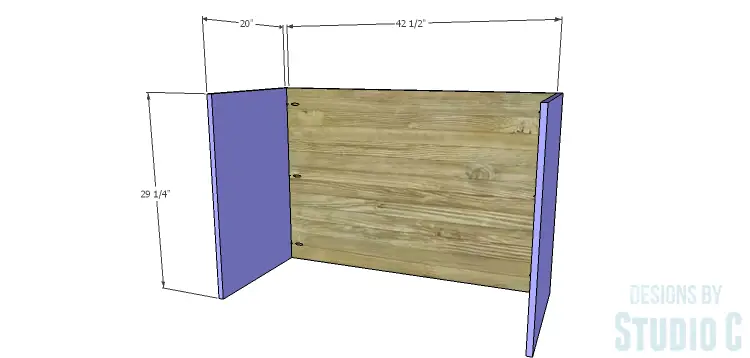
Cut the pieces for the sides and the back. With the pocket holes jig set for 3/4″ material, drill pocket holes in each side edge of the back piece. Secure the sides to the back using glue and 1-1/4″ pocket hole screws.
Step Two
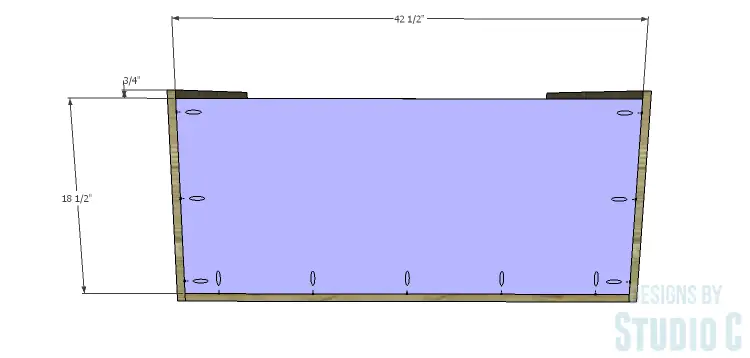
Cut the pieces for the bottom. Drill pocket holes in each side edge as well as the back edge of the piece. Secure the bottom piece to the sides and back. The bottom will be 3/4″ shorter than the sides to allow for the drawer front.
Step Three
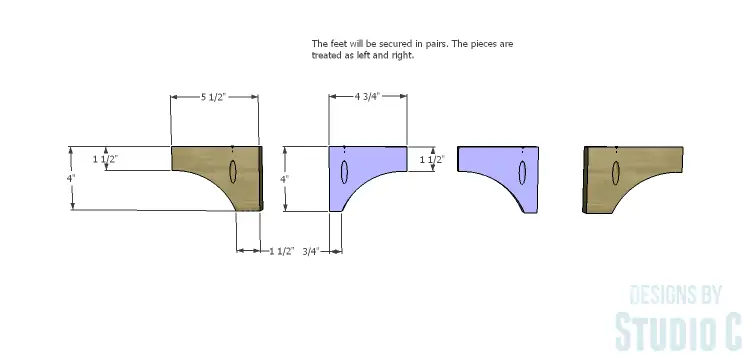
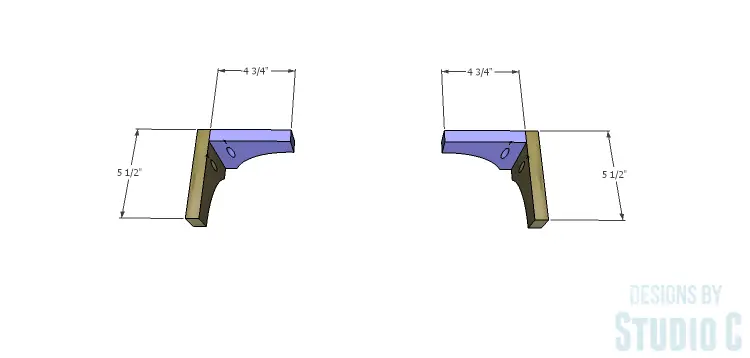
Cut the pieces for the base feet. There will be four right pieces and four left pieces, two of each length. Cut an arc in each piece using a jigsaw or a bandsaw maintaining the dimensions as shown in the drawing. Drill a pocket hole in the top edge of each foot. Assemble the feet in an L shape as shown using glue and 1-1/4″ brad nails.
Step Four
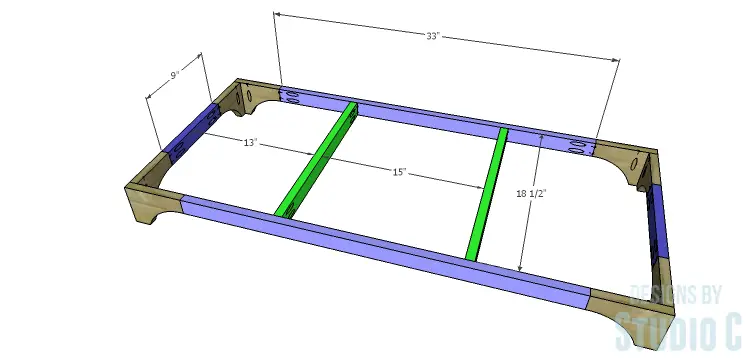
Cut the pieces for the base frame and supports. Drill pocket holes in each end of each piece as well as in one long edge of each piece (except for ONE of the longer framing pieces which will be the front of the base) to secure the base to the bottom of the cabinet (the pocket holes are NOT shown in the drawings). Assemble the base frame as shown using glue and 1-1/4″ pocket hole screws.
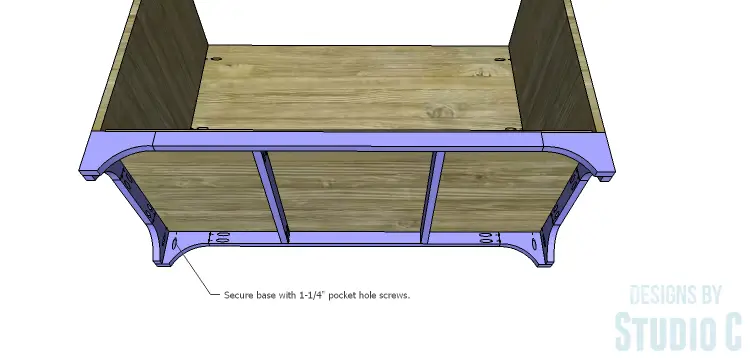
Secure the base frame to the cabinet bottom and sides using glue and 1-1/4″ pocket hole screws.
Step Five
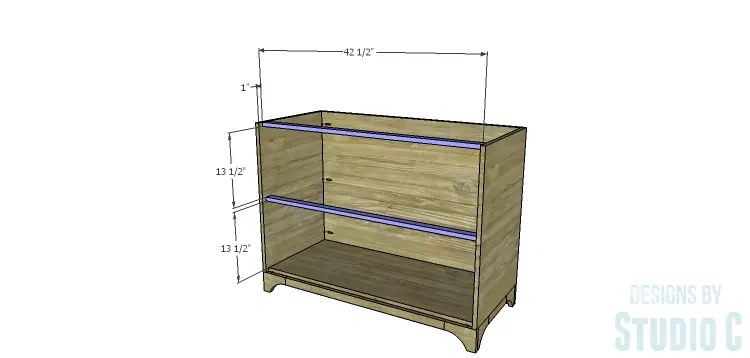
Cut the pieces for the stretchers and drill pocket holes in each end. The stretchers will be secured to the sides of the cabinet and located 1″ back from the front edge of the sides to allow for the drawer fronts.
Step Six
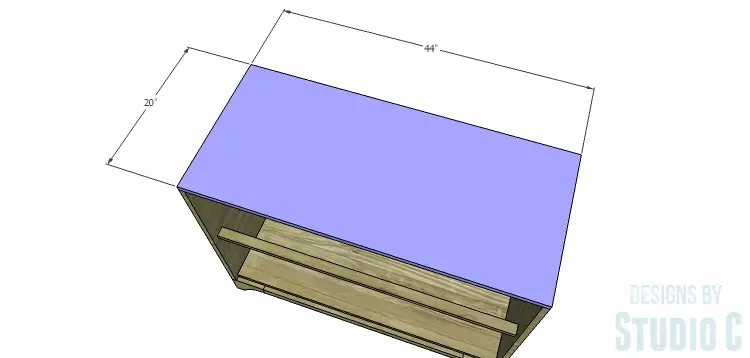
Cut the piece for the top. Secure the top to the sides, back, and upper stretcher using glue and 1-1/4″ brad nails through the top.
Step Seven
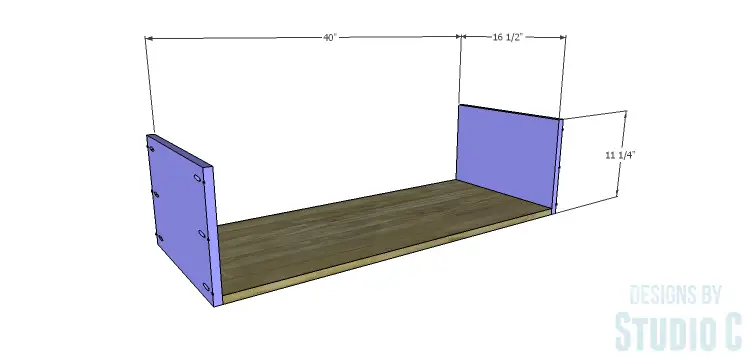
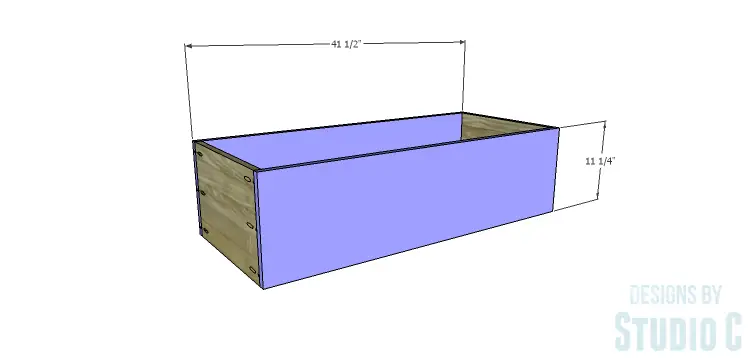
Cut the pieces for the drawer boxes. Drill pocket holes in all four edges of the bottom as well as each end of the sides. Assemble the drawer boxes as shown using glue and 1-1/4” pocket hole screws. Install the drawer slides according to the manufacturer’s installation instructions, locating them ¾” back from the front edge of the sides. Refer to this easy tutorial on installing drawer slides. Make any necessary adjustments.
Step Eight
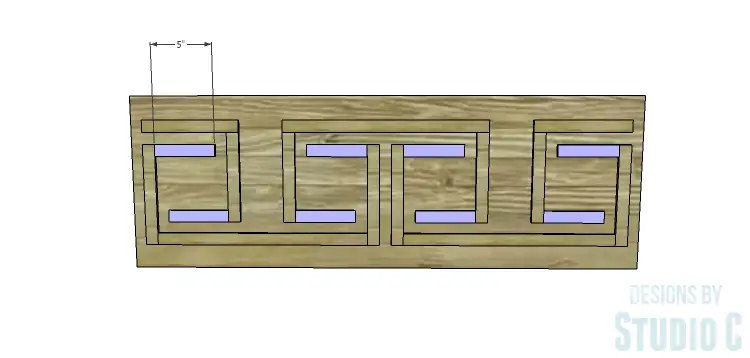
Cut the pieces for the drawer fronts. The Greek Key design will be cut and assembled from pieces of the lattice strips. It may be easier to mark the position of the strips on the drawer front pieces prior to securing the design. Follow each drawing and position the pieces as shown. Secure the pieces using glue (1/2″ brad nails may be used, if desired).
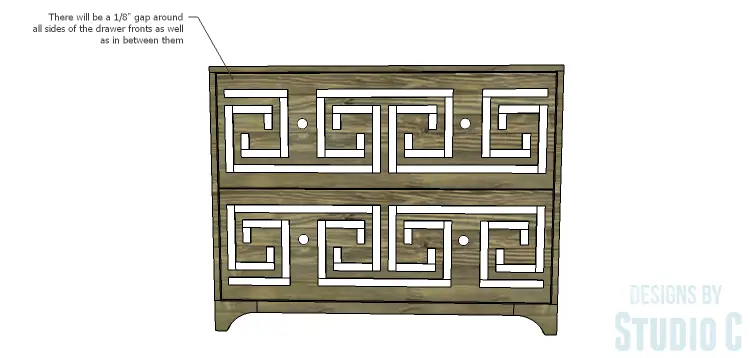
Mark the position for the drawer pulls and drill the holes. Shim the drawer front in the opening – there will be a 1/8” gap around all sides – then drive screws through the holes for the drawer pulls into the drawer box. Open the drawer, and secure the drawer front using countersunk 1-1/4” screws from the inside. Remove the screws from the holes for the drawer pull then finish drilling the holes. Install the drawer pull. This easy tutorial on installing drawer fronts will be helpful! 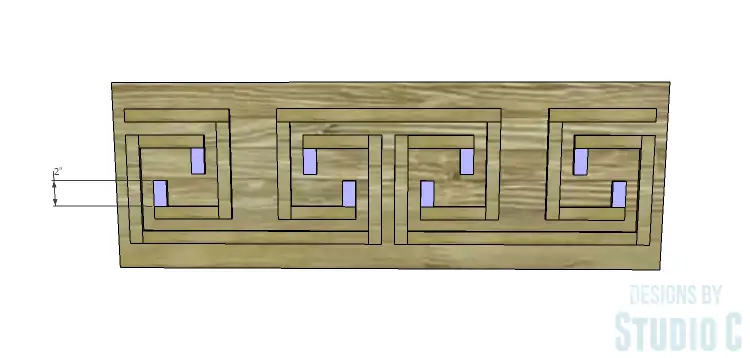
Finish as desired.
The chest would be a fabulous addition to any room – as a media chest, as toy storage in a kid’s room, or even in a bathroom to store towels and toiletries. The DIY plans to build a Greek Key Chest are easy to follow but if you have any questions, leave a comment below!
Originally posted 2014-12-17 08:00:50.
