A Beautiful Buffet with Lots of Storage Potential
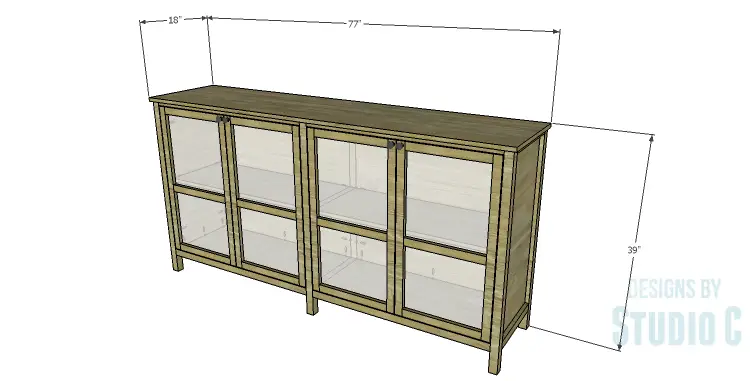
Looking for a buffet with a sleek and uncomplicated design? Our DIY furniture plans for the Frances Buffet are just what you need! This lovely piece boasts clean and simple lines, along with four doors that come with customizable inserts. Plus, there’s plenty of shelving space behind those doors. Best of all, this buffet is a breeze to build and won’t break the bank!

Materials:
- 1-1/4″ pocket hole screws (<– affiliate link!)
- 2-1/2″ pocket hole screws
- 1-1/2″ screws
- 1-1/4″ brad nails
- Edge banding, optional (<– affiliate link!)
- 4 sets of hinges
- Plexiglas for the doors
- Mirror clips
- 4 magnetic catches
- Cabinet pulls
- Wood glue
- Sandpaper (100, 150, 220 grits)
- Finishing supplies (primer & paint, or stain, sealer)
Lumber:
- 10 – 1×2 at 8′
- 6 – 2×2 at 8′
- 2 – 4′ x 8′ sheets of 3/4″ plywood
Cut List:
- 6 – 2×2 at 38-1/4″ – Legs
- 3 – 2×2 at 14-1/2″ – Side & Center Framing
- 4 – 1×2 at 14-1/2″ – Side & Center Framing
- 2 – 3/4″ plywood at 14-1/2″ x 32″ – Side Panels
- 4 – 1×2 at 35-3/4″ – Upper Front & Back Stretchers
- 4 – 2×2 at 35-3/4″ – Lower Front & Back Stretchers
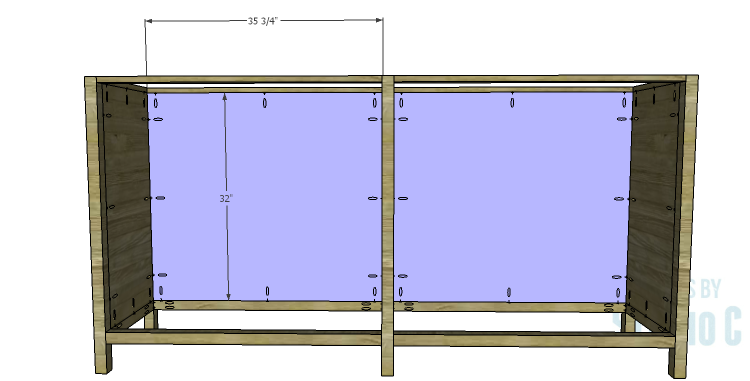
- 2 – 3/4″ plywood at 32″ x 35-3/4″ – Back Panels
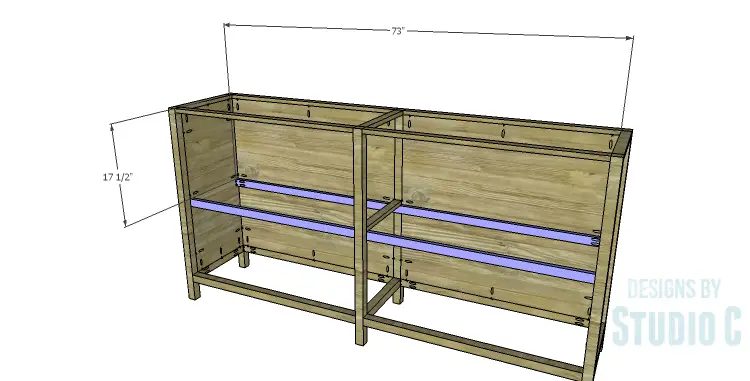
- 2 – 1×2 at 73″ – Shelving Supports
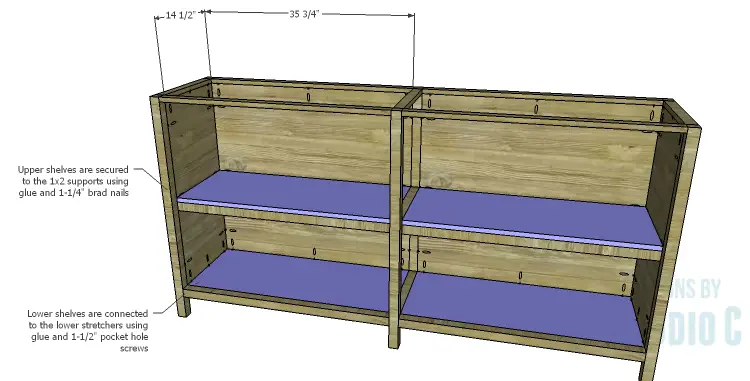
- 4 – 3/4″ plywood at 14-1/2″ x 35-3/4″ – Shelves
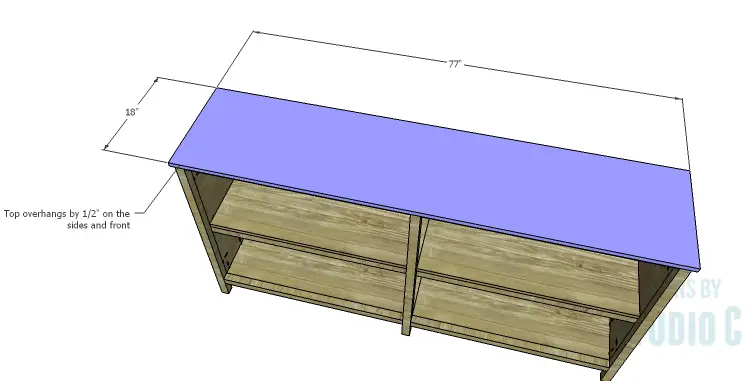
- 1 – 3/4″ plywood at 18″ x 77″ – Top
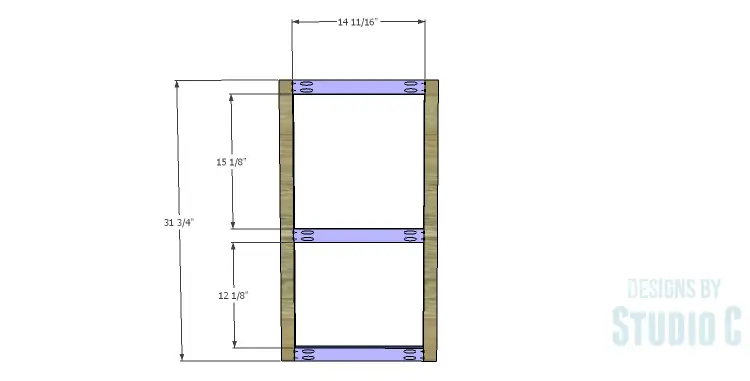
- 12 – 1×2 at 14-11/16″ – Door Rails
- 8 – 1×2 at 31-3/4″ – Door Stiles
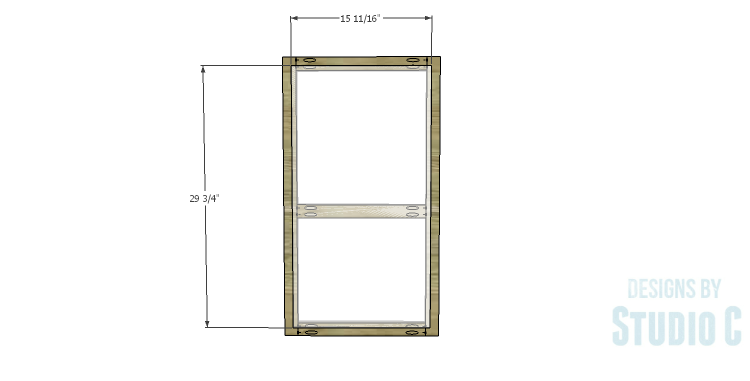
- 2 – Plexiglas at 15-11/16″ x 29-3/4″ – Door Panels
Step One
Edge banding will be applied to the exposed edges of the plywood prior to assembly.
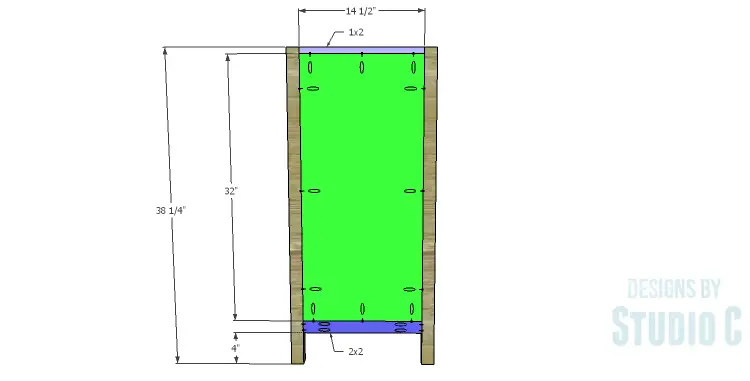
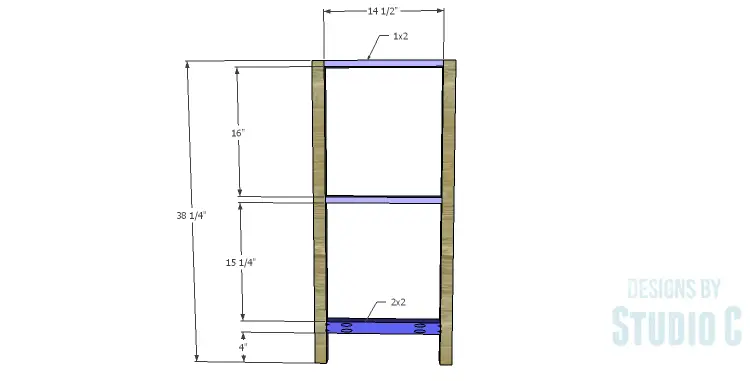
Cut the pieces for the legs, the side framing, the center framing, and the side panels. With the pocket hole jig set for 1-1/2″ material, drill pocket holes in each end of the 2×2 pieces. Secure the 2×2 pieces to the legs using glue and 2-1/2″ pocket hole screws.
Set the pocket hole jig for 3/4″ material and drill pocket holes in each end of the 1×2 pieces. Secure the 1×2 pieces to the legs using glue and 1-1/4″ pocket hole screws. The pocket holes on the side framing and the upper framing piece on the center framing will face up. The pocket holes in the middle piece on the center framing will face down.
Drill pocket holes in all four edges of the panels. Insert the panels into the side frames then secure using glue and 1-1/4″ pocket hole screws. The back face of the panels will be flush with the back face of the framing.
Step Two
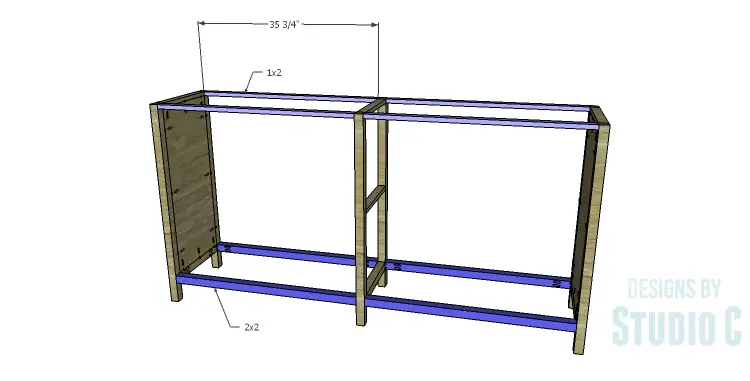
Cut the pieces for the upper and lower stretchers. Drill pocket holes in each end of the 1×2 pieces then secure them to the legs using glue and 1-1/4″ pocket hole screws. The pocket holes will face up.
Set the pocket hole jig for 1-1/2″ material and drill pocket holes in each end of the 2×2 pieces. Secure the 2×2 stretchers to the legs using glue and 2-1/2″ pocket hole screws.
Step Three
Cut the pieces for the back panels. Set the pocket hole jig for 3/4″ material and drill pocket holes in all four edges of the panels. Insert the panels into the back frames then secure using glue and 1-1/4″ pocket hole screws. The back face of the panels will be flush with the back face of the framing.
Step Four
Cut the pieces for the shelf supports and drill pocket holes in each end. Position the supports in the cabinet as shown (under the middle piece on the center framing) and secure in place using glue and 1-1/4″ pocket hole screws. Drive a couple of 1-1/2″ screws through the support into the center legs.
Step Five
Cut the pieces for the shelves. Drill pocket holes in all four edges of two of the shelves (for the bottom) and in each end only of the remaining two pieces (for the upper shelves). Secure the bottom shelves to the 2×2 framing and stretchers using glue and 1-1/4″ pocket hole screws. The top face of these shelves will be flush with the top edge of the lower 2×2 stretchers.
Rest the upper shelves on the shelf supports. Secure the ends of the shelves to the side panels and the middle piece of the center framing. The top face of the shelves will be flush with the top face of the middle piece. Secure the long sides of the shelves to the supports using a few 1-1/4″ brad nails.
Step Six
Cut the piece for the top. The front and sides will overhang by 1/2″. Secure in place using glue and 1-1/4″ brad nails through the top into the upper stretchers and legs.
Step Seven
Cut the pieces for the door frames. Drill pocket holes in each end of the shorter pieces. Assemble the doors as shown using glue and 1-1/4″ pocket hole screws.
Cut the Plexiglas to size using a score and snap method. Score a line on the Plexiglas with a box cutter, move the Plexiglas to the edge of a work table then snap it along the line by gently pushing down on the part of the Plexiglas that hangs over the edge.
Secure the Plexiglas to the back of the door frame using mirror clips positioned so they do not interfere with the shelf or the support!
Step Eight
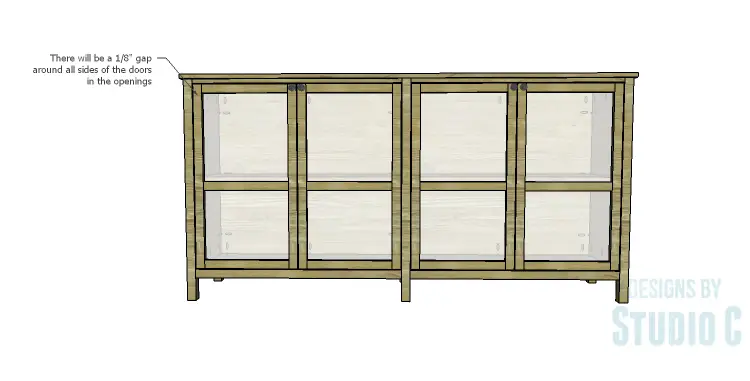
Install the hinges on the doors, then install the doors in the cabinet. There will be a 1/8″ gap around all sides of the door frames in the opening as well as in between them. Install the magnetic catches to keep the doors closed.
Finish as desired.
The buffet is a great piece that will look fabulous in any room. Here are a few others similar to the DIY furniture plans to build a Frances buffet:
The Plexiglas panels can be substituted with glass, 1/4″ plywood, punched aluminum, or baffle fabric if the buffet will be used as a media stand… Pretty awesome, right? If there are any questions about the DIY furniture plans to build a Frances Buffet, leave a comment below!
Originally posted 2015-01-14 08:00:34.


Comments are closed.