
Get Organized in Style with the DIY Victoria Three Drawer Dresser!
Are you tired of searching for the perfect dresser that fits your style and budget? Why not build the Victoria three-drawer dresser? Not only will it be a unique addition to your home, but it will also give you a sense of accomplishment and satisfaction when showing off your DIY skills!
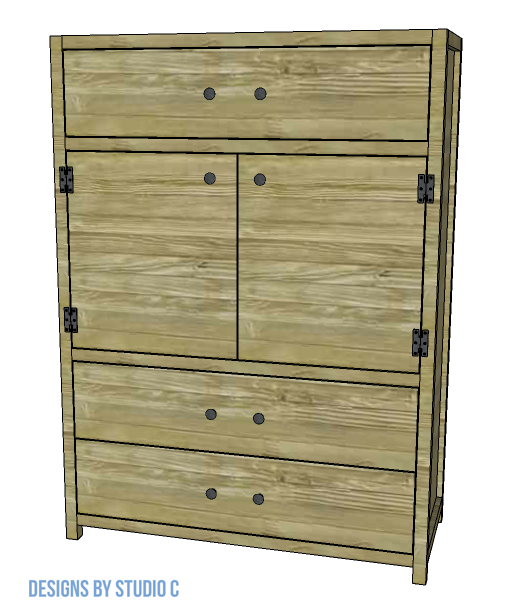
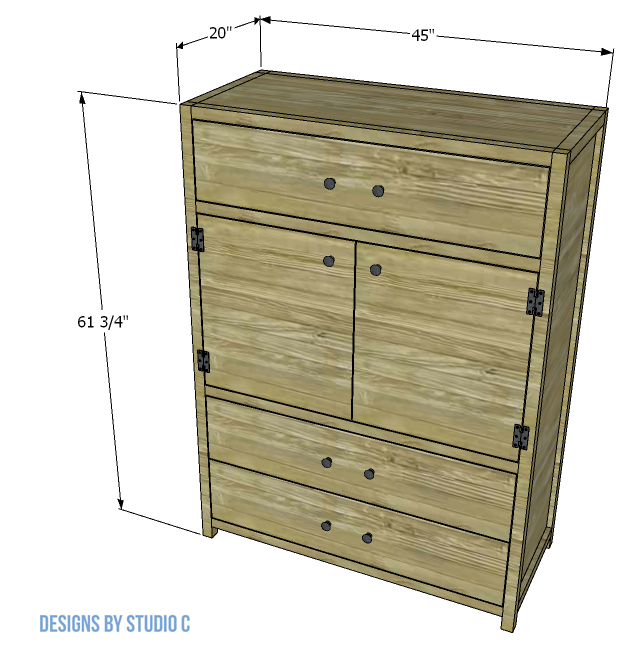
The Victoria dresser features three large drawers with doors over a shelving space. This large piece offers a lot of storage for any room!
This is a fun project that anyone can do. The plans are suitable for all skill levels and when completed, you will have a beautiful piece of furniture and the satisfaction of knowing that you built it yourself! So, grab your tools and get started on your own DIY dresser today!
Materials:
- 1-1/4″ pocket hole screws
- 2-1/2″ pocket hole screws
- 1-1/4″ screws (to secure the drawer fronts)
- Edge banding (<– affiliate link!)
- 3 sets of 16″ drawer slides soft close (<– affiliate link!)
- 2 sets of hinges
- Drawer knobs or pulls
- Wood glue
- Sandpaper (80, 120, 220 grits)
- Finishing supplies
Lumber:
- 6 – 2×2 at 8′
- 1 – 4′ x 4′ sheet of 1/4″ plywood
- 3 – 4′ x 8′ sheets of 3/4″ plywood
Cut List:
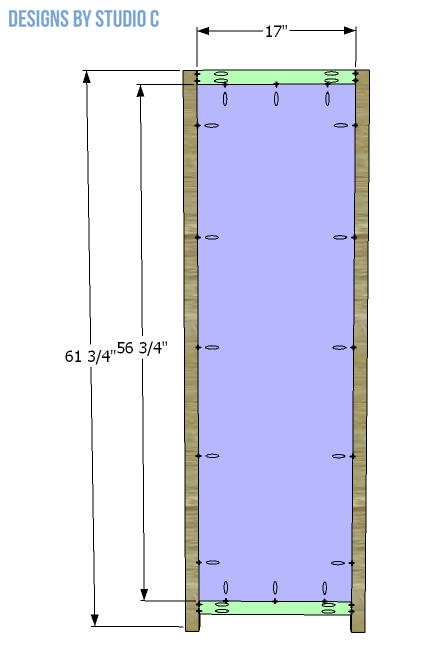
- 4 – 2×2 at 61-3/4″ – Legs
- 4 – 2×2 at 17″ – Side Framing
- 2 – 3/4″ plywood at 17″ x 56-3/4″ – Side Panels
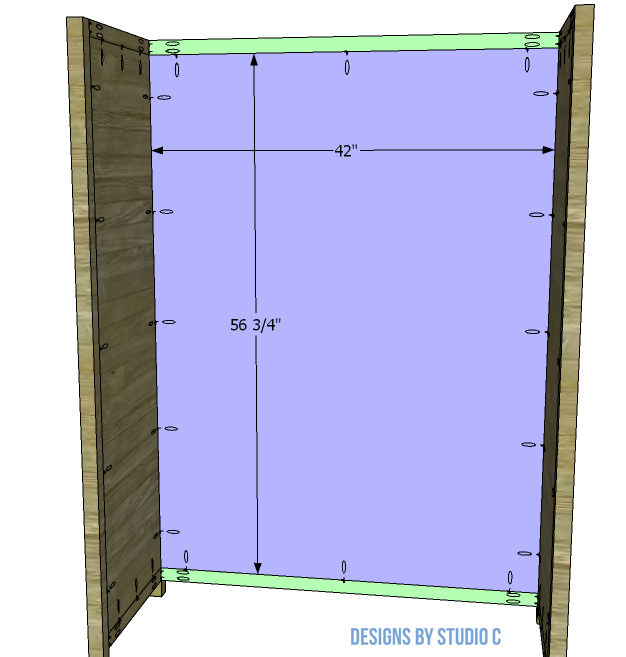
- 2 – 2×2 at 42″ – Back Framing
- 1 – 3/4″ plywood at 42″ x 56-3/4″ – Back Panel
- 4 – 2×2 at 42″ – Front Stretchers
- 4 – 3/4″ plywood at 17″ x 42″ – Top, Bottom and Shelves
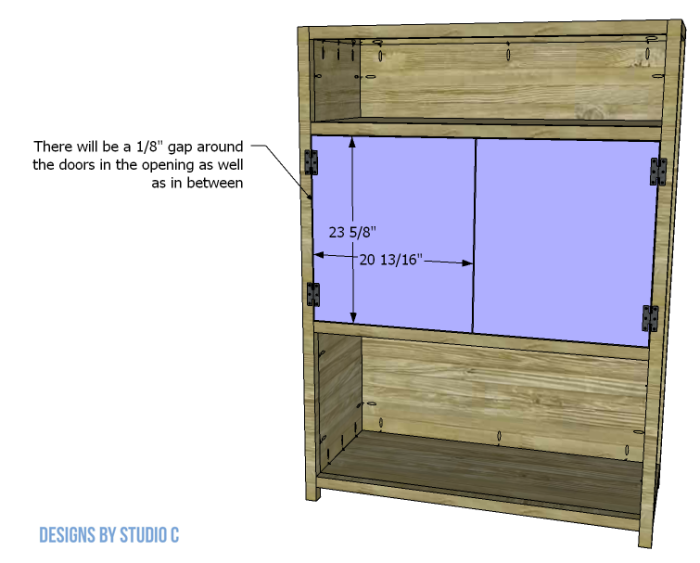
- 2 – 3/4″ plywood at 20-13/16″ x 23-5/8″- Doors
- 6 – 3/4″ plywood at 8″ x 17″ – Drawer Box Sides
- 6 – 3/4″ plywood at 8″ x 39-1/2″ – Drawer Box Front and Back
- 3 – 1/4″ plywood at 16″ x 41″ – Drawer Box Bottom
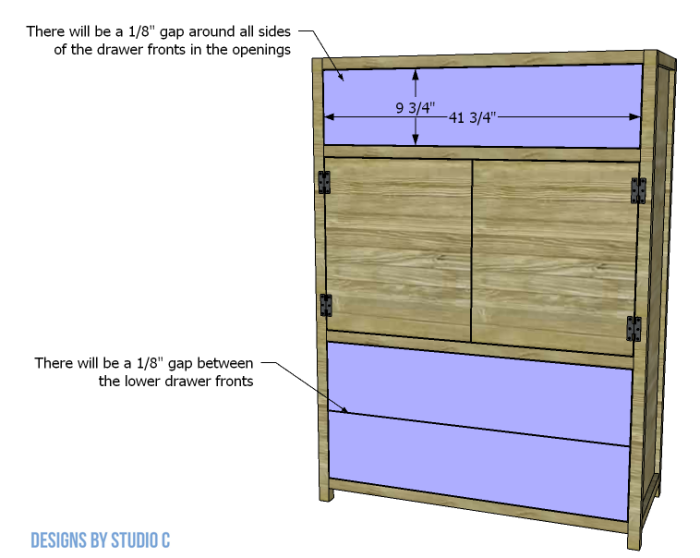
- 3 – 3/4″ plywood at 9-3/4″ x 41-3/4″ – Drawer Fronts
Notes About the Project:
- Edge banding will be applied to the exposed edges of the plywood before sanding
- Sand all pieces before assembly – it makes finishing easier!
- When using a 4′ x 4′ sheet of 1/4″ plywood for the drawer box bottoms, the pieces may be a little bit short to allow for the width of the saw blade. This is not critical and will not affect the drawer boxes in any way
Step One
Cut the pieces for the legs and side frames. With the pocket hole jig set for 1-1/2” material, drill pocket holes in each end of the framing pieces.
Cut the pieces for the side panels. Set the pocket hole jig for 3/4” material and drill pocket holes in all four edges of each piece. Secure the framing pieces to the top and bottom of the side panels – back faces flush – and secure using glue and 1-1/4” pocket hole screws.
Secure the side panel assembly to the legs using glue and 1-1/4” pocket hole screws through the side panels, and 2-1/2” pocket hole screws through the framing pieces.
Step Two
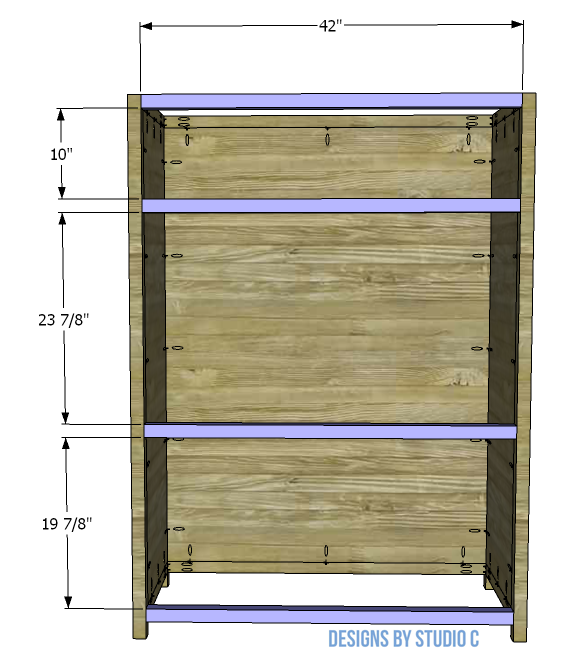
Cut the pieces for the back framing. Set the pocket hole jig for 1-1/2” material and drill pocket holes in each end.
Cut the piece for the back panel. side panels. Set the pocket hole jig for 3/4” material and drill pocket holes in all four edges of the panel. Secure the framing pieces to the top and bottom of the back panel – back faces flush – and secure using glue and 1-1/4” pocket hole screws.
Secure the back panel assembly to the legs using glue and 1-1/4” pocket hole screws through the back panel, and 2-1/2” pocket hole screws through the framing pieces.
Step Three
Cut the pieces for the front stretchers. Set the pocket hole jig for 1-1/2″ material and drill pocket holes in each end. Secure the front stretchers as shown using glue and 2-1/2″ pocket hole screws.
Step Four
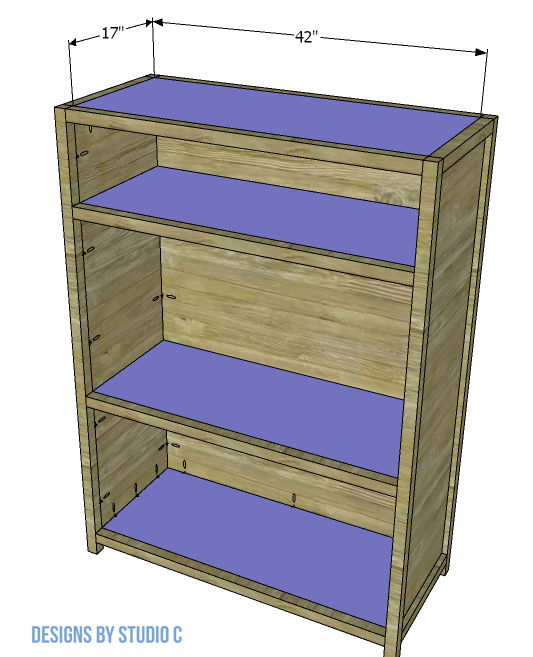
Cut the pieces for the top, bottom and shelves. Set the pocket hole jig for 3/4″ material, and drill pocket holes in all four edges of each piece. Secure each piece to the front stretchers as shown (top face flush with the top faces of the stretchers) using glue and 1-1/4″ pocket hole screws.
Step Five
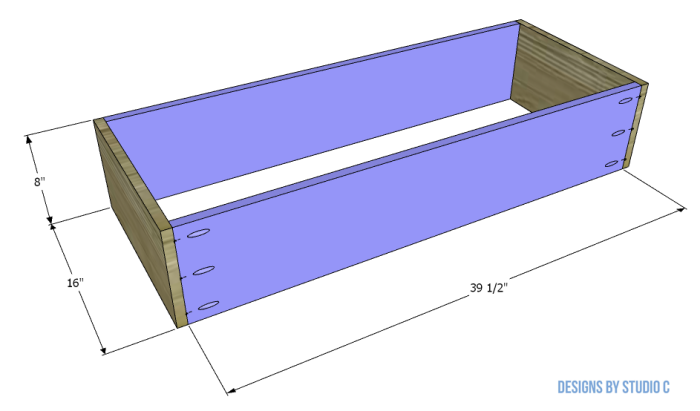
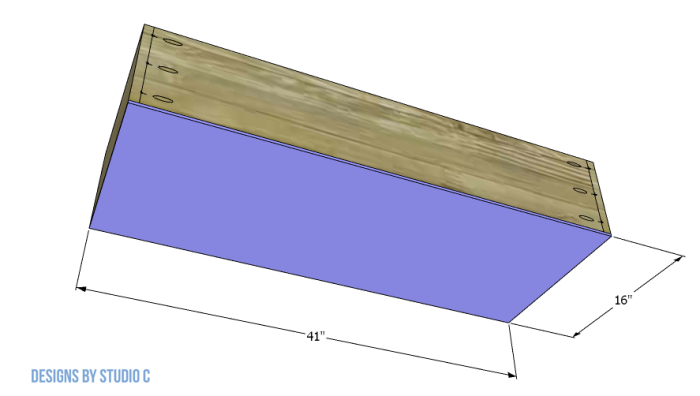
Cut the pieces for the drawer boxes and the drawer bottoms. Assemble the drawers using glue and 1-1/4″ pocket hole screws. Secure the bottoms to the drawer boxes using 1-1/4″ brad nails.
Install the drawer slides according to the manufacturer’s installation instructions, locating them 3/4″ back from the front face of the opening. Take a look at this tutorial on installing drawer slides for reference!
Step Six
Cut the pieces for the doors. There will be a 1/8″ gap around all sides of the doors in the opening, as well as in between. Install the hinges according to the manufacturer’s installation instructions.
Step Seven
Cut the pieces for the drawer fronts. Mark the position for the drawer pulls and drill the holes. Shim the drawer front in the opening – there will be a 1/8” gap around all sides – then drive screws through the holes for the drawer pulls into the drawer box. Open the drawer, and secure the drawer front using countersunk 1-1/4” screws from the inside. Remove the screws from the holes for the drawer pull then finish drilling the holes. Install the drawer pull. This easy tutorial on installing drawer fronts will be quite helpful!
Finish as desired!
Have questions about the plans to build a Victoria three-drawer dresser? Leave a comment below!


Comments are closed.