
A Beautiful Bath Vanity in a Minimalist Style
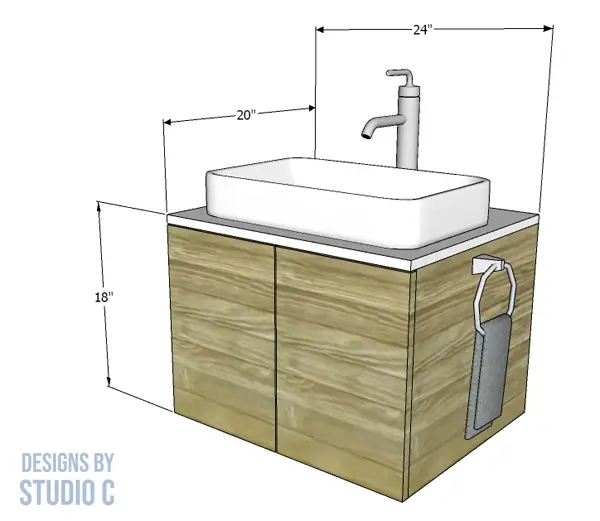
This easy to build floating wooden vanity mounts directly to the wall using a hanging cleat. It features doors on the front with a shelf behind it for storage, and is perfect for a small space. This plan is excellent for any skill level including first-time builders!
As shown, the floating wood vanity has a vessel sink but a drop-in sink can be used as well. Make sure it is mounted at a comfortable height either way!
Materials:
- 1-1/4″ pocket hole screws
- Edge banding
- Two sets of concealed hinges (<– affiliate link!)
- Two door pulls
- 3″ screws
- 4″ Spax Powerlags (for mounting the cleat to the wall) (<– affiliate link!)
- Wood glue
- Sandpaper (80, 120, 220 grits)
- Finishing supplies
Lumber:
- 1 – Scrap of 1×3 at 22-1/2″
- 1 – Scrap of 2×4 at 22″
- 1 – 4′ x 8′ sheet of 3/4″ plywood
Cut List:
- 2 – 3/4″ plywood at 17-1/4″ x 19-1/4″ – Sides
- 1 – 3/4″ plywood at 19-1/4″ x 22-1/2″ – Bottom
- 1 – 1×3 at 22-1/2″ – Front Stretcher
- 1 – 3/4″ plywood at 20″ x 24″ – Top
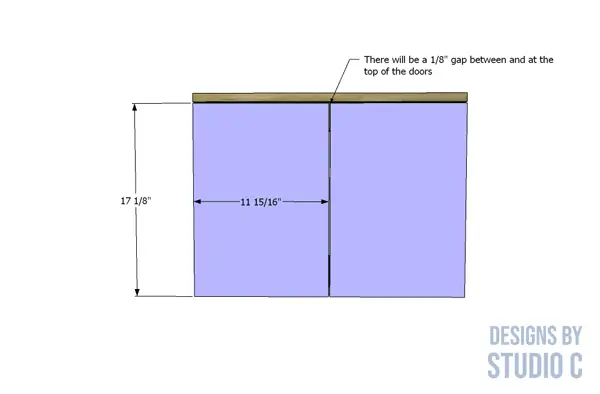
- 2 – 3/4″ plywood at 11-15/16″ x 17-1/8″ – Doors

Notes About the Project:
- Apply the edge banding before putting the pieces together
- Sand everything before assembly – it makes finishing easier!
- When finishing the top – a piece of laminate (Formica brand, etc.) adhered to the top, spar urethane over stain or exterior paint are good options
- Mounting instructions are included below
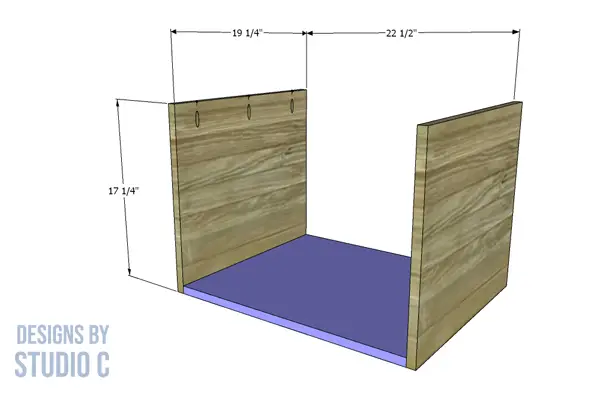
Step One
Cut the pieces for the sides and the bottom. With the pocket hole jig set for 3/4″ material, drill pocket holes in the top edge of the side pieces, as well as each side (the 19-1/4″ direction) of the bottom. Secure the sides to the bottom using glue and 1-1/4″ pocket hole screws.
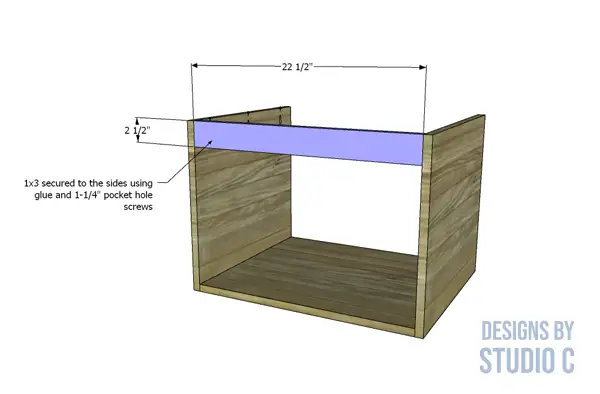
Step Two
Cut the piece for the front stretcher and drill pocket holes in each end. Secure the stretcher to the sides using glue and 1-1/4″ pocket hole screws.
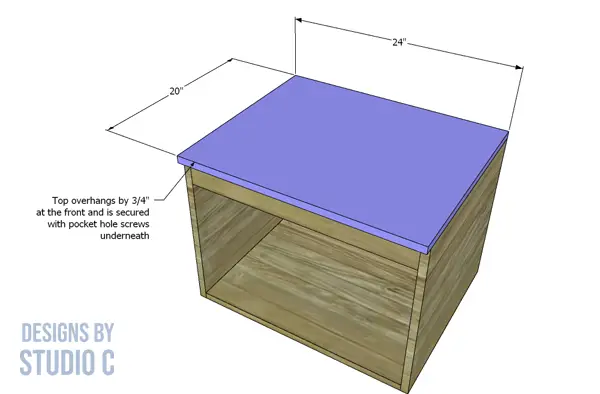
Step Three
Cut the piece for the top. The front edge will overhang by 3/4″. Secure the top to the sides using glue and 1-1/4″ pocket hole screws.
Step Four
Cut the pieces for the doors. Install the concealed hinges according to the manufacturer’s installation instructions. Pro tip: a concealed hinge jig (<– affiliate link!) is a really helpful tool for this application! Install the doors with a 1/8″ gap between them and the bottom edges flush with the bottom of the vanity, then install the door pulls.
Step Five
To mount the floating wood vanity on the bathroom wall:
Locate the wall studs using a stud finder, and mark the areas with a pencil. Determine the proper height for the vanity with a vessel sink (roughly 24 to 35″ from the floor for an 8-inch tall vessel sink) or a drop-in sink (roughly 30 to 43″ from the floor depending on the preferred height). Mount the 2×4 to the wall studs and secure using the 4″ Spax Powerlags. Slide the vanity over the 2×4, then secure the vanity to the sides of the 2×4 using countersunk 3″ screws (two on each side should be sufficient).
Here are a few other easy to build bath vanity plans:
- Custom Bath Vanity (with a built-in laundry hamper!)
- Furniture Style Vanity
- Trunk Bath Vanity
Have questions about the easy to build floating wooden vanity? Leave a comment below!
Originally posted 2022-09-09 13:48:52.


Comments are closed.