
Build a Wide Wall Mounted Desk
DIY Wall Mounted Desk with Shelves
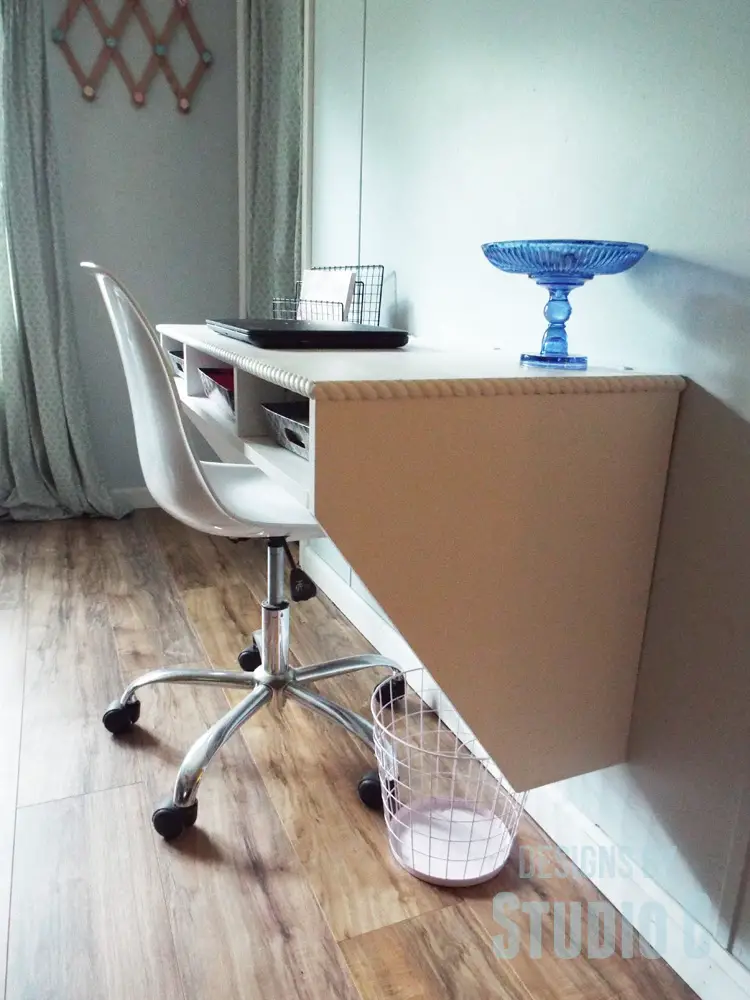
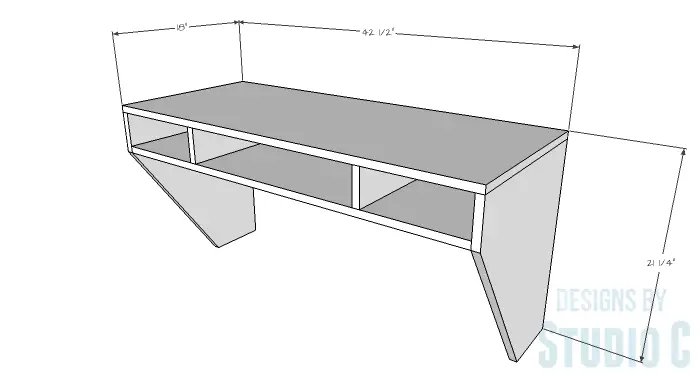
I love this desk… It is simple and the perfect piece with a modern touch. The DIY furniture plans to build a Wide Wall Mounted Desk feature angled sides and three cubbies under the top plus it will mount on a wall (on a 2×4 cleat screwed into studs) at any height you choose. A hole can be drilled at one end toward the back for cord management or an outlet can be added to the desk top. This quick and easy desk can be constructed out of one sheet of plywood making it a super-economical project!
Materials:
- 1-1/4″ pocket hole screws (<–affiliate link!)
- 1-3/4″ brad nails
- 3-1/2″ or 4″ screws
- Edge banding (<–affiliate link!)
- Wood glue
- Sandpaper (100, 150, 220 grits)
- Finishing supplies (primer & paint, or stain, sealer)
Tools Needed:
- Table Saw or Circular Saw
- Jigsaw, optional
- Drill
- Pocket Hole Jig
- Iron for edge banding
- Pneumatic brad nailer with compressor
- Sander
Lumber:
- 1 – 4′ x 8′ sheet of 3/4″ plywood
- 1 – 2×4 at 4′
Cut List:
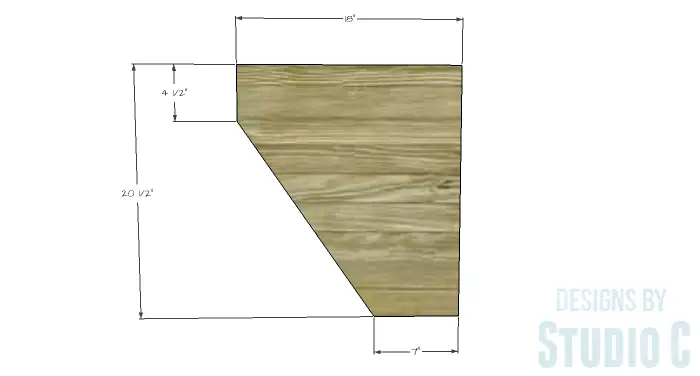
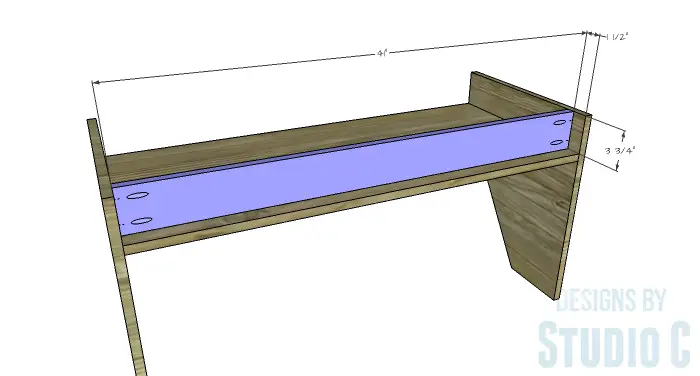
- 2 – 3/4″ plywood at 18″ x 20-1/2″ – Sides
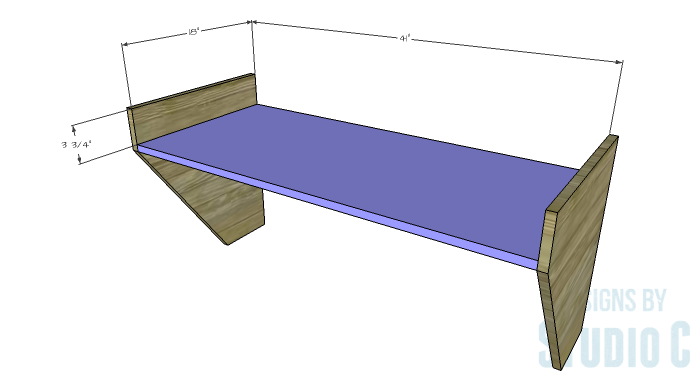
- 1 – 3/4″ plywood at 18″ x 41″ – Shelf
- 1 – 3/4″ plywood at 3-3/4″ x 41″ – Back
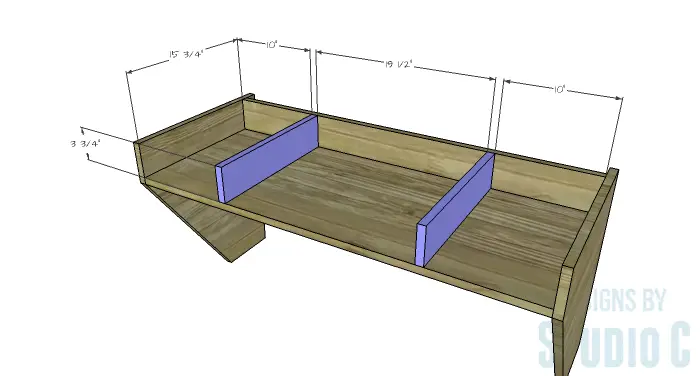
- 3 – 3/4″ plywood at 3-3/4″ x 15-3/4″ – Dividers
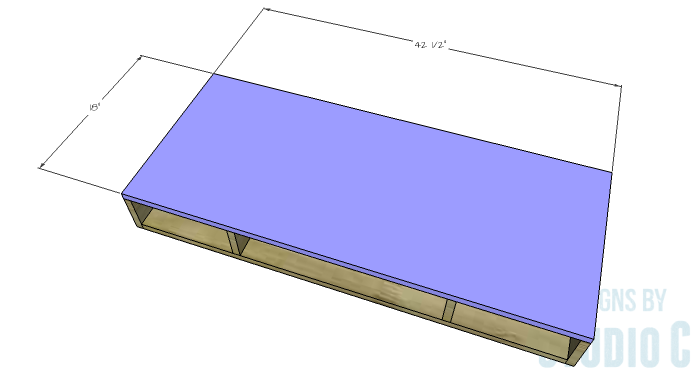
- 1 – 3/4″ plywood at 18″ x 42-1/2″ – Top
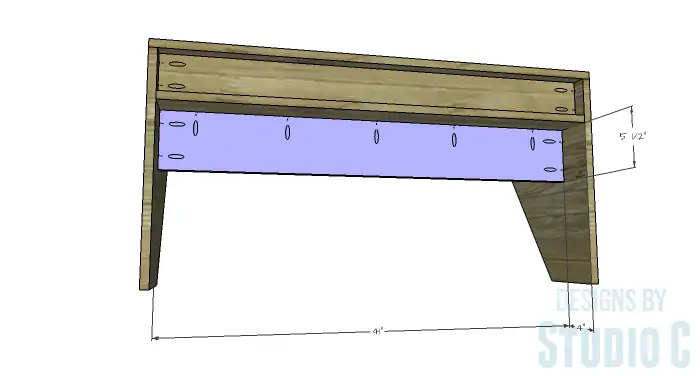
- 1 – 3/4″ plywood at 5-1/2″ x 41″ – Under Shelf Support
- 1 – 2×4 at 40-1/2″ – Cleat (to hang desk)
Edge banding will be applied to the exposed edges of the plywood prior to assembly.
Step One
Cut the pieces for the sides. Cut the angle in the sides using a circular saw or a jigsaw.
Step Two
Cut the piece for the shelf. With the pocket hole jig set for 3/4″ material, drill pocket holes in each end of the shelf piece. Secure the shelf to the sides as shown using glue and 1-1/4″ pocket hole screws.
Step Three
Cut the piece for the back and drill pocket holes in the side edges. Secure the back to the sides using glue and 1-1/4″ pocket hole screws. Locate the back 1-1/2″ forward of the back edge of the shelf. This will allow the desk to fit over the cleat that will be mounted to the wall. Add a few brad nails through the underside of the shelf into the lower edge of the back.
Step Four
Cut the pieces for the dividers. Secure the dividers to the shelf and back using glue and 1-3/4″ brad nails.
Step Five
Cut the piece for the top. Secure the top to the sides, back and dividers using glue and 1-3/4″ brad nails.
Step Six
Cut the piece for the under shelf support. Drill pocket holes in the side edges as well as one long edge. Secure the support to the sides and shelf using glue and 1-1/4″ pocket hole screws. This piece will add support to the shelf to keep it from sagging and will also keep the sides from splaying out.
Step Seven
Cut the piece for the cleat. The cleat will be installed on the wall using 3-1/2″ or 4″ screws through the cleat into wall studs. For maximum support, secure the cleat to at least two wall studs. Locate the cleat at the height desired minus 3/4″. Position the desk over the cleat (the cleat will fit between the top and the shelf) and secure in place using 3-1/2″ or 4″ screws through the top of the desk into the top edge of the cleat. Note that the desk is not for sitting or standing on but will support a computer, speakers, books, etc.
This desk is perfect for a kitchen nook, dining room or entryway. Have any questions about the DIY furniture plans to build a Wide Wall Mounted Desk? Leave a comment below.
Originally posted 2016-04-06 08:00:16.
[…] long screws. I changed the assembly method when constructing the desk, and the plans can be found here, complete with a material list, tool list, lumber list and cut […]
[…] you can see the Bench she’s talking about in today’s show. She will show it off with her wall mounted desk when it is […]
[…] I decided to build the wall mounted desk from a set of previously posted plans, I was going to end up with a blank space above the desk on […]
[…] Wide Wall Mounted Desk […]
[…] house was such a huge job! Now it is finished, and I get to start adding in the furniture like this wall-mounted desk I built a few years ago. I decided to add a furniture power outlet with USB ports to the desk top […]