
DIY Furniture Plans to Build an Arden Buffet
A Console Table with Both Hidden and Exposed Storage
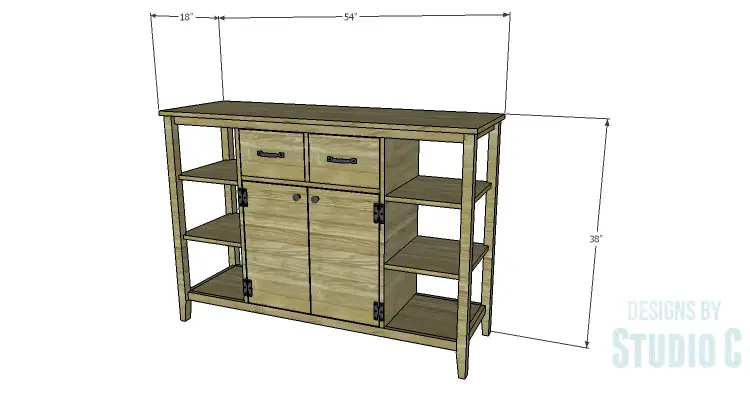
This console table is an excellent way to store everyday linens and dishes, yet keep it looking like a fancy collection… The DIY furniture plans to build an Arden Buffet feature three exposed shelves on each side, as well as doors with a shelf behind them and two drawers. The buffet is a very easy build that can be completed in a weekend!

The DIY furniture plans to build an Arden Buffet are suitable for all skill levels! The Caroline Buffet is another easy to build buffet or console table!
Materials:
- 1-1/4″ pocket hole screws
- 1-1/4″ brad nails
- Edge banding, optional
- 2 sets of hinges
- Cabinet Pulls
- Wood glue
- Sandpaper (100, 150, 220 grits)
- Finishing supplies (primer & paint, or stain, sealer)
- Paste Wax
Lumber:
- 4 – 1×2 at 6′
- 2 – 2×2 at 8′
- 2 – 4′ x 8′ sheets of 3/4″ plywood
Cut List:
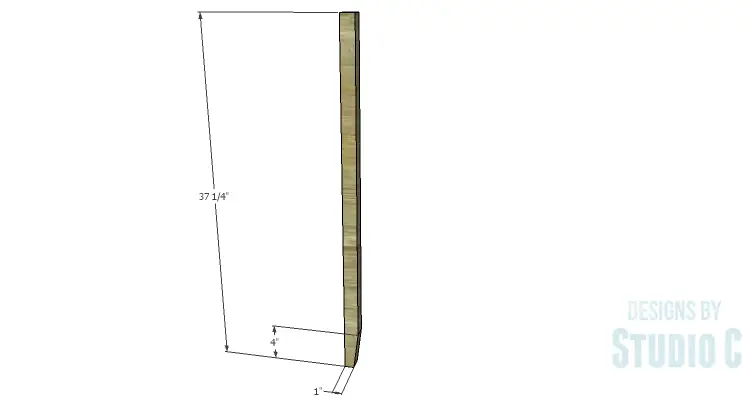
- 4 – 2×2 at 37-1/4″ – Legs
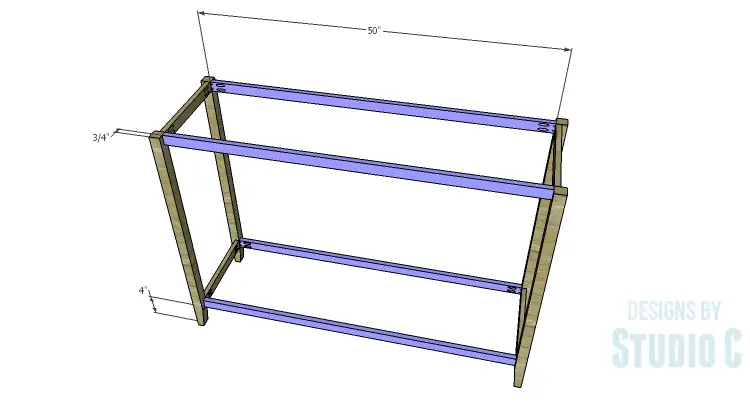
- 4 – 1×2 at 14″ – Side Frames
- 4 – 1×2 at 50″ – Stretchers
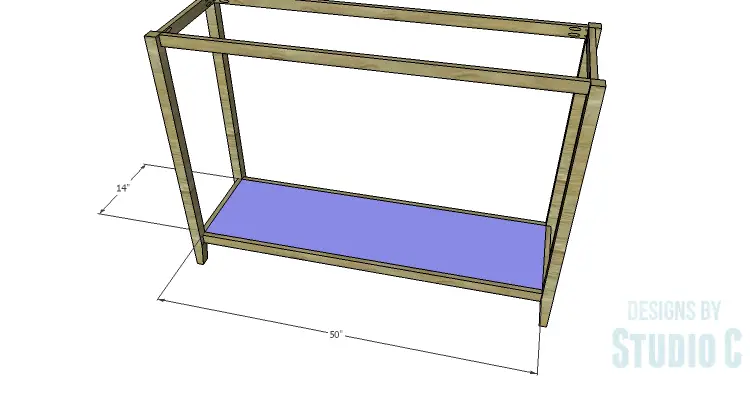
- 1 – 3/4″ plywood at 14″ x 50″ – Bottom
- 2 – 3/4″ plywood at 15-1/2″ x 31-3/4″ – Sides
- 1 – 3/4″ plywood at 24-1/2″ x 30-1/4″ – Back
- 1 – 3/4″ plywood at 14-3/4″ x 24-1/2″ – Drawer Shelf
- 1 – 3/4″ plywood at 13-3/4″ x 24-1/2″ – Cabinet Shelf
- 1 – 3/4″ plywood at 9-1/4″ x 14-3/4″ – Drawer Divider
- 4 – 3/4″ plywood at 12-3/4″ x 15-1/2″ – Outer Shelves
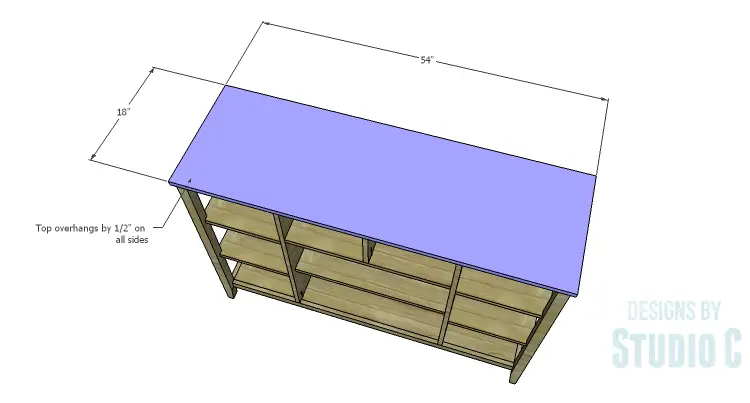
- 1 – 3/4″ plywood at 18″ x 54″ – Top
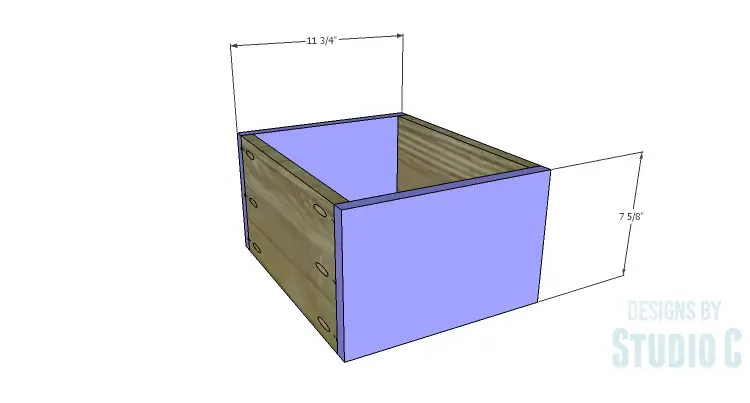
- 2 – 3/4″ plywood at 10-1/4″ x 13-1/4″ – Drawer Box Bottom
- 4 – 3/4″ plywood at 7-5/8″ x 13-1/4″ – Drawer Box Sides
- 4 – 3/4″ plywood at 7-5/8″ x 11-3/4″ – Drawer Front & Back
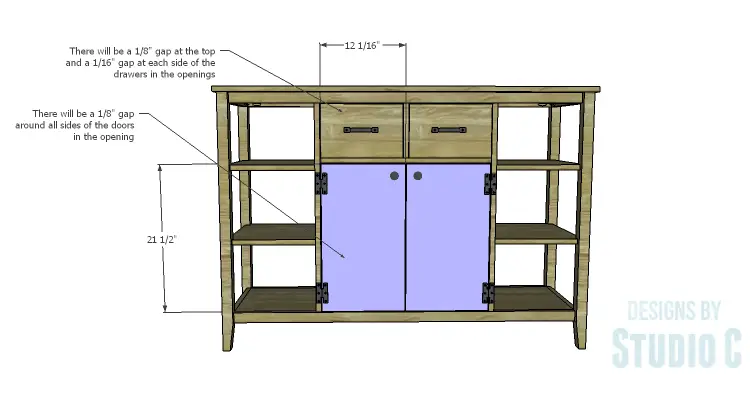
- 2 – 3/4″ plywood at 12-1/16″ x 21-1/2″ – Doors
Step One
Edge banding will be applied to the exposed edges of the plywood prior to assembly.
Cut the pieces for the legs. Cut the taper in the lower end of the legs using a jigsaw or a tapering jig on the table saw.
Cut the pieces for the side framing. With the pocket hole jig set for 3/4″ material, drill pocket holes in each end of the framing pieces. Secure the pieces to the legs using glue and 1-1/4″ pocket hole screws. The back face of the framing pieces will be flush with the inside faces of the legs. The taper on the legs will face to the inside.

Step Two
Cut the pieces for the stretchers and drill pocket holes in each end. Secure the stretchers to the legs using glue and 1-1/4″ pocket hole screws. The back face of the stretchers will be flush with the inside faces of the legs.
Step Three
Cut the piece for the bottom and drill pocket holes in all four edges. Secure the bottom panel to the lower side framing pieces and the lower stretchers using glue and 1-1/4″ pocket hole screws. The top face of the bottom panel will be flush with the top edge of the framing pieces and stretchers.
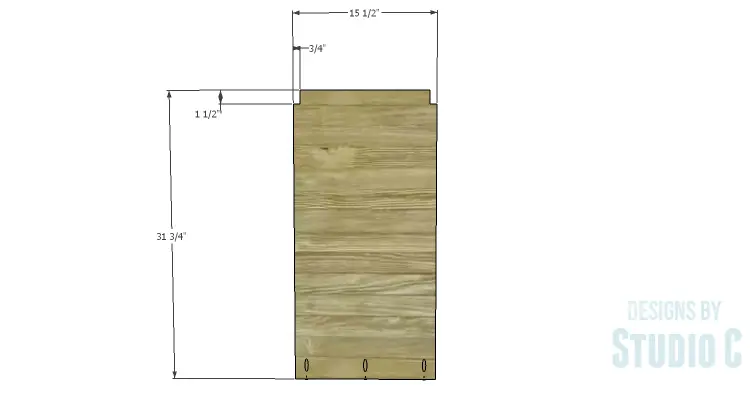
Step Four
Cut the pieces for the sides. Cut the notches using a jigsaw. Secure the side panels to the bottom using glue and 1-1/4″ pocket hole screws. Secure the stretchers to the notches using a few 1-1/4″ brad nails.

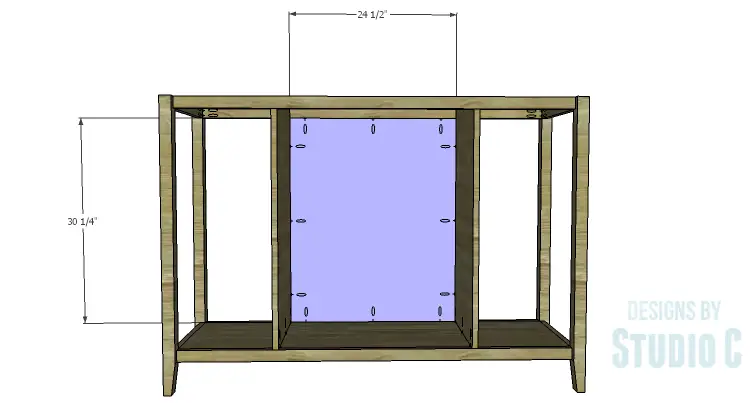
Step Five
Cut the piece for the back and drill pocket holes in all four edges. Secure the back panel to the sides, bottom, and rear stretcher using glue and 1-1/4″ pocket hole screws.
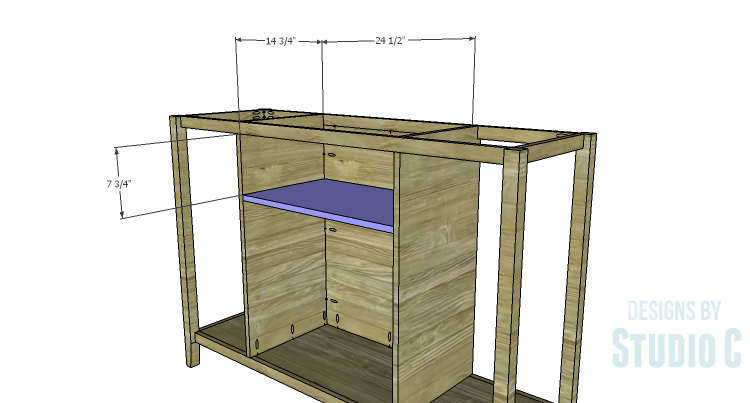
Step Six
Cut the piece for the drawer shelf and drill pocket holes in each end, as well as one long edge. Secure the shelf to the sides and back, as shown, using glue and 1-1/4″ pocket hole screws.
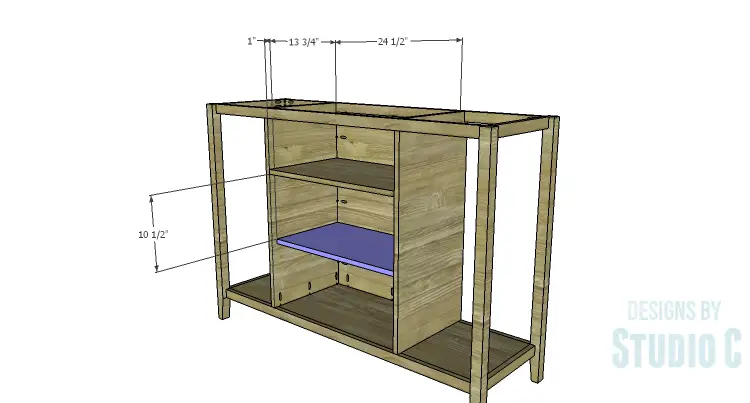
Cut the piece for the cabinet shelf and drill pocket holes in each end, as well as one long edge. Secure the shelf to the sides and back, as shown, using glue and 1-1/4″ pocket hole screws. Note that the shelf will be set back 1″ from the front edge of the sides. This allows for the inset doors.
Step Seven
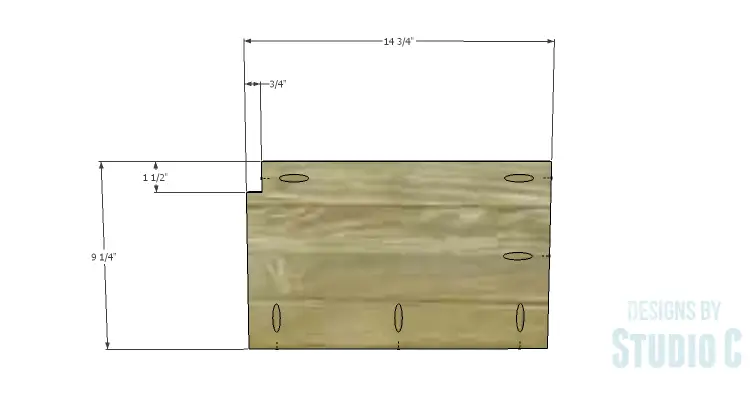
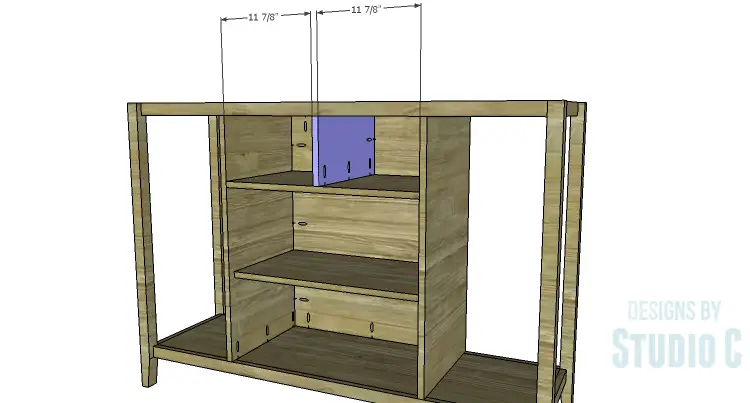
Cut the piece for the divider and cut the notch using a jigsaw. Drill pocket holes in the piece as shown. Secure the divider to the back, drawer shelf, and the front stretcher using glue and 1-1/4″ pocket hole screws.
Step Eight
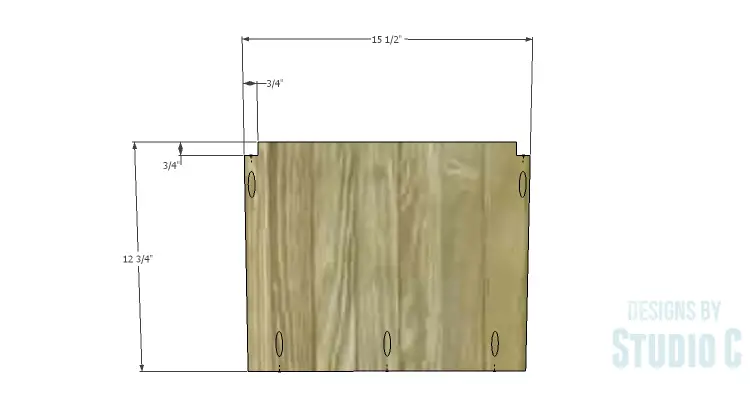
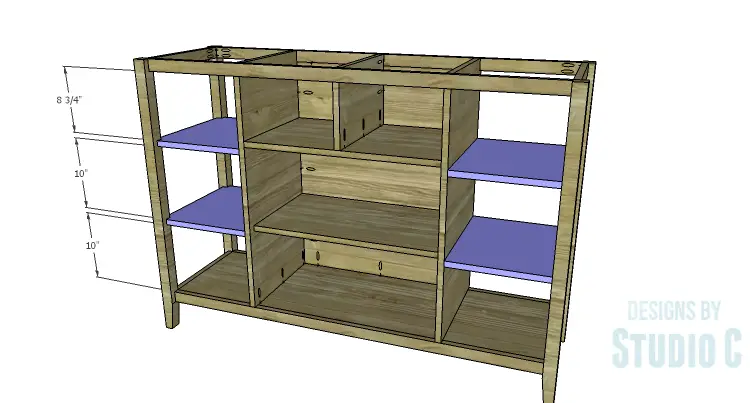
Cut the pieces for the outer shelves and cut the notches using a jigsaw. Secure the shelves to the side panels and the legs using glue and 1-1/4″ pocket hole screws.
Step Nine
Cut the piece for the top. The top will overhang all sides by 1/2″. Secure in place using glue and 1-1/4″ brad nails.
Step Ten
Cut the pieces for the drawers. There will be no drawer slides installed but a coat of paste wax can be applied to the sides and bottom of the drawers to allow them to slide smoothly in the openings. Drill pocket holes in all four edges of the bottom as well as each end of the sides. Secure the sides to the bottom using glue and 1-1/4″ pocket hole screws. Secure the front and back in the same manner.

Step Eleven
Cut the pieces for the doors. Install the hinges on the doors, then install the doors in the cabinet.
Finish as desired. Install the cabinet pulls.
This buffet would also be a great addition to a bathroom to hold towels and toiletries, or even in an entry way. Have any questions about the DIY furniture plans to build an Arden Buffet? Leave a comment below!
Originally posted 2015-03-09 08:00:33.