
Update a Kitchen or Bathroom Without Buying New Countertops
When I remodeled my kitchen and bathrooms the first time, I built custom countertops for each space. Eventually, it was time for a change and I discovered a countertop coating that was inexpensive and easy to apply. So I’d like to share how to use a countertop coating to update a kitchen or bathroom saving money and time.
When I built new vanities for the bathrooms, I was ready for different countertops but didn’t really want to spend the money to build new ones. I came across a countertop coating that mimics stone and can be applied with minimal effort. There are only three steps but for maximum durability, there is cure time between steps. This project will take about a week or so to be fully ready for use!
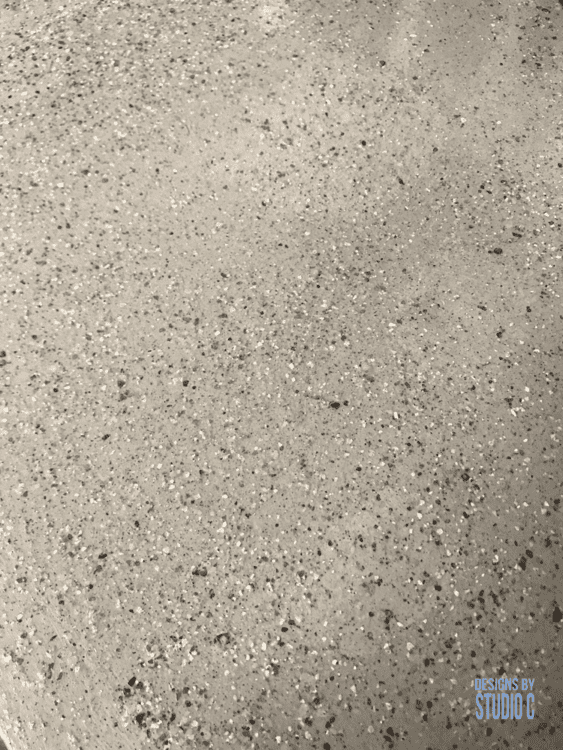
I used Daich Spreadstone (affiliate link!) in each project. I used Natural White in the bathrooms and Onyx Fog (a medium grey) in the kitchen. Each kit contains the base coat (Step 1), a stone coat (Step 2) and a sealer (Step Three) with three fabric rollers, a roller frame, a tray, a smoothing tool, a dust mask, sandpaper and full instructions.
The kits are definitely affordable, and contain enough material to do a full sized kitchen. I was able to coat two 6’ countertops in the bathrooms with one kit and still have material left over for another project. For the kitchen, the total countertop space is approximately 9’, and I still have enough material left over to coat a couple of small table tops.
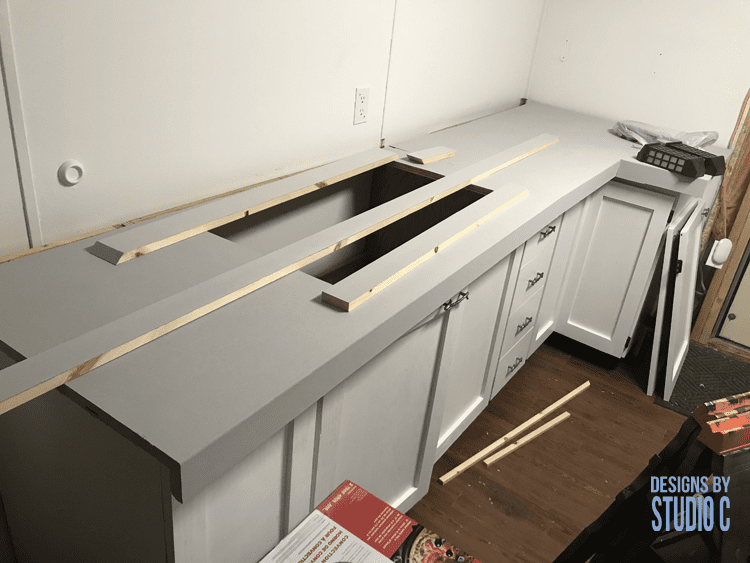
The coatings can be used over existing laminate, or sanded wood or plywood, and I used a combination of both. (I’m not sure if it can be used over tile – it is best to do research or contact the manufacturer prior to trying it!). The material will also cover any seams in the laminate or wood pretty well.
In the first step, the material is lightly sanded with any dust removed. The base coat, which gives the stone coat something to cover and “bite” into, is applied. The directions for the particular kit I’m using require one coat with a spot touch-up for a second coat. I used three coats in order to get a good foundation for the coating, and then let it dry 24 hours.
The second coat is the stone coat. It is actual small pieces of stone in a sort of glaze that is applied over the base coat. The instructions call for one coat with a spot touch-up on the second coat as well, but I used two full coats and let it dry 24 hours. Once the stone coating is dry, it can be lightly sanded. I used 150 grit sandpaper because anything heavier would sand all the way through to the original countertop. The goal is to knock down the high spots – it will not be perfectly smooth!
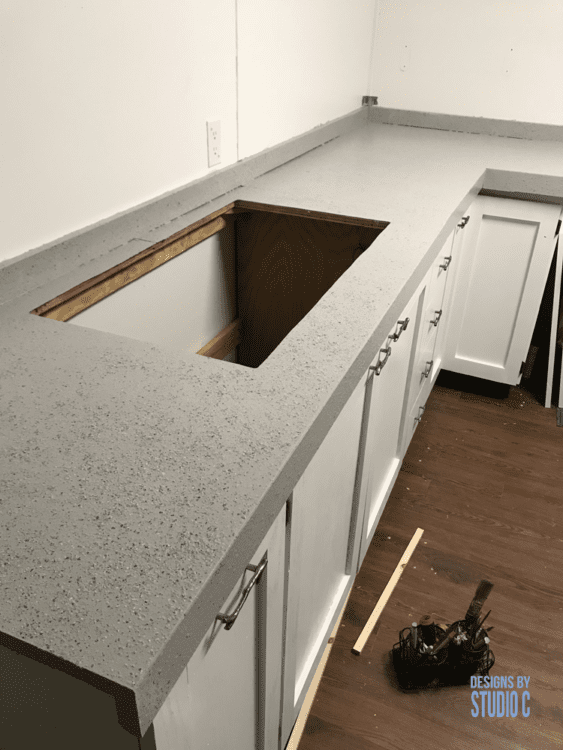
The final coat is the sealer, and the instructions call for two coats. I decided on three coats with the first coat being the heaviest and the subsequent coats being lighter. I let it dry for a couple of days, then installed the sinks and returned to heavy use within a week.

I applied the coating in my bathroom almost two years ago and it has held up really well! There are no scratches, flaking, peeling or rub-off on any part of the countertop. The durability is fantastic!With the bathroom countertops being white, I was worried about stains but it doesn’t appear to have any nor has the sealer turned yellow.
Have any questions about how to use a countertop coating to update a kitchen or bathroom? Leave a comment below!
Other Related Posts:
Originally posted 2018-10-28 08:00:13.


Comments are closed.