
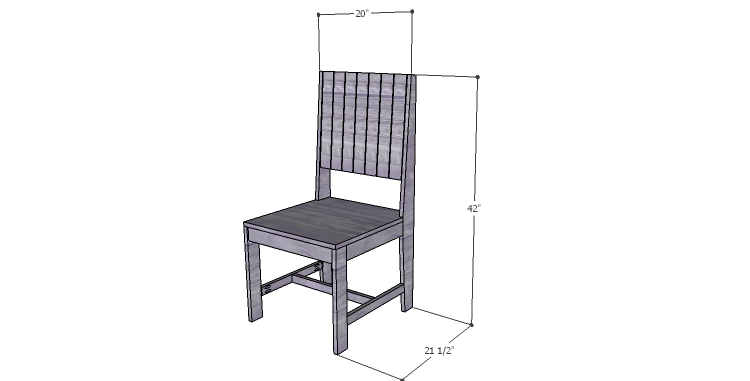
DIY Plans to Build a Global Market Chair
A Simple Chair Anyone Can Build!
Hey there! Guess what? I’ve got some great news for you! Building chairs is actually super easy, and this one in particular is a breeze! The plans for the Global Market chair are perfect for beginners in woodworking and you can make a few of them in just one weekend! I can totally picture this chair with a cool, aged finish or even made entirely out of pallet wood! But if you’re not into that rustic look, you could totally paint it a bright color and stencil the back slats in a contrasting shade for a fun pop of personality! I’m seriously considering adding this chair to my own “to build” list!

Materials:
- 1-1/4″ pocket hole screws (<– affiliate link!)
- 1-1/4″ brad nails
- 1-1/4″ screws
- Edge banding (for the seat)
- Wood glue
- Sandpaper (100, 150, 220 grits)
- Finishing supplies (primer & paint, or stain, sealer)
Lumber:
- 1 – 1×2 at 6′
- 3 – 1×3 at 8′
- 2 – 1×4 at 6′
- 2 – 3/4″ square dowels at 3′
- 1 – 2′ x 2′ sheet of 3/4″ plywood
Cut List:
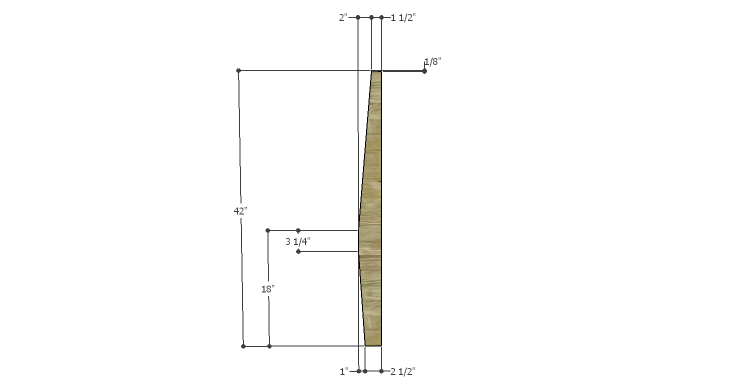
- 2 – 1×4 at 42″ – Back Legs
- 2 – 1×4 at 17-1/4″ – Front Legs
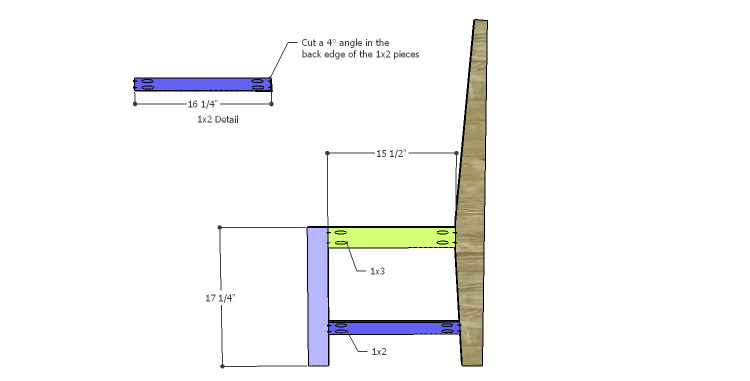
- 2 – 1×3 at 15-1/2″ – Upper Side Stretcher
- 2 – 1×2 at 16-1/4″ – Lower Side Stretcher
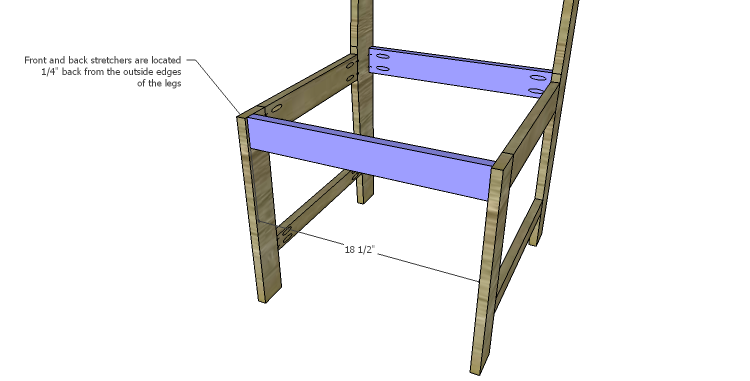
- 2 – 1×3 at 18-1/2″ – Front & Back Stretchers
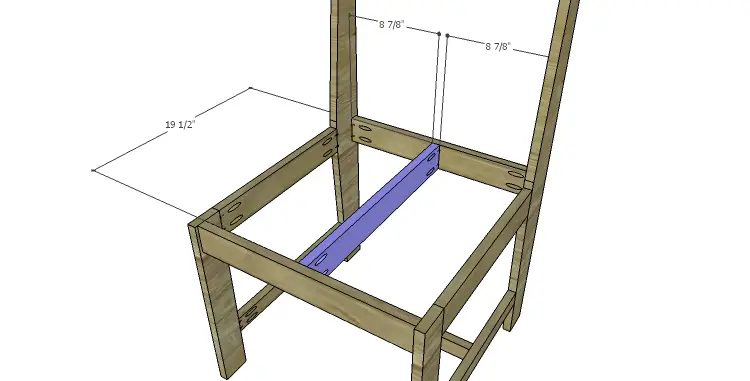
- 1 – 1×3 at 19-1/2″ – Center Support
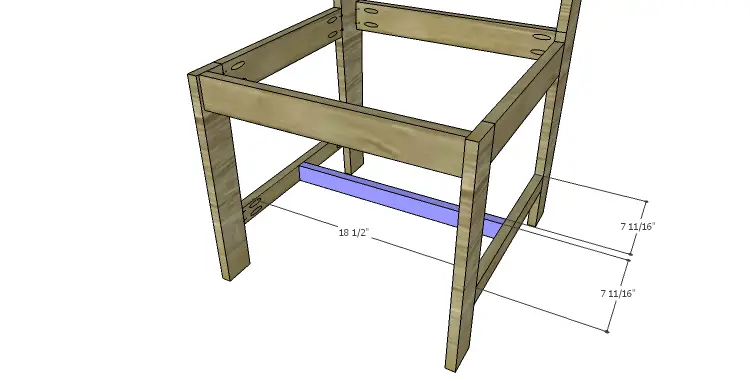
- 1 – 1×2 at 18-1/2″ – Lower Center Stretcher
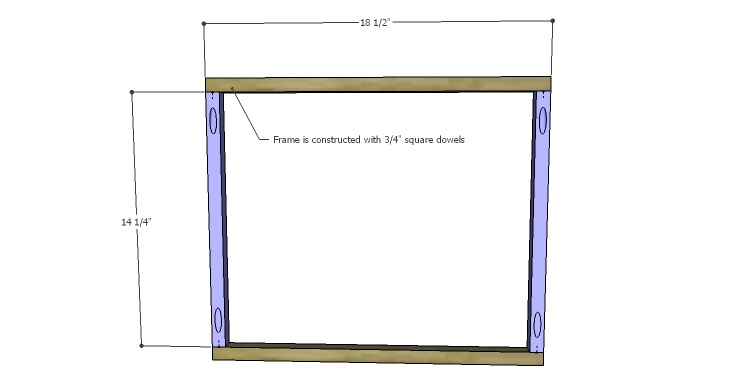
- 2 – 3/4″ square dowels at 14-1/4″ – Back Frame
- 2 – 3/4″ square dowels at 18-1/2″ – Back Frame
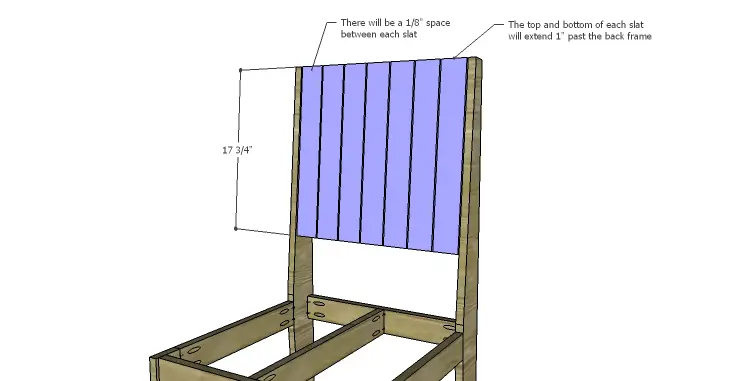
- 7 – 1×3 at 17-3/4″ – Back Slats
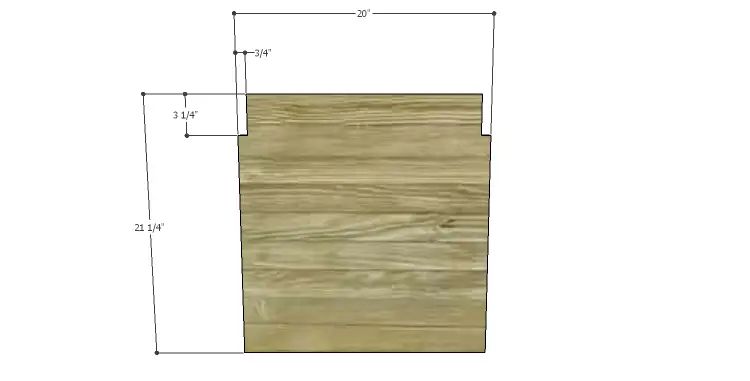
- 1 – 3/4″ plywood at 20″ x 21-1/4″ – Seat
Step One
Cut the pieces for the back legs. Draw lines for the tapers on the boards and cut the tapers using a jigsaw, a bandsaw, or a tapering jig on the table saw.
Step Two
Cut the pieces for the front legs and side stretchers. The 1×2 stretchers will have a 4° angle cut in ONE end. With the pocket hole jig set for 3/4″ material, drill pocket holes in each end of the stretchers, treating the 1×2 stretchers as a left piece and a right piece. Assemble the side frames with the back legs using glue and 1-1/4″ pocket hole screws.
Step Three
Cut the pieces for the front and back stretchers. Drill pocket holes in each end of the stretchers. Secure the stretchers to the front legs and the back legs using glue and 1-1/4″ pocket hole screws. Position the stretchers 1/4″ back from the outside edges of the legs.
Step Four
Cut the piece for the seat support and drill pocket holes in each end. Secure to the center of the front and back stretchers using glue and 1-1/4″ pocket hole screws.
Step Five
Cut the piece for the lower center stretcher and drill pocket holes in each end. Secure the stretcher to the center of the lower side stretchers using glue and 1-1/4″ pocket hole screws.
Step Six
Cut the pieces for the back frame. Drill one pocket holes in each end of the shorter pieces. Assemble the frame using glue and 1-1/4″ pocket hole screws.
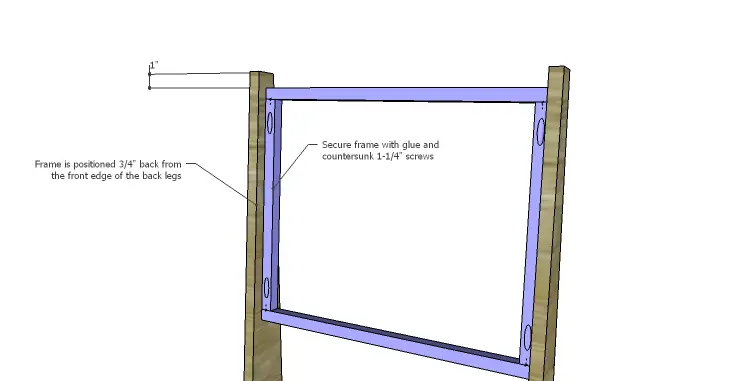
Position the frame inside the back legs. The frame will be positioned 1″ down from the top of the legs, and 3/4″ back from the front edge to allow for the slats. Secure in place using glue and countersunk 1-1/4″ screws.
Step Seven
Cut the pieces for the slats. The slats will extend 1″ past the top and bottom of the back frame (flush with the top of the back legs), and will be spaced 1/8″ apart from the legs and each other. Secure the slats in place using glue and 1-1/4″ brad nails.
Step Eight
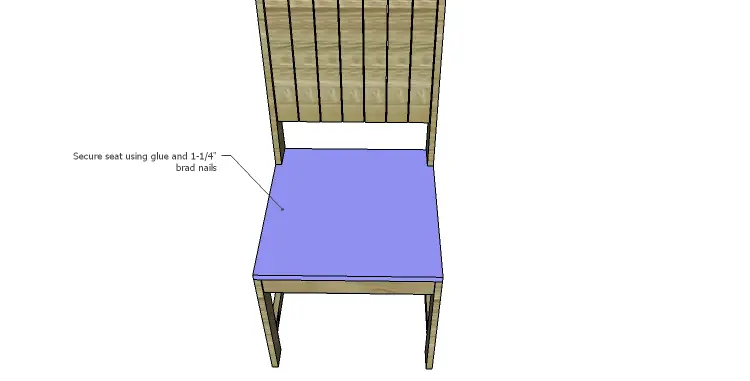
Cut the piece for the seat. Cut the notches using a jigsaw. Apply edge banding to the exposed edges of the plywood, then position the seat on the frame. Secure in place using glue and 1-1/4″ brad nails through the seat into the stretchers, legs, and the support.
Finish as desired!
The Global market chair would be a great addition to the home office or around a dining room table! The chair is definitely a welcome addition to any dinner party where you can show off your handiwork! Any questions about the DIY plans to build a Global Market chair? Leave a comment below or contact me at cher {at} designsbystudioc {dot} com – I’m here to help!
