
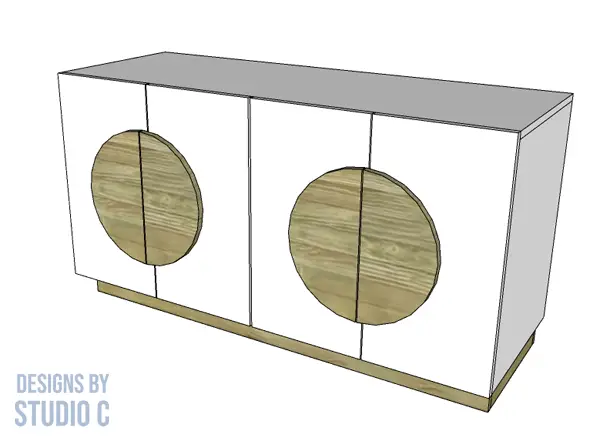
An Easy to Build Cabinet with a Circular Door Detail
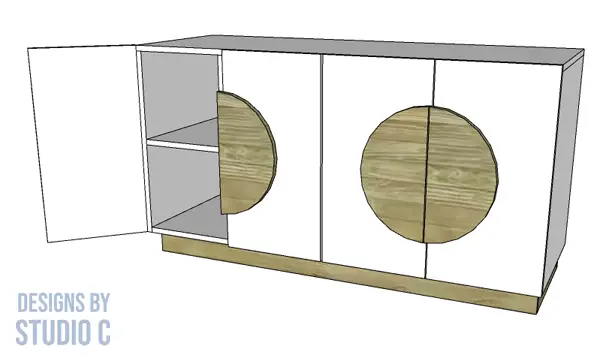
This cabinet is fabulous! The plans to build a Tracey credenza feature half-circle handles on each of the four doors, and is mainly constructed with plywood. There is shelving inside allowing for plenty of storage space! This plan is an excellent project for every skill level!
Materials:
- 1-1/4″ pocket hole screws (<– affiliate link!)
- 1-1/4″ screws
- 1-1/4″ brad nails
- 2″ brad nails
- Edge banding (<– affiliate link!)
- Four sets of hinges
- Wood glue
- Sandpaper (80, 120, 220 grits)
- Finishing supplies
Lumber:
- 1 – 1×2 at 6′
- 2 – 1×4 at 6′
- 1 – 4′ x 8′ sheet of 1/4″ plywood
- 3 – 4′ x 8′ sheets of 3/4″ plywood
Cut List:
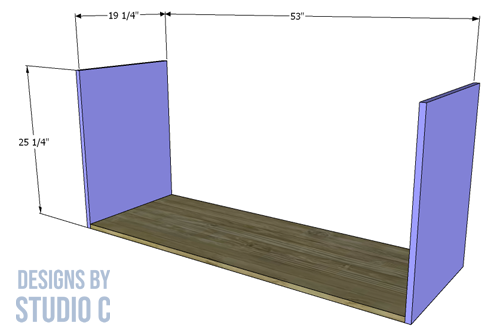
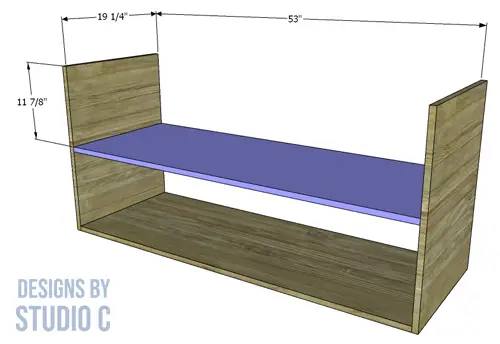
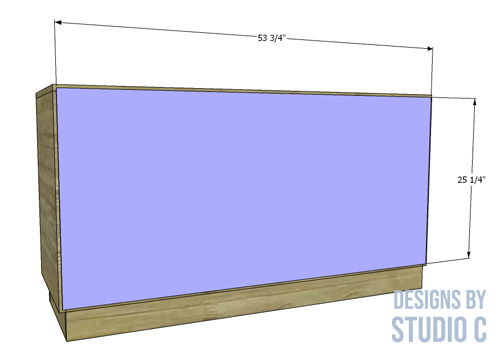
- 2 – 3/4″ plywood at 19-1/4″ x 25-1/4″ – Sides
- 1 – 3/4″ plywood at 19-1/4″ x 53″ – Bottom
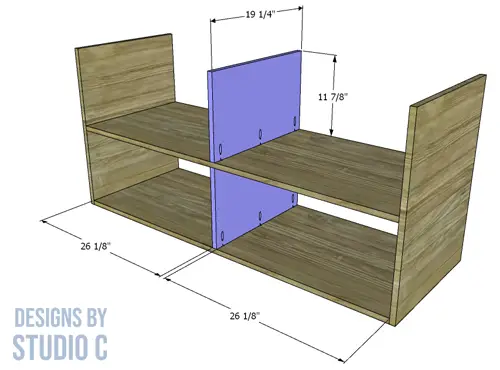
- 1 – 3/4″ plywood at 19-1/4″ x 53″ – Shelf
- 2 – 3/4″ plywood at 11-7/8″ x 19-1/4″ – Dividers
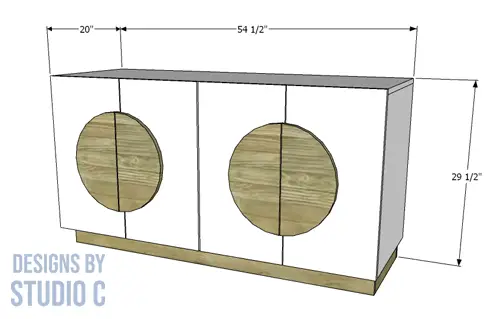
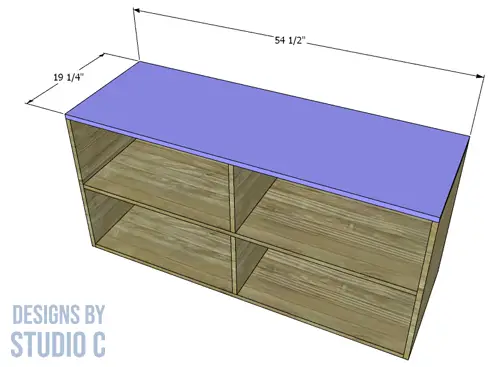
- 1 – 3/4″ plywood at 19-1/4″ x 54-1/2″ – Top
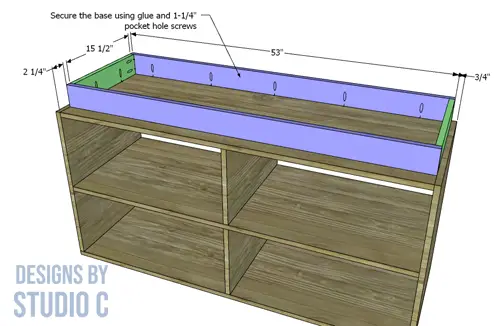
- 2 – 1×4 at 53″ – Base
- 2 – 1×4 at 15-1/2″ – Base
- 1 – 1/4″ plywood at 25-1/4″ x 53-3/4″ – Back
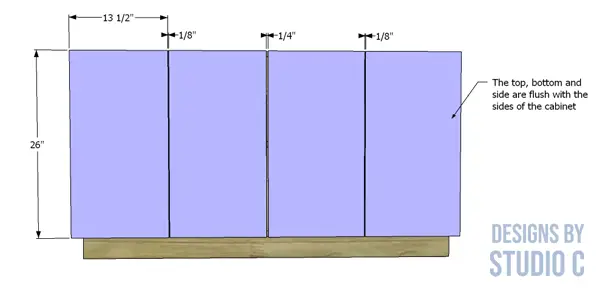
- 4 – 3/4″ plywood at 13-1/2″ x 26″ – Doors
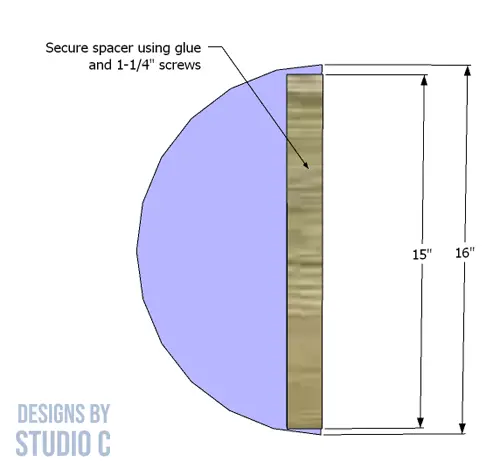
- 2 – 3/4″ plywood circles at 16″ in diameter – Door Handle
- 4 – 1×2 at 15″ – Door Handle Spacer
Notes About the Project:
- Apply the edge banding to the exposed edges of the plywood before assembly.
- A circle cutting jig is an excellent choice for this project however, if you’re not comfortable with circles, the door “handles” can be rectangular or square!
- Sand all of the pieces before assembly.
- Concealed hinges would be great for these doors!
Step One
Cut the pieces for the bottom and the sides. With the pocket hole jig set for 3/4″ material, drill pocket holes in each end of the bottom piece. Secure the bottom to the sides using glue and 1-1/4″ pocket hole screws.
Step Two
Cut the piece for the shelf and drill pocket holes in each end. Secure the shelf to the sides using glue and 1-1/4″ pocket hole screws.
Step Three
Cut the pieces for the shelf dividers and drill pocket holes in the bottom edges only. Secure the lower divider first, using glue and 1-1/4″ pocket hole screws. Add a few 2″ brad nails through the shelf into the top of the lower divider. Secure the upper divider to the shelf using glue and 1-1/4″ pocket hole screws.
Step Four
Cut the piece for the top. Secure the top to the sides and upper divider using glue and 2″ brad nails.
Step Five
Cut the pieces for the base. Drill pocket holes along one long edge of each piece, as well as each end of the shorter pieces. Assemble the frame using glue and 1-1/4″ pocket hole screws.
Flip the cabinet upside down and position the base on the bottom piece with the back flush with the back edge of the bottom (approximately 2-1/4″ away from the front edge). Secure in place using glue and 1-1/4″ pocket hole screws.
Step Six
Cut the piece for the back. Secure the back to the back side of the cabinet using glue and 1-1/4″ brad nails.
Step Seven
Cut the pieces for the doors. Install the doors on the cabinet, using hinges of your choice, making sure the outer doors are flush with the sides of the cabinet and allowing a 1/8″ gap between each door.
Step Eight
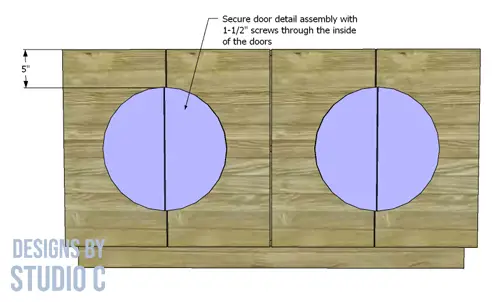
Cut the circles for the door “handles” using a circle cutting jig on a bandsaw or by using a jigsaw. Cut the 1×2 pieces for the spacers and attach to the half circles using glue and 1-1/4″ brad nails.
Position the “handles on the doors and secure from the inside using 1-1/4” screws.
Finish the cabinet as desired!
Have questions about the plans to build a Tracey credenza? Leave a comment below!
Originally posted 2022-05-17 08:00:57.


Comments are closed.