
Build the Lily Queen Bed
An Easy to Build Queen Size Bed
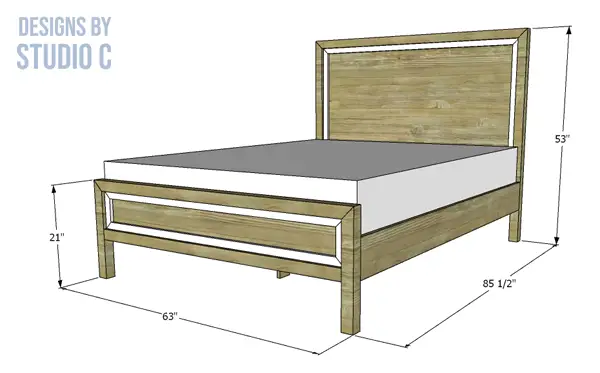
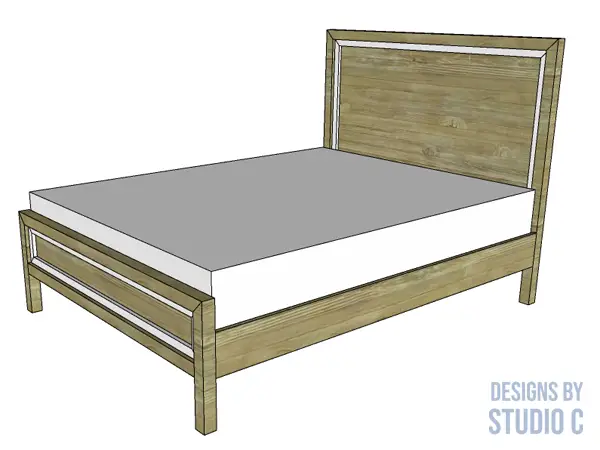
The easy to build Lily Queen Bed is an excellent first project! The framing for the headboard and footboard is made by stacking 1×3 boards, then ripping them on a table saw to create posts that aren’t too big or small. There are plywood panels in each frame, with 1×2 trim at the edges (which can easily be substituted with decorative carved trim!). The queen bed frame plans can also be scaled up for a king size, or scaled down for full or twin size.
Materials:
- 1-1/4″ pocket hole screws
- 1-1/2″ pocket hole screws
- 3-1/2″ screws (<– affiliate link!)
- 1-1/4″ screws
- 1-1/2″ brad nails
- Wood glue
- Sandpaper (80, 120, 220 grits)
- Finishing supplies
Lumber:
- 2 – 1×2 at 8′
- 21 – 1×3 (laminated in stacks of three, and ripped on the table saw – see post link in Step One)
- 1 – 1×3 at 8′ (For the Center Support)
- 1 – 1×3 at 4′ (For the Center Support Legs)
- 13 – 1×4 at 6′
- 2 – 1×8 at 8′
- 1 – 4′ x 8′ sheet of 3/4″ plywood
Cut List:
- 2 – 1×3 assemblies at 53″ – Headboard Leg Framing
- 2 – 1×3 assemblies at 21″ – Footboard Leg Framing
- 2 – 1×3 assemblies at 63″ – Headboard and Footboard Upper Framing
- 2 – 1×3 assemblies at 58-1/2″ – Headboard and Footboard Lower Framing
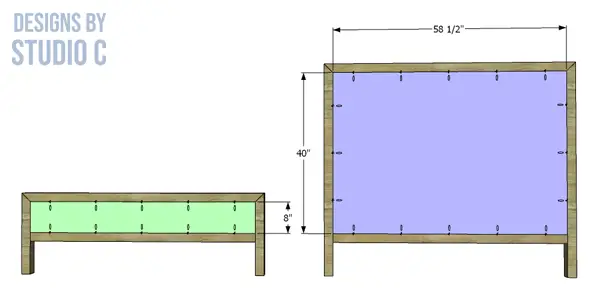
- 1 – 3/4″ plywood at 40″ x 58-1/2″ – Headboard Panel
- 1 – 3/4″ plywood at 8″ x 58-1/2″ – Footboard Panel
- 2 – 1×2 at 40″ – Headboard Trim (Sides)
- 3 – 1×2 at 58-1/2″ – Headboard and Footboard Trim (Top and Bottom)
- 2 – 1×2 at 8″ – Footboard Trim (Sides)
- 2 – 1×8 at 81″ – Side Rails
- 2 – 1×2 at 74″ – Slat Supports
- 1 – 1×3 at 82-1/2″ – Center Support
- 2 – 1×3 at 14″ – Center Support
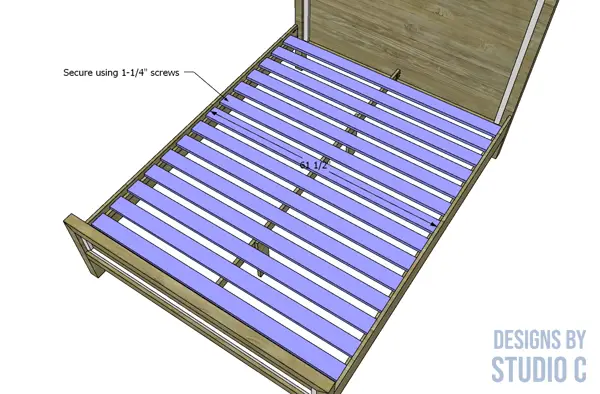
- 13 – 1×3 at 61-1/2″ – Slats
Notes About the Project:
- Bedrail hardware (<– affiliate link!) can be used to connect the side rails rather than pocket hole screws
- Sand all pieces prior to assembly
- To save material, both panels are cut from one sheet of plywood. The pieces are going to be slightly smaller than the listed dimension because of the kerf of the blade (i.e. 7-15.16″ wide for the footboard panel rather than 8″)
- The slats can be replaced with plywood panels (make sure to cut airholes in the panels for circulation!)
Step One
Layer the 1×3 pieces in stacks of three to make each piece for the headboard and footboard. I wrote a tutorial on making legs this way that will be extremely helpful! Once the assemblies have been ripped on the table saw, sand the piece then cut the pieces to length for the headboard and footboard.
Step Two
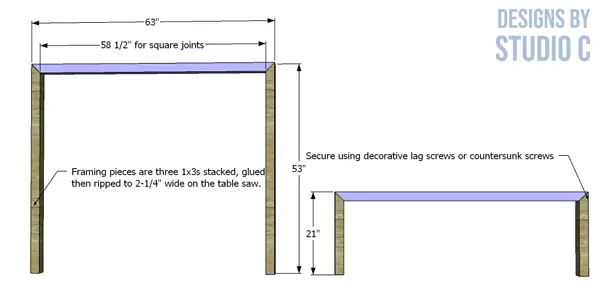
I drew the framing for the headboard and footboard to use mitered joints for the top piece and the legs (this is reflected in the cut list) but regular square joints can be used as well. Just cut the legs for the headboard and footboard to the same length as indicated in the cut list, and the top pieces of the framing at 58-1/2″.
Drill countersunk holes in the sides of the legs to attach the top piece, then secure using glue and 3-1/2″ screws. The holes can be plugged with a wood button. Additionally, spray painted lag screws can be used for assembly.
Step Three
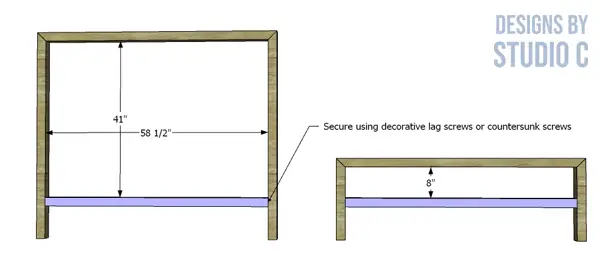
Cut the lower framing pieces and secure to the legs using glue and countersunk screws, as shown in the drawing.
Step Four
Cut the plywood panels for the headboard and footboard. With the pocket hole jig set for 3/4″ material, drill pocket holes in all four edges of the headboard panel, and the two longer edges in the footboard panel. Secure the panels to the framing using glue and 1-1/4″ pocket hole screws. The back faces (the side with the pocket holes) will be flush with the back faces of the headboard and footboard frames.
Step Five
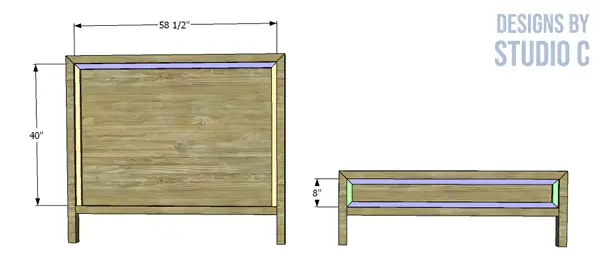
Cut the pieces for the headboard and footboard trim. Secure the trim to the panels as shown, using glue and 1-1/2″ brad nails (or shorter nails for thinner trim).
Step Six
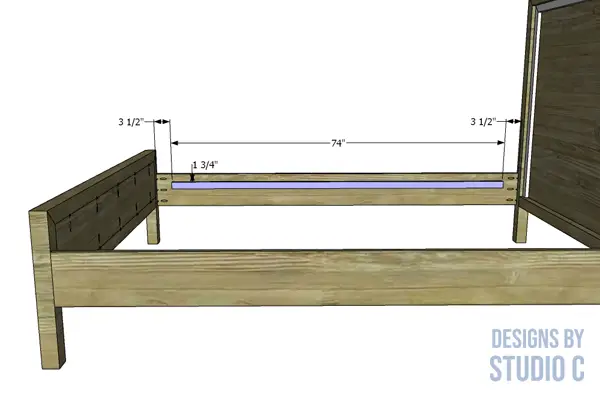
Cut the pieces for the side rails and drill pocket holes in each end. Secure the side rails to the legs using 1-1/2″ pocket hole screws. Do not use glue so that the bed can be disassembled as needed!

Step Seven
Cut the pieces for the slat supports. Position them on the side rails as shown, securing in place using glue and 1-1/4″ screws.
Step Eight
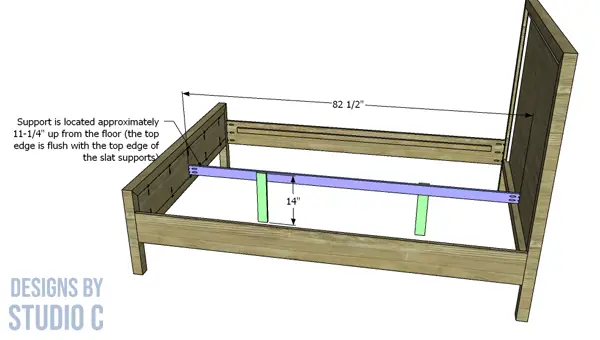
Cut the piece for the center leg support, and drill pocket holes in each end.
Cut the pieces for the center support legs, and secure them to the center support using glue and 1-1/4″ screws.
Secure the center support assembly to the headboard and footboard as shown, using 1-1/4″ pocket hole screws. Do not use glue so that the bed can be disassembled as needed!
Step Nine
Cut the pieces for the slats. Secure the slats. evenly spaced, to the side rail supports and the center support using 1-1/4″ screws (do not use glue!).
Finish as desired!
Have questions about the plans to build the Lily queen bed? Leave a comment below!
