DIY Plans to Build a Forester Sideboard
A Large Sideboard That Is Easy to Build!
Do you have a soft spot for spacious sideboards? Well, I definitely do, and this one is absolutely amazing! The do-it-yourself plans to build a Forester Sideboard include four generously-sized drawers and two large shelves. Not to mention, it’s slightly taller than usual, adding a touch of grandeur to any space! Once you’ve finished it in your own style, this piece of furniture will undoubtedly become a beloved favorite that seamlessly complements any type of decor!
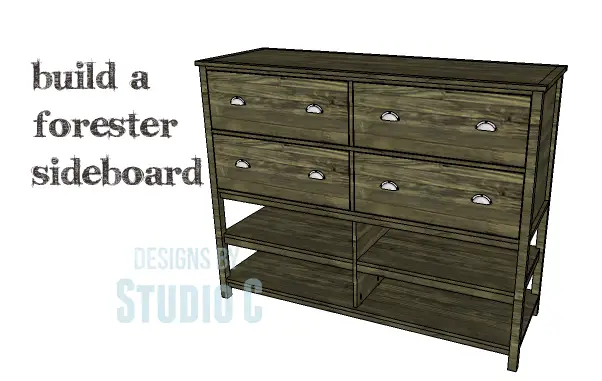
The DIY plans to build a Forester Sideboard are suitable for all skill levels, and would be a great addition to any room!
Materials:
- 1-1/4″ pocket hole screws (<– affiliate link!)
- 1-1/4″ brad nails
- Edge banding, optional
- 4 sets of 18″ drawer slides (<– affiliate link!)
- Cabinet pulls
- Wood glue
- Sandpaper (100, 150, 220 grits)
- Finishing supplies (primer & paint, or stain, sealer)
Lumber:
- 12 – 1×2 at 8′
- 9 – 1×10 at 8′
- 4 – 2×2 at 6′
- 3 – 4′ x 8′ sheets of 3/4″ plywood
Cut List:
- 4 – 2×2 at 49-1/4″ – Legs
- 6 – 1×2 at 18-1/2″ – Side Framing
- 5 – 1×2 at 60-1/4″ – Stretchers
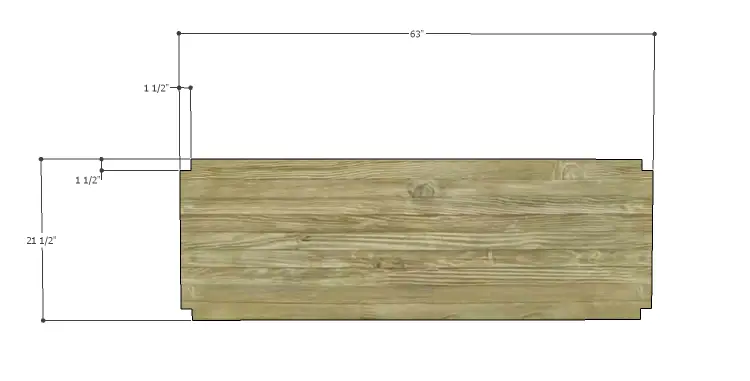
- 2 – 3/4″ plywood at 21-1/2″ x 63″ – Bottom& Upper Shelf
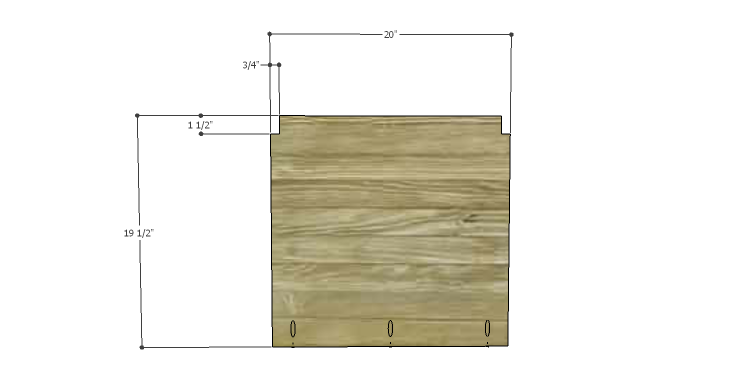
- 1 – 3/4″ plywood at 19-1/2″ x 20″ – Divider
- 4 – 1×2 at 18-1/2″ – Middle Framing Sides
- 4 – 1×2 at 29-5/8″ – Middle Framing Stretchers
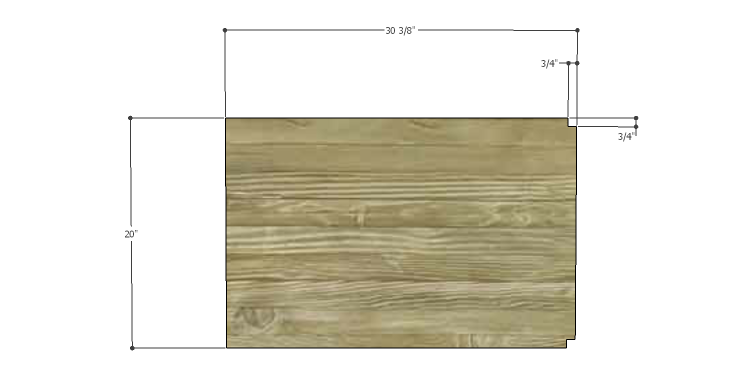
- 2 – 3/4″ plywood at 20″ x 30-3/8″ – Middle Shelves
- 2 – 3/4″ plywood at 18-1/2″ x 23-1/2″ – Upper Sides
- 1 – 3/4″ plywood at 23-1/2″ x 60″ – Upper Back
- 2 – 1×2 at 60″ – Front Stretchers
- 2 – 1×2 at 11-3/8″ – Drawer Dividers
- 3 – 1×2 at 18-1/2″ – Center Supports
- 1 – 3/4″ plywood at 19-1/2″ x 61″ – Top
- 2 – 1×2 at 19-1/2″ – Top Side Trim
- 2 – 1×2 at 64″ – Top Front & Back Trim
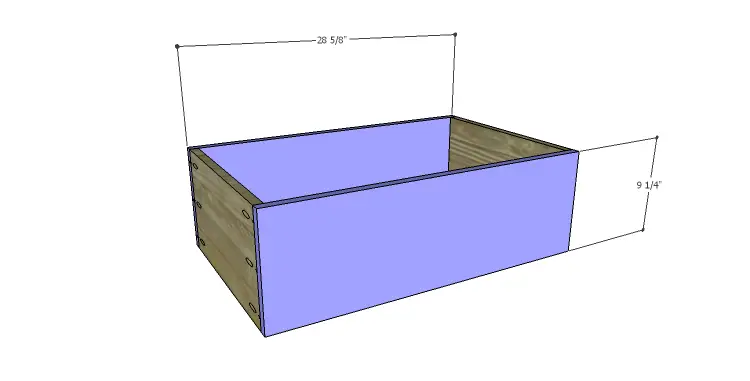
- 4 – 3/4″ plywood at 16-1/2″ x 27-1/8″ – Drawer Box Bottom
- 16 – 1×10 at 16-1/2″ – Drawer Box Sides
- 16 – 1×10 at 28-5/8″ – Drawer Box Front & Back
- 4 – 3/4″ plywood at 11-1/8″ x 29-3/8″ – Drawer Fronts
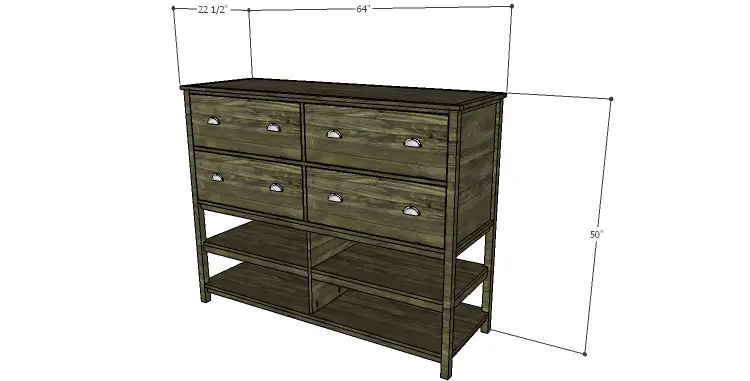
Step One
Edge banding will be applied to the exposed edges of the plywood prior to assembly!
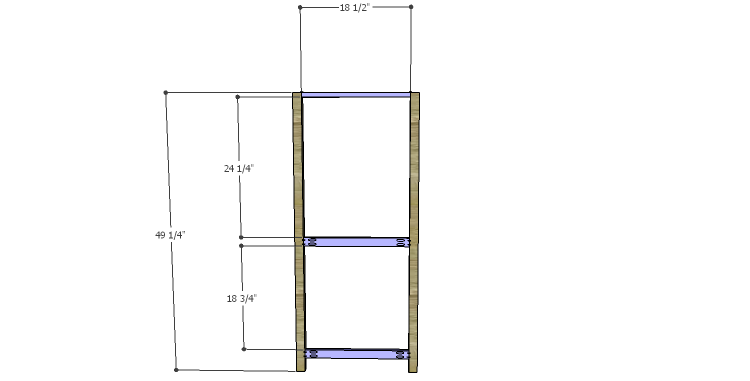
Cut the pieces for the legs and the side framing. With the pocket hole jig set for 3/4″ material, drill pocket holes in each end of the framing pieces. The top framing piece will be positioned so that the pocket holes are facing up and will be hidden by the top. The lower framing pieces will be positioned so the pocket holes face to the inside, and will be flush with the inside face of the legs. Secure the framing pieces to the legs using glue and 1-1/4″ pocket hole screws.
Step Two
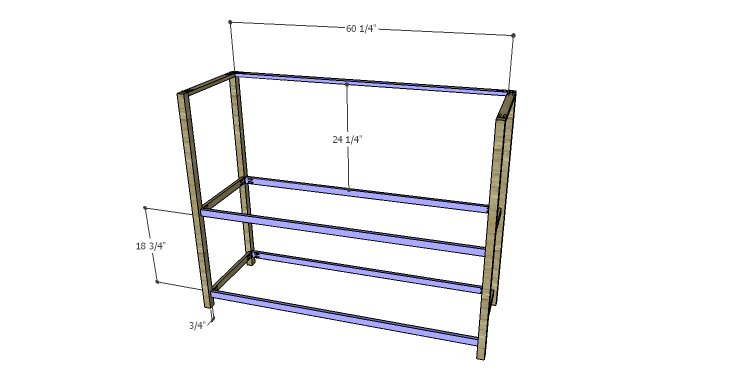
Cut the pieces for the stretchers and drill pocket holes in each end. The upper back stretcher will be positioned so that the pocket holes are facing up and will be hidden by the top. The lower stretchers will be positioned so the pocket holes face to the inside, and will be flush with the inside face of the legs. Secure the stretchers to the legs using glue and 1-1/4″ pocket hole screws.
Step Three
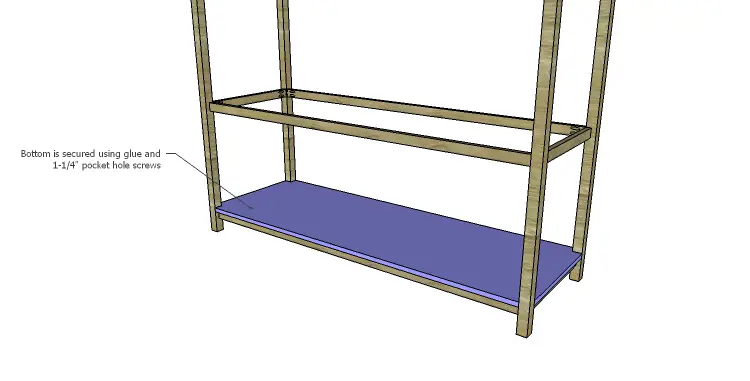
Cut the pieces for the bottom and the upper shelf. Cut the notches using a jigsaw. Place the bottom piece on top of the lower stretchers and secure in place with glue and 1-1/4″ brad nails. Set the upper shelf piece off to the side.
Step Four
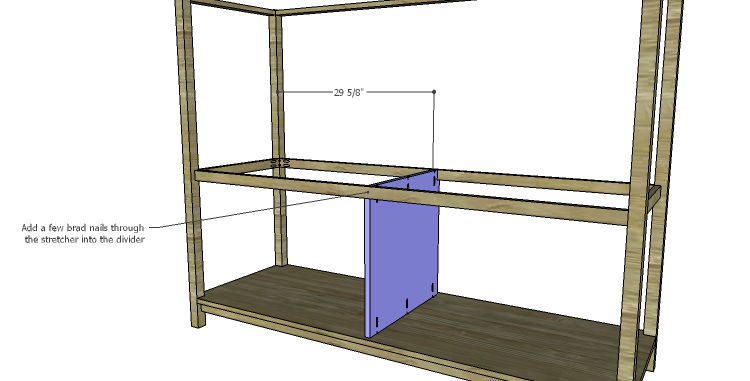
Cut the piece for the divider and cut the notches using a jigsaw. Position the divider on the bottom as shown, securing the piece to the bottom using glue and 1-1/4″ pocket hole screws. Add a few brad nails through the stretchers above into the divider.
Step Five
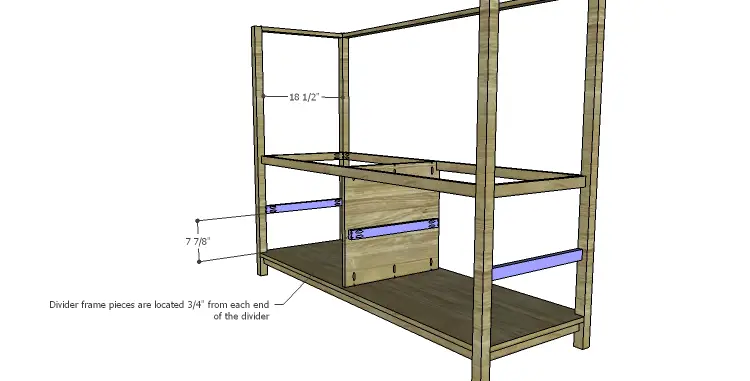
Cut the pieces for the middle framing sides and middle stretchers. Drill pocket holes in each end of the framing pieces, and one end only of the stretcher pieces. Secure two of the stretcher piece on each side of the divider as shown locating the pieces 3/4″ from the front of the divider and 3/4″ from the back of the divider using glue and 1-1/4″ brad nails. Secure the outer framing pieces to the legs using glue and 1-1/4″ pocket hole screws. The inside faces of the outer side framing pieces will be flush with the inside faces of the legs.
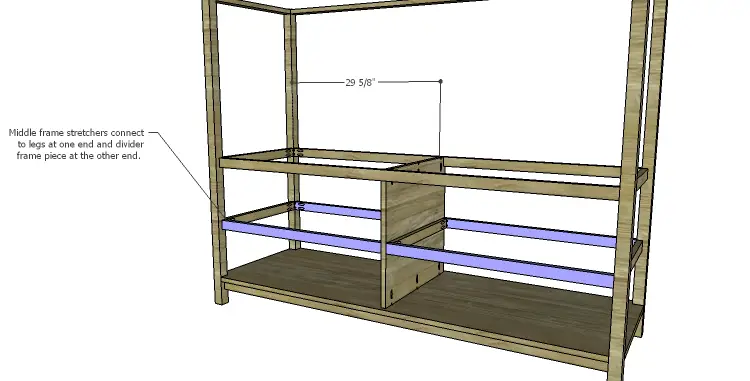
Position the middle stretchers as shown securing the end with the pocket holes to the legs using glue and 1-1/4″ pocket hole screws. The other end will be secured to the framing pieces attached to the divider using glue and 1-1/4″ pocket hole screws.
Step Six
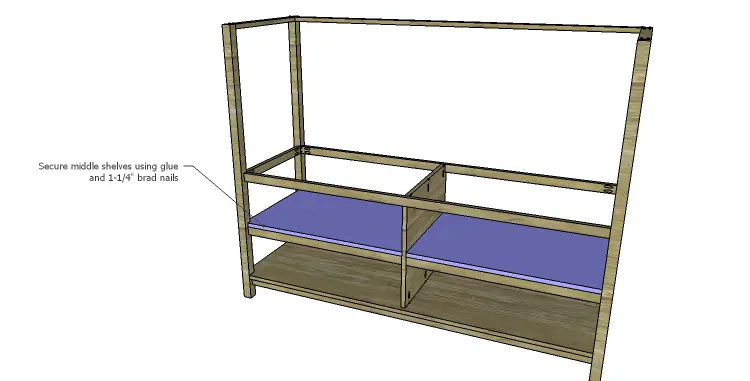
Cut the pieces for the middle shelf and cut the notches as shown using a jigsaw. Position the shelves on the frames then secure in place using glue and 1-1/4″ brad nails.
Step Seven
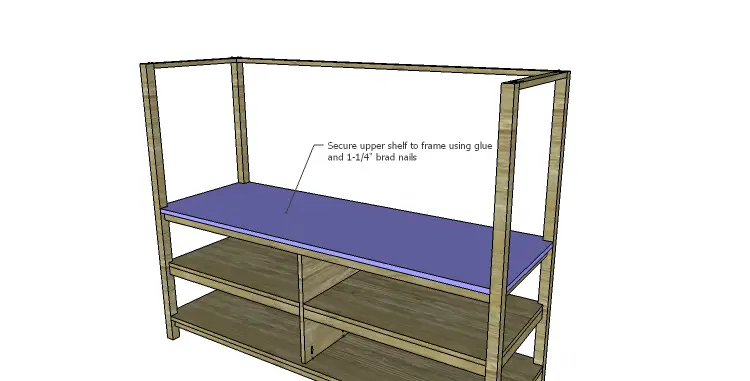
Position the upper shelf on the upper stretchers and dividers securing in place with glue and 1-1/4″ brad nails.
Step Eight
Cut the pieces for the upper sides and drill pocket holes in all four edges. Secure to the legs, upper shelf, and uppermost side stretcher using glue and 1-1/4″ pocket hole screws. The inside face of the sides will be flush with the inside face of the legs.

Step Nine
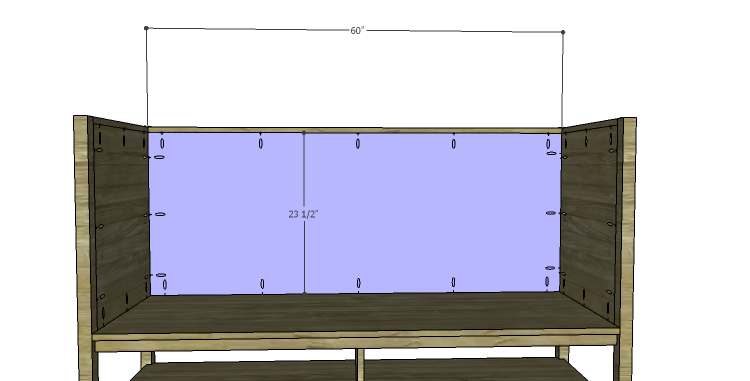
Cut the piece for the back and and drill pocket holes in all four edges. Secure to the legs, upper shelf, and upper back stretcher using glue and 1-1/4″ pocket hole screws. The inside face of the back will be flush with the inside face of the legs.
Step Ten
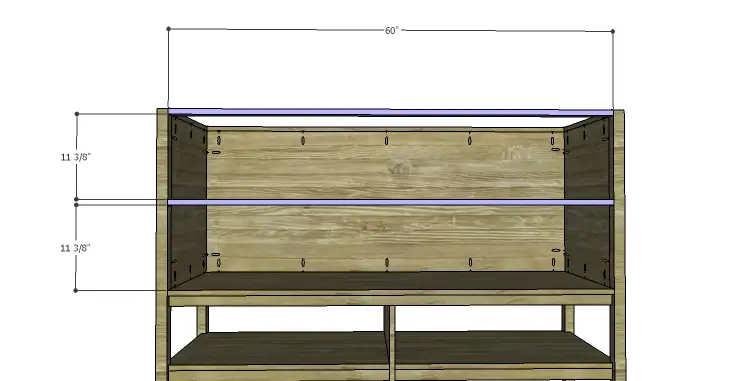
Cut the pieces for the stretchers and the drawer dividers. Drill pocket holes in each end of the stretchers and one end only of the drawer dividers. Secure the stretchers as shown using glue and 1-1/4″ pocket hole screws. Position the upper stretcher so that the pocket holes face up and position the lower stretcher so that the pocket holes face down.
Position the drawer dividers as shown. Install the lower divider first, using glue and 1-1/4″ pocket holes into the upper shelf. Add a few brad nails through the lower front stretcher into the lower divider. Install the upper divider using glue and 1-1/4″ pocket hole screws into the lower stretcher. Add a few brad nails through the upper stretcher into the upper divider.
Step Eleven
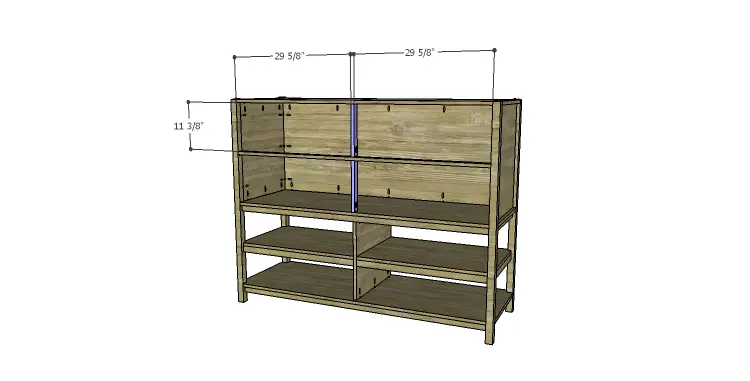
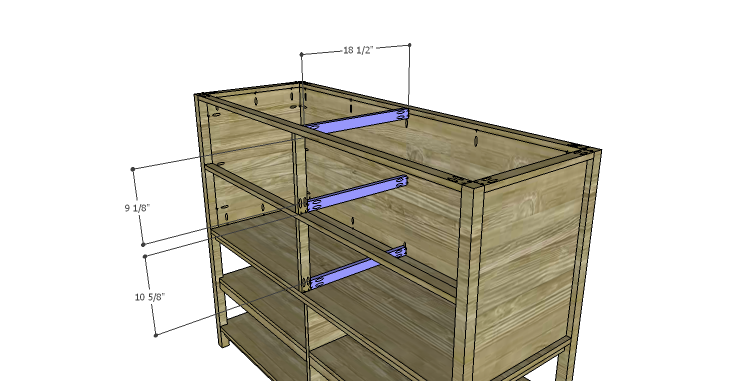
Cut the pieces for the center supports and drill pocket holes in each end. Secure the supports to the drawer dividers and the back as shown using glue and 1-1/4″ pocket hole screws. The lower edge of the middle support will be flush with the upper face of the lower stretcher.
Step Twelve
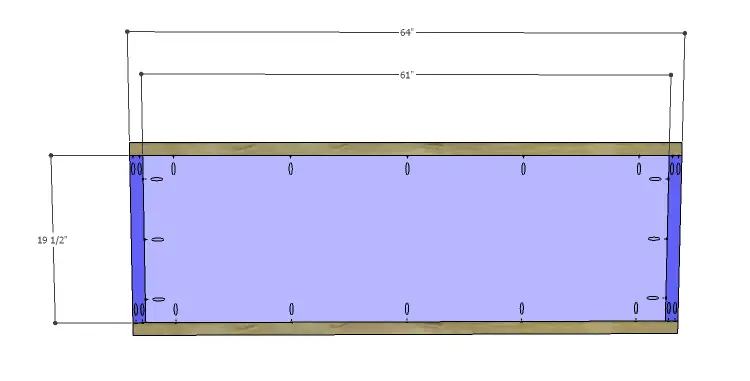
Cut the pieces for the top and the top trim. Drill pocket holes in all four edges of the top as well as each end of the side trim pieces. Attach the side trim pieces to the side edges of the top using glue and 1-1/4” pocket hole screws, then attach the front and back trim pieces.
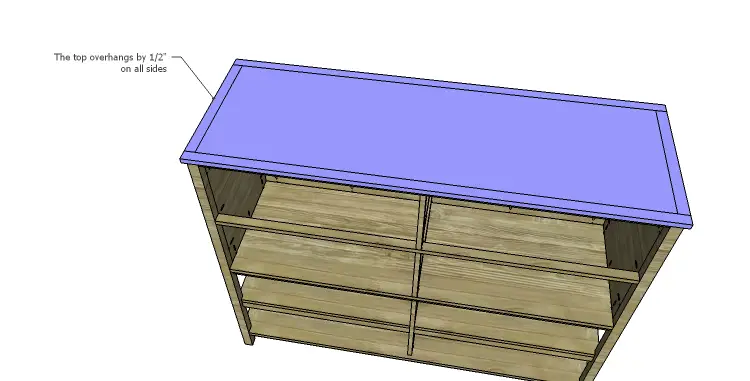
The top will overhang the cabinet by ½” on all sides. Secure the top in place using glue and 1-1/4” brad nails.
Step Thirteen
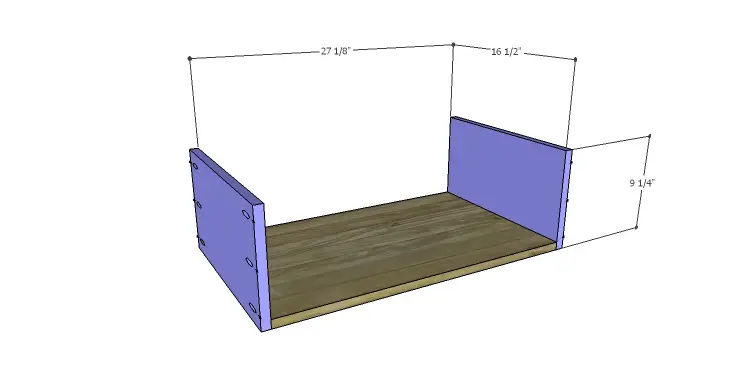
Cut the pieces for the drawer boxes. Drill pocket holes in all four edges of the bottom as well as each end of the sides. Assemble the drawer boxes as shown using glue and 1-1/4” pocket hole screws. Install the drawer slides according to the manufacturer’s installation instructions, locating them ¾” back from the front edge of the legs and drawer dividers. Take a look at this easy tutorial on installing drawer slides! Make any necessary adjustments.
Step Fourteen
Cut the pieces for the drawer fronts. Mark the position for the drawer pulls and drill the holes. Shim the drawer front in the opening – there will be a 1/8” gap around all sides – then drive screws through the holes for the drawer pulls into the drawer box. Open the drawer, and secure the drawer front using countersunk 1-1/4” screws from the inside. Remove the screws from the holes for the drawer pull then finish drilling the holes. Install the drawer pull. This easy tutorial on installing drawer fronts will be quite helpful! 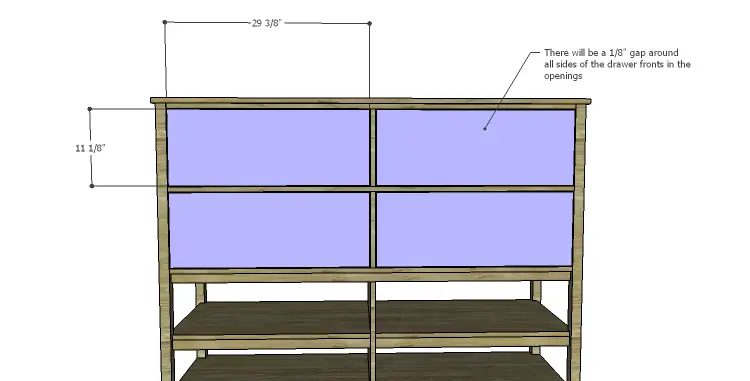
Finish the sideboard as desired!
The sideboard would be a great addition to a dining room or an entryway. It would also be great as a dresser in a bedroom or as a media center for a smaller TV! Leave a comment below if there are any questions about the DIY plans to build a Forester Sideboard or I can be contacted at cher {at} designsbystudioc {dot} com!
Originally posted 2014-10-15 08:00:42.

[…] A Large Sideboard That Is Easy to Build! […]