
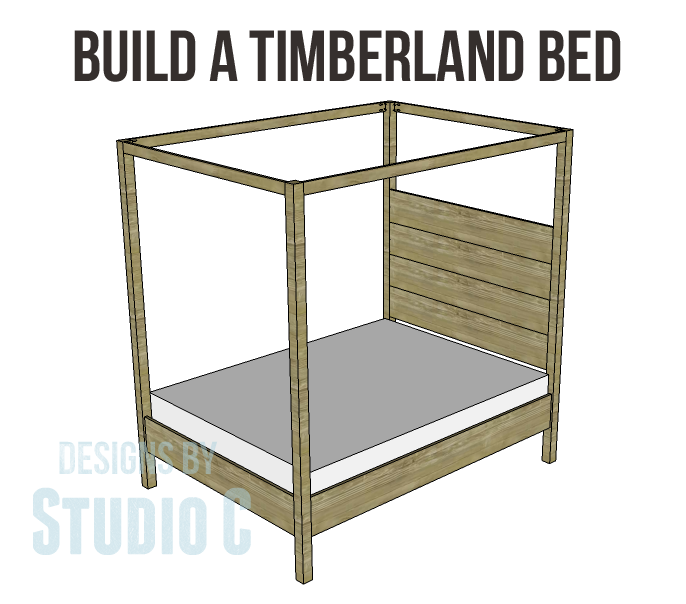
Build a Fabulous Bed
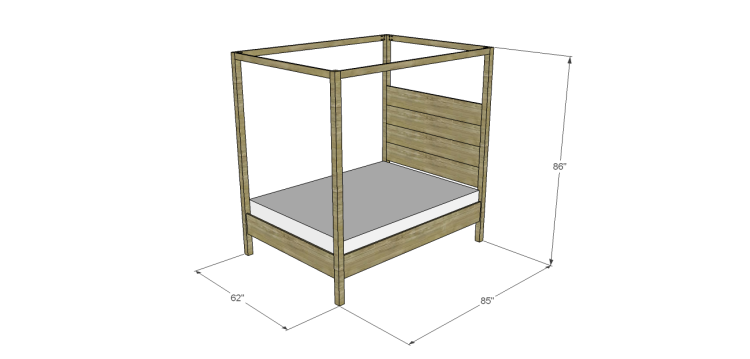
I like the rustic simplicity of this bed – plain in style and construction. The Timberland queen bed plans are constructed with planked 1×10 lumber and the upper canopy frame is completely optional – the legs for the headboard and footboard can be cut off, if desired! The plans are drawn for a queen bed. Adjustments for larger or smaller mattresses are as easy as changing the length of the boards.
Materials:
- 1-1/4″ pocket hole screws (<– affiliate link!)
- 1-1/4″ screws
- Key hole bed rail brackets (<– affiliate link!)
- Wood glue
- Sandpaper (100, 150, 220 grits)
- Finishing supplies (primer & paint, or stain, sealer)
Lumber:
- 1 – 1×2 at 4′
- 3 – 1×2 at 8′
- x – 1×3 at 6′
- 6 – 1×10 at 6′
- 2 – 1×10 at 8′
- 4 – 3×3 posts at 8′ *
*3×3 posts can be made by ripping 4×4 posts down on the table saw, or by laminating 2 – 2x4s together (for each post) and ripping on the table saw.
Cut List:
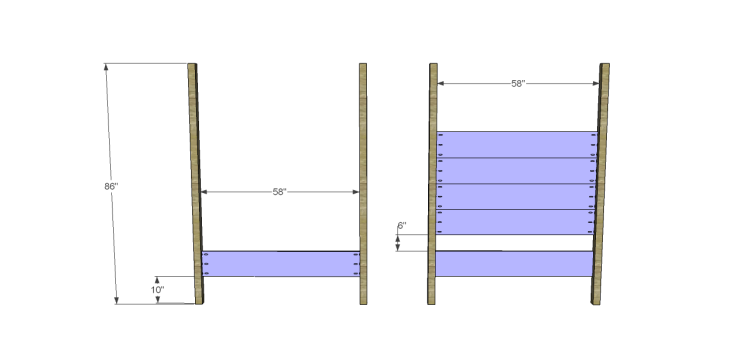
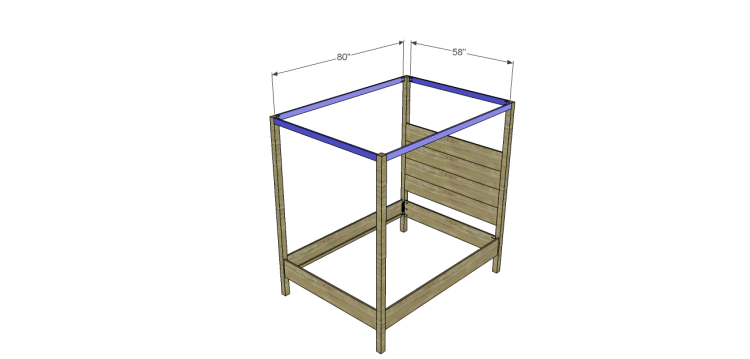
- 4 – 3×3 posts at 86″ – Legs
- 6 – 1×10 at 58″ – Headboard and Footboard
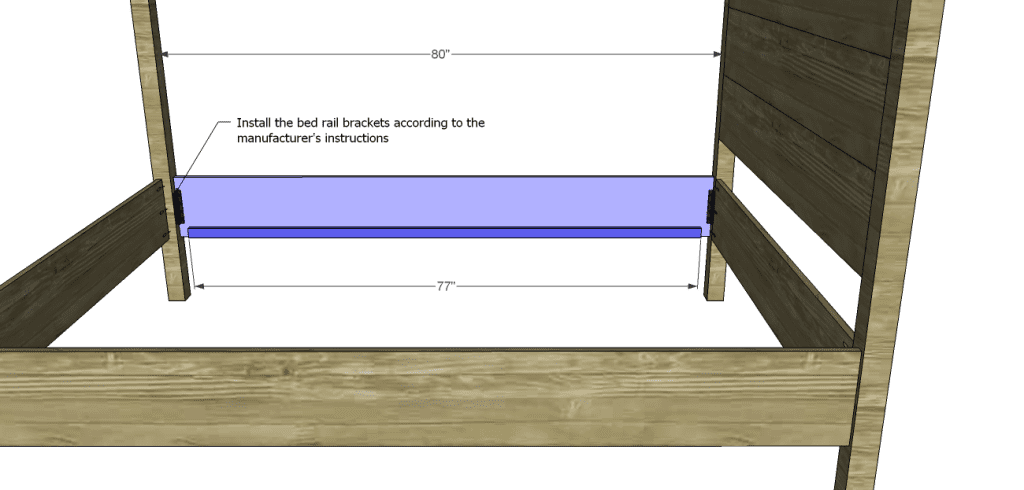
- 2 -1×10 at 80″ – Side Rails
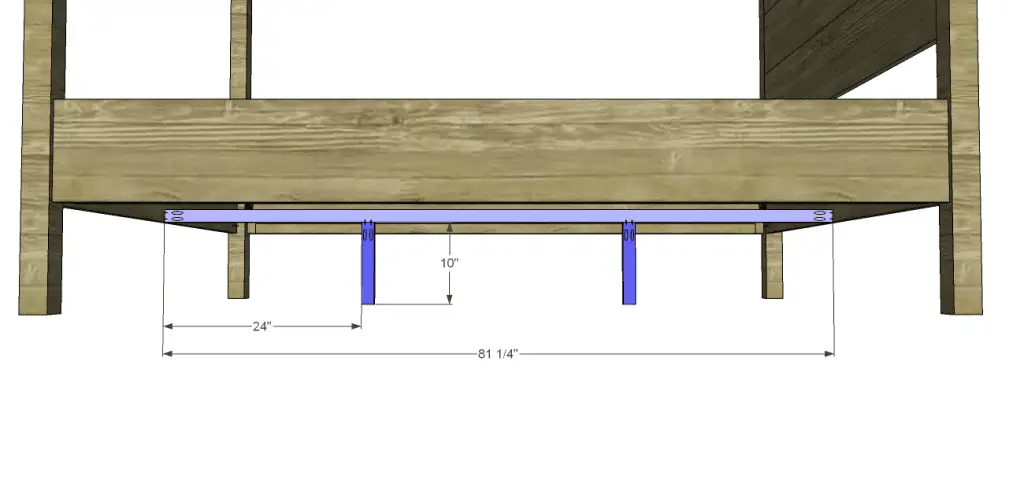
- 2 – 1×2 at 77″ – Slat Supports
- 1 – 1×2 at 81-1/4″ – Center Slat Support
- 2 – 1×2 at 10″ – Center Slat Support Legs
- 2 – 1×3 at 58″ – Upper Frame
- 2 – 1×3 at 80″ – Upper Frame
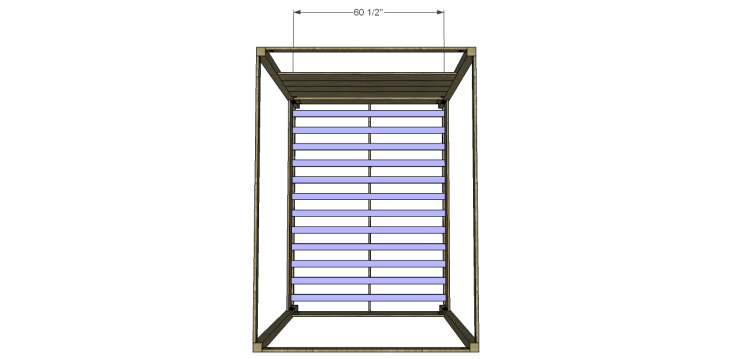
- 12 – 1×3 at 60-1/2″ – Slats
Step One
Cut the pieces for the legs, the headboard, and the footboard. With the pocket hole jig set for 3/4″ material, drill pocket holes in each end of the 1×10 pieces. Attach to the legs as shown to create the headboard and the footboard using glue and 1-1/4″ pocket hole screws. The pieces are positioned 1/2″ back from the outside face of the legs.
Step Two
Cut the pieces for the side rails and slat supports. Attach the slat supports to the bottom edge of each side rail using glue and 1-1/4″ screws. The bottoms of the pieces will be flush with each other. Install the bed rail brackets according to the manufacturer’s installation instructions. The hardware will be positioned so it is flush with the inside face of the legs which should make it 1/2″ in from the outside face of the legs.
Step Three
Cut the pieces for the upper frame and drill pocket holes in each end. Secure to the legs using 1-1/4″ pocket hole screws. Glue can be used on the shorter pieces at the headboard and footboard but DO NOT use glue on the longer pieces so the bed can be dismantled!
Step Four
Cut the pieces for the center support. Drill pocket holes in each end of the longer piece, and one end only of the legs. Secure the legs to the longer piece using glue and 1-1/4″ pocket hole screws. Secure the entire assembly at the lower center of the headboard and the footboard using 1-1/4″ pocket hole screws. DO NOT use glue!
Step Five
Cut the pieces for the slats. Space the slats approximately 2-1/2″ apart and secure them to the supports using 1-1/4″ screws. DO NOT use glue!
Finish as desired!
These are the perfect plans for those new to woodworking! The bed would look great with a weathered grey finish or even painted a bright color. Have questions about the Timberland queen bed plans? Contact me at cher {at} designsbystudioc {dot} com!
Disclaimer:
This post contains a link to a site of which I am an affiliate. What that means is if the think is clicked and a purchase is made, I receive a commission on that purchase!
Originally posted 2014-04-21 08:00:57.


11 Comments
So if I wanted to make it a king bed, would I just add inches?
Yes, 16″ to the width – the headboard, the footboard, the shorter upper frame pieces, and the slats!
This looks amazing, Cher!
Thank you so much, Jessica! I really like this one!
do you attach the side rails & headboard/footboard flush to the outside of the legs?
Hi, Mel! They are positioned approximately 1/2″ in from the outside face of the legs so that the bed rail hardware can be positioned flush to the inside face of the legs. Does that make sense? I failed to indicate that on the plans and will change them now. Hope this helps!
Hi, Cher! That’s helpful, thank you for the quick reply.
The same thought had occurred to me in regards to where to attach the footboard and headboard relative to the inside/outside face of the legs, seeing as how there’s a 1-1/4″ difference between the center slat (81-1/4″) and side rails/upper frame length (80″).
I’m attaching all my pieces together tomorrow and am very excited since it’s one of my first projects. Thank you for the help!
How exciting, Mel!! Please share a photo, if you don’t mind – I would love to see the finished result!! Thanks again!
could you make a version of this with drawers underneath? one can never have too much storage.
That is one very true statement, Jen! I do have plans for underbed boxes that can be built in addition to the bed. They can be found here: http://designsbystudioc.com/diy-plans-build-rolling-under-bed-storage-boxes/ Hope this helps! 🙂
Pingback: Queen Size Canopy Bed – Free Woodworking Plan.com