
Plans to Build a Luna Dining Table
DIY Dining Table with a Floating Top!
I absolutely adore tables! Actually, I have such a huge collection of tables in my house that my family has forbidden me from building any more – we simply don’t have any space left! However, I must confess that this particular table has made it onto my secret “to build” list… The plans for the Luna Dining Table are simply fantastic, with its elegant tapered legs and a stylish floating top. And the best part? It’s a budget-friendly project! Just like my other builds, this one is super quick and easy – that’s just how I like to do things!
Materials:
- 2-1/2″ pocket hole screws
- 1-1/4″ brad nails
- Edge banding, optional (<– affiliate link!)
- Wood glue
- Sandpaper (100, 150, 220 grits)
- Finishing supplies (primer & paint, or stain, sealer)
Lumber:
- 2 – 1×2 at 6′
- 2 – 1×2 at 8′
- 2 – 2×3 at 6′
- 2 – 2×3 at 8′
- 4 – 3×3 posts at 3′
- 1 sheet of 3/4″ plywood
Cut List:
- 4 – 3×3 posts at 28-1/2″ – Legs
- 2 – 2×3 at 65″ – Frame
- 4 – 2×3 at 41″ – Frame & Supports
- 2 – 1×2 at 68″ – Spacers
- 4 – 1×2 at 41″ – Spacers
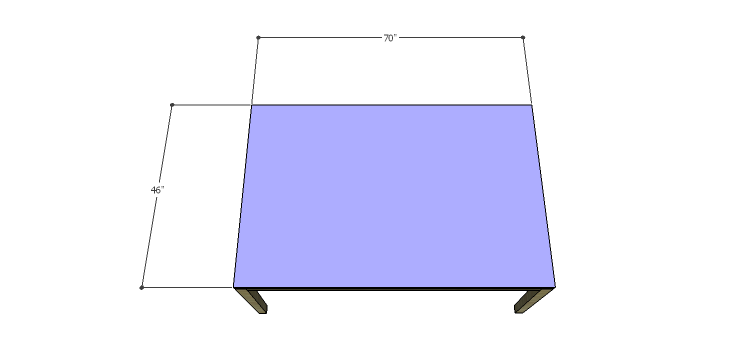
- 1 – 3/4″ plywood at 46″ x 70″ – Top
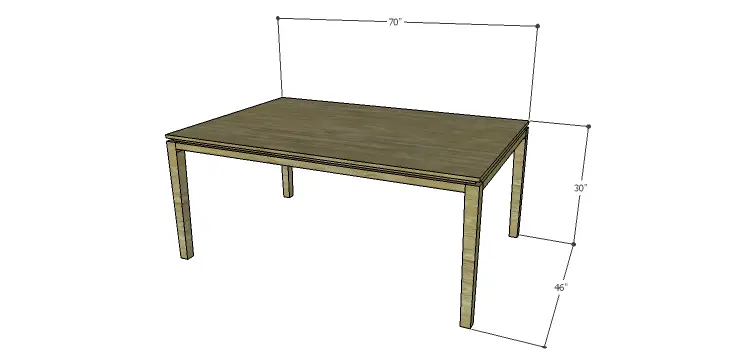
Click on the drawings for a larger view!
Step One
Cut the pieces for the legs. There will be a taper cut on two adjoining faces of each leg. Cut the tapers using a jigsaw or a tapering jig on the table saw.

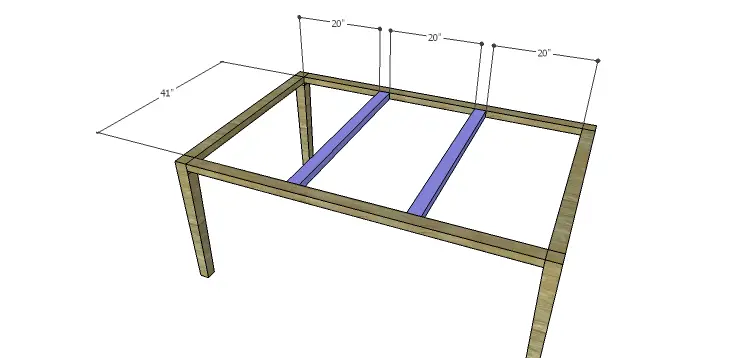
Step Two
Cut the pieces for the frame and supports. With the pocket hole jig set for 1-1/2″ material, drill pocket holes in each end of each piece. Assemble the frame as shown, securing the pieces to the legs using glue and 2-1/2″ pocket hole screws. Orient the pocket holes so they face down, and the tapers on the legs will all face to the inside.

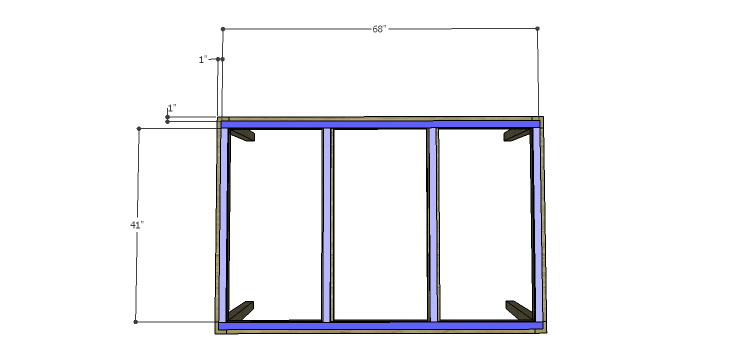
Step Three
Cut the pieces for the spacers. Secure the spacers to the frame and supports using glue and 1-1/4″ brad nails. The back edge of the spacers will be flush with the back edge of the frame, while the middle spacers will be centered on the supports.
Step Four
Cut the piece for the top and apply edge banding, if desired. Secure the top to the spacers using glue and 1-1/4″ brad nails. The edges of the top will be flush with the sides of the framing pieces.
Finish as desired!
The table can be lengthened to suit any needs by adding to the length of the longer framing pieces, the longer spacers, and the top. A few more supports will have to be added, as well. This table would be great either painted, stained, or left natural! Any questions about the plans to build a Luna Dining Table? Leave a comment below or contact me at cher {at} designsbystudioc {dot} com!
Originally posted 2014-06-23 08:00:15.

[…] I posted plans for the Luna Dining Table… So why not build a few chairs to match? The Luna Dining Chair plans feature a floating seat, […]
[…] in how the top fit onto the frame. After searching for other plans and ideas I came across this Luna table design that featured a floating top. I like the modern look of that table and so I decided that […]
[…] Plans to Build the Luna Dining Table.The Luna dining table features tapered legs and a floating top and would work perfectly in the dining room or kitchen. […]
[…] I posted plans for the Luna Dining Table… So why not build a few chairs to match? The Luna Dining Chair plans feature a floating seat, […]