A Beautiful Sideboard with Faux Paneled Doors
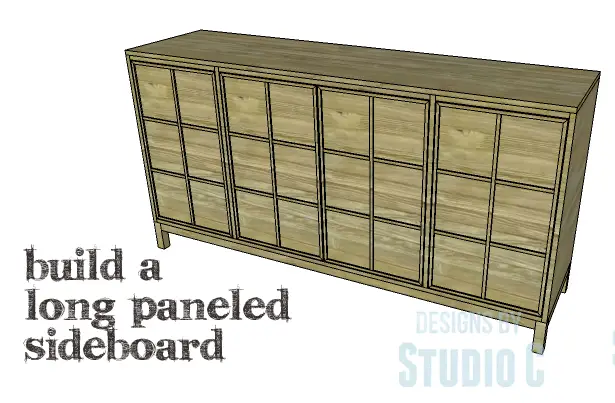
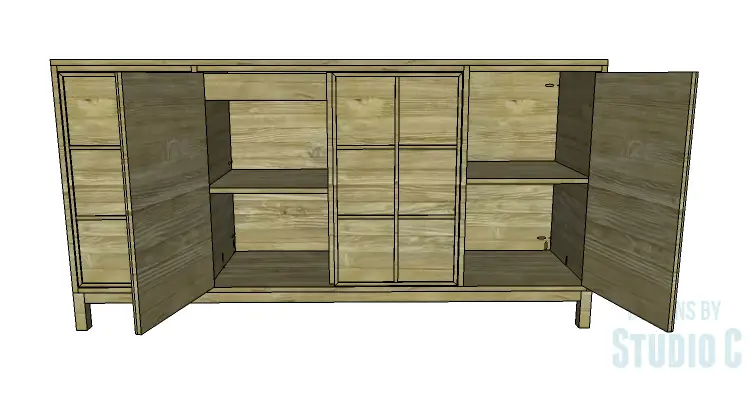
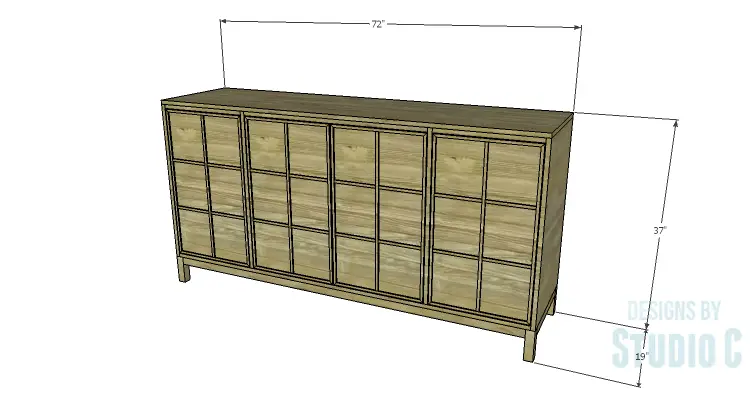
This sideboard is the perfect piece for those who like large pieces with tons of storage. The DIY plans to build a Long Paneled Sideboard feature four doors with narrow trim on the front, shelves inside, and a drawer in the center space. This piece measures six feet long and can be completed in a weekend!
Materials:
- 1-1/4″ pocket hole screws (<– affiliate link)
- 2-1/2″ pocket hole screws
- 1-1/4″ brad nails
- 1/2″ screws
- Edge banding
- 1 set of 16″Drawer slides
- 4 sets of hinges
- Cabinet pulls
- Wood glue
- Sandpaper (100, 150, 220 grits)
- Finishing supplies (primer & paint, or stain, sealer)
Lumber:
- 1 – 1×2 at 6′
- 1 – 1×4 at 8′
- 3 – 2×2 at 8′
- 1 – 2′ x 4′ sheet of 1/4″ plywood
- 1 – 4′ x 8′ sheet of 1/2″ plywood
- 3 – 4′ x 8′ sheets of 3/4″ plywood
- 8 – 1/4″ thick x 1/2″ wide trim at 8′
Cut List:
- 4 – 2×2 at 5-1/2″ – Base Legs
- 5 – 2×2 at 16″ – Base Framing
- 2 – 2×2 at 69″ – Base Framing
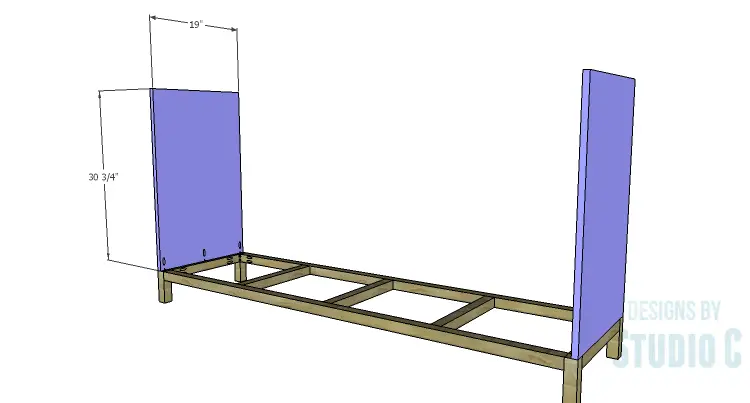
- 2 – 3/4″ plywood at 19″ x 30-3/4″ – Sides
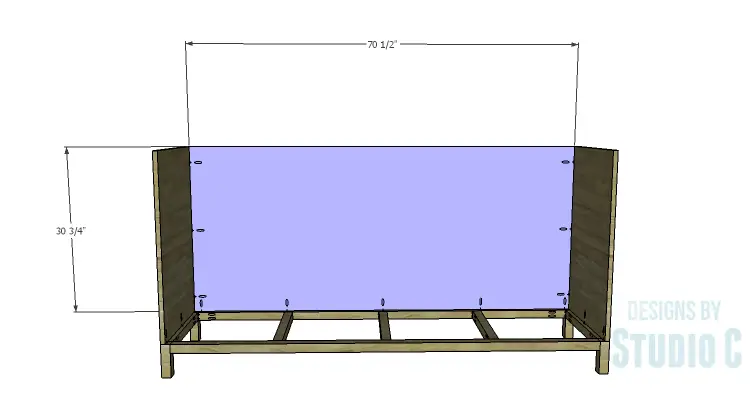
- 1 – 3/4″ plywood at 30-3/4″ x 70-1/2″ – Back
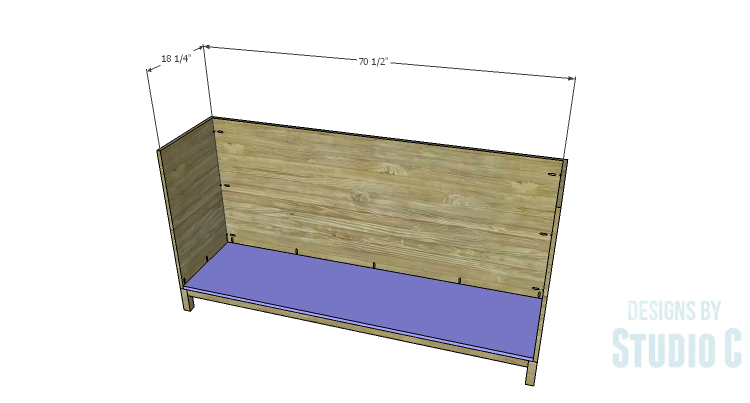
- 1 – 3/4″ plywood at 18-1/4″ x 70-1/2″ – Bottom
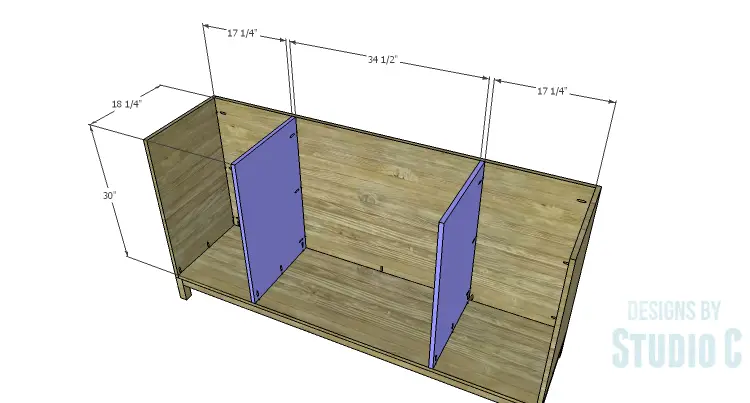
- 2 – 3/4″ plywood at 18-1/4″ x 30″ – Dividers
- 2 – 3/4″ plywood at 17-1/4″ x 17-1/4″ – Shelves
- 1 – 3/4″ plywood at 17-1/4″ x 34-1/2″ – Center Shelf
- 2 – 1×2 at 17-1/4″ – Stretchers
- 1 – 1×2 at 34-1/2″ – Center Stretcher
- 1 – 3/4″ plywood at 19″ x 72″ – Top
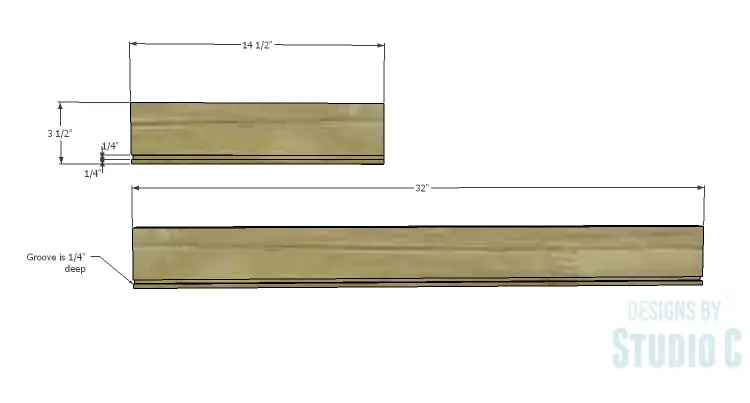
- 2 – 1×4 at 14-1/2″ – Drawer Sides
- 2 – 1×4 at 32″ – Drawer Front & Back
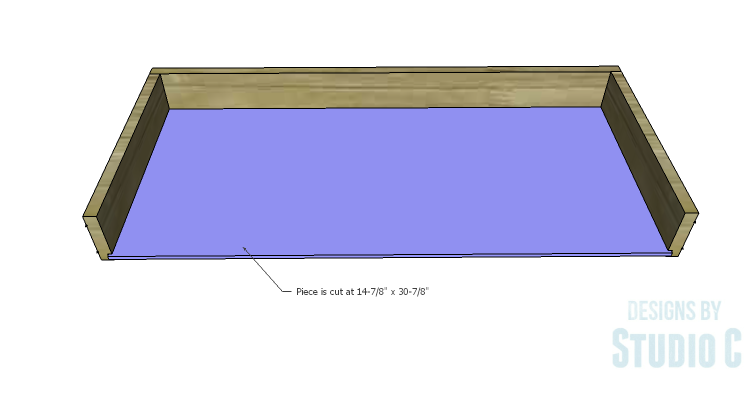
- 1 – 1/4″ plywood at 14-7/8″ x 30-7/8″ – Drawer Bottom
- 4 – 1/2″ plywood at 17″ x 29″ – Door Base
- 1 – 1/4″ plywood at 1-1/2″ x 17″ – Center Filler
- Trim pieces cut to fit
Edge banding will be applied to the exposed edges of the plywood prior to assembly!
Step One
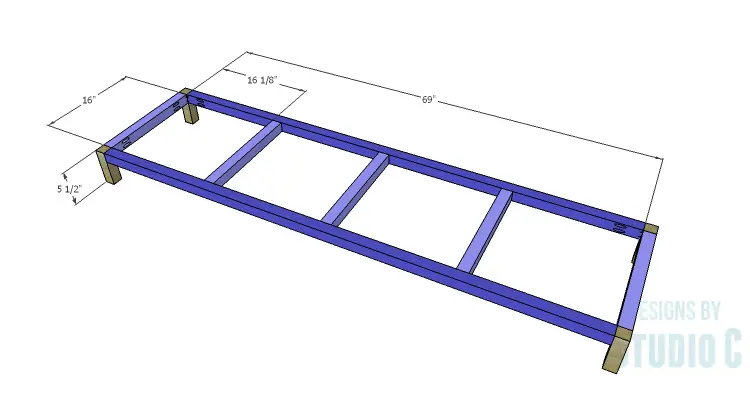
Cut the pieces for the base framing and the legs. With the pocket hole jig set for 1-1/2″ material, drill pocket holes in each end of the framing pieces. Assemble the base as shown using glue and 2-1/2″ pocket hole screws.
Step Two
Cut the pieces for the sides. Set the pocket hole jig for 3/4″ material and drill pocket holes in the lower edge only. Secure the sides to the base frame using glue and 1-1/4″ pocket hole screws. The outside face of the side will be flush with the outside edge of the base.
Step Three
Cut the piece for the back, and drill pocket holes in the side and lower edges. Secure the back to the base and the sides using glue and 1-1/4″ pocket hole screws.
Step Four
Cut the piece for the bottom. Secure the bottom to the base between the sides and back using glue and 1-1/4″ brad nails.
Step Five
Cut the pieces for the dividers, and drill pocket holes in the back and lower edges only. Secure the dividers to the bottom and back using glue and 1-1/4″ pocket hole screws.
Step Six
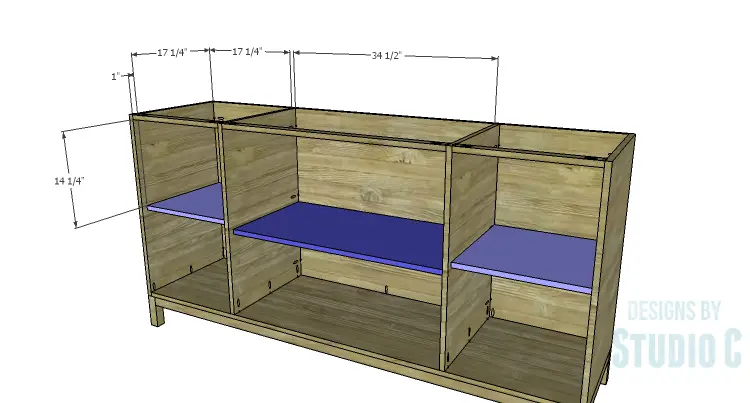
Cut the pieces for the shelves, and drill pocket holes in the side and back edges only. Secure the outer shelves to the side, divider, and back of the outer (narrower) cubbies as shown using glue and 1-1/4″ pocket hole screws. The shelves will be positioned 1″ back from the front edge of the sides and dividers, making it flush with the back. This is to allow for the doors.
The center shelf will be positioned slightly lower than the outer shelves to allow room for the drawer. This shelf will also be positioned 1″ back from the front edge of the dividers, making it flush with the back. Secure in place using glue and 1-1/4″ pocket hole screws.
Step Seven
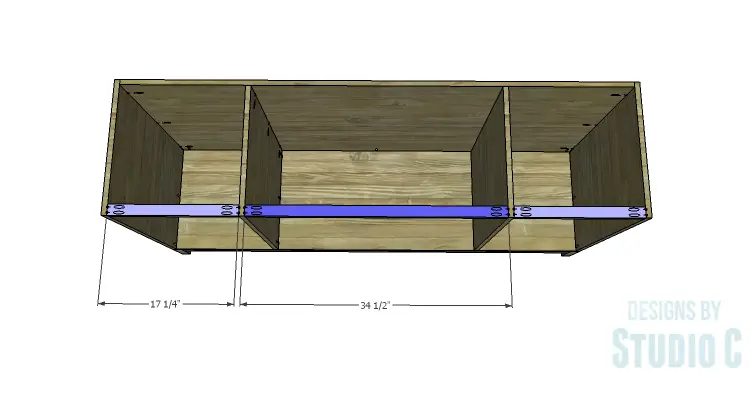
Cut the pieces for the stretchers and drill pocket holes in each end. Secure the stretchers to the sides and dividers as shown using glue and 1-1/4″ pocket hole screws.
Step Eight
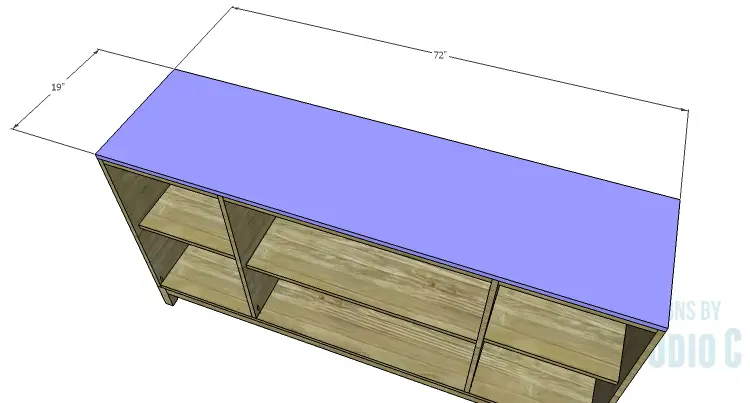
Cut the piece for the top. Secure the top using glue and 1-1/4″ brad nails. The top will be flush with the cabinet on all sides.
Step Nine
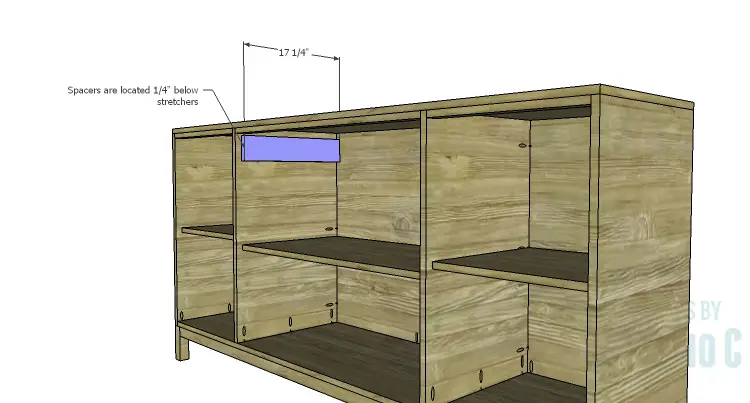
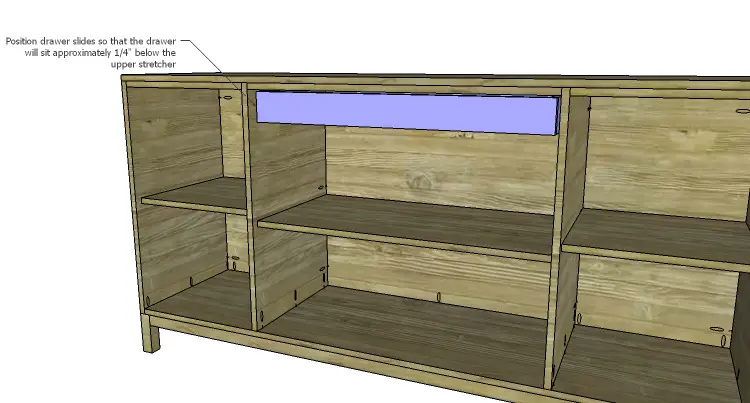
Cut the pieces for the drawer spacers. The spacers will allow the drawer to open and close without interference from the doors. Secure the spacers in place using glue and 1-1/4″ brad nails. These pieces will be located 1/4″ below the stretcher, and 1″ back from the front edge of the dividers.
Step Ten
Cut the pieces for the drawers. A 1/4″ wide x 1/4″ deep groove will be cut in the lower edge of each piece to create a channel for the drawer bottom. This can be done using a straight bit on a router, or by lowering the blade on a table saw and making two passes through.
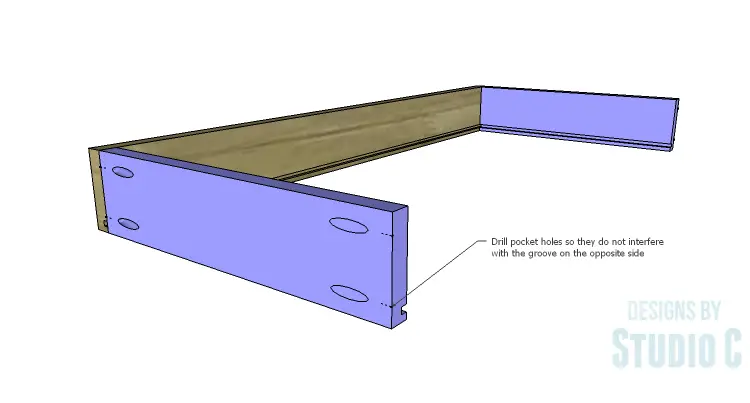
Drill pocket holes in each end of the side pieces, opposite of the channels. When drilling the pocket holes, locate them so they will not interfere with the channels. Secure the sides to the back piece using glue and 1-1/4″ pocket hole screws.
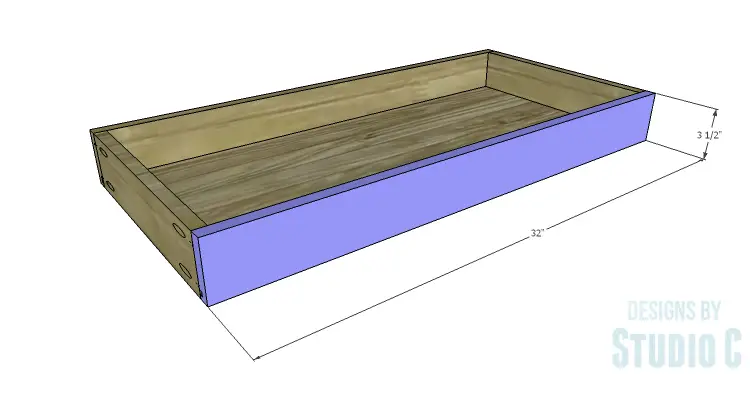
Cut the piece for the drawer bottom and slide the bottom into the channels. It should be a semi-snug fit, and should fit easily. Place the drawer front piece over the assembly with the bottom in the channel and secure using glue and 1-1/4″ pocket hole screws.
Install the drawer slides on the drawer and on the spacers, then adjust as necessary. The drawer should be positioned 1/4″ below the stretcher and should move easily.
Step Eleven
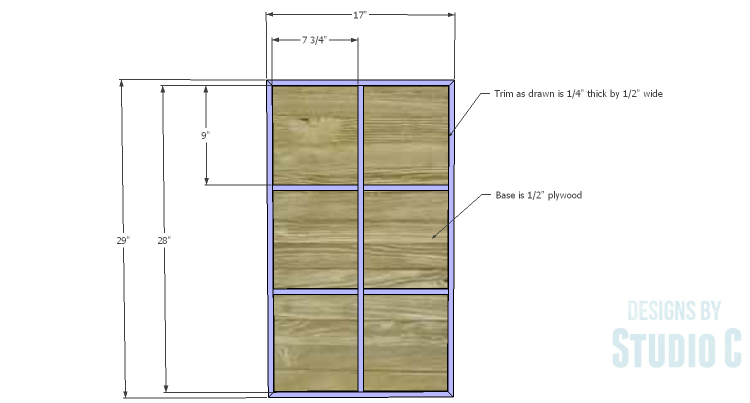
Cut the pieces for the doors. The plans are drawn using 1/4″ thick x 1/2″ wide trim. The dimensions in the drawing for the trim are approximate, and the trim should be cut to fit. Wider trim can also be used.
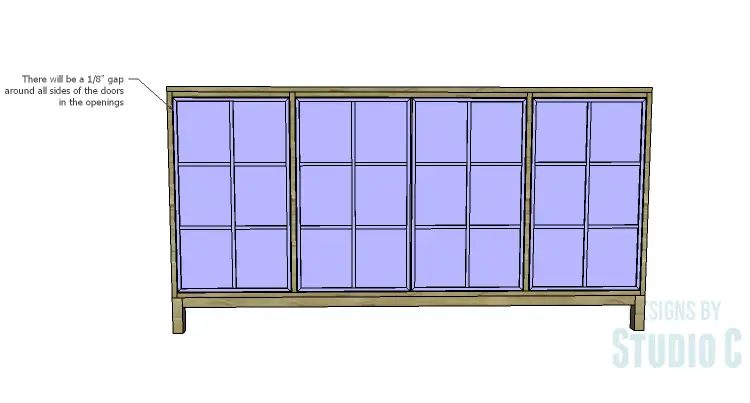
Secure the trim pieces using glue and clamp in place. Install the hinges on the doors, then install the doors in the cabinet. Install the cabinet pulls as desired.
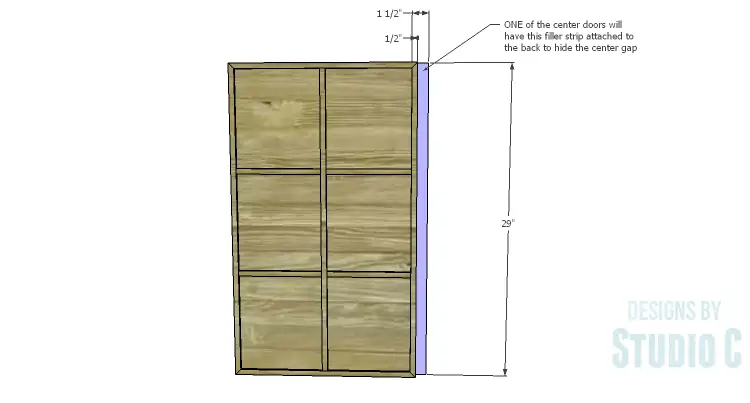
One of the center doors will have a filler secured to the back to hide the center gap. The filler can go on either side and will be secured using glue and 1/2″ screws.
Finish as desired.
This sideboard is an excellent piece for storing linens and china, and can also be used to store backpacks and shoes in an entryway! Here are a few ideas for plans similar to the DIY plans to build a Long Paneled Sideboard:
Have any questions about the DIY plans to build a Long Paneled Sideboard? Leave a comment below!
Originally posted 2015-07-20 08:00:46.


Comments are closed.