
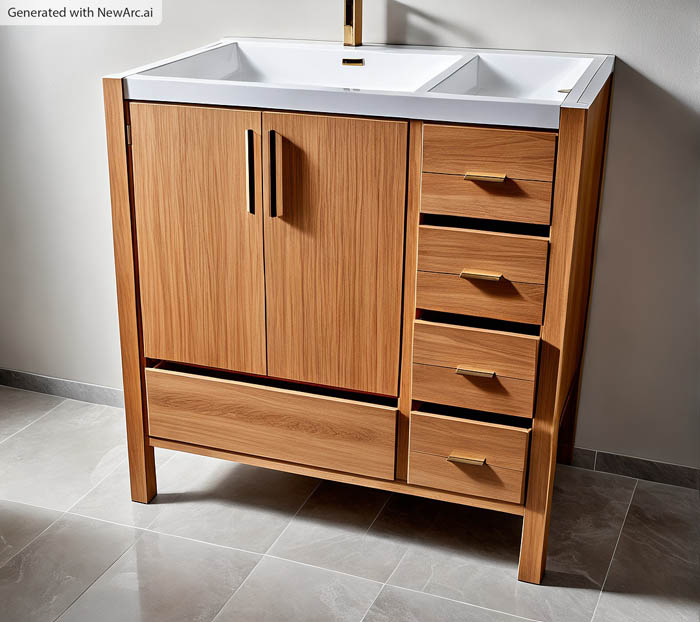
DIY Alert: Transform Your Bathroom with an Easy to Build Bath Vanity!
Check out the easy to build Whitman Bath Vanity! It’s super-easy to build and looks like a fancy piece of furniture. You’ll have plenty of space to store all your bathroom stuff with four drawers on one side, a big bottom drawer, and doors in the middle with an open shelf. Even if you’ve never built anything before, this is a great project to start with. Trust me, you’ll feel like a pro when you’re done!

Materials:
- 1-1/4″ pocket hole screws
- 1″ brad nails
- 2″ brad nails
- Edge banding, optional (<– affiliate link!)
- Two sets of concealed hinges
- Four sets of 18″ drawer slides (<– affiliate link!)
- Cabinet pulls of your choice
- Wood glue
- Sandpaper (80, 120, 220 grits)
- Finishing supplies (paint or stain and sealer)
Lumber:
- 1 – 1×2 at 3′ (a scrap will do just fine!)
- 4 – 1×6 at 8′
- 2 – 2×2 at 8′
- 1 – 4′ x 4′ sheet of 1/4″ plywood
- 1 – 4′ x 4′ sheet of 3/4″ plywood
- 1 – 4′ x 8′ sheet of 3/4″ plywood
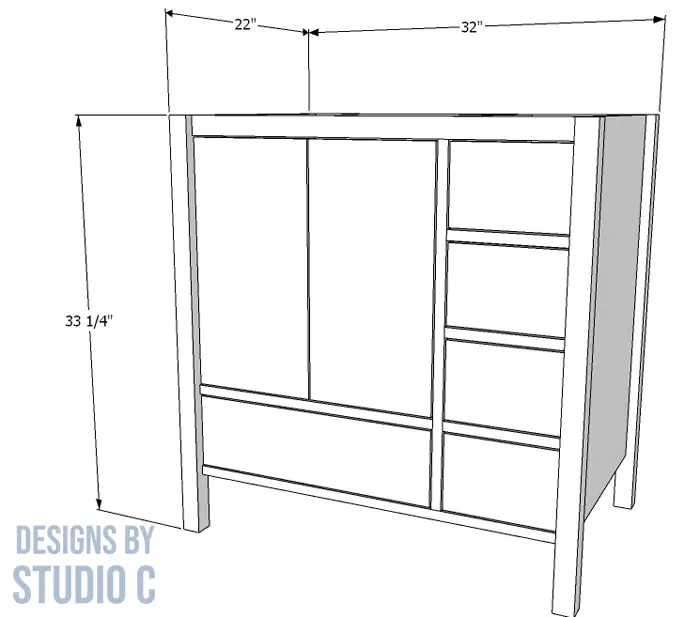
Cut List:
- 4 – 2×2 at 33-1/4″ – Legs
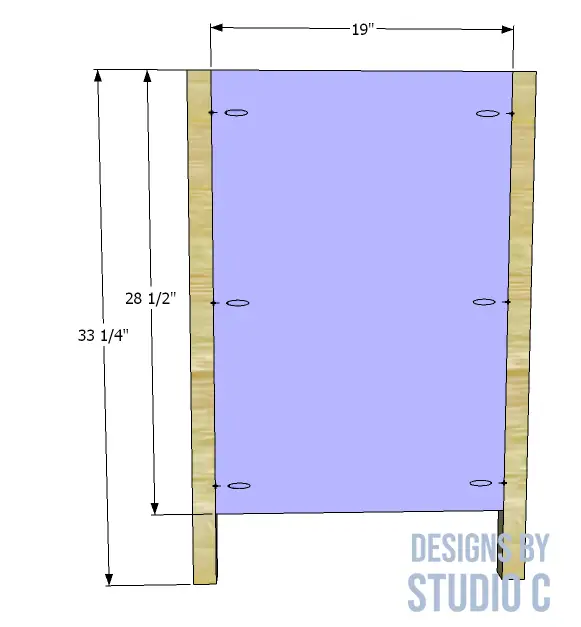
- 2 – 3/4″ plywood at 19″ x 28-1/2″ – Side Panels
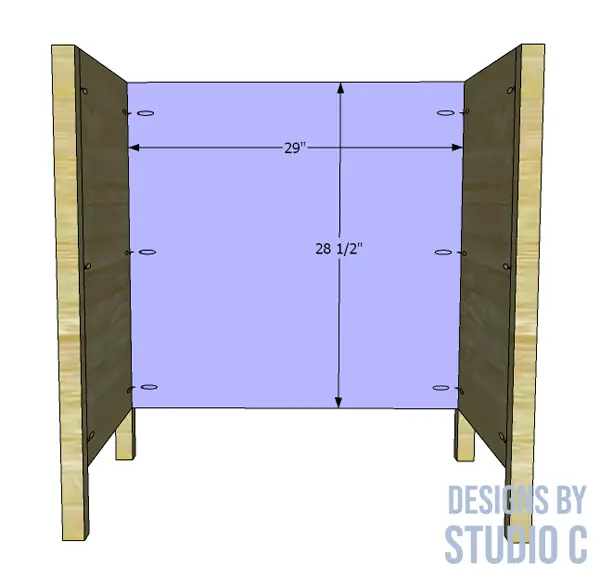
- 1 – 3/4″ plywood at 28-1/2″ x 29″ – Back
- 1 – 3/4″ plywood at 19-3/4″ x 29″ – Bottom
- 1 – 1×2 at 29″ – Front Stretcher
- 1 – 3/4″ plywood at 19-3/4″ x 27-3/4″ – Center Divider
- 1 – 3/4″ plywood at 19-3/4″ x 19-3/4″ – Shelf Divider
- 4 – 3/4″ plywood at 8-1/2″ x 19-3/4″ – Drawer Divider
- 10 – 1×6 at 18″ – Drawer Box Sides
- 2 – 1×6 at 17-1/4″ – Large Drawer Box Front & Back
- 8 – 1×6 at 6″ – Small Drawer Box Front & Back
- 1 – 1/4″ plywood at 18″ x 18-3/4″ – Large Drawer Box Bottom
- 4 – 1/4″ plywood at 7-1/2″ x 18″ – Small Drawer Box Bottoms
- 2 – 3/4″ plywood at 9-11/16″ x 19-1/4″ – Doors
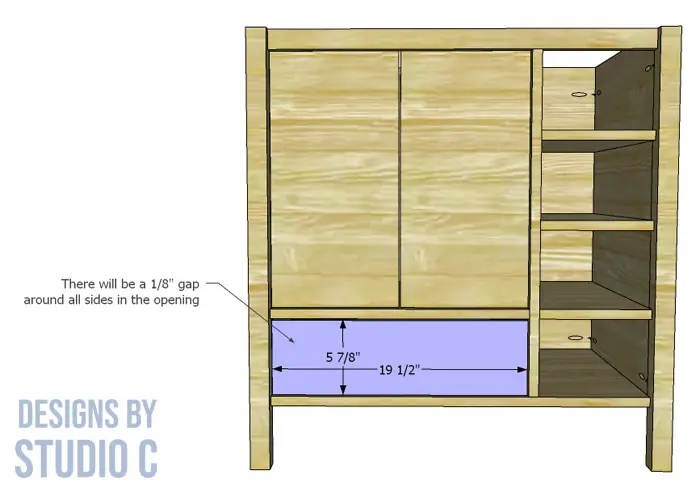
- 1 – 3/4″ plywood at 5-7/8″ x 19-1/2″ – Large Drawer Front
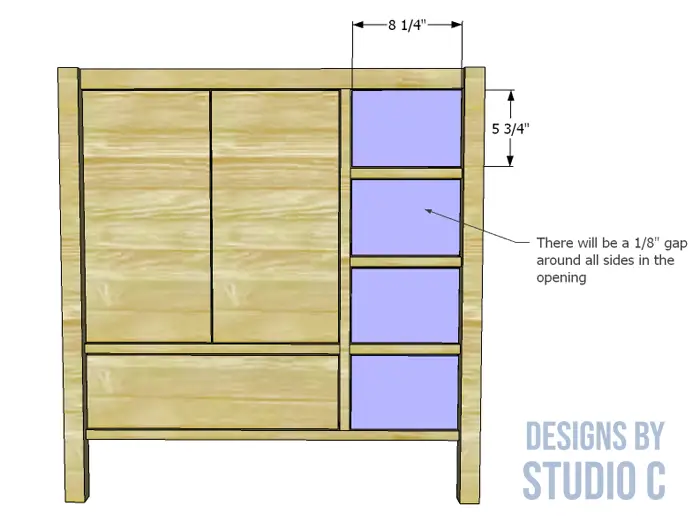
- 4 – 3/4″ plywood at 5-3/4″ x 8-1/4″ – Small Drawer Fronts
Notes About the Project:
- This plan does not include the vanity top. It would be a separate purchase or you could always build your own!
- Edge banding will be applied to the exposed edges of the plywood before assembly.
- For easier finishing, sand all parts prior to assembly.
- The position of the four drawers can be switched to the opposite side of the doors and long drawer (mirrored) if that works better for your space!
Step One
Cut the pieces for the legs and the sides. With the pocket hole jig set for 3/4″ material, drill pocket holes in each long edge of the side pieces. Secure the sides to the legs using glue and 1-1/4″ pocket hole screws. The back face of the side pieces will be flush with the back face of the legs.
Step Two
Cut the piece for the back, and drill pocket holes in the side edges. Secure the back to the legs using glue and 1-1/4″ pocket hole screws. The back face of the back piece will be perpendicular to the sides.
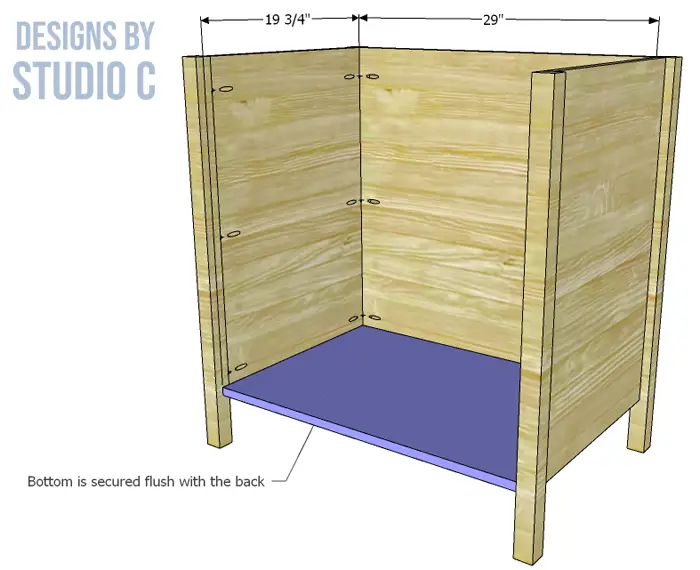
Step Three
Cut the piece for the bottom and drill pocket holes in the side and back edges. Secure the bottom to the sides and back panels using glue and 1-1/4″ pocket hole screws (the pocket holes will face down).
Step Four
Cut the pieces for the front stretcher and drill pocket holes in each end. Secure the stretcher to the front legs using glue and 1-1/4″ pocket hole screws. The stretcher will be positioned 3/4″ back from the front face of the legs.

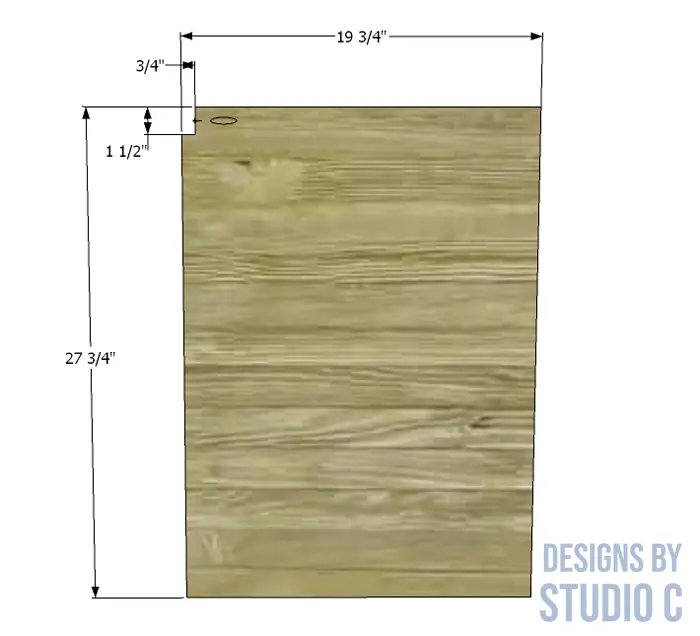
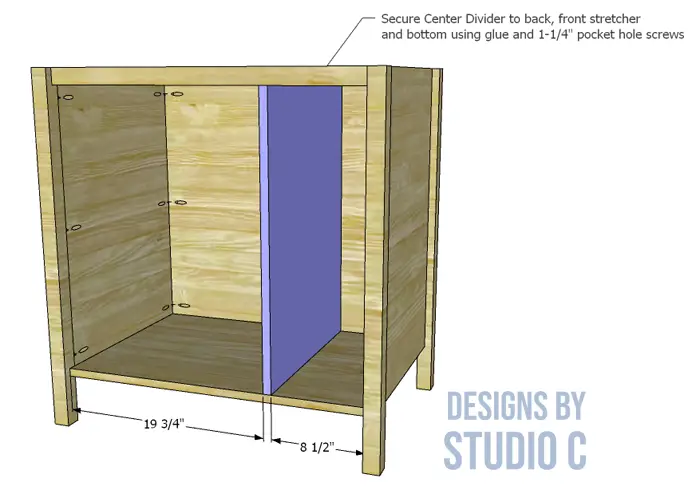
Step Five
Cut the piece for the center divider and cut a notch at the top front edge to allow for the upper stretcher. Drill one pocket hole as shown. Secure the divider to the bottom and back using glue and 2″ brad nails from the outside. Secure the front stretcher with one pocket hole screw at the notch located at the top.
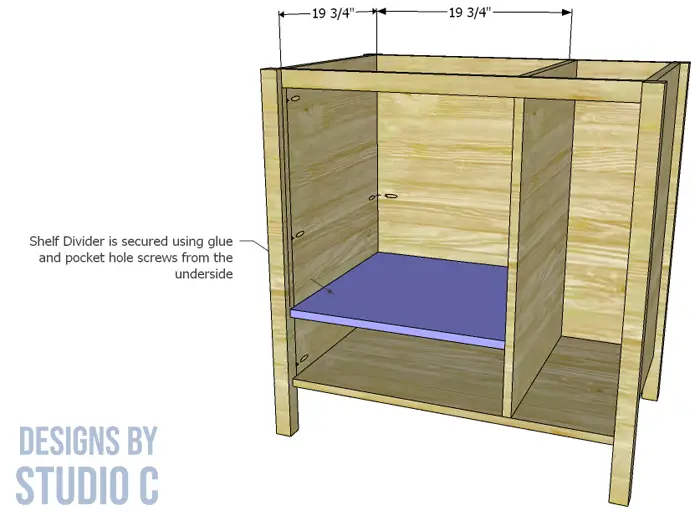
Step Six
Cut the piece for the shelf divider and drill pocket holes in the side and back edges. Secure the shelf divider to the side and center divider using glue and 1-1/4″ pocket hole screws.
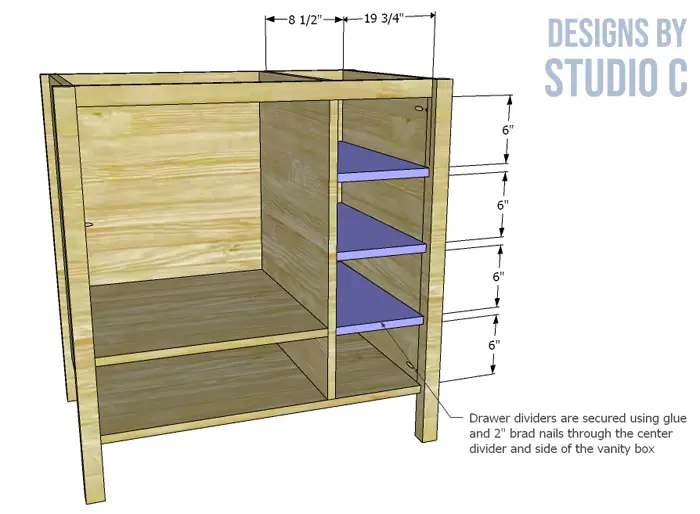
Step Seven
Cut the pieces for the drawer dividers. Secure the drawer dividers to the center divider and side panel using glue and 2″ brad nails.
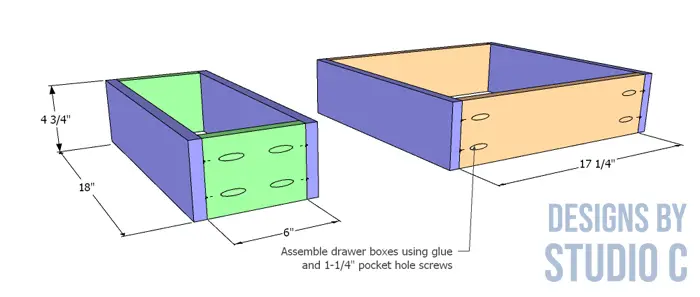
Step Eight
Cut the pieces for the drawer boxes. Drill pocket holes in each end of the front and back drawer box pieces. Assemble the drawer box frames as shown using glue and 1-1/4″ pocket hole screws.
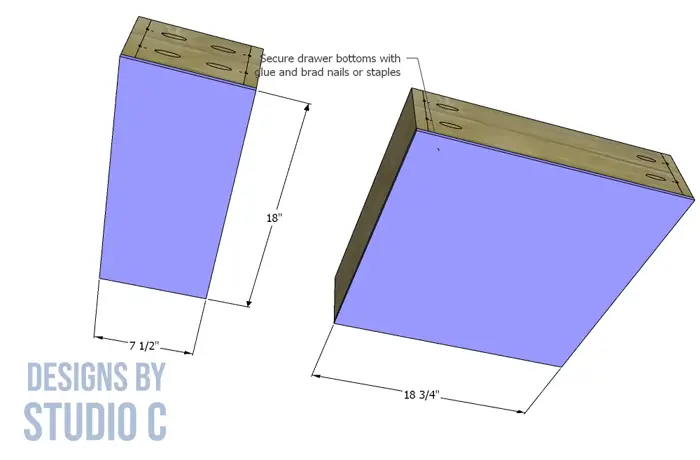
Cut the pieces for the drawer box bottoms and secure to the bottom of the frames using glue and 1″ brad nails.
Install the drawer slides according to the manufacturer’s instructions. This tutorial on installing drawer slides will be very helpful! Make adjustments as necessary.
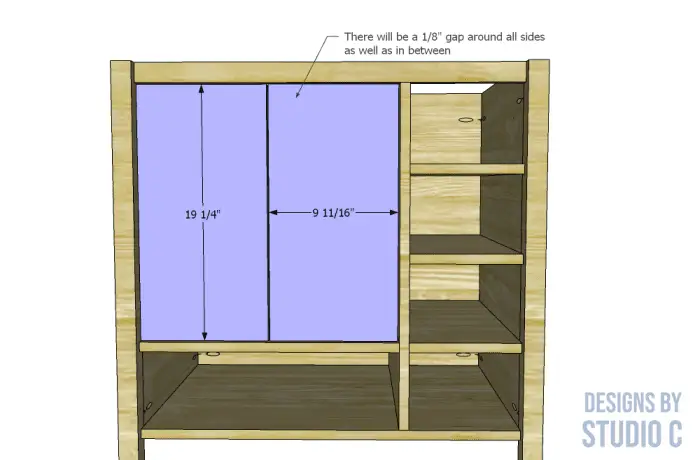
Step Nine
Cut the pieces for the doors, and install the concealed hinges. A concealed hinge jig (<– affiliate link!) makes this part super-easy! Make adjustments as necessary.
Step Ten
Cut the pieces for the drawer fronts Follow this tutorial on installing drawer fronts for professional results!
Finish as desired!
The plans to build a Whitman bath vanity are great for a weekend project, and the finished piece will make your bathroom look like it came straight out of a magazine! Have questions about the Whitman bath vanity? Leave a comment below!
Originally posted 2023-08-17 08:00:56.


Comments are closed.