
Build a Cute Shelf Inspired by a Catalog Retailer
Here is another PB Teen item I hacked – the Beadboard Peg Shelf. This shelf cost me less than $20.00 to build! This would be a great Christmas gift or a baby shower gift and it would also be fabulous in another color!

Materials:
- 1- 1×6 at 6′
- Scrap piece of beadboard at 5-1/2″ x 30″
- 1 – 1/4″ x 3/4″ trim at 4′
- Wood Glue
- Brad nailer and brads – 5/8″ & 1-1/4″
- 4 – drawer pulls
- Sawtooth hangers or soda can tabs (for hanging)
Cut the pieces as follows:
- 2 @ 1x6x30″
- 1 @ 5-1/2″ x 30″ beadboard
- 2 @ 1/4″ x 3/4″ x 5-1/2″ trim with one end mitered
- 1 @ 1/4″ x 3/4″ x 30″ trim with both ends mitered
Start by cutting all of the pieces. Sand only the shelf piece, as the others do not have to be sanded yet.

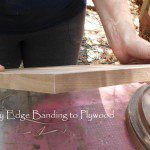
Since I had a narrow scrap of beadboard, I had to use three pieces and butt them together. I applied glue to the bottom board, place the beadboard, then secured with 5/8″ brad nails.


I repeated the process until all of my beadboard pieces were in place.

Next, I glued the longest trim piece (with both ends mitered) at the bottom of the beadboard, then secured in place with 5/8″ brad nails. I added the side trim pieces in the same manner.


Drawer pulls are used on the front of the shelf for hanging a sweater, a purse, or a diaper bag. I marked the placement of the holes for the pulls using a pencil, then drilled the holes.


I used Dry Dex to fill in the nail holes, seams where I pieced the beadboard, and any knots or imperfections. Once it was dry, I sanded with 220 grit sand paper. I hope the seams won’t show once the shelf is painted!!


I ran a bead of glue on the underside of the shelf piece and held the beadboard piece there for a little bit – it is hotter than Hades here and I knew the glue would set up a little so I could nail the shelf to the beadboard. (Using 1-1/4″ brad nails!)


I took the shelf inside and painted it. (If I did it outside, it would dry way too fast in this heat and have a funky texture!) I used Behr Ultra Premium Plus in Ultra Pure White Satin, then I sealed it with Rust-Oleum Ultimate Polyurethane in Matte Soft Touch.
I didn’t have any knobs in my stash so I bought new ones and inserted them through the holes.

I’ve been trying to find ways to use the things in my projects that I already have at home. I decided to use soda can tabs as the hanging hardware for the shelf. I positioned them on the back, then positioned a washer and screw to hold the tab to the back of the shelf.

What do you think? If you have any questions regarding these plans, let me know!
Originally posted 2012-07-05 08:00:09.


2 Comments
I love this idea…never even thought of using drawer pulls, very clever!