
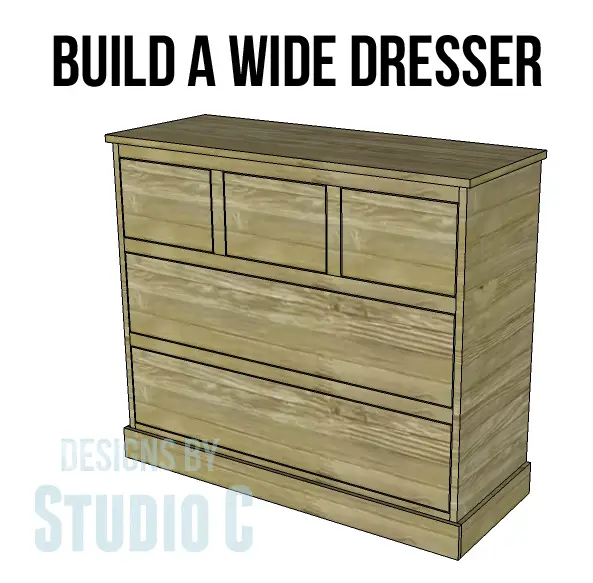
Use These Wide Chest of Drawers Plans to Create Extra Storage Where It’s Needed Most!
I’ve previously shared plans for the Tall Chest and here are the matching wide chest of drawers plans! These plans are similar in style to the Tall Chest with just as much storage. Featuring three small drawers and two large drawers, this piece can be finished to suit your style!
Materials:
- 1-1/4″ pocket hole screws
- 1-1/4″ brad nails
- 5 sets of 12″ drawer slides
- 5 drawer pulls or handles
- Edge banding, optional
- Wood glue
- Sandpaper (100, 150, 220 grits)
- Finishing supplies (primer & paint, or stain, sealer)
Lumber:
- 1 – 2×2 at 4′
- 2 sheets of 3/4″ plywood (PureBond would be an excellent choice!)
- 3-1/2″ trim of choice
Cut List:
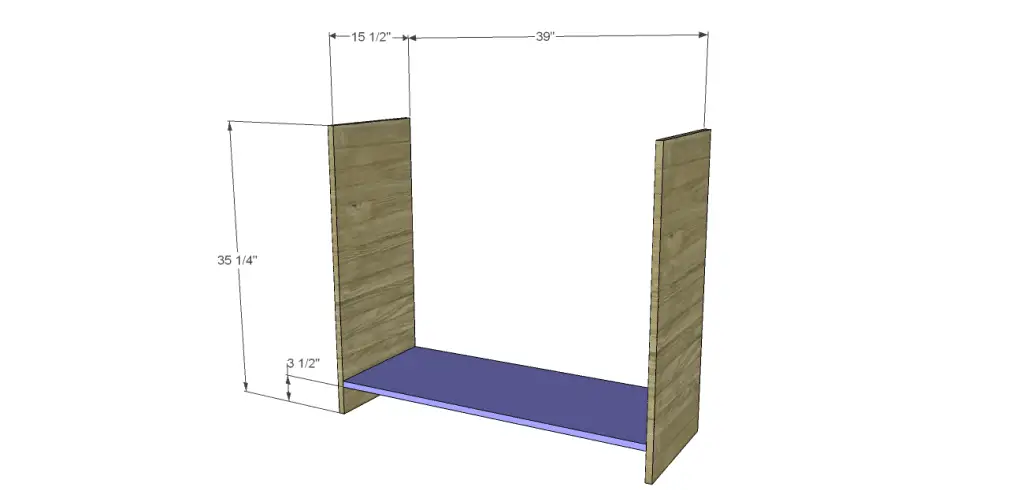
- 2 – 3/4″ plywood at 15-1/2″ x 35-1/4″ – Sides
- 1 – 3/4″ plywood at 15-1/2″ x 39″ – Bottom
- 1 – 3/4″ plywood at 31″ x 39″ – Back
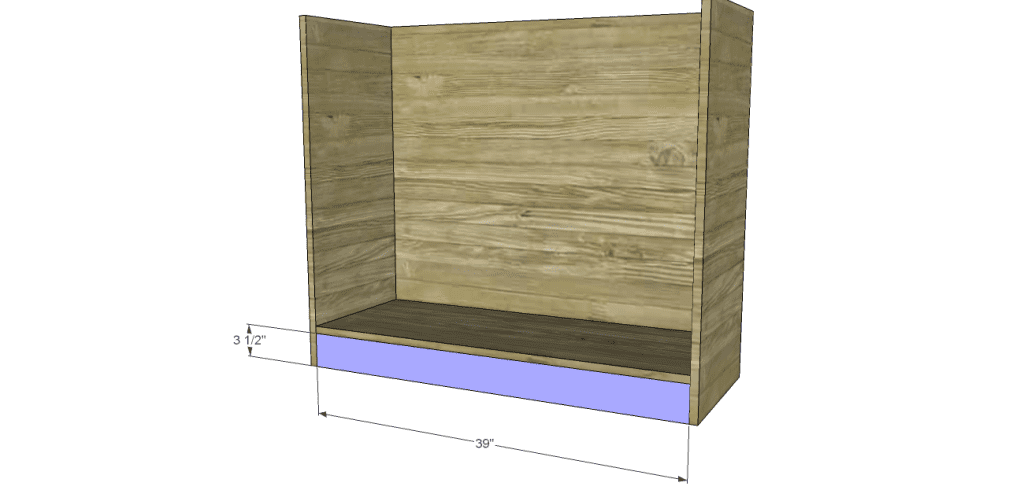
- 1 – 3/4″ plywood at 3-1/2″ x 39″ – Bottom Kick Plate
- 3 – 3/4″ plywood at 1-1/2″ x 39″ – Stretchers
- 2 – 3/4″ plywood at 1-1/2″ x 8-1/2″ – Dividers
- 2 – 2×2 at 14″ – Drawer Slide Supports
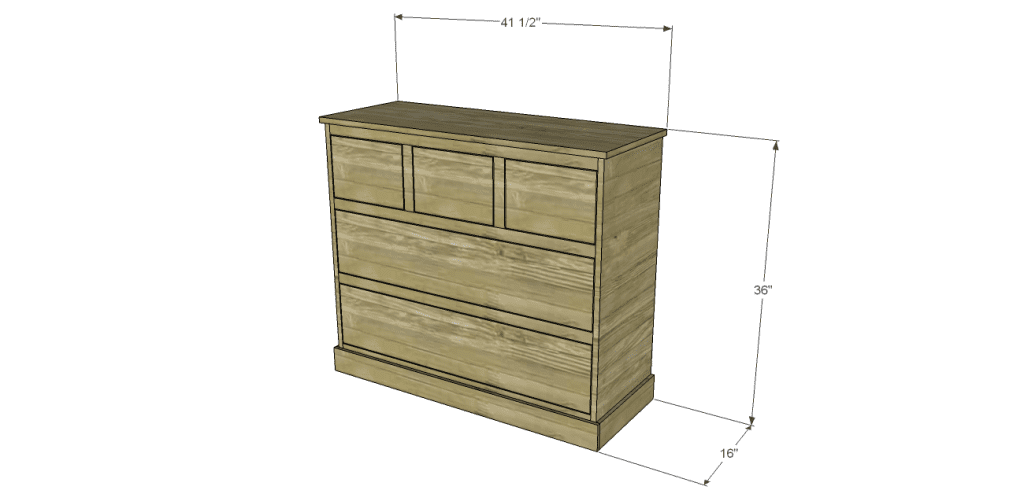
- 1 – 3/4″ plywood at 16″ x 41-1/2″ – Top
- 3 – 3/4″ plywood at 9-1/2″ x 10-1/2″ – Small Drawer Bottom
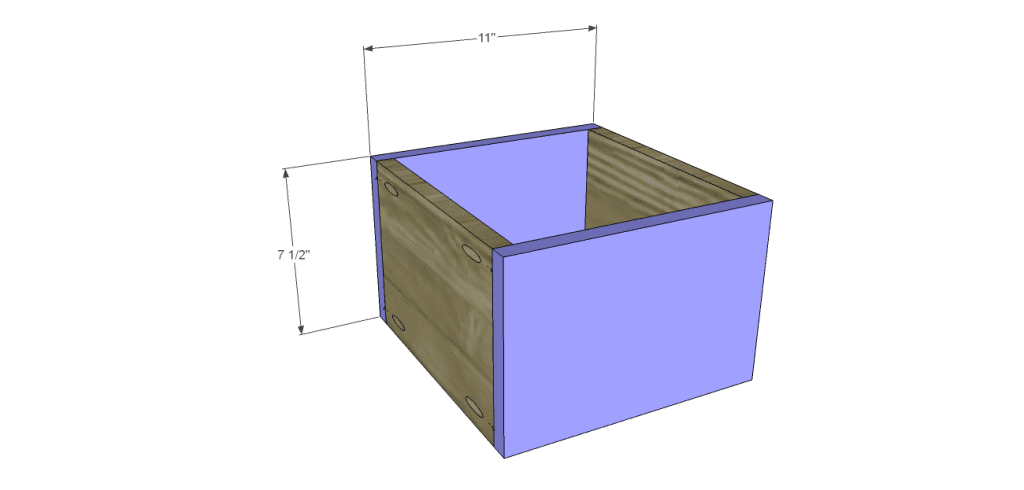
- 10 – 3/4″ plywood at 7-1/2″ x 10-1/2″ – Small & Large Drawer Box Sides
- 6 – 3/4″ plywood at 7-1/2″ x 11″ – Small Drawer Box Front & Back
- 2 – 3/4″ plywood at 10-1/2″ x 36-1/2″ – Large Drawer Bottom
- 4 – 3/4″ plywood at 7-1/2″ x 38″ – Large Drawer Box Front & Back
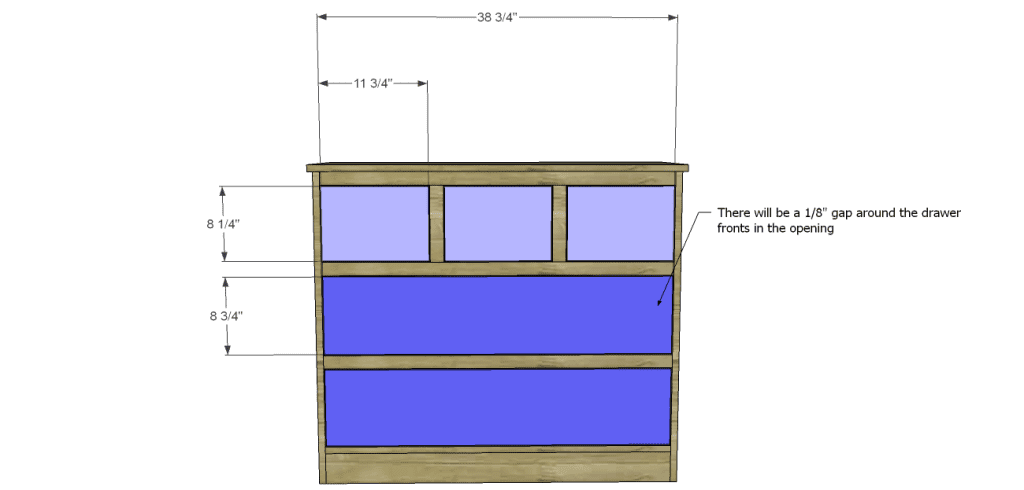
- 3 – 3/4″ plywood at 8-1/4″ x 11-3/4″ – Small Drawer Fronts
- 2 – 3/4″ plywood at 8-3/4″ x 38-3/4″ – Large Drawer Fronts
- Lower Trim cut to fit
Step One
Edge banding will be applied to the exposed edges of the plywood before assembly.
Cut the pieces for the sides and bottom. With the pocket hole jig set for 3/4″ material, drill pocket holes in each end of the bottom piece. Secure to the sides as shown, then secure using glue and 1-1/4″ pocket hole screws.
Step Two
Cut the piece for the back. Drill pocket holes in the sides as well as the bottom edge. Secure to the sides and bottom using glue and 1-1/4″ pocket hole screws.

Step Three
Cut the piece for the kick plate and drill pocket holes in each end. Position as shown, then secure using glue and 1-1/4″ pocket hole screws. Insert a few 1-1/4″ brad nails through the bottom piece into the lick plate to secure.
Step Four
Cut the pieces for the stretchers and drill pocket holes in each end. Position as shown, then secure using glue and 1-1/4″ pocket hole screws.

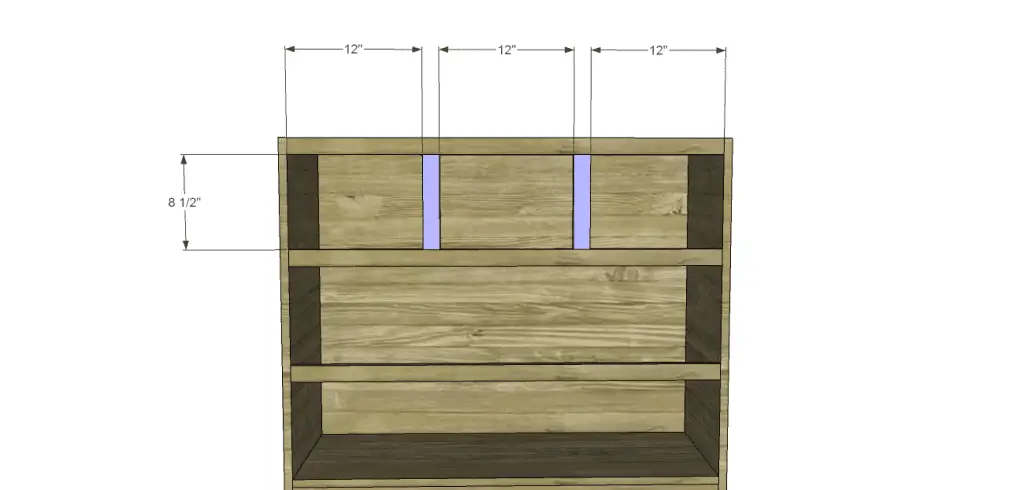
Step Five
Cut the pieces for the dividers and drill pocket holes in each end. Position as shown, then secure using glue and 1-1/4″ pocket hole screws.
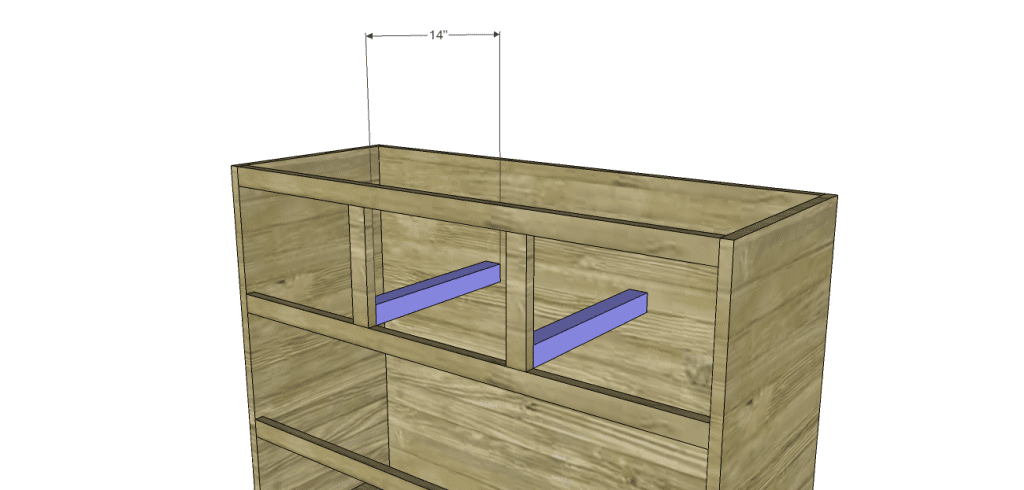
Step Six
Cut the pieces for the drawer slide supports. Secure to the dividers and back using glue and 1-1/4″ brad nails.
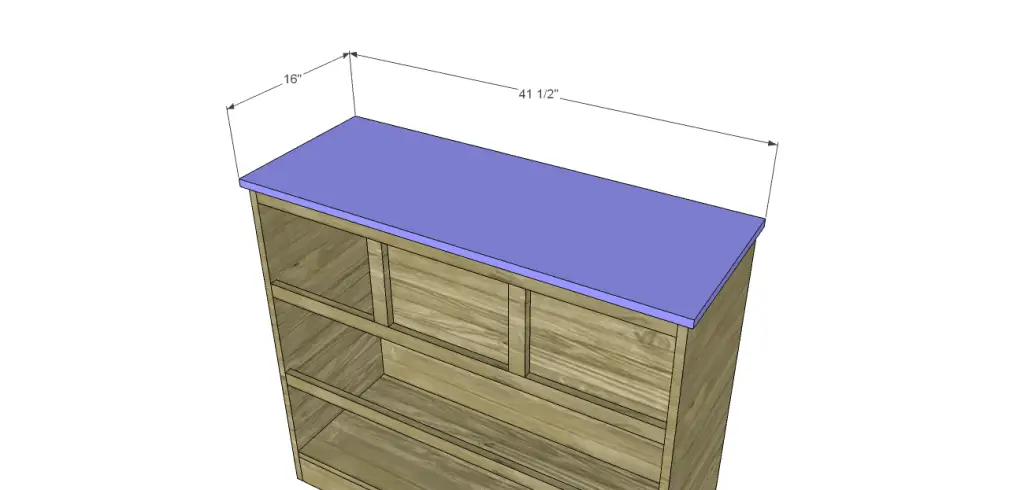
Step Seven
Cut the piece for the top. The top will overhang the sides and front by 1/2″. Secure in place using glue and 1-1/4″ brad nails.
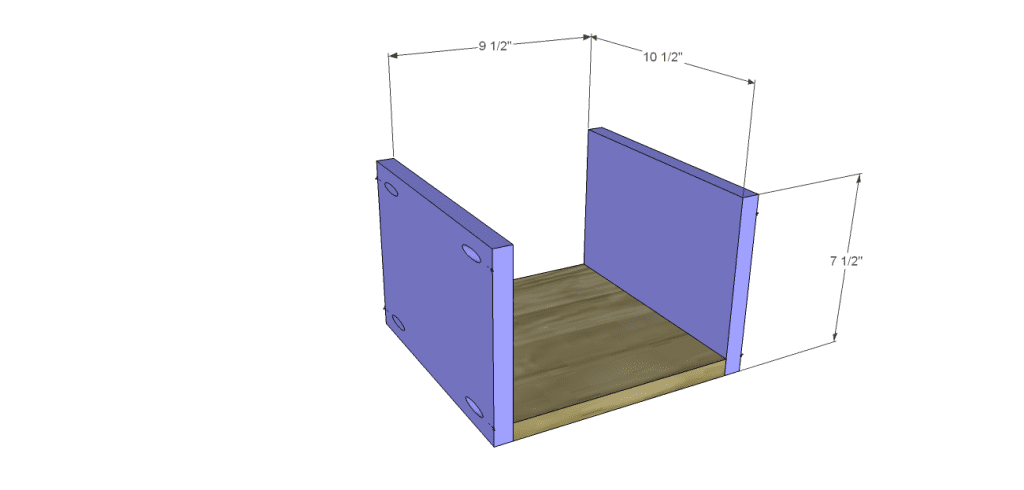
Step Eight
Cut the pieces for the drawer boxes. Drill pocket holes in all four edges of the bottom as well as each end of the sides. Assemble the drawer box as shown using glue and 1-1/4” pocket hole screws. Install the drawer slides according to the manufacturer’s installation instructions, locating them ¾” back from the front edge of the sides . Take a look at this easy tutorial on installing drawer slides. Make any necessary adjustments.


Step Nine
Cut the pieces for the drawer fronts. Mark the position for the drawer pulls and drill the holes. Shim the drawer front in the opening – there will be a 1/8” gap around all sides – then drive screws through the holes for the drawer pulls into the drawer box. Open the drawer, and secure the drawer front using countersunk 1-1/4” screws from the inside. Remove the screws from the holes for the drawer pull then finish drilling the holes. Install the drawer pull. This easy tutorial on installing drawer fronts will be a huge help!
Step Ten
Cut the trim pieces to fit. Pieces of 3/4″ plywood can be cut at 3-1/2″ wide and used as trim also. Install the sides first, securing them with glue and 1-1/4″ brad nails, then install the front.

Finish as desired.
These wide chest of drawers plans are incredibly easy, and perfect for first-time builders! (Two of the first projects I ever built were dressers!) Have a request for a plan? Contact me at cher {at} designsbystudioc {dot} com!
Originally posted 2013-11-11 08:00:56.


4 Comments
if making this is easy for first time builders, I might give it a try.. wish me luck! 🙂
You can do it!! I’d be happy to help walk you through it, also!
This looks just like the dresser I had as a kid!
Awesome!