
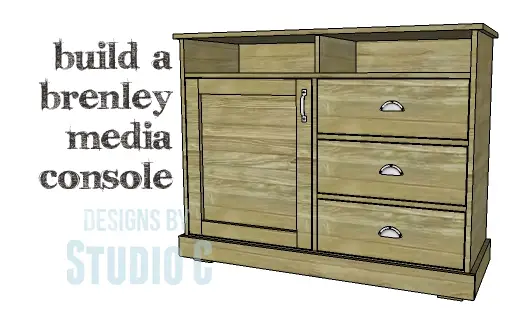
A Simply Rustic Media Console
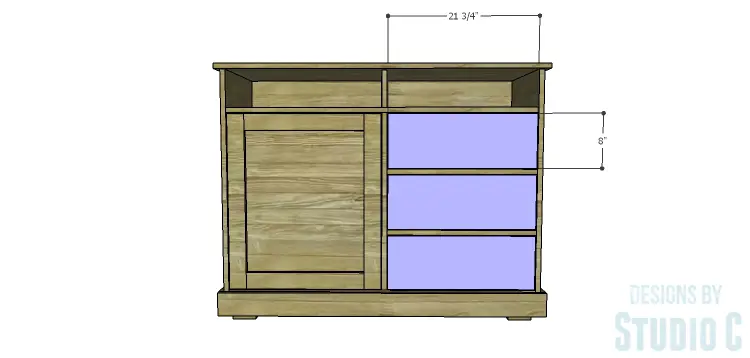
This media stand with its rustic look and large amount of storage is a super-simple build. The DIY plans to build a Brenley Media Console feature a door with a shelf behind it, three drawers, and two open cubbies. As an added detail, the lower trim stops just short of the floor so that the feet are exposed. This is an excellent project for those new to woodworking!
The plans to build this media console are suitable for all skill levels! Here’s another great project along the same lines…
Materials:
- 1-1/4″ pocket hole screws
- 1-1/4″ brad nails
- 3/4″ screws
- 1-1/2″ screws
- Edge banding, optional
- 3 sets of 16″ Drawer slides
- Cabinet pulls
- Wood glue
- Sandpaper (100, 150, 220 grits)
- Finishing supplies (primer & paint, or stain, sealer)
Lumber:
- 1 – 1×2 at 6′
- 1 – 1×3 at 8′
- 2 – 1×4 at 6′
- 3 – 1×8 at 8′
- Scraps of 4×4 at 4″ each
- 1 – 2′ x 4′ sheet of 1/4″ plywood
- 3 – 4′ x 8′ sheet of 3/4″ plywood
Cut List:
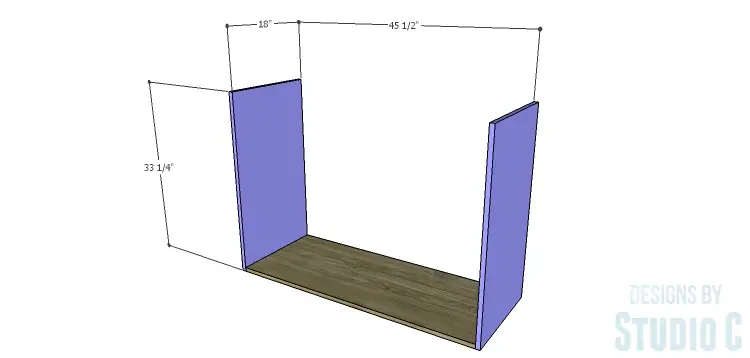
- 2 – 3/4″ plywood at 18″ x 33-1/4″ – Sides
- 1 – 3/4″ plywood at 18″ x 45-1/2″ – Bottom
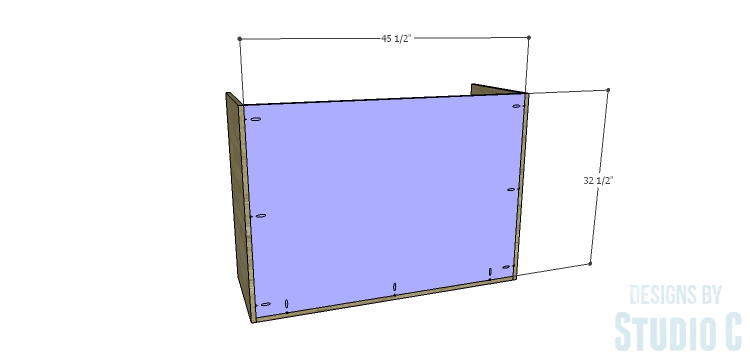
- 1- 3/4″ plywood at 32-1/2″ x 45-1/2″ – Back
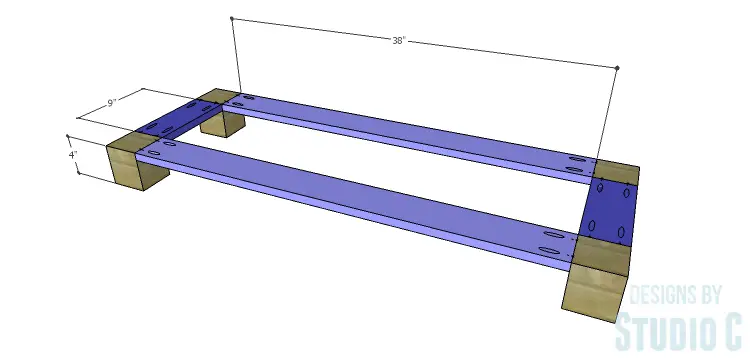
- 4 – 4×4 posts at 4″ – Base Legs
- 2 – 1×4 at 9″ – Base Frame
- 2 – 1×4 at 38″ – Base Frame
- 1 – 3/4″ plywood at 17-1/4″ x 26-1/4″ – Lower Divider
- 3 – 1×2 at 22″ – Drawer Stretchers
- 1 – 3/4″ plywood at 16-1/4″ x 22-3/4″ – Middle Shelf
- 1 – 3/4″ plywood at 17-1/4″ x 45-1/2″ – Upper Shelf
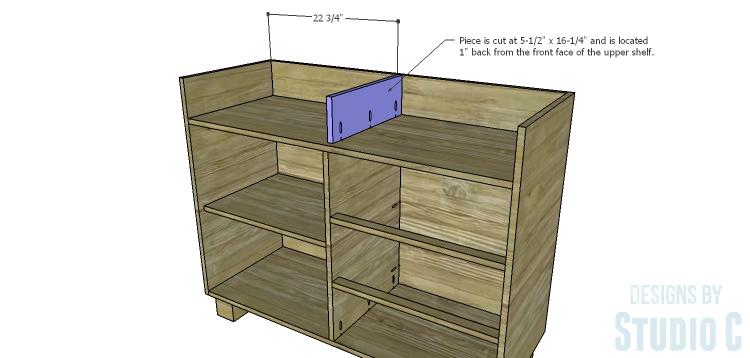
- 1 – 3/4″ plywood at 5-1/2″ x 16-1/4″ – Upper Divider
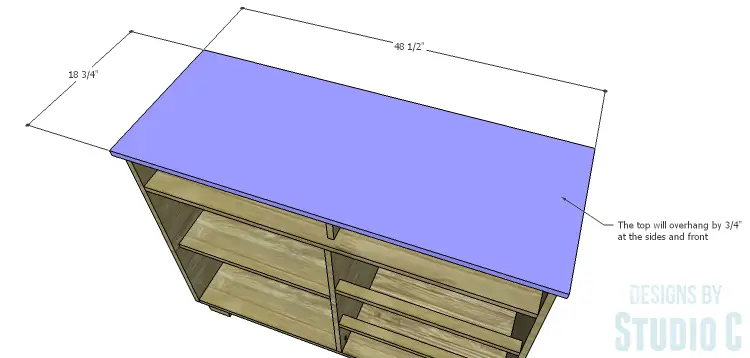
- 1 – 3/4″ plywood at 18-3/4″ x 48-1/2″ – Top
- 2 trim cut to fit for the sides
- 1 trim cut to fit for the front
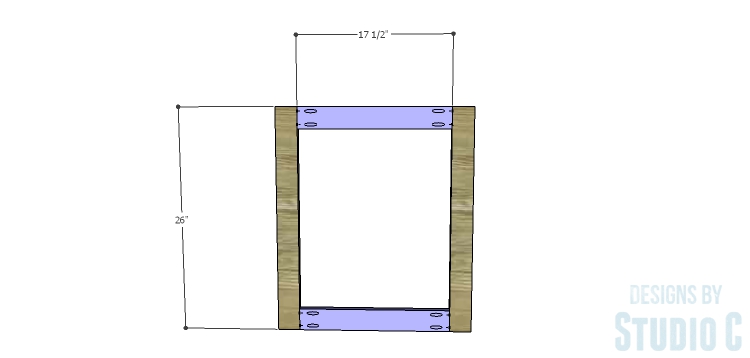
- 2 – 1×3 at 17-1/2″ – Door Rails
- 2 – 1×3 at 26″ – Door Stiles
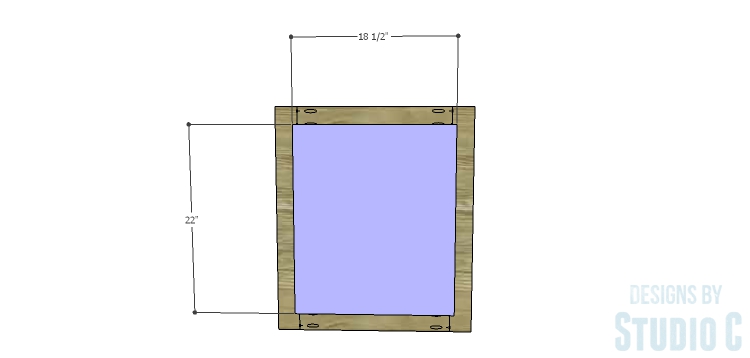
- 2 – 1/4″ plywood at 18-1/2″ x 22″ – Door Panels
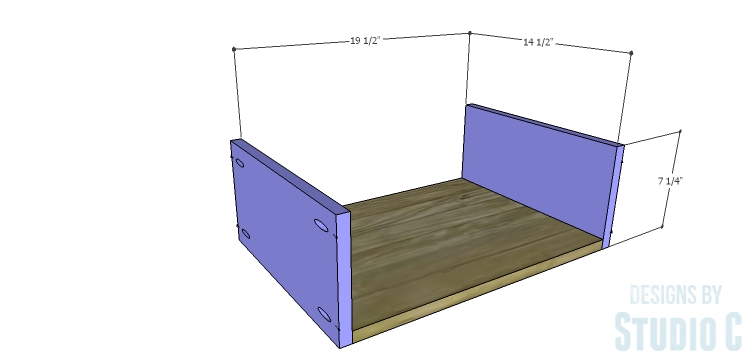
- 3 – 3/4″ plywood at 14-1/2″ x 19-1/2″ – Drawer Box Bottom
- 6 – 1×8 at 14-1/2″ – Drawer Box Sides
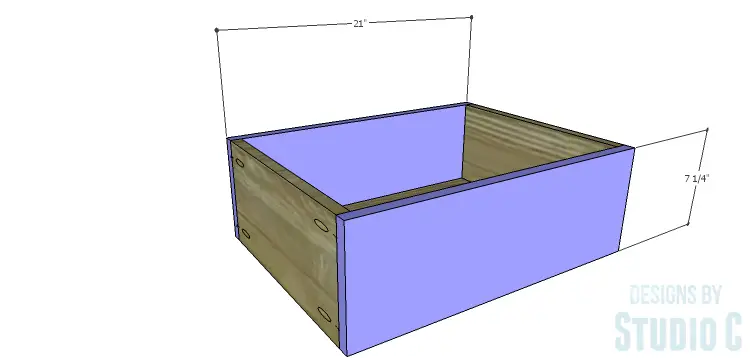
- 6 – 1×8 at 21″ – Drawer Box Front & Back
- 3 – 3/4″ plywood at 8″ x 21-3/4″ – Drawer Fronts
Step One
Edge banding will be applied to the exposed edges of the plywood prior to assembly.
Cut the pieces for the sides and the bottom. With the pocket hole jig set for 3/4″ material, drill pocket holes in each end of the bottom. Secure the bottom to the sides using glue and 1-1/4″ pocket hole screws.
Step Two
Cut the piece for the back and drill pocket holes in the side and bottom edges. Secure the back to the sides and bottom using glue and 1-1/4″ pocket hole screws.
Step Three
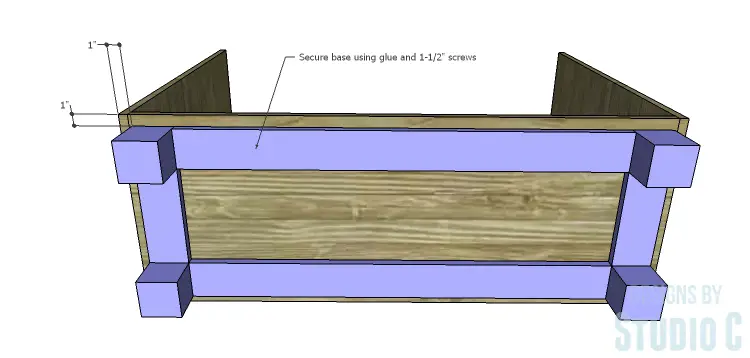
Cut the pieces for the base frame and legs. Drill pocket holes in each end of the frame pieces. Secure the frame pieces to the legs using glue and 1-1/4″ pocket hole screws.
Position the frame on the bottom locating the frame 1″ from each side edge. Secure the base frame to the bottom using glue and countersunk 1-1/2″ screws.
Step Four
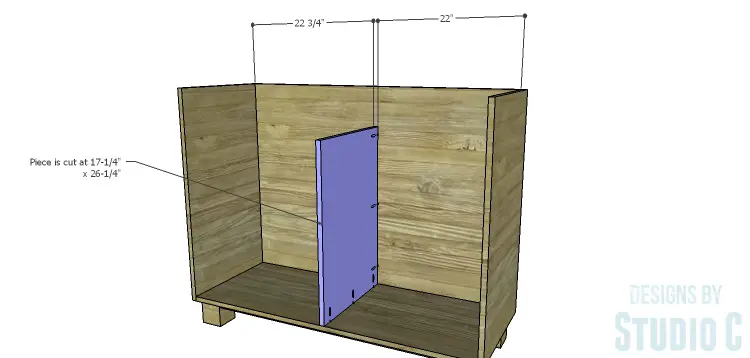
Cut the piece for the divider and drill pocket holes in the bottom edge and the back edge. Secure the divider to the bottom and back using glue and 1-1/4″ pocket hole screws.
Step Five
Cut the pieces for the drawer stretchers and drill pocket holes in each end. Secure the stretchers to the divider and side using glue and 1-1/4″ pocket hole screws.

Step Six
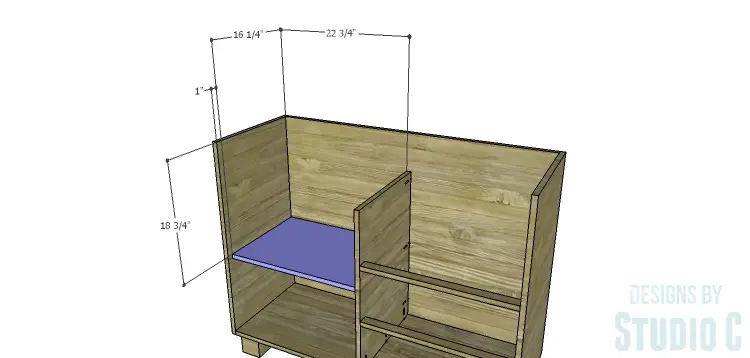
Cut the piece for the middle shelf and drill pocket holes in the side and back edges. Secure the shelf to the divider, side, and back using glue and 1-1/4″ pocket hole screws.
Step Seven
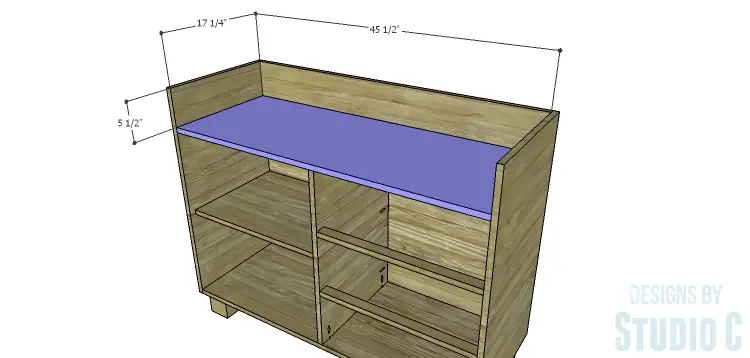
Cut the piece for the upper shelf and drill pocket holes in the side and back edges. Secure the shelf to the sides and back using glue and 1-1/4″ pocket hole screws. Add a few brad nails through the shelf into the divider.
Step Eight
Cut the piece for the upper divider and drill pocket holes in the lower edge. Secure the divider to the shelf using glue and 1-1/4″ pocket hole screws. Add a few brad nails through the back into the upper divider.
Step Nine
Cut the piece for the top. The top will overhang the sides and front by 3/4″. Secure the top in place using glue and 1-1/4″ brad nails.
Step Ten
Cut the pieces for the trim. There are no dimensions given for the trim because it will depend on the type of trim used and the join at the sides. Cut the pieces for the sides, and secure them using glue and 1-1/4″ brad nails. The pieces will be positioned 1″ up from the bottom of the legs. cut the piece for the front then secure it in the same manner.

Step Eleven
Cut the pieces for the drawer boxes. Drill pocket holes in all four edges of the bottom as well as each end of the sides. Assemble the drawer boxes as shown using glue and 1-1/4” pocket hole screws. Install the drawer slides according to the manufacturer’s installation instructions, locating them ¾” back from the front edge of the sides. This easy tutorial on installing drawer slides will be helpful! Make any necessary adjustments.
Step Twelve
Cut the pieces for the drawer fronts. Mark the position for the drawer pulls and drill the holes. Shim the drawer front in the opening – there will be a 1/8” gap around all sides – then drive screws through the holes for the drawer pulls into the drawer box. Open the drawer, and secure the drawer front using countersunk 1-1/4” screws from the inside. Remove the screws from the holes for the drawer pull then finish drilling the holes. Install the drawer pull. Take a look at this easy tutorial on installing drawer fronts.
Step Thirteen
Cut the pieces for the door frame and drill pocket holes in each end of the rails (the shorter pieces). Assemble the frame using glue and 1-1/4″ pocket hole screws.
Cut the pieces for the door panels. Position the panels on the back of the door frame, securing in place using glue and 3/4″ screws.
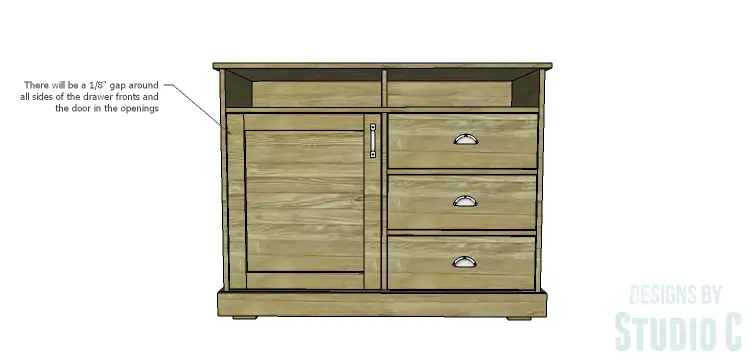
Finish as desired. Drill holes in the back of the open cubbies for electrical cords, if desired.
The media center would be an awesome addition to any room. The piece can also double as toy storage in the kiddos room, or even as a dresser! The DIY plans to build a Brenley Media Console can be completed in a weekend! Any questions? Leave a comment below!
Originally posted 2014-11-11 08:00:46.


Comments are closed.