
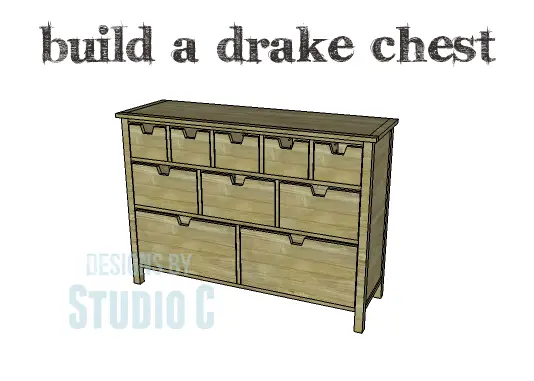
Plans to Build a Drake Chest
A Great Piece with Lots of Storage
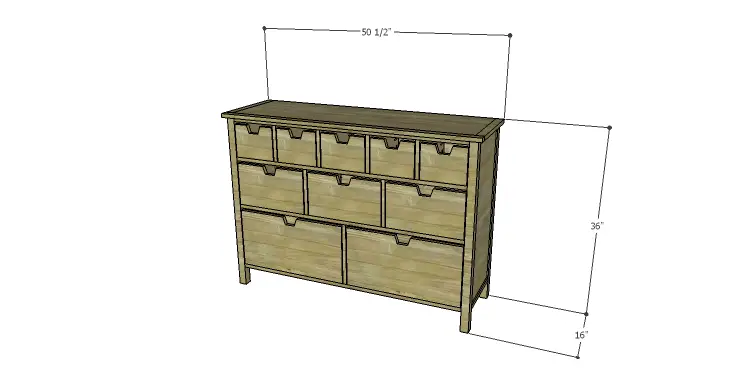
This chest is one of those pieces that is so well suited for any room… Featuring ten drawers, the plans to build a Drake chest are really easy plus, there are no drawer slides or handles to install. Just add a coat of paste wax on the bottom of the drawers to help them slide smoothly in the openings!
Materials:
- 1-1/4” pocket hole screws (<– affiliate link!)
- 1″ brad nails
- 1-1/4” brad nails
- Edge banding, optional
- Wood glue
- Sandpaper (100, 150, 220 grits)
- Finishing supplies (primer & paint, or stain, sealer)
- Paste wax
Lumber:
- 5 – 1×2 at 8′
- 2 – 2×2 at 6′
- 1 – 2′ x 2′ piece of 1/2″ plywood
- 3 sheets of 3/4″ plywood
Cut List:
- 4 – 2×2 at 35-1/4″ – Legs
- 4 – 1×2 at 12-1/2″ – Side Framing
- 2 – 3/4″ plywood at 12-1/2″ x 29-3/4″ – Side Panels
- 6 – 1×2 at 46″ – Back Framing & Front Stretchers
- 1 – 3/4″ plywood at 29-3/4″ x 46″ – Back Panel
- 1 – 3/4″ plywood at 12-1/2″ x 46″ – Bottom
- 2 – 3/4″ plywood at 12-1/2″ x 47″ – Shelves
- 6 – 1/2″ plywood at 1-1/2″ x 12-1/2″ – Spacers
- 1 – 3/4″ plywood at 12-1/4″ x 14″ – Lower Divider
- 2 – 3/4″ plywood at 9″ x 14″ – Middle Dividers
- 4 – 3/4″ plywood at 7″ x 14″ – Upper Dividers
- 1 – 3/4″ plywood at 14-3/4″ x 47-1/2″ – Top Panel
- 2 – 1×2 at 14-3/4″ – Top Side Trim
- 1 – 1×2 at 50-1/2″ – Top Front Trim
- 2 – 3/4″ plywood at 12-1/2″ x 20-7/8″ – Large Drawer Box Bottom
- 4 – 3/4″ plywood at 11-3/4″ x 12-1/2″ – Large Drawer Box Sides
- 4 – 3/4″ plywood at 11-3/4″ x 22-3/8″ – Large Drawer Front & Back
- 1 – 3/4″ plywood at 12-1/2″ x 13-1/4″ – Middle Center Drawer Box Bottom
- 2 – 3/4″ plywood at 8-1/2″ x 12-1/2″ – Middle Center Drawer Box Sides
- 2 – 3/4″ plywood at 8-1/2″ x 14-3/4″ – Middle Center Drawer Box Front & Back
- 2 – 3/4″ plywood at 12-1/2″ x 13″ – Middle End Drawer Box Bottom
- 4 – 3/4″ plywood at 8-1/2″ x 12-1/2″ – Middle End Drawer Box Sides
- 4 – 3/4″ plywood at 8-1/2″ x 14-1/2″ – Middle End Drawer Box Front & Back
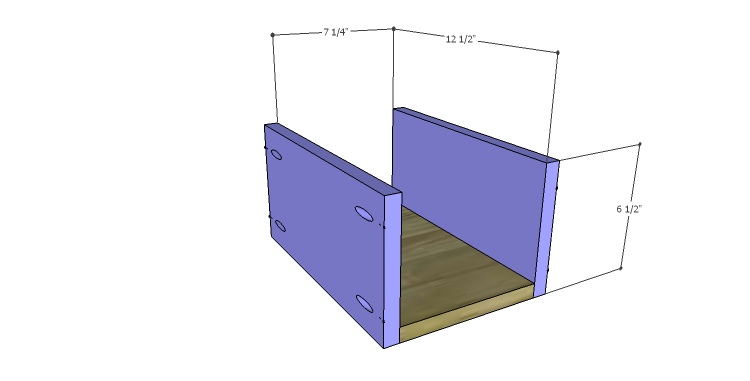
- 1 – 3/4″ plywood at 7-1/4″ x 12-1/2″ – Top Center Drawer Box Bottom
- 2 – 3/4″ plywood at 6-1/2″ x 12-1/2″ – Top Center Drawer Box Sides
- 2 – 3/4″ plywood at 6-1/2″ x 8-3/4″ – Top Center Drawer Box Front & Back
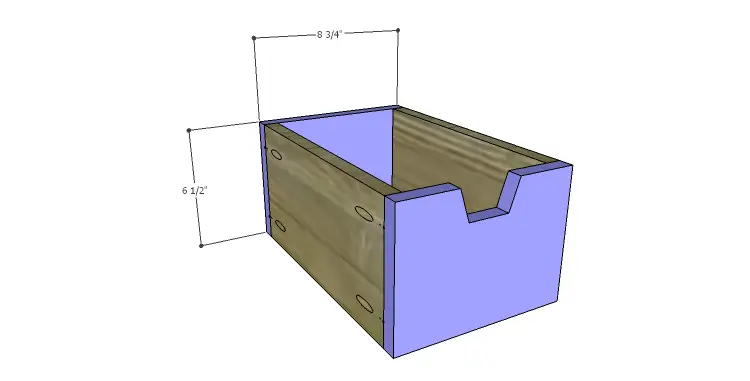
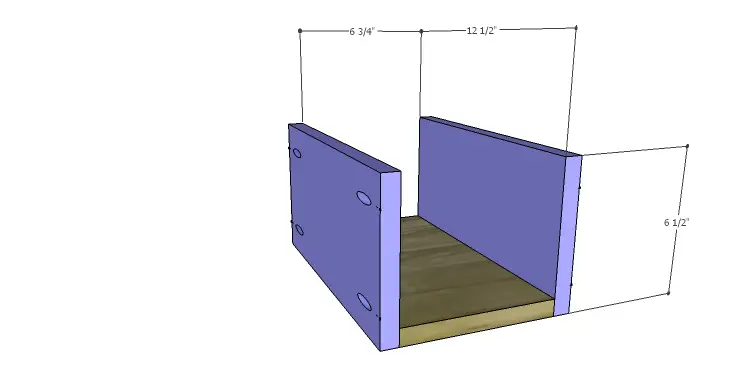
- 4 – 3/4″ plywood at 6-3/4″ x 12-1/2″ – Top Drawer Box Bottom
- 8 – 3/4″ plywood at 6-1/2″ x 12-1/2″ – Top Drawer Box Sides
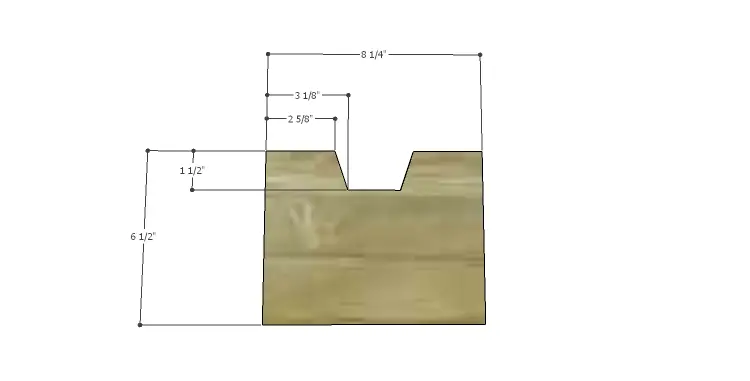
- 8 – 3/4″ plywood at 6-1/2″ x 8-1/4″ – Top Drawer Front & Back
Notes:
The top center drawer and the middle center drawer are wider than the other drawers in the corresponding row. The 1×2 and 2×2 lumber can be substituted with plywood for continuity of the wood species.
Edge banding will be applied to the exposed edges of the plywood prior to assembly.
Step One
Cut the pieces for the legs, side framing, and side panels. With the pocket hole jig set for 3/4″ material, drill pocket holes in each end of the framing pieces as well as all four edges of the panels. Secure the framing pieces to the legs using glue and 1-1/4″ pocket hole screws. Insert the panel and secure to the legs and framing using glue and 1-1/4″ pocket hole screws. The panels will be positioned 1/4″ back from the outside faces of the legs.

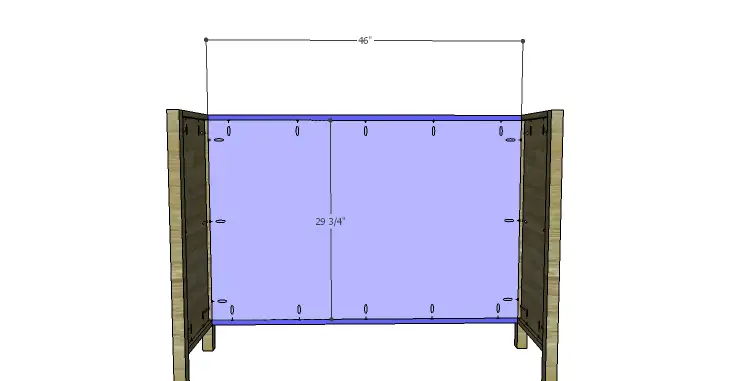
Step Two
Cut the pieces for the back framing and the back panel. Drill pocket holes in each end of the framing pieces as well as all four edges of the panel. Secure the framing pieces to the legs using glue and 1-1/4″ pocket hole screws. Insert the panel and secure to the legs and framing using glue and 1-1/4″ pocket hole screws. The inside face of the back panel will be positioned so it is flush with the inside faces of the legs.
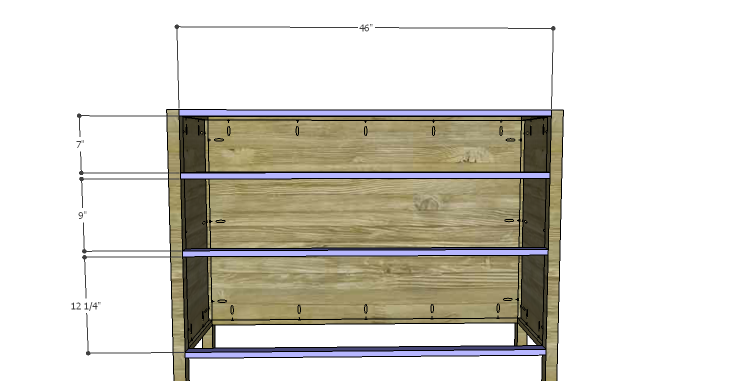
Step Three
Cut the pieces for the stretchers and drill pocket holes in each end. Position the stretchers as shown securing them to the legs using glue and 1-1/4″ pocket hole screws.
Step Four
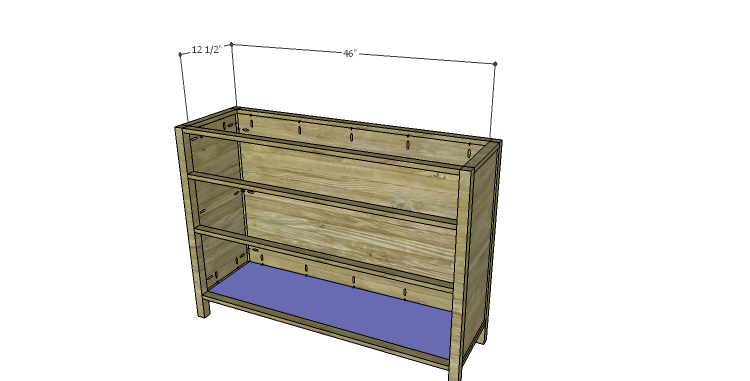
Cut the piece for the bottom and drill pocket holes in all four edges. Secure to the lower side framing, the lower back framing, and the lowest stretcher using glue and 1-1/4″ pocket hole screws.
Step Five
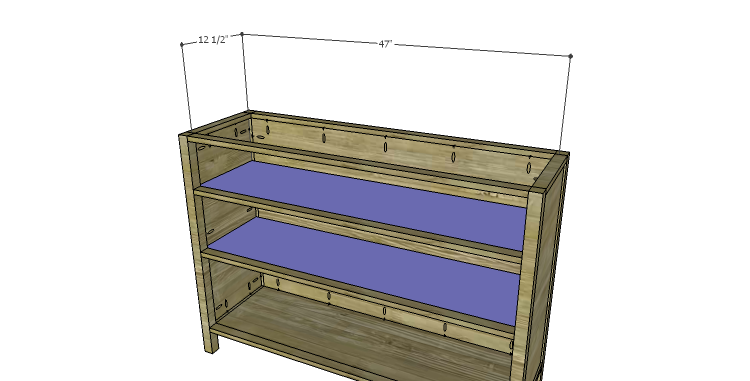
Cut the pieces for the shelves and drill pocket holes in all four edges. Secure to the side panels, back panel, and front stretchers as shown using glue and 1-1/4″ pocket hole screws.
Step Six
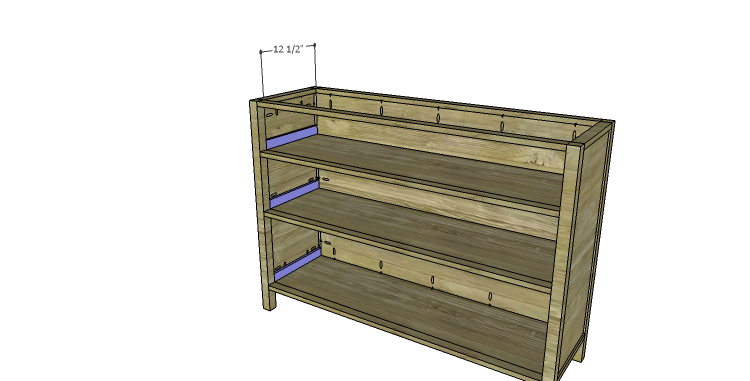
Cut the pieces for the spacers. The spacers will help keep the drawers located at the outer edges in line with the cabinet. Secure the spacers above the bottom and each shelf using glue and 1″ brad nails.
Step Seven
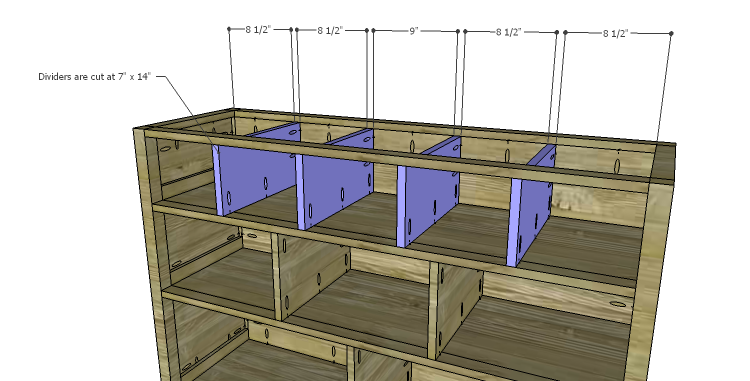
Cut the pieces for the dividers. Drill pocket holes in the bottom edge, the back edge, and the top edge of the lower and middle dividers. Drill pocket holes in the bottom edge and back edge of the top dividers. Secure the dividers to the bottom and shelves as shown using glue and 1-1/4″ pocket hole screws. A close-quarter drill or right angle drill attachment may be required to secure the middle dividers. For the top dividers, secure the top edge to the uppermost stretcher using 1-1/4″ brad nails.


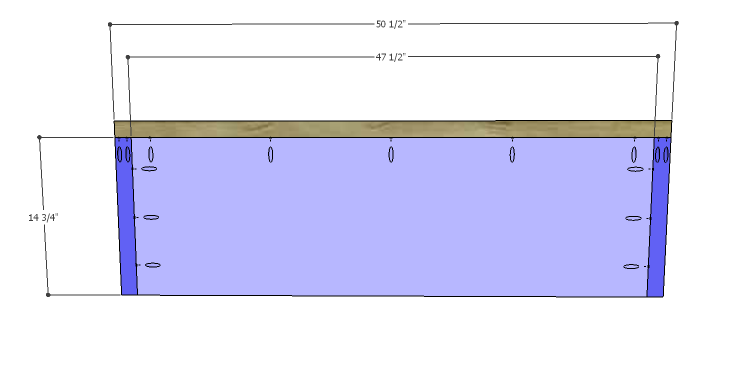
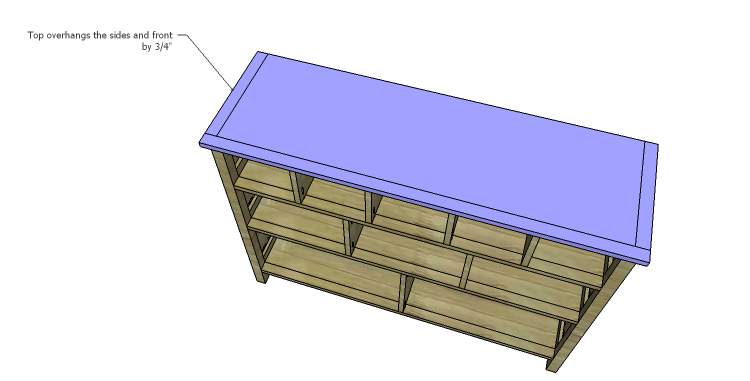
Step Eight
Cut the pieces for the top panel, top side trim, and top front trim. Drill pocket holes in one end of the top side trim as well as the front and side edges of the panel. Secure the side trim to the panel first using glue and 1-1/4″ pocket hole screws, then install the front trim piece.
The front and sides of the top will overhang by 3/4″. Secure in place using glue and 1-1/4″ brad nails.
Step Nine
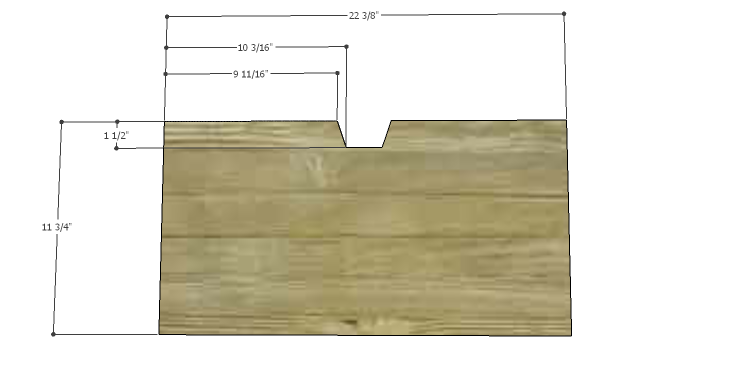
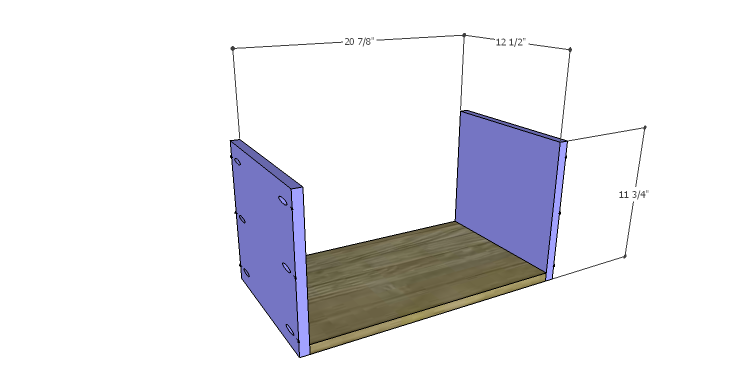
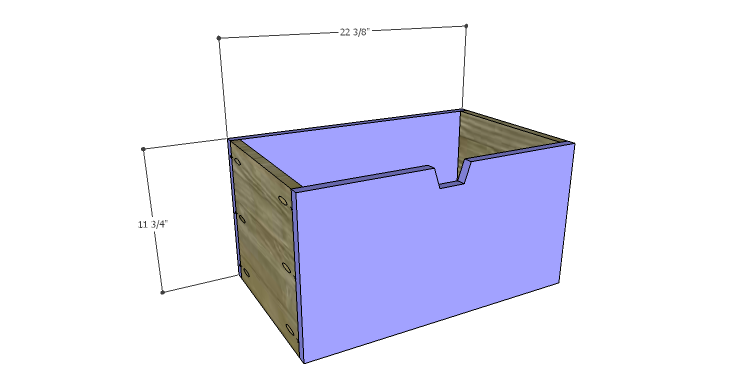
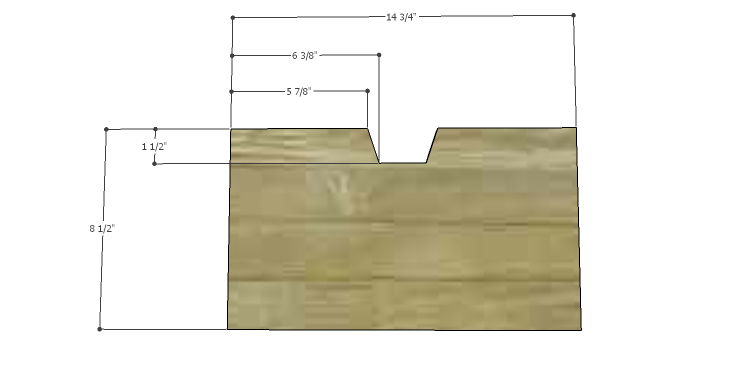
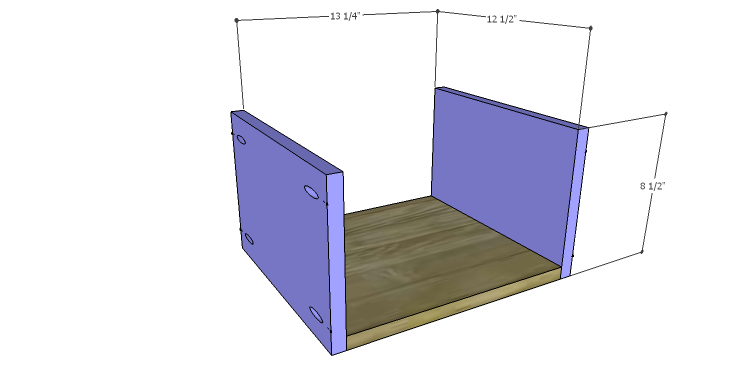
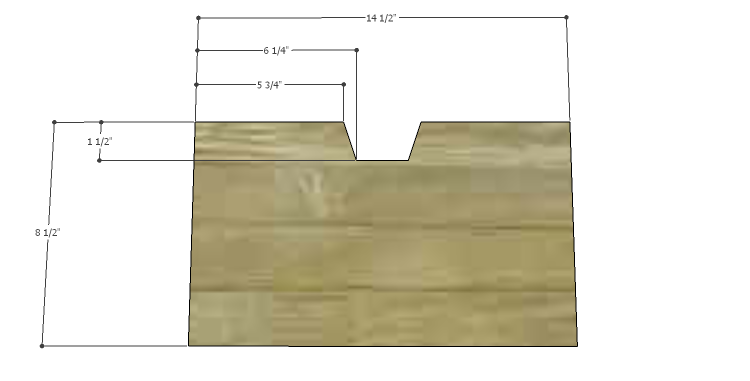
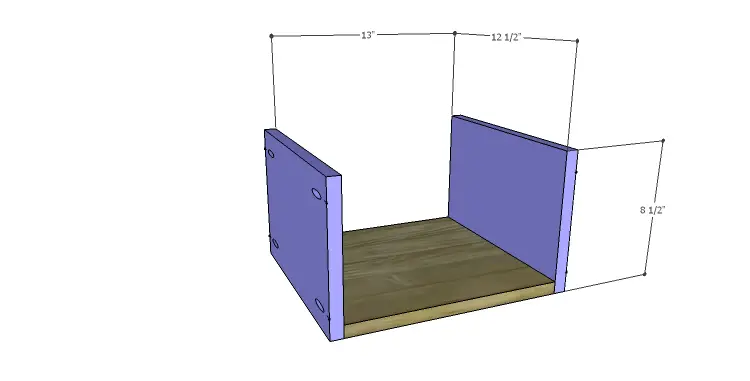
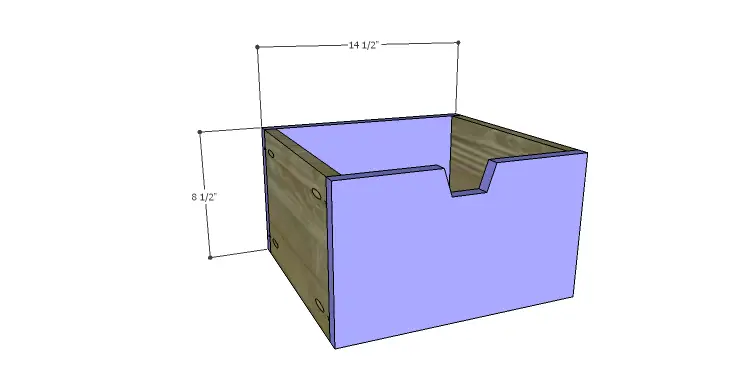
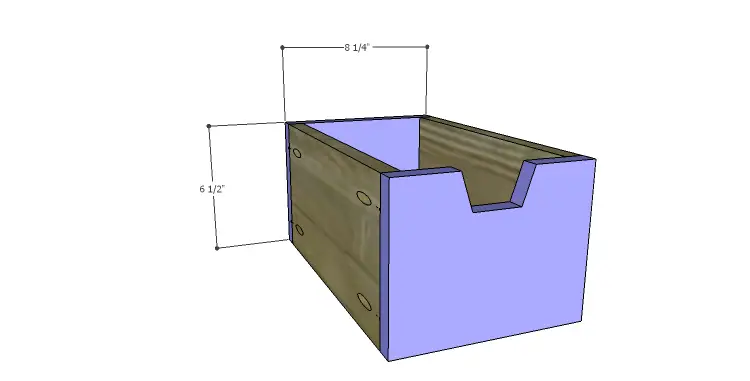
Cut the pieces for the lower drawer boxes. All of the drawers will be assembled in the same manner. Cut the notches in the fronts using a jigsaw. Drill pocket holes in each end of the sides as well as all four edges of the bottom. Secure the sides to the bottom using glue and 1-1/4″ pocket hole screws, then install the front and back.
Step Ten
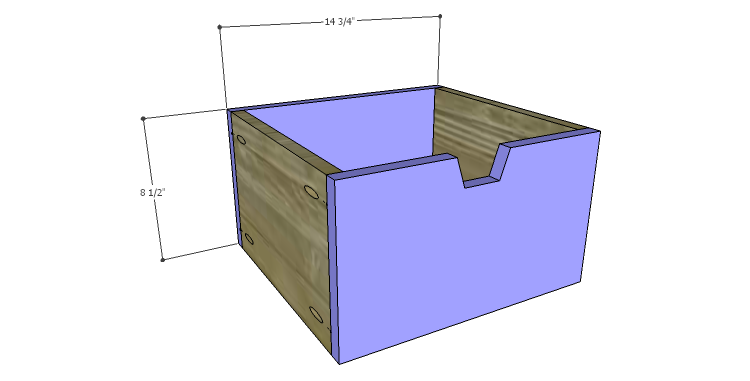
Cut the pieces for the middle drawers, noting that the center drawer is wider than the other two. Assemble the drawers in the same manner as the lower drawer boxes (see Step Nine).
Step Eleven
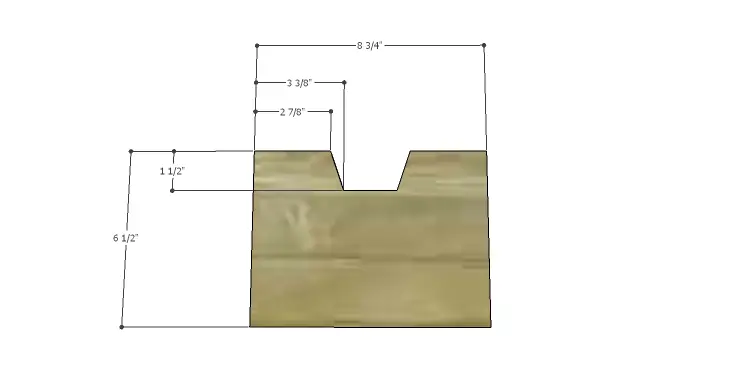
Cut the pieces for the top drawers, noting that the center drawer is wider than the other four. Assemble the drawers in the same manner as the lower drawer boxes (see Step Nine).
Finish as desired. Apply a coat of paste wax to the bottom of each drawer.
As a fun accent, the front of the drawers can be painted with chalkboard paint or given a really neat design using the glue-resist technique! Have any questions about the plans to build a Drake chest? Leave a comment below or contact me at cher {at} designsbystudioc {dot} com!
Originally posted 2014-08-18 08:00:34.

[…] This 10 drawer chest would be perfect in a childs room as a dresser or even as a TV console. Lots of possibilities. Here are the free woodworking plans. […]
[…] Furniture: Incorporate colorful accent furniture pieces, such as chairs or side tables, to add a bold statement to your neutral space. Opt for vibrant […]