An Easy to Build Desk with Storage
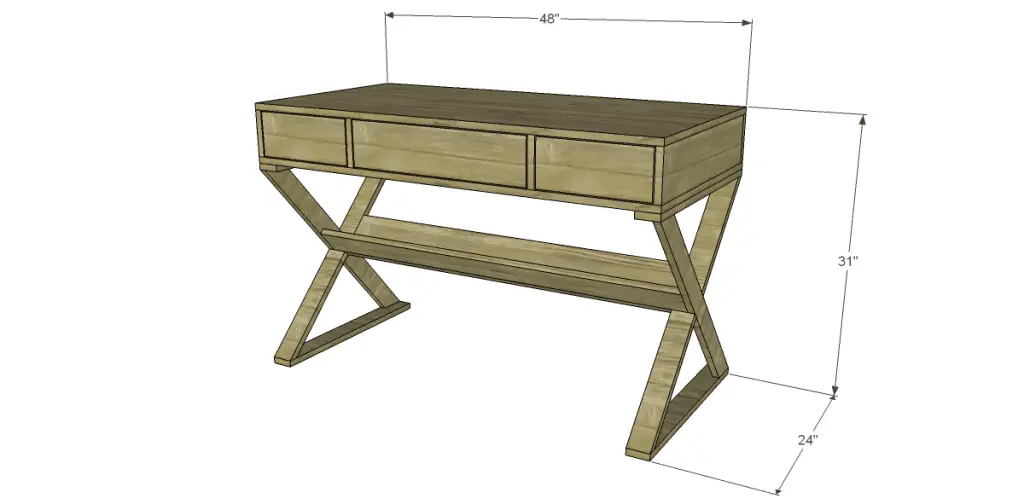
The free plans to build a Bicknell writing desk feature ample storage with three deep drawers and a nice, wide top. It would be the perfect addition for those of us who need to get organized (ahem). The legs are shaped in the X style that is so popular in furniture now!
Materials:
- 1-1/4″ pocket hole screws
- 1-1/4″ screws
- Edge banding for the plywood, if desired
- Three sets of 20″ drawer slides
- Drawer pulls
Lumber:
- 3 – 1×3 at 8′
- 1 – 1×4 at 4′
- 1 – 1×6 at 4′
- One sheet of 3/4″ plywood
Cut List:
- 4 – 1×3 at 33″ – Legs
- 4 – 1×3 at 24″ – Leg Supports
- 2 – 3/4″ plywood at 24″ x 48″ – Top & Bottom
- 1 – 3/4″ plywood at 5-1/4″ x 48″ – Back
- 4 – 3/4″ plywood at 5-1/4″ x 23-1/4″ – Sides & Dividers
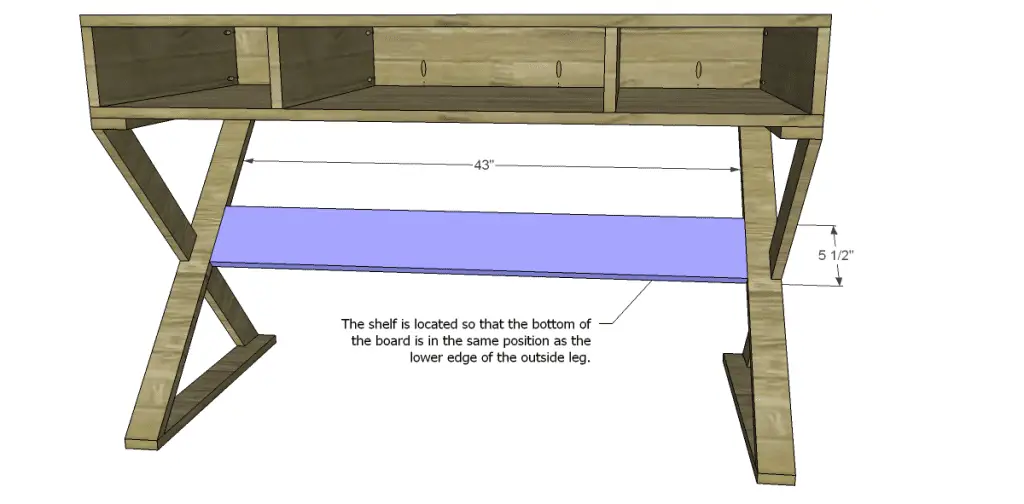
- 1 – 1×6 at 43″ – Shelf Back
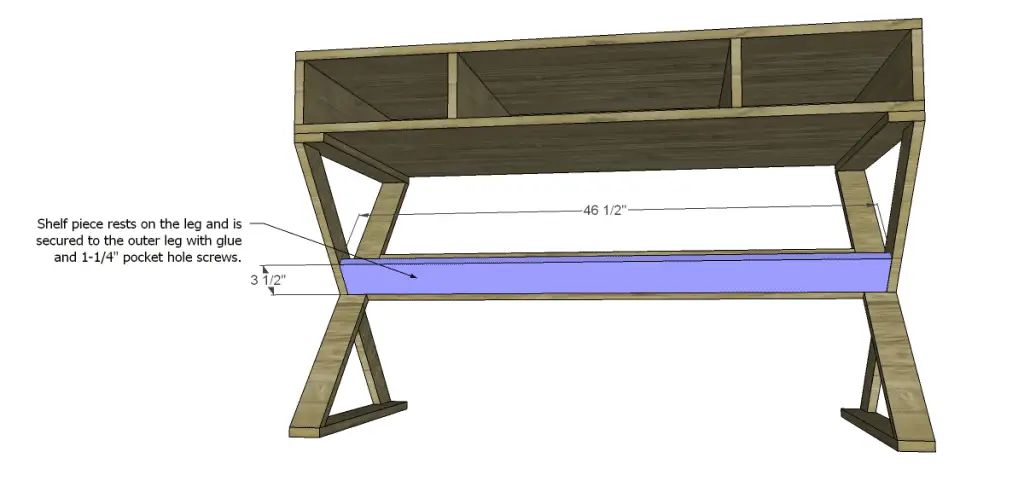
- 1 – 1×4 at 46-1/2″ – Shelf Front
- 2 – 3/4″ plywood at 9-1/2″ x 19-1/4″ – Smaller Drawer Bottom
- 1 – 3/4″ plywood at 18-1/2″ x 19-1/4″ – Larger Drawer Bottom
- 6 – 3/4″ plywood at 5″ x 19-1/4″ – Drawer Sides
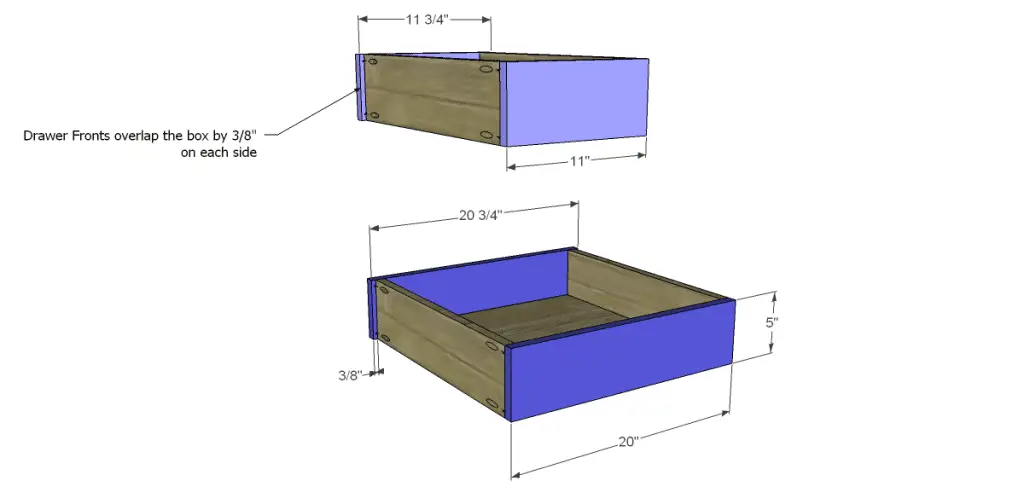
- 2 – 3/4″ plywood at 5″ x 11″ – Smaller Drawer Back
- 2 – 3/4″ plywood at 5″ x 11-3/4″ – Smaller Drawer Front
- 1 – 3/4″ plywood at 5″ x 20″ – Larger Drawer Back
- 1 – 3/4″ plywood at 5″ x 20-3/4″ – Larger Drawer Front
Step One
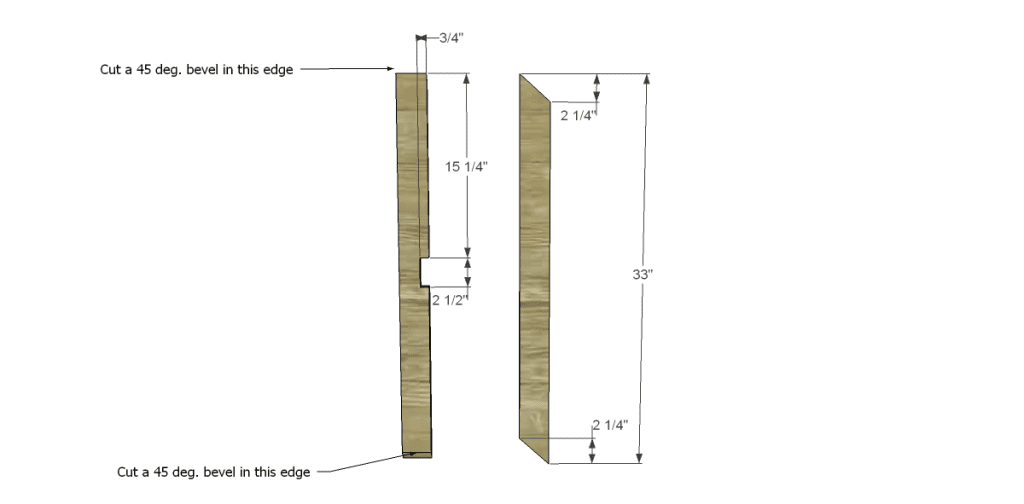
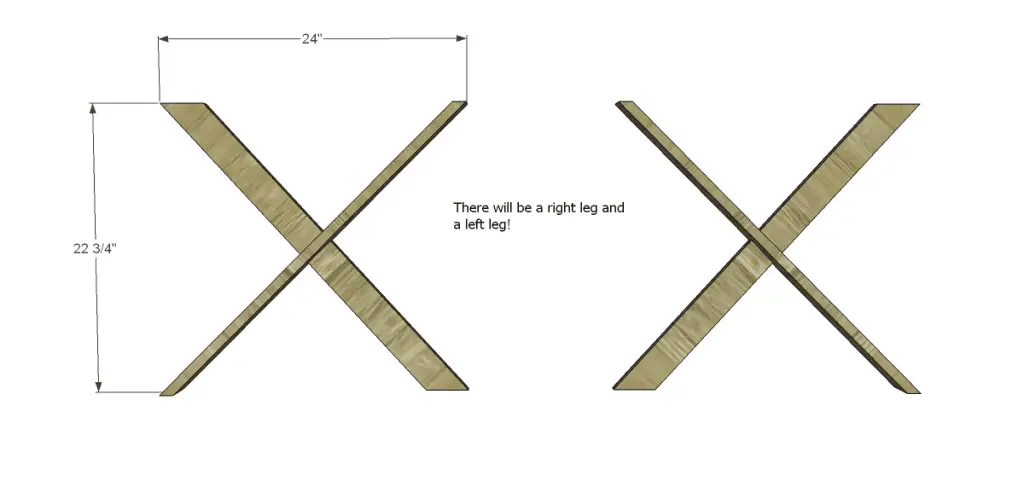
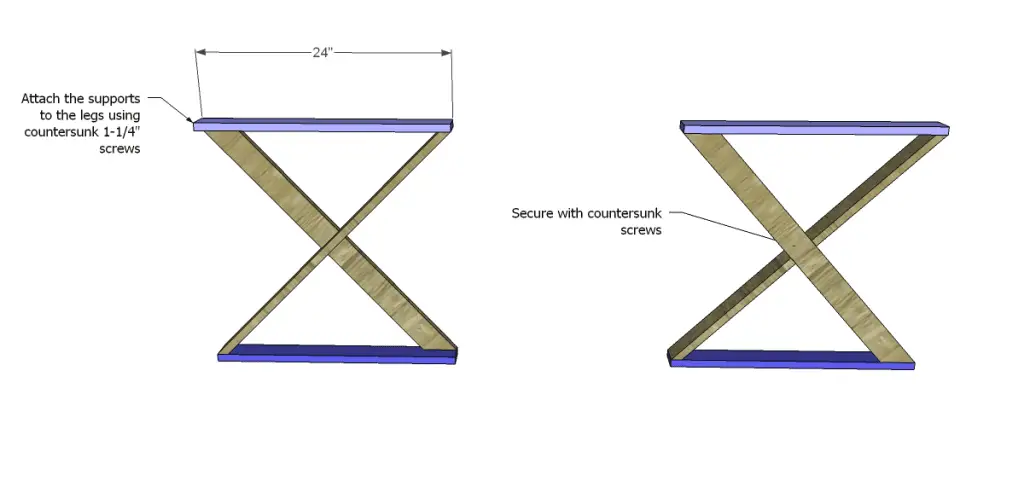
Cut the pieces for the legs. In two of the pieces, cut a 45 degree bevel at each end as shown. Cut the notch as shown using a jigsaw. In the other two pieces, cut the angle as shown. Assemble the legs making sure there is a right leg and a left leg, and secure in the center with countersunk 1-1/4″ screws. Maintain the dimensions as shown. Cut the pieces for the leg supports. Position the pieces on each leg assembly and secure with glue and countersunk 1-1/4″ screws.
Step Two
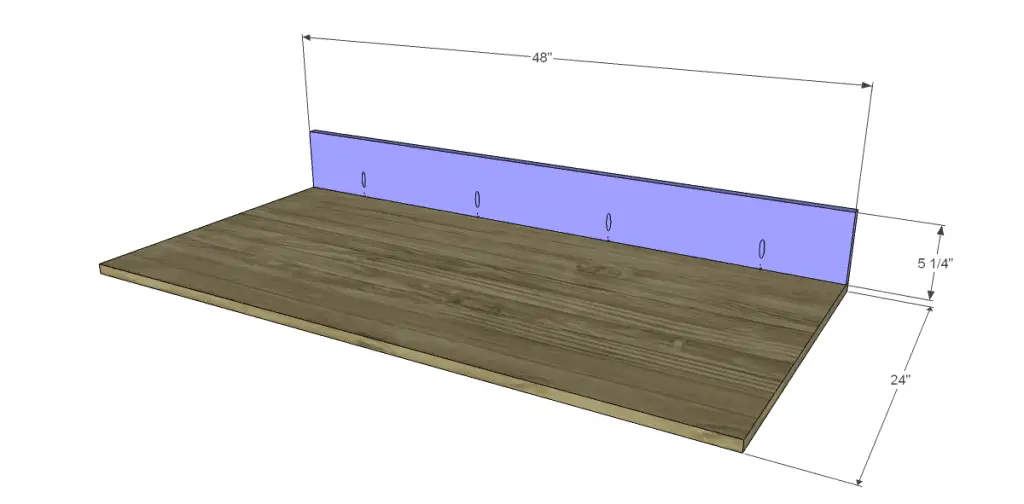
Cut the pieces for the box. If using edge banding, it will be applied to the exposed edges of the plywood before assembly. Drill pocket holes along the bottom of the back piece and secure to the back edge of the bottom using glue and 1-1/4″ pocket hole screws.
Step Three
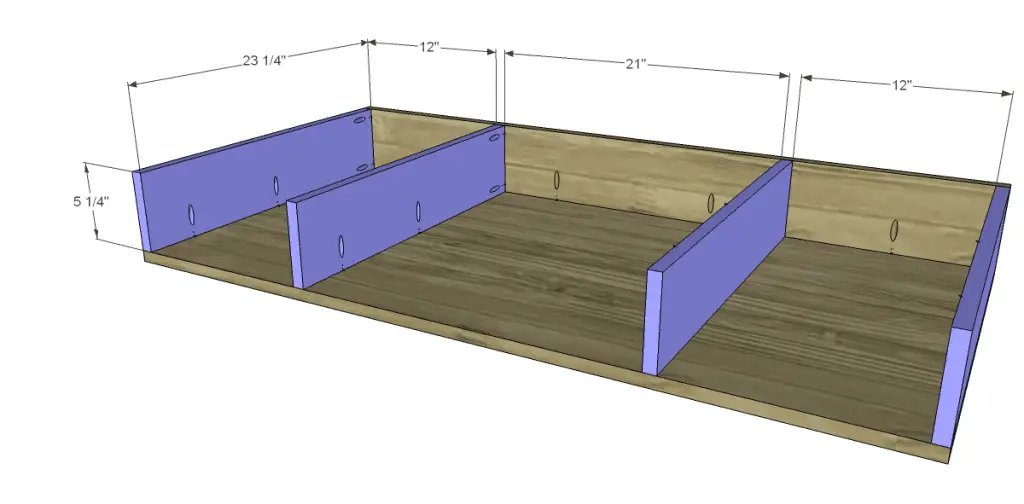
Cut the pieces for the sides and dividers. Drill pocket holes in one long edge (for the bottom) as well as one short edge (for the back). Secure in place using glue and 1-1/4″ pocket hole screws.
Step Four
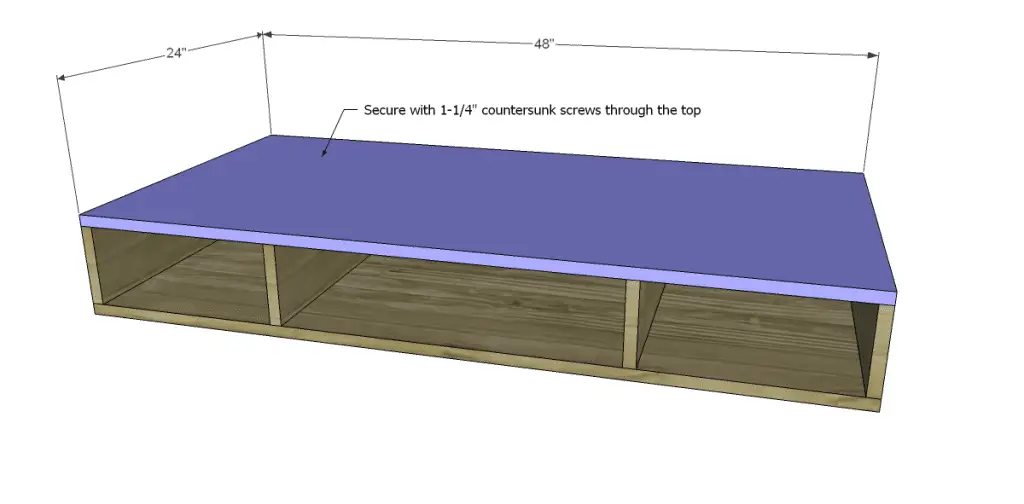
Cut the piece for the top. Secure to the box using glue and 1-1/4″ countersunk screws through the top into the sides, dividers, and back. The box can also be inverted so that the countersunk screws face the bottom and the holes will not have to be filled! Position the legs as shown and secure to the box using glue and 1-1/4″ countersunk screws.
Step Five
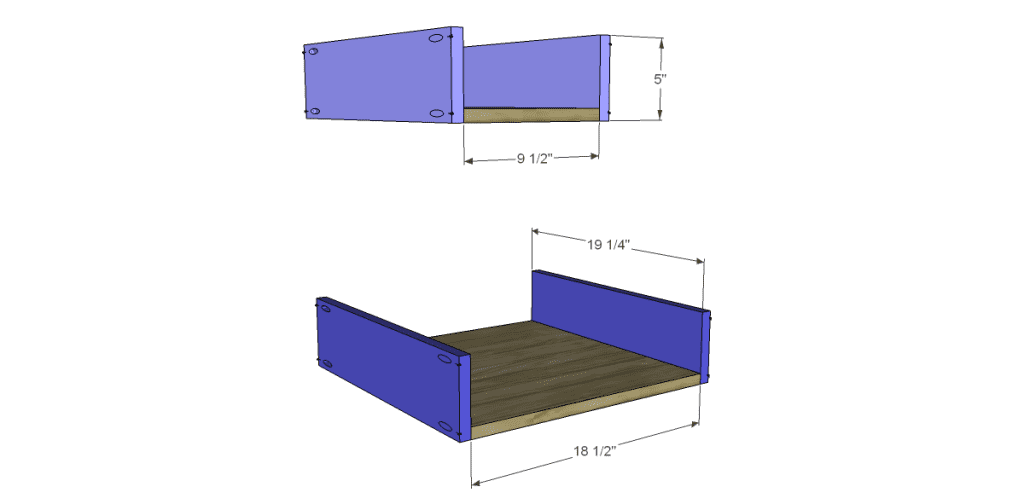
Cut the pieces for the drawer boxes. Drill pocket holes in all four edges of the bottom pieces as well as each end of the side pieces. Attach the sides to the bottom as shown using glue and 1-1/4″ pocket hole screws. Attach the front and back as shown using glue and 1-1/4″ pocket hole screws. The fronts will overlap the boxes by 3/8″ on each side.
Install the drawer slides according to the manufacturer’s instructions. This easy tutorial on installing drawer slides will be helpful! Make any necessary adjustments and install the drawer pulls on the drawers.
Step Six
Cut the pieces for the back shelf piece. Drill pocket holes in each end of the 1×6 piece. Position the piece so that the pocket holes face to the back, and the lower edge is parallel with the center of the X. (See the drawings) Secure with glue and 1-1/4″ pocket hole screws.
Step Eight
Cut the piece for the front shelf piece. Drill pocket holes along one long edge and at each end. Position the piece so it rests on the back shelf piece and flat part of the legs. (See the drawings) Secure with glue and 1-1/4″ pocket hole screws.
Step Eight
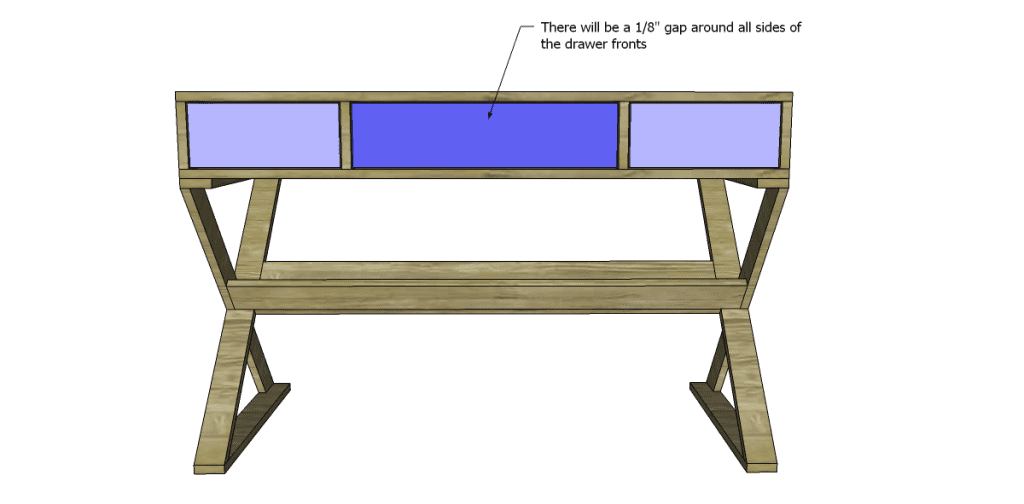
Install the drawers.
Finish as desired.
Have any questions about the free plans for a Joss & Main Inspired Bicknell Writing Desk? Leave a comment below!

Comments are closed.