
Build the Ivy Cabinet
An Easy to Build Cabinet with Storage
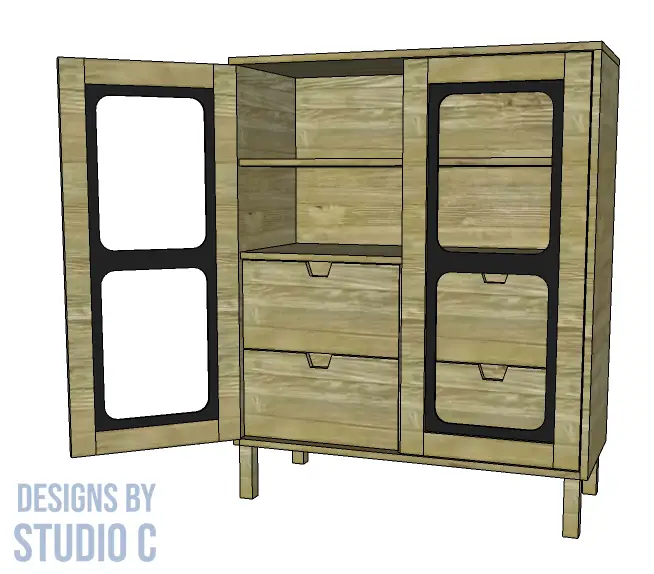
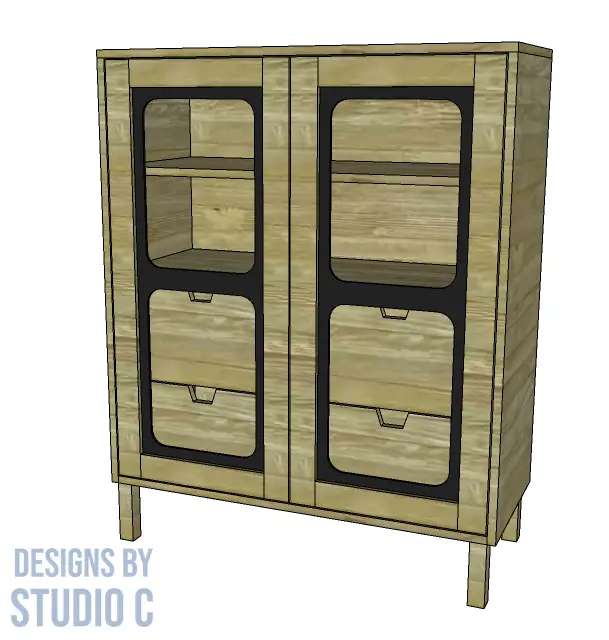
This fabulous cabinet is inspired by Anthropologie, and features window-paneled doors with drawers and shelving inside. There are no drawer slides, only wood runners that the drawers will slide on (so that eliminates some frustration!) and no drawer handles. The plans to build the Ivy cabinet are suitable for all skill levels, and is an easy project to complete!
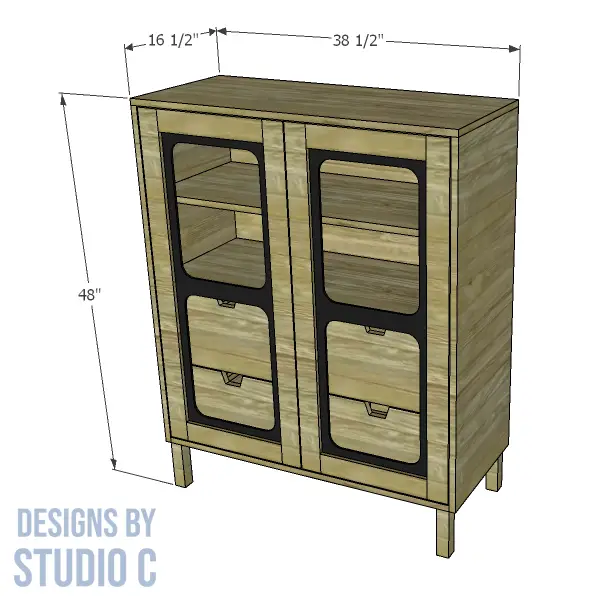
The windowed inserts for the doors are made using 1/4″ plywood, and Plexiglas can be glued to the back side.
Materials:
- 1-1/4″ pocket hole screws
- 1-1/4″ brad nails
- 3″ screws (to attach legs)
- Edge banding, optional
- Small or non-mortise hinges (<– affiliate link!)
- Wood glue
- Sandpaper (80, 120, 220 grits)
- Finishing supplies
- Paste Wax
Lumber:
- 4 – 3/4″ square dowels at 3′
- 3 – 1×3 at 8′
- 1 – 2×2 at 4′
- 1 – 4′ x 8′ sheet of 1/4″ plywood
- 2 – 4′ x 8′ sheets of 3/4″ plywood
Cut List:
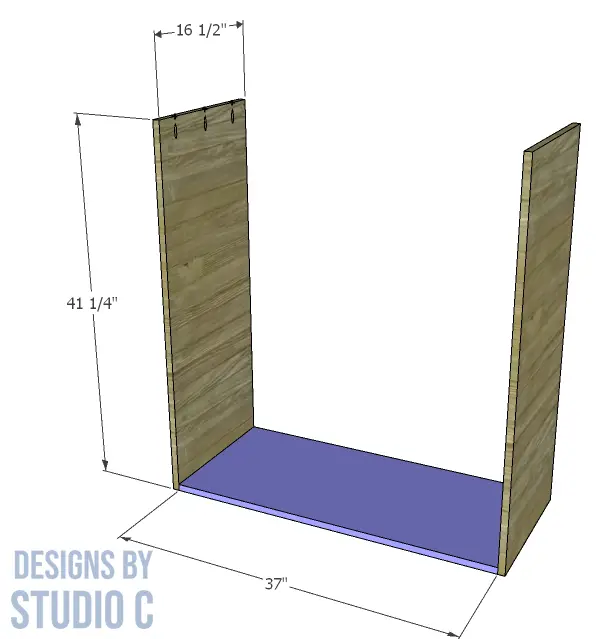
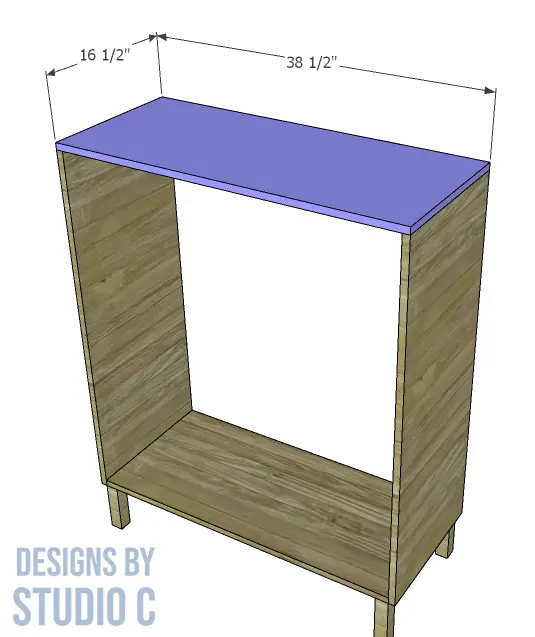
- 1 – 3/4″ plywood at 16-1/2″ x 37″ – Bottom
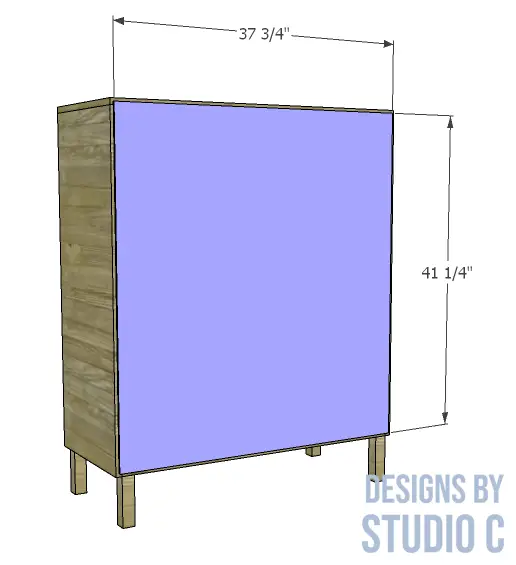
- 2 – 3/4″ plywood at 16-1/2″ x 41-1/4″ – Sides
- 4 – 2×2 at 6″ – Legs
- 1 – 3/4″ plywood at 16-1/2″ x 38-1/2″ – Top
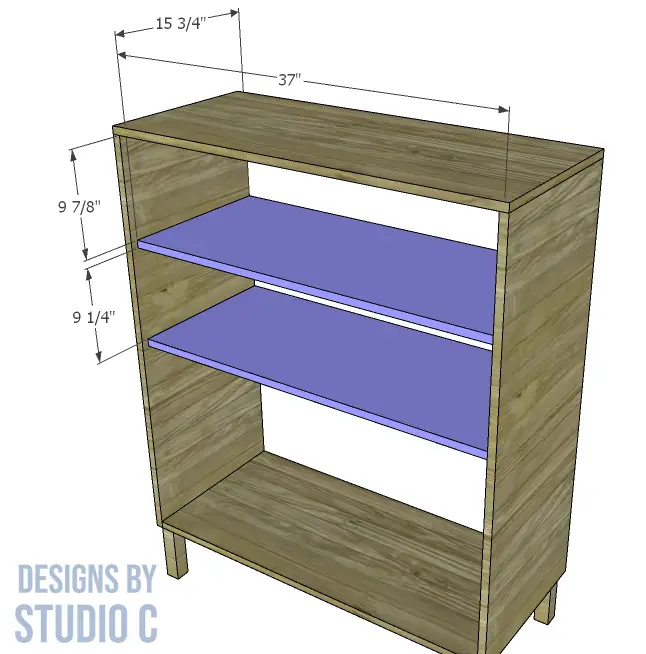
- 2 – 3/4″ plywood at 15-3/4″ x 37″ – Shelves
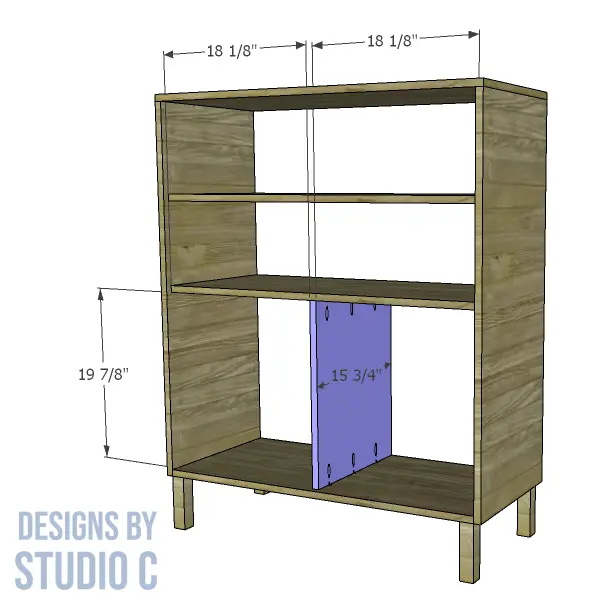
- 1 – 3/4″ plywood at 15-3/4″ x 19-7/8″ – Divider
- 1 – 1/4″ plywood at 37-3/4″ x 41-1/4″ – Back
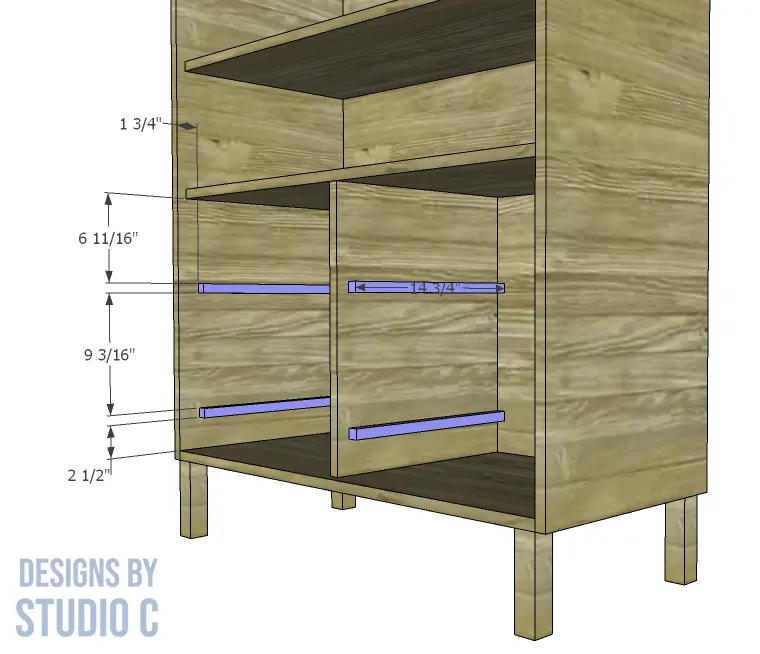
- 4 – 3/4″ x 3/4″ dowel rods at 14-3/4″ – Drawer Runners
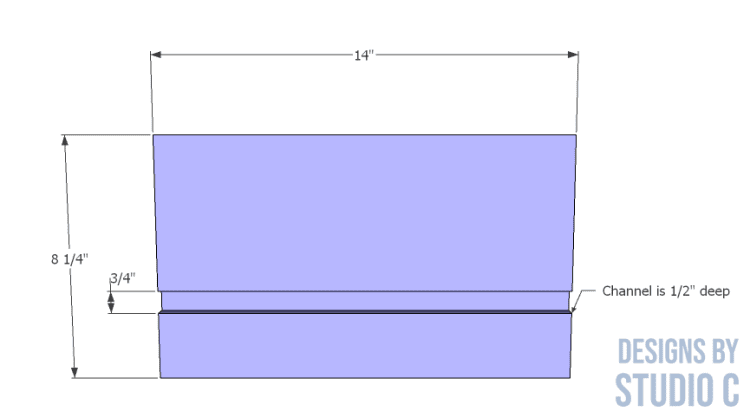
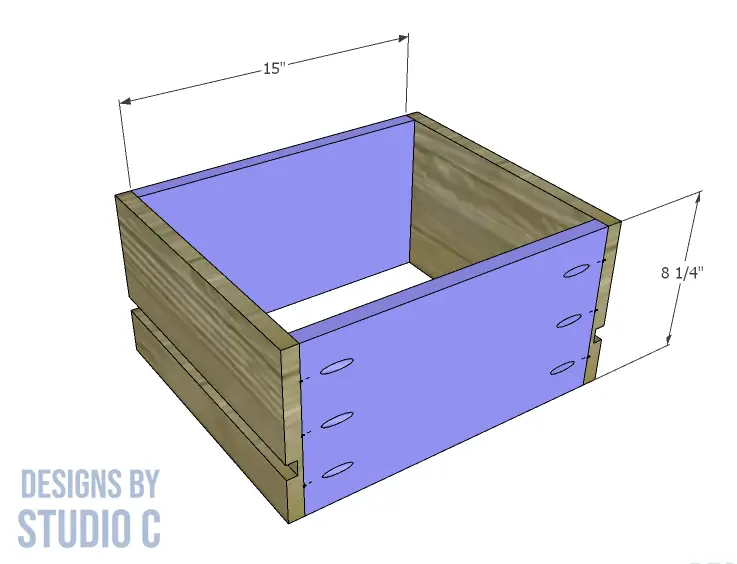
- 8 – 3/4″ plywood at 8-1/4″ x 14″ – Drawer Box Sides
- 8 – 3/4″ plywood at 8-1/4″ x 15″ – Drawer Box Front and Back
- 4 – 1/4″ plywood at 14″ x 16-1/2″ – Drawer Box Bottom
- 4 – 3/4″ plywood at 9-3/4″ x 17-7/8″ – Drawer Fronts
- 4 – 1×3 at 13-5/16″ – Door Frame
- 4 – 1×3 at 40-1/4″ – Door Frame
- 2 – 1/4″ plywood at 13-13/16″ x 35-3/4″ – Door Insert
Notes About the Project:
- Edge banding will be applied to the exposed edges of the plywood prior to assembly
- Sand all of the pieces before putting it all together
- A soup can can be used to draw the radius on the door inserts
Step One
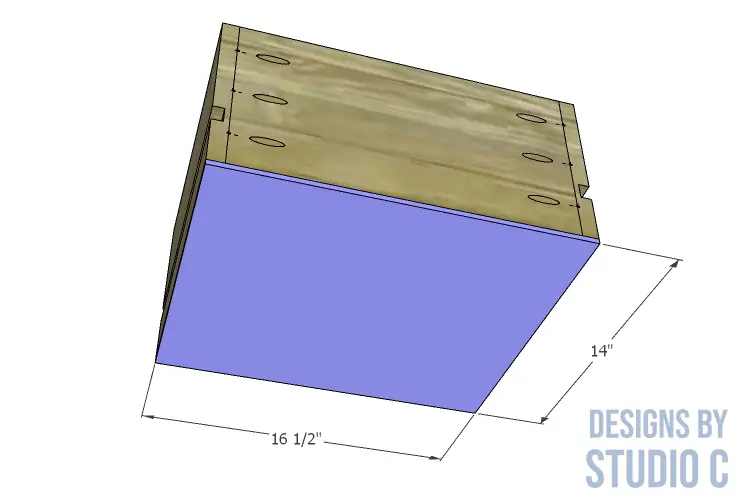
Cut the pieces for the sides and bottom. With the pocket hole jig set for 3/4″ material, drill pocket holes in each end of the bottom as well as the top edges of the sides. Secure the sides to the bottom using glue and 1-1/4″ pocket hole screws.
Step Two
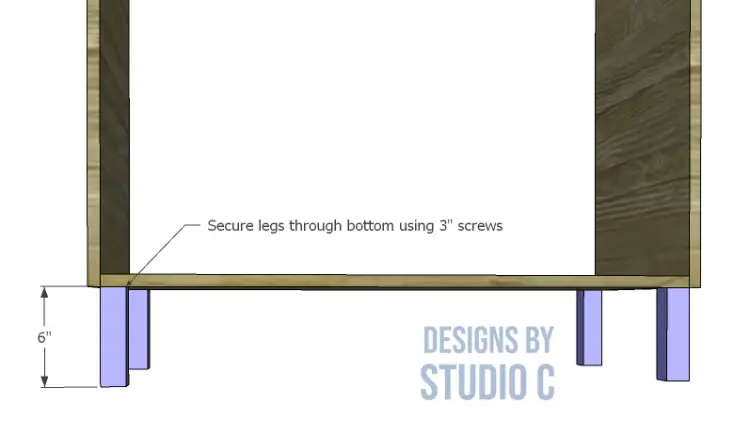
Cut the pieces for the legs. The legs will be positioned on the bottom flush with the front and back of the bottom, and along the edge where the sides meet the bottom. Secure them to the bottom using glue and 3″ screws through the bottom into the legs.
Step Three
Cut the piece for the top. Secure the top to the sides using glue and 1-1/4″ pocket hole screws.
Step Four
Cut the pieces for the shelves and drill pocket holes in each end. Secure the shelves to the sides using glue and 1-1/4″ pocket hole screws. The back edge of the shelves will be flush with the back edges of the sides and bottom.
Step Five
Cut the piece for the divider and drill pocket holes in each end. Secure the divider to the bottom and the underside of the shelf above it using glue and 1-1/4″ pocket hole screws. The back edge of the divider will be flush with the back edges of the shelf and bottom.
Step Six
Cut the piece for the back. Secure the back using 1-1/4″ brad nails.
Step Seven
Cut the pieces for the drawer runners. Secure the runners to the sides and both sides of the divider using glue and 1-1/4″ brad nails. See the drawing for placement.
Step Eight
Cut the pieces for the drawer boxes. Cut a 3/4″ wide by 1/2″ deep groove in the side pieces using a router table or dado stack on the table saw. Drill pocket holes in each end of the front and back pieces. Assemble the drawers using glue and 1-1/4″ pocket hole screws.
Step Nine
Cut the pieces for the drawer box bottoms. Secure the bottoms to the drawer boxes using glue and 1-1/4″ brad nails. Insert the drawer boxes in the cabinet, and make any adjustments to the runners as necessary – if the drawers don’t slide well, apply a coat of paste wax to the runners.
Step Ten
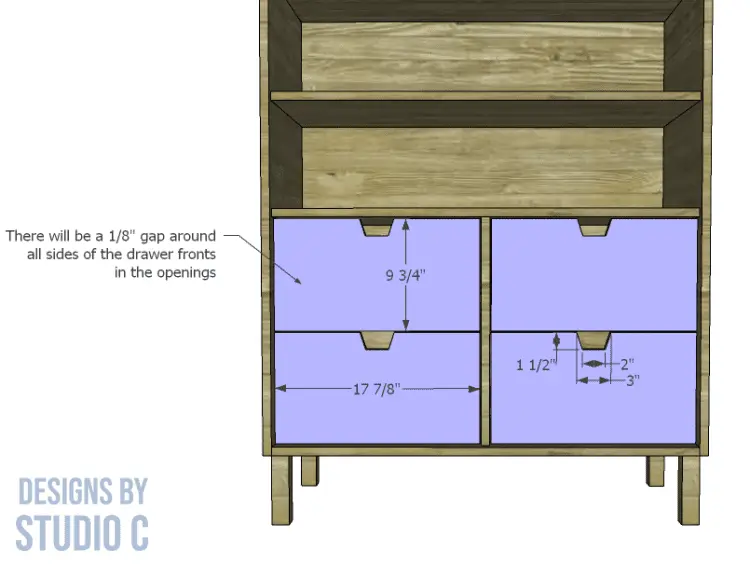
Cut the pieces for the drawer fronts. Cut the notches in the fronts with a jigsaw. Starting with the lower drawer fronts, add shims or spacers to the bottom, sides and in between so that there is a 1/8″ gap then secure the drawer fronts using 1-1/4″ brad nails. Open the drawers and further secure the fronts to the drawer boxes using 1-1/4″ screws from the inside.
Repeat the process with the two upper drawer fronts.
Step Eleven
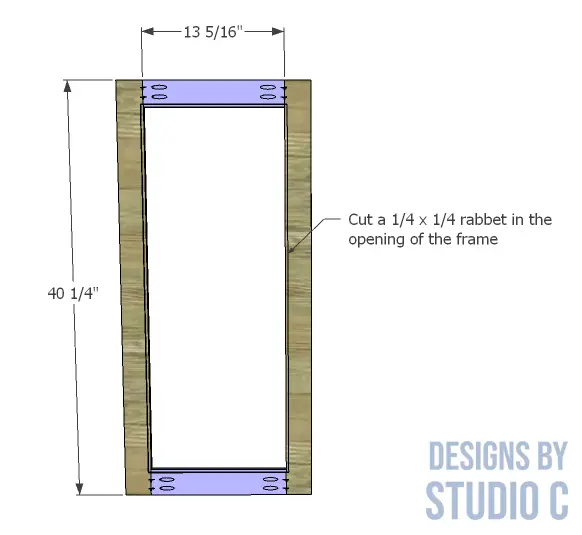
Cut the pieces for the door frames and drill pocket holes in each end of the shorter pieces leaving room for the 1/4″ x 1/4″ rabbet that will be cut along the inside of the frame when assembled. Assemble the door using glue and 1-1/4″ pocket hole screws then cut the rabbet with a router.
Step Twelve
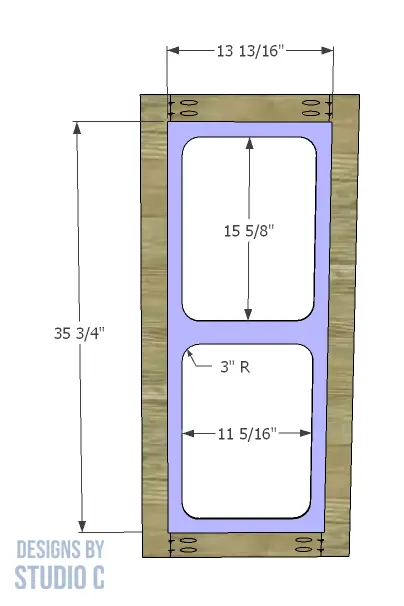
Cut the pieces for the door insert. Draw the openings on the inserts and cut them out using a jigsaw. Apply a thing bead of glue along the inside of the rabbet. Place the insert in the frame and clamp in place.
Step Thirteen
Install the hinges on the doors, then install the doors in the opening. There will be a 1/8″ gap around all sides. The door frame can be shaved, if necessary.

Finish the cabinet as desired!
Have questions about the plans to build an Ivy cabinet? Leave a comment below!
Originally posted 2022-03-31 08:00:42.

A friend uses automotive “Bondo” to fill plywood edges. It cures hard, works well through sanding or shaping and take paint easily. I sxoffed until I saw how good it looked. Much easier than edge binding.
That’s an absolutely great idea! I’ll have to try it – thanks for the tip!