

The Shanghai Console Table Plans – a Great Table with a Bit of an Eastern Influence!
Love furniture with an air of the Far East? Then the plans to build a Shanghai console table are for you! With the fabulously curved legs, the table is big on style and storage but with the slim profile, doesn’t take up a lot of room.

Materials:
- 1-1/4″ pocket hole screws (<– affiliate link!)
- 2-1/2″ pocket hole screws
- 1-1/4″ brad nails
- 3″ screws
- 2 sets of hinges
- 5 – Cabinet pulls
- Wood glue
- Sandpaper (100, 150, 220 grits)
- Finishing supplies (primer & paint, or stain, sealer)
- Paste Wax
Lumber:
- 4 – 2×2 at 8′ (or 2 – 2×4 at 8′ cut in half)
- 4 – 2×4 at 6′
- 1 – half sheet of 3/4″ plywood
- 1 – full sheet of 3/4″ plywood
Cut List:
- 4 – 2×4 at 36″ – Side Legs
- 4 – 2×4 at 27-1/4″ – Inner Legs
- 6 – 2×2 at 9″ – Side and Inner Frames
- 2 – 3/4″ plywood at 9″ x 29″ – Side Panels
- 4 – 2×2 at 58-1/2″ – Upper Dividers
- 2 – 3/4″ plywood at 9″ x 22-1/2″ – Inner Leg Panels
- 2 – 2×2 at 5-3/4″ – Drawer Dividers
- 4 – 2×2 at 10-1/2″ – Lower Stretchers
- 2 – 3/4″ plywood at 9″ x 10-1/2″ – Cabinet Bottoms
- 2 – 3/4″ plywood at 10-1/2″ x 21-3/4″ – Cabinet Back
- 1 – 3/4″ plywood at 5-3/4″ x 58-1/2″ – Drawer Area Back
- 1 – 3/4″ plywood at 9″ x 58-1/2″ Drawer Shelf
- 2 – 2×2 at 9-3/4″ – Drawer Spacers
- 1 – 3/4″ plywood at 12″ x 61-1/2″ – Top
- 3 – 3/4″ plywood at 9-3/4″ x 16-3/4″ – Drawer Bottom
- 6 – 3/4″ plywood at 5-5/8″ x 9-3/4″ – Drawer Sides
- 6 – 3/4″ plywood at 5-5/8″ x 18-1/4″ – Drawer Front & Back
- 2 – 3/4″ plywood at 10-1/4″ x 21-1/2″ – Doors

Step One
Edge banding will be applied to the exposed edges of the plywood prior to assembly.
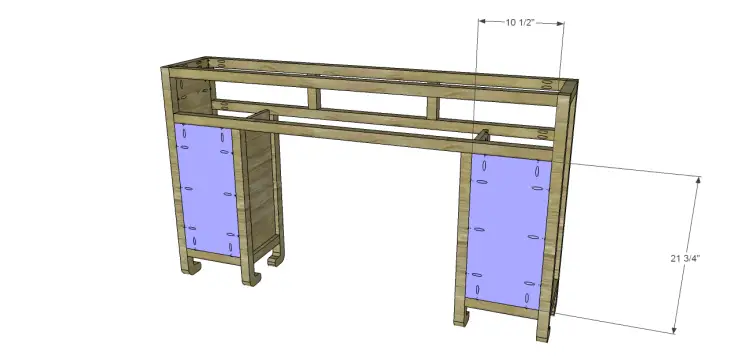
Cut the pieces for the legs. Maintaining the dimensions shown, draw the curved feet on the 2×4 pieces, then cut the leg out using a jigsaw or a band saw. Set the shorter legs to the side.
Cut the pieces for the side frames and the side panels. With the pocket hole jig set for 1-1/2″ material, drill pocket holes in each end of the frame pieces. Reset the pocket hole jig for 3/4″ material and drill pocket pocket holes in all four edges of each panel. Secure the frame pieces to the panels using glue and 1-1/4″ pocket hole screws. The back face of the panel will be flush with the inside face of the frame pieces. Secure the panel assembly to the legs (with the curved feet facing each other) using glue and pocket hole screws. Use 1-1/4″ pocket hole screws through the panel, and 2-1/2″ pocket hole screws through the frame pieces.


Step Two
Cut the pieces for the upper stretchers. Set the pocket hole jig for 1-1/2″ material and drill pocket holes in each end. Secure the stretchers to the side legs as shown using glue and 2-1/2″ pocket hole screws.

Step Three
Cut the pieces for the inner frames and the inner panels. Drill pocket holes in each end of the frame pieces. Reset the pocket hole jig for 3/4″ material and drill pocket pocket holes in all four edges of each panel. Secure the lower frame pieces to the panels using glue and 1-1/4″ pocket hole screws. The back face of the panel will be flush with the inside face of the frame pieces. Secure the panel assembly to the legs (with the curved feet facing each other) using glue and pocket hole screws. Use 1-1/4″ pocket hole screws through the panel, and 2-1/2″ pocket hole screws through the frame pieces. The panel will be 3/4″ taller than the legs (it will attach to the drawer shelf).

Step Four
Cut the pieces for the lower stretchers and the drawer dividers. Set the pocket hole jig for 1-1/2″ material and drill pocket holes in each end of the stretchers, as well as the lower end of the dividers. Secure the stretchers to the legs using glue and 2-1/2″ pocket hole screws (a close-quarter drill or a shorter square bit may be required). Secure the dividers to the lower of the upper stretchers using glue and 2-1/2″ pocket hole screws then secure the upper portion of the dividers using countersunk 3″ screws through the uppermost stretcher.

Step Five
Cut the pieces for the cabinet bottoms. Set the pocket hole jig for 3/4″ material and drill pocket holes in all four edges. Secure to the lower stretchers using glue and 1-1/4″ pocket hole screws from the bottom. The top face of the bottom piece will be flush with the top face of the stretchers.
Cut the pieces for the cabinet backs and drill pocket holes in all four edges. Secure to the legs as shown using glue and 1-1/4″ pocket hole screws.


Step Six
Cut the piece for the drawer back and drill pocket holes in each long edge. Secure to the upper stretchers as shown using glue and 1-1/4″ pocket hole screws.

Step Seven
Cut the piece for the drawer shelf and drill pocket holes in all four edges. Secure to the stretcher, back, and sides as shown using glue and 1-1/4″ pocket hole screws. The back face (with the pocket holes) will be flush with the top face of the stretcher. Secure the top of the inner side panels to the bottom of the shelf using glue and 1-1/4″ pocket hole screws.
Cut the pieces for the drawer spacers. Set the pocket hole jig for 1-1/2″ material and drill pocket holes in one end only of each piece. Secure to the dividers using glue and 2-1/2″ pocket hole screws. Add a few brad nails through the back into the spacers.


Step Eight
Cut the piece for the top then secure using glue and 1-1/4″ brad nails.

Step Nine
Cut the pieces for the drawer boxes. Set the pocket hole jig for 3/4″ material and drill pocket holes in each end of the side pieces, as well as all four edges of the bottoms. Secure the sides to the bottom first, then secure the front and back using glue and 1-1/4″ pocket hole screws. There will be a 1/8″ gap at the sides and top of the drawers in the openings.


 Step Ten
Cut the pieces for the doors. There will be a 1/8″ gap around all sides of the doors in the openings. Install the hinges on the doors first, then install the hinges in the cabinet. Install the cabinet pulls.

Finish as desired. Apply a coat of paste wax to the bottom of the drawers to help them slide smoothly in the openings.
With a distressed finish, the finished table built using the Shanghai console table plans will fit into any decor or style! I really love the chunky curved legs! Any questions? Contact me at cher {at} designsbystudioc {dot} com!
Originally posted 2014-03-24 08:00:36.


3 Comments
This is my favorite so far. I’d love to see it finished in gloss white.
Thank you so much, Margaret! Gloss white would be the perfect finish for this piece!! I’m glad you stopped by…