Free Plans to Build a Pier One Inspired Glenfield Media Stand
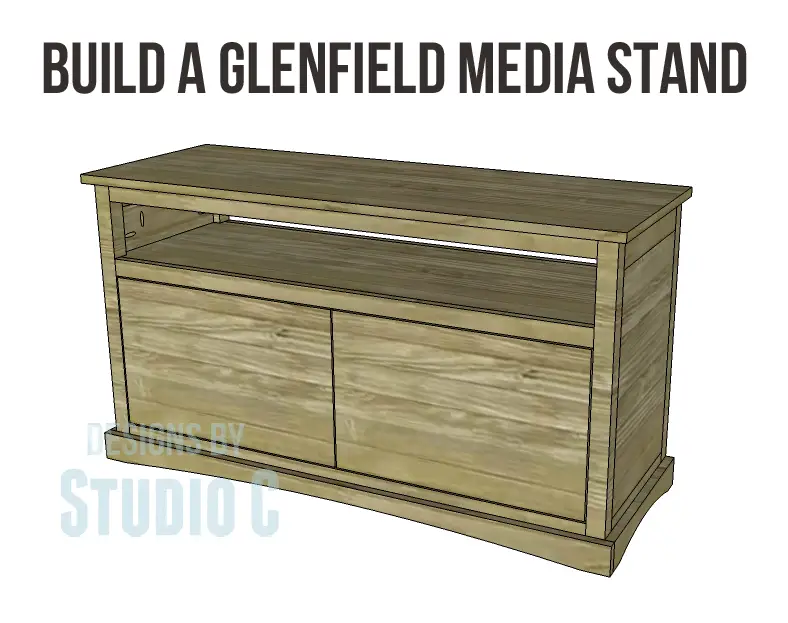
What an awesome media stand! I intentionally left the doors plain on the free plans to build a Pier One inspired Glenfield media stand so they could be customized to match any décor – stenciled, vinyl, distressed, however you choose!
Materials:
- 1-1/4″ pocket hole screws
- 1-1/4″ brad nails
- Edge banding, optional
- 2 – sets of hinges (for inset doors)
- Magnetic catch
- 2 – cabinet pulls
- Finishing supplies
Lumber:
- 2 – 2×2 at 6′
- 3 – 1×2 at 8′
- 3 – 1×3 at 8′
- 1 – full sheet of 3/4″ plywood
- 1 – quarter sheet of 3/4″ plywood
Cut List:
- 4 – 2×2 at 25-1/4″ – Legs
- 4 – 1×3 at 13-1/2″ – Side Frames
- 2 – 3/4″ plywood at 13-1/2″ x 19-1/4″ – Side Panels
- 6 – 1×2 at 43″ – Back Frame, Back Shelf Support, & Front Stretchers
- 2 – 1×3 at 43″ – Back Frame & Front Stretchers
- 1 – 3/4″ plywood at 13-3/4″ x 43″ – Back Panel
- 2 – 3/4″ plywood at 15″ x 44-1/2″ – Upper Shelf & Bottom
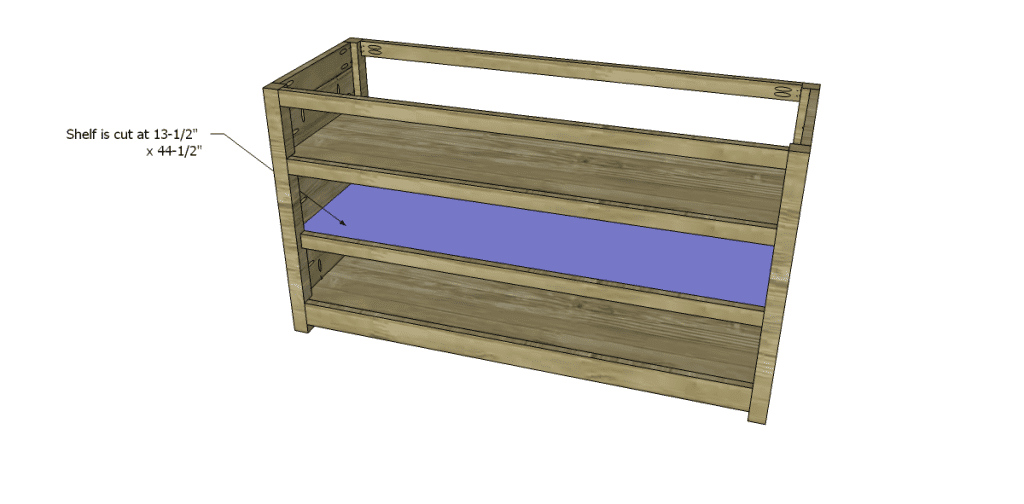
- 1 – 3/4″ plywood at 13-1/2″ x 44-1/2″ – Middle Shelf
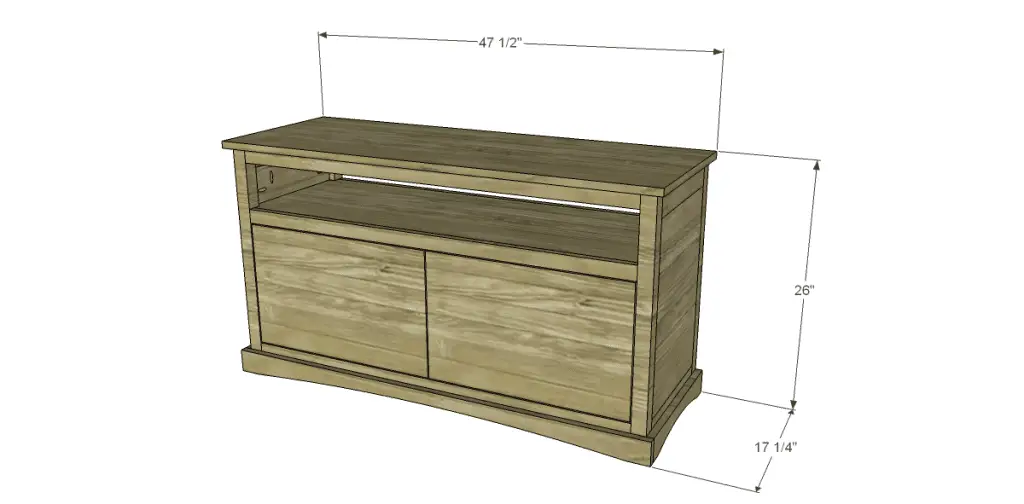
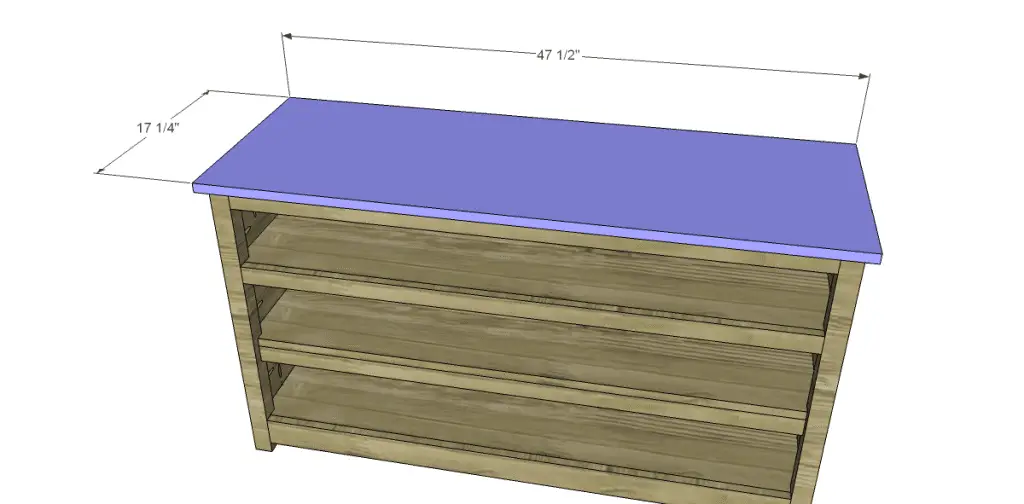
- 1 – 3/4″ plywood at 17-1/4″ x 47-1/2″ – Top
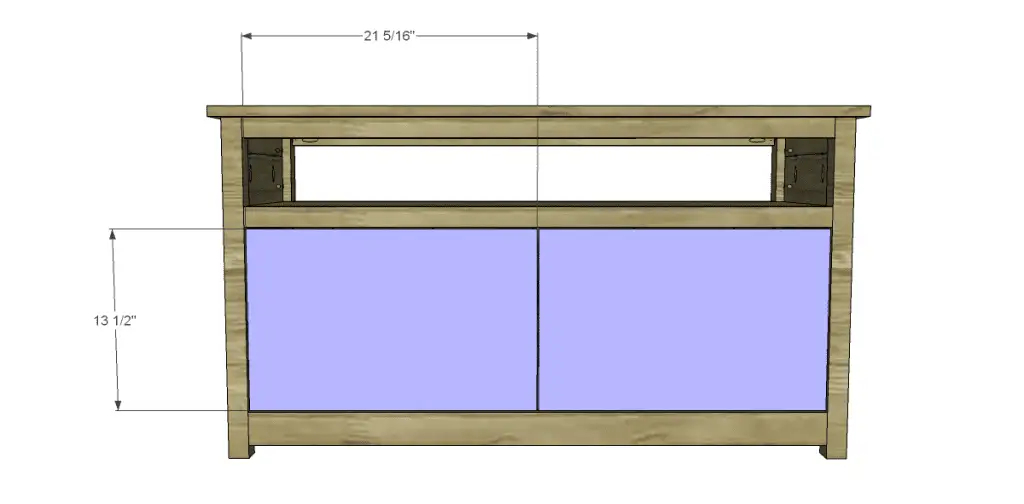
- 2 – 3/4″ plywood at 13-1/2″ x 21-5/16″ – Doors
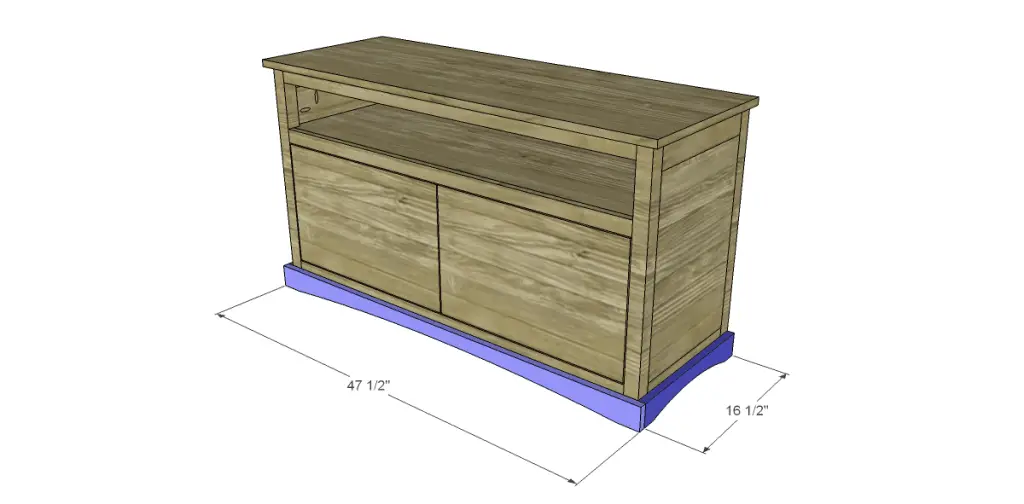
- 2 – 1×3 at 16-1/2″ – Side Trim
- 1 – 1×3 at 47-1/2″ – Front Trim
Step One
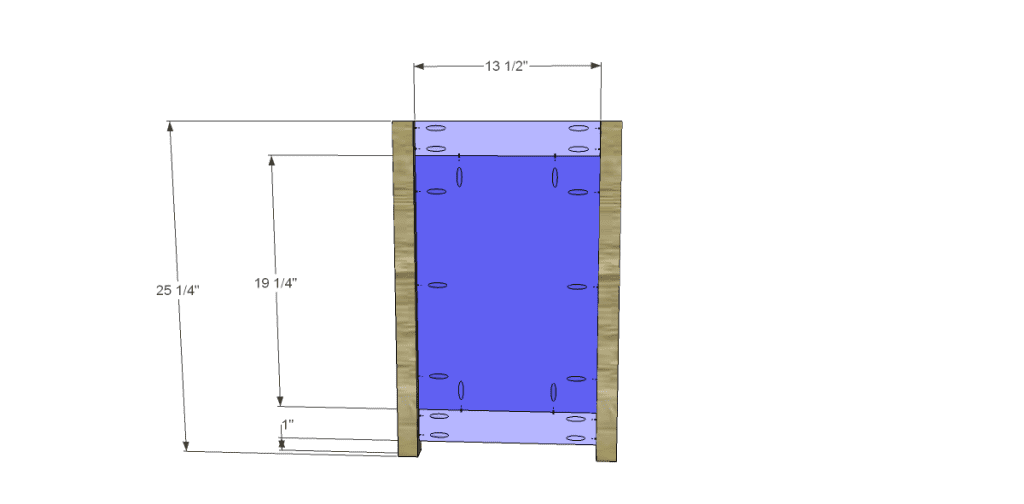
Cut the pieces for the legs, side frames, and side panels. Drill pocket holes in each end of the frame pieces as well as all four edges of the panels. Secure the frame pieces to the panels using glue and 1-1/4″ pocket hole screws, then secure the legs using glue and 1-1/4″ pocket hole screws. The outside face of the panel assembly will be flush with the outside face of the legs.
Step Two
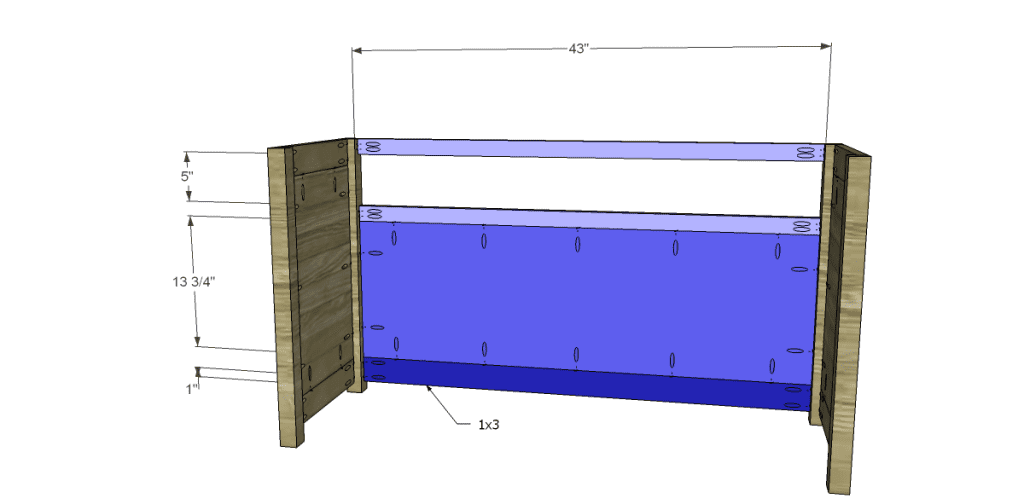
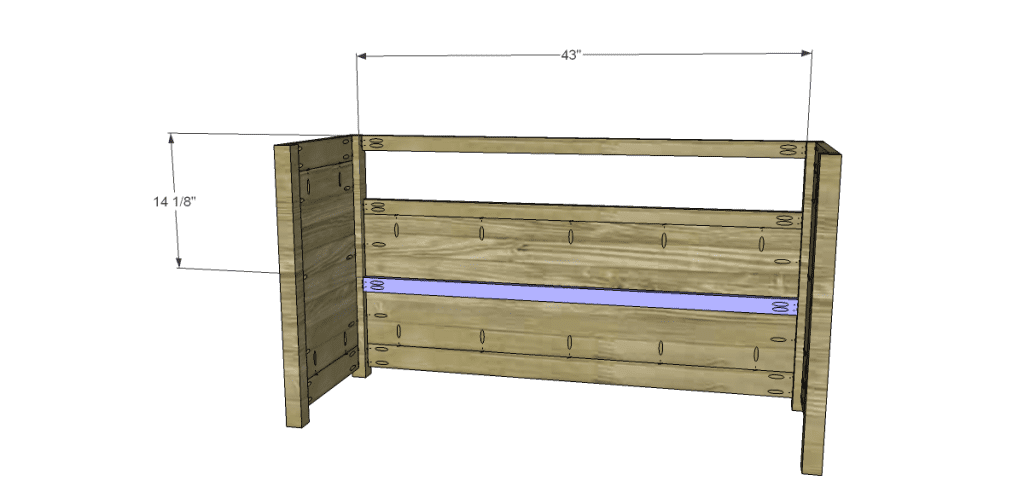
Cut the pieces for the back frame and panel. Drill pocket holes in each end of the frame pieces as well as all four edges of the panel. Secure the upper frame piece (1×2) as shown using glue and 1-1/4″ pocket hole screws. Secure the remaining frame pieces to the panel using glue and 1-1/4″ pocket hole screws, then secure to the legs using glue and 1-1/4″ pocket hole screws. The outside face of the panel assembly will be flush with the outside face of the legs.
Step Three
Cut the piece for the back shelf support and drill pocket holes in each end. Secure to the legs as shown using glue and 1-1/4″ pocket hole screws.
Step Four
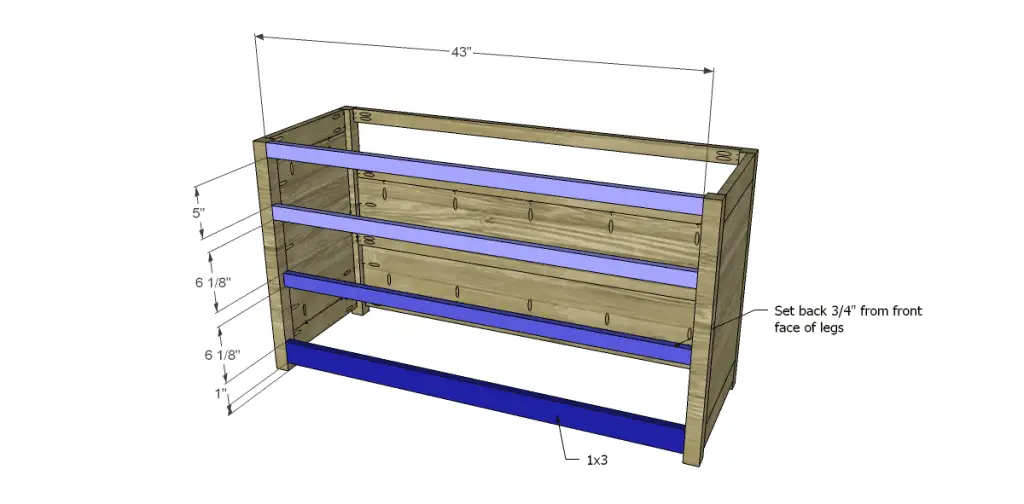
Cut the pieces for the stretchers and drill pocket holes in each end. The middle 1×2 (for the middle shelf) will be set back 3/4″ from the front face of the legs. Secure each stretcher with glue and 1-1/4″ pocket hole screws.
Step Five
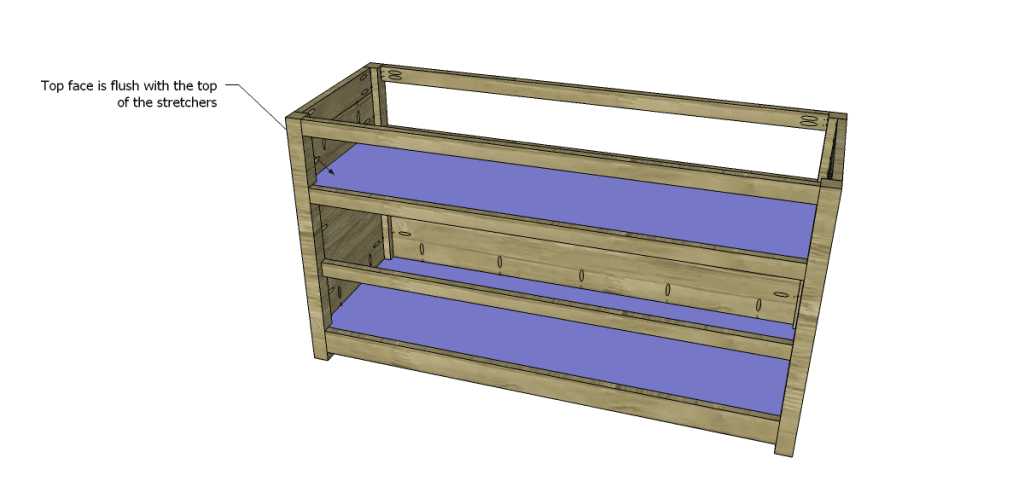
Cut the pieces for the upper shelf and the bottom. Cut the notches using a jigsaw and drill pocket holes in all four edges of each piece. Secure to the stretchers using glue and 1-1/4″ pocket hole screws. The top face of the shelf and bottom will be flush with the top face of the stretchers.
Step Six
Cut the piece for the middle shelf and drill pocket holes in all four edges. Secure to the middle front stretcher, the sides, and the back shelf support using glue and 1-1/4″ pocket hole screws.
Step Seven
Cut the piece for the top. The top will overlap by 3/4″ at each side and the front. Secure in place using glue and 1-1/4″ brad nails.
Step Eight
Cut the pieces for the doors. There will be a 1/8″ gap at each side as well as in between the doors. Secure the hinges to the door, then secure to the cabinet. Install the magnetic catch and cabinet pulls.
Step Nine
Cut the pieces for the trim. Cut the arcs as desired in each piece making the arc no higher than 1″. Attach the side pieces first using glue and 1-1/4″ brad nails, then secure the front.
Finish as desired!
Use the free plans to build a Pier One inspired Glenfield media stand to construct a piece of furniture that can also be used as a console to store linens, or as a buffet in the dining room. Share your fabulous work with me… Send photos to cher {at} designsbystudioc {dot} com or designsbystudioc {at} gmail {dot} com. I would love to feature your work on DbSC!

1 Comment
Pingback: Glenfield Media Stand – Free Woodworking Plan.com