Craft Your Dream Workspace with a DIY Corner Desk
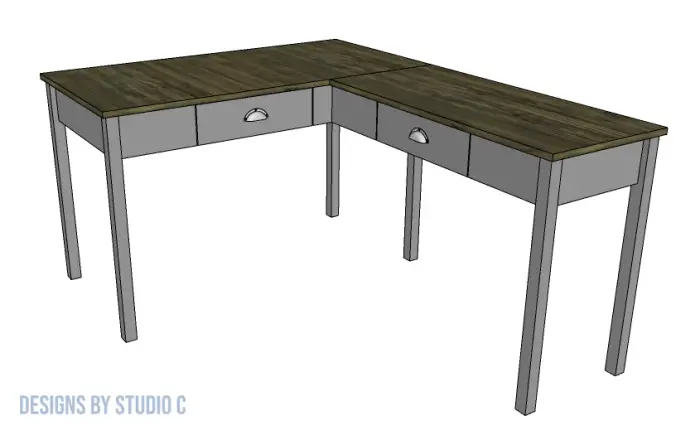
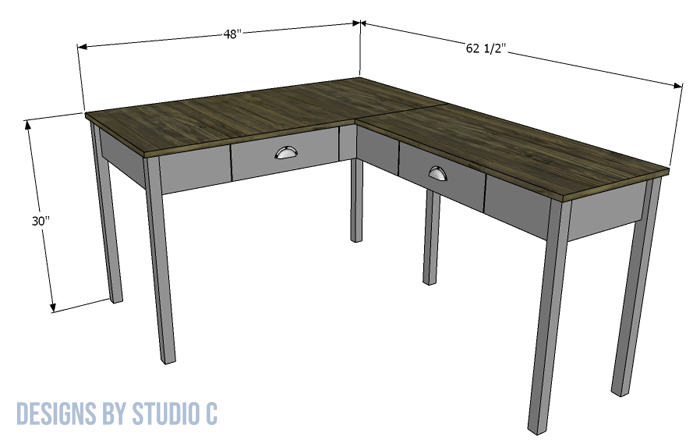
Wow, this desk is absolutely incredible! You won’t believe the amazing features of the DIY plans to build a Vivian desk. It boasts a spacious workspace with a narrower return, and even has a drawer in the aprons on both sides. Plus, you can choose to cut the top piece in one or two pieces, depending on your preference. When paired with a comfy office chair with lumbar support (<– affiliate link!), this desk will truly shine in your home office. Trust us, you won’t regret building this amazing desk!
Materials:
- 1-1/4″ pocket hole screws
- 1-1/4″ brad nails
- 2″ brad nails
- 1-1/4″ screws
- Edge banding (<– affiliate link!)
- One set of 12″ drawer slides
- One set of 20″ drawer slides
- Drawer pulls, your choice
- Wood glue
- Sandpaper (80, 120, 220 grits)
- Finishing supplies
Lumber:
- 1 – 1×2 at 4′
- 2 – 1×4 at 8′
- 4 – 1×6 at 8′
- 2 – 2×2 at 8′
- 1 – 2′ x 4′ sheet of 1/4″ plywood
- 1 – 4′ x 8′ sheet of 3/4″ plywood
Cut List:
- 6 – 2×2 at 29-1/4″ – Legs
- 2 – 1×6 at 20″ – Main Desk Side Framing
- 1 – 1×6 at 44″ – Main Desk Back
- 1 – 1×6 at 10″ – Main Desk Front Apron
- 1 – 1×6 at 17″ – Main Desk Front Apron
- 2 – 1×6 at 20″ – Main Desk Slide Supports
- 1 – 1×6 at 13-1/4″ – Return Side Framing
- 1 – 1×6 at 37″ – Return Back
- 1 – 1×6 at 10″ – Return Front Apron
- 1 – 1×6 at 10-3/4″ – Return Front Apron
- 2 – 1×6 at 13-1/4″ – Return slide Supports
- 1 – 1×6 at 13-1/4″ – Return Top Support
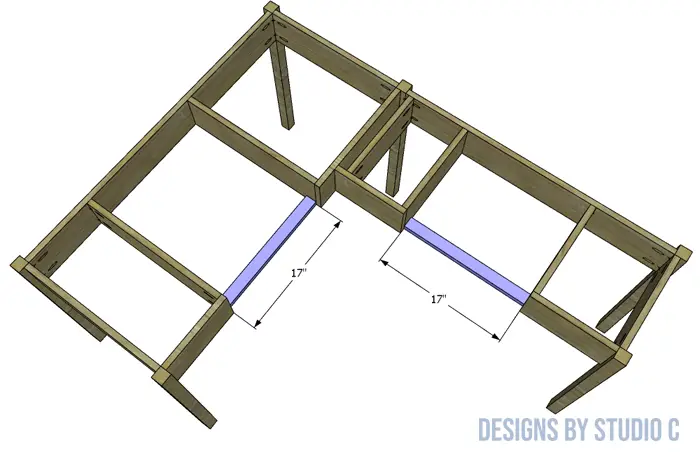
- 2 – 1×2 at 17″ – Drawer Box Stretchers
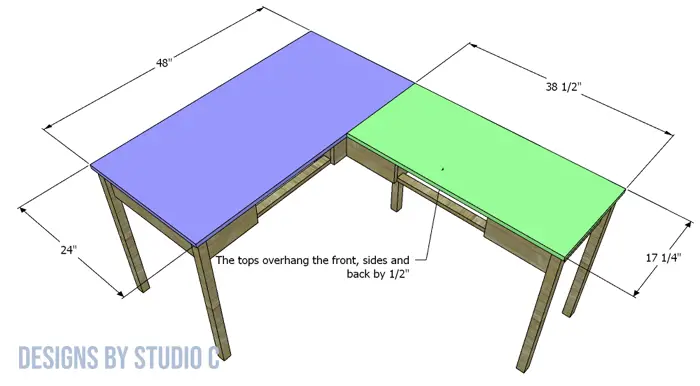
- 1 – 3/4″ plywood at 24″ x 48″ – Main Desk Top
- 1 – 3/4″ plywood at 17-1/4″ x 38-1/2″ – Return Top
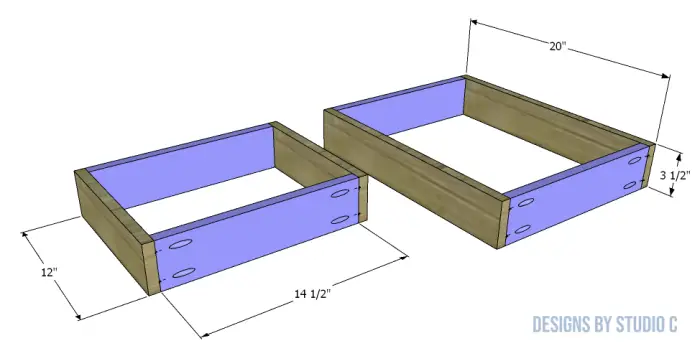
- 4 – 1×4 at 14-1/2″ – Drawer Box Frames Front and Back (both drawers)
- 2 – 1×4 at 12″ – Drawer Box Frame (Smaller Drawer)
- 2 – 1×4 at 20″ – Drawer Box Frame (Larger Drawer)
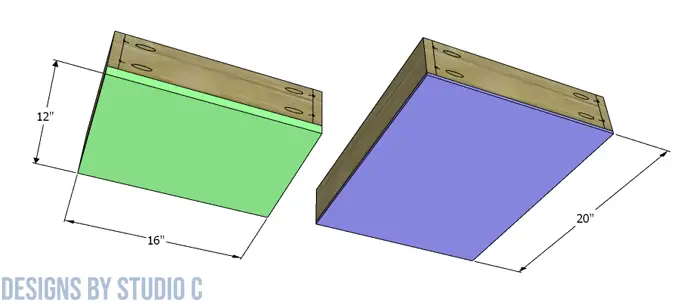
- 1 – 1/4″ plywood at 12″ x 16″ – Smaller Drawer Box Bottom
- 1 – 1/4″ plywood at 16″ x 20″ – Larger Drawer Box Bottom
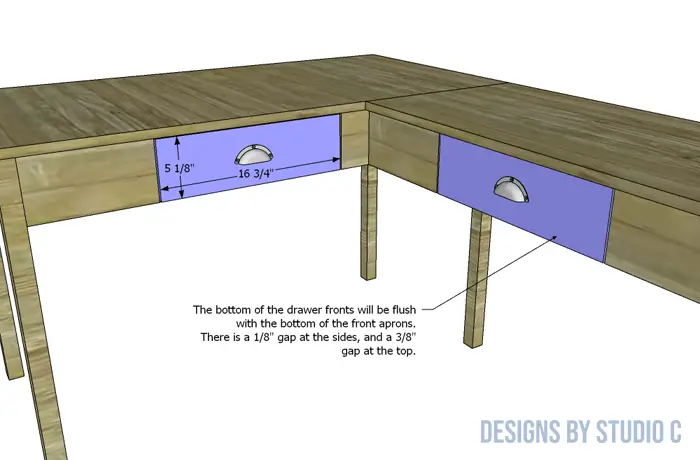
- 2 – 3/4″ plywood at 5-1/8″ x 16-3/4″ – Drawer Fronts
Notes About the Project:
- Edge banding will be applied to the edges of the top and the drawer fronts prior to installing them
- Sand all of the pieces before assembly to make finishing easier!
Step One
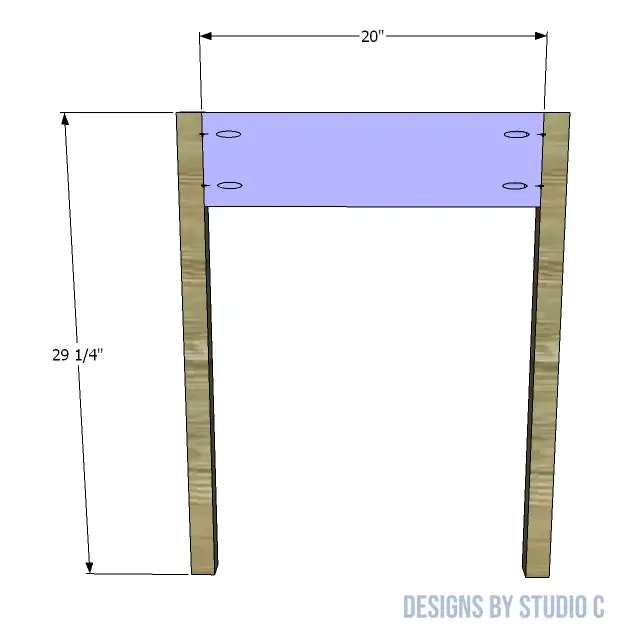
Cut the pieces for the legs and the side framing for the main desk. Set the pocket hole jig for 3/4″ material and drill pocket holes in each end of the framing pieces. Secure the framing piece to the legs using glue and 1-1/4″ pocket hole screws. The back face of the framing pieces will be flush with the inside faces of the legs.
Step Two
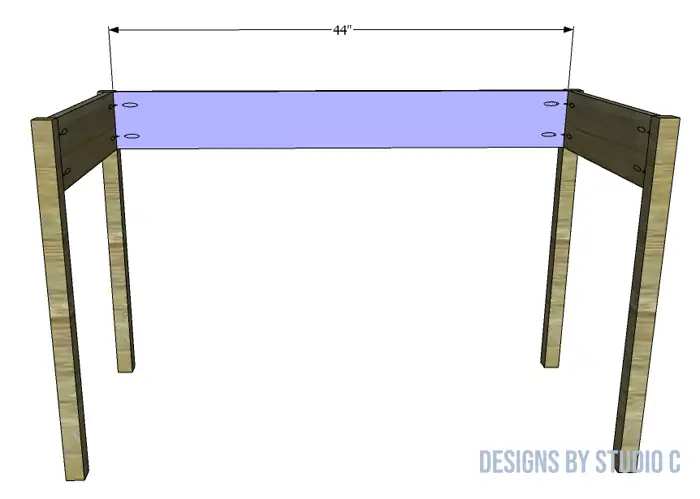
Cut the piece for the back panel for the main desk and drill pocket holes in each end. Secure the back panel to the side assemblies using glue and 1-1/4″ pocket hole screws. The back face of the back piece will be flush with the inside faces of the legs.
Step Three
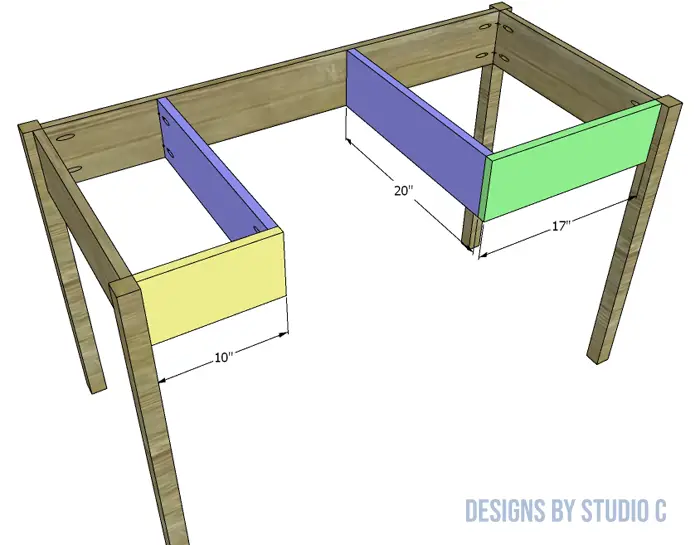
Cut the pieces for the aprons and the drawer slide supports. Drill pocket holes in each end of the 20″ slide support pieces, and one end of each of the apron pieces. Secure each of the support pieces to the apron pieces using glue and 1-1/4″ pocket hole screws, then secure the aprons to the legs and the supports to the back panel using glue and 1-1/4″ pocket hole screws. See the drawing for reference.
Step Four
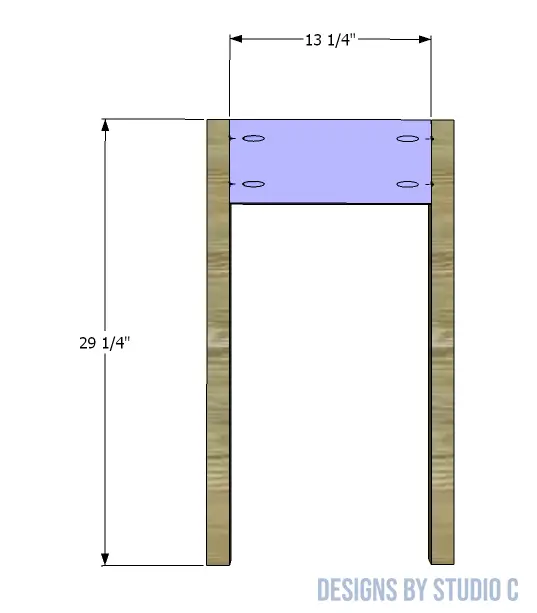
Cut the pieces for the return side assembly (return legs and return side panel). Drill pocket holes in each end of the side panel and assemble using glue and 1-1/4″ pocket hole screws. The back face of the framing piece will be flush with the inside faces of the legs.
Step Five
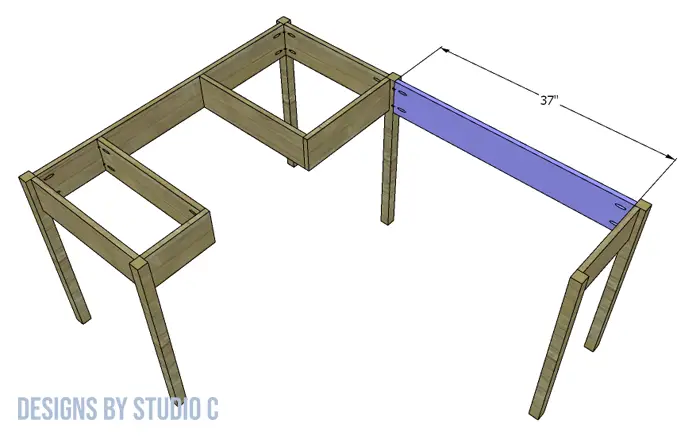
Cut the piece for the return back, and drill pocket holes in each end. Secure the return back to the return side assembly as well as to the main desk side – see the drawing for reference – using glue and 1-1/4″ pocket hole screws. The back face of the back piece will be flush with the inside faces of the legs.
Step Six
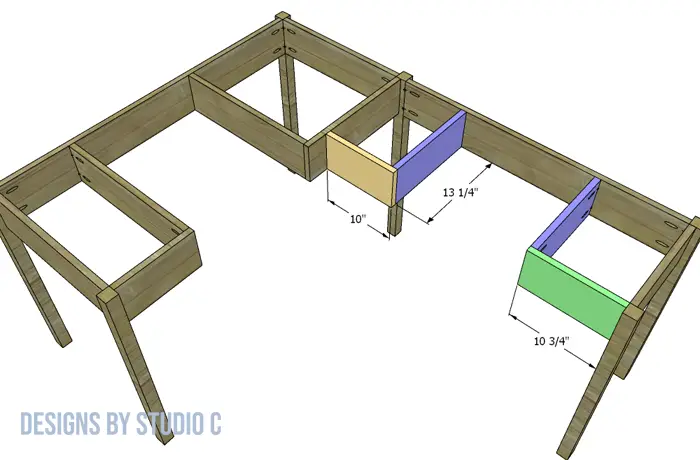
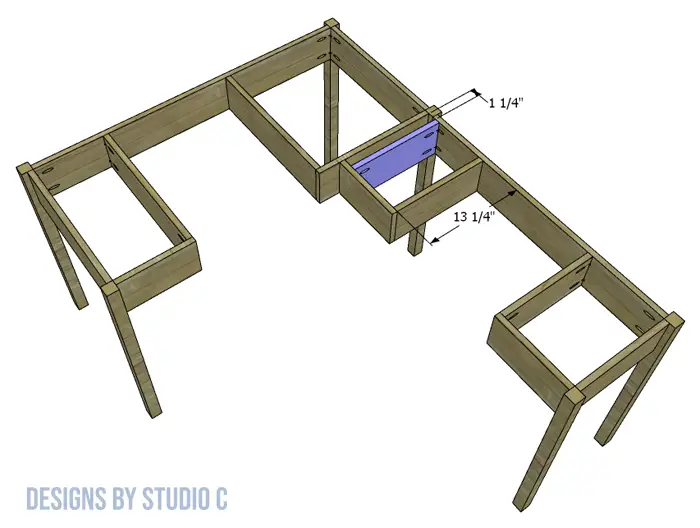
Cut the pieces for the return aprons and the drawer slide supports. Drill pocket holes in each end of the 13-1/4″ slide support pieces, and one end of each of the apron pieces. Secure each of the support pieces to the apron pieces using glue and 1-1/4″ pocket hole screws, then secure the aprons to the legs and the supports to the back panel using glue and 1-1/4″ pocket hole screws. See the drawing for reference.
Step Seven
Cut the piece for the return top support and drill pocket holes in each end. Secure the piece to the apron and back piece as shown in the drawing, using glue and 1-1/4″ pocket hole screws.
Step Eight
Cut the pieces for the drawer stretchers. Secure the pieces in the space for the drawers with the bottom face flush with the bottom edge of the drawer slide supports, using glue and 2″ brad nails. These pieces are to keep the drawer box area from spreading apart so that the drawer fits correctly.
Step Nine
Cut the pieces for the tops. The tops are dimensioned so they overhang all sides of the main desk and return frames by 1/2″. Secure the tops in place using glue and 2″ brad nails.
Step Ten
Cut the pieces for the drawer boxes and the drawer bottoms. Assemble the drawers using glue and 1-1/4″ pocket hole screws. Secure the bottoms to the drawer boxes using 1-1/4″ brad nails.
Install the drawer slides according to the manufacturer’s installation instructions, locating them 3/4″ back from the front face of the opening and positioned above the stretchers. Take a look at this tutorial on installing drawer slides for reference!
Step Eleven
Cut the pieces for the drawer fronts. Mark the position for the drawer pulls and drill the holes. Shim the drawer front in the opening – there will be a 1/8” gap around all sides and a 3/8″ gap at the top with the bottom flush with the aprons – then drive screws through the holes for the drawer pulls into the drawer box. Open the drawer, and secure the drawer front using countersunk 1-1/4” screws from the inside. Remove the screws from the holes for the drawer pull then finish drilling the holes. Install the drawer pull. This easy tutorial on installing drawer fronts will be quite helpful!
Finish the desk as desired and install the drawer pulls.
This DIY desk is the perfect plan for all skill levels, and is a fabulous weekend project! Have questions about the plans to build the Vivian desk? Leave a comment below!

