
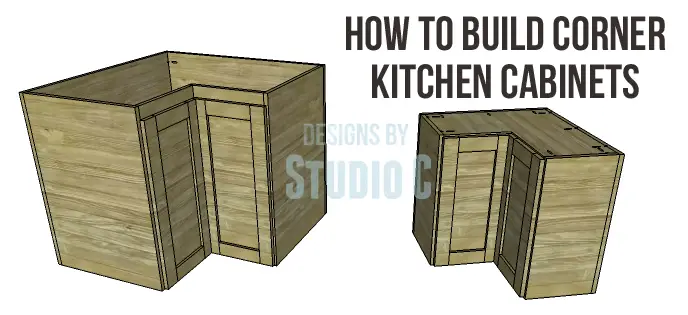
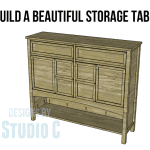
An Easy Project for a Kitchen Remodel – the Corner Kitchen Cabinet Plans
I was recently asked by a reader if I had plans on the site to build corner kitchen cabinets… I do have a post about my lower corner kitchen cabinet not fitting through the front door (d’oh!) but did not have any corner kitchen cabinet plans. The plans are based on the corner cabinets I built for my own kitchen, including the “L” shaped door – I was too cheap the spend the money on the corner cabinet door hinges to make the doors open flat. The “L” shaped doors still open wide enough for me to get my larger appliances in and out, including my 6qt. slow cooker! The doors don’t have to be built the same way I show here – build them to suit your needs! The materials and lumber listed are to build one upper cabinet and one lower cabinet. The lower cabinet also rests on adjustable cabinet feet. I used the adjustable feet to keep the cabinet off of the floor. The hardware includes clips for the kick plate.
 Materials:
- 1-1/4″ pocket hole screws (<– affiliate link!)
- 1-1/4″ brad nails
- 4 – overlay hinges
- 4 – corner cabinet door hinges, optional
- 4 – adjustable cabinet feet
- Edge banding, optional
- Wood glue
- Sandpaper (100, 150, 220 grits)
- Finishing supplies (primer & paint, or stain, sealer)
Lumber:
- 3 – 1×2 at 6′
- 2 – 1×3 at 6′
- 2 – 1×3 at 8′
- 1 – 2′ x 4′ sheet of 1/4″ plywood
- 3 sheets of 3/4″ plywood
Cut List:
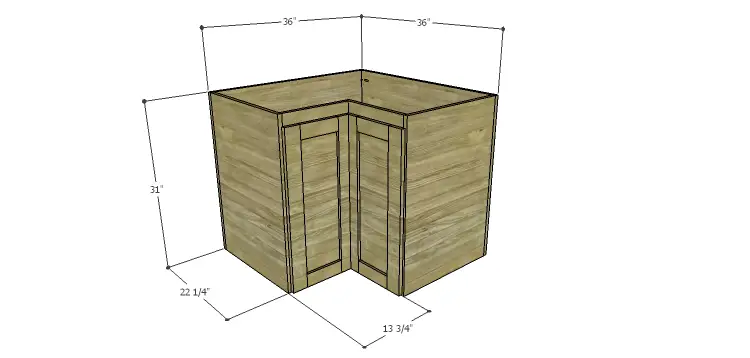
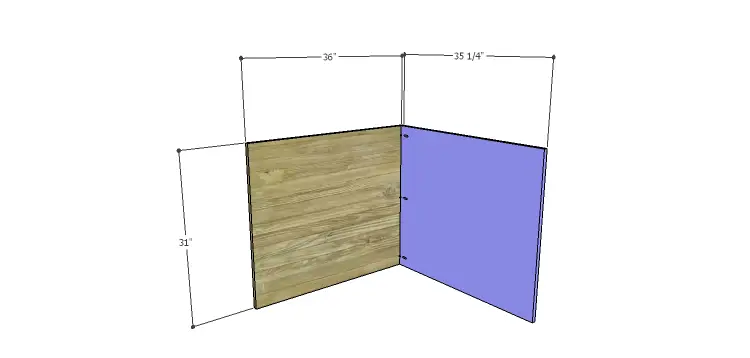
- 1 – 3/4″ plywood at 31″ x 36″ – Lower Back
- 1 – 3/4″ plywood at 31″ x 35-1/4″ – Lower Back
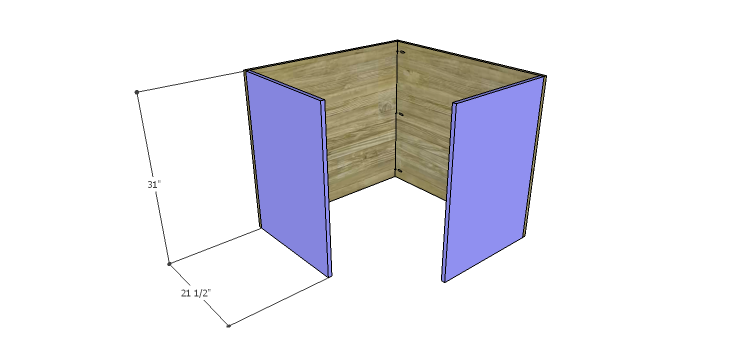
- 2 – 3/4″ plywood at 21-1/2″ x 31″ – Lower Sides
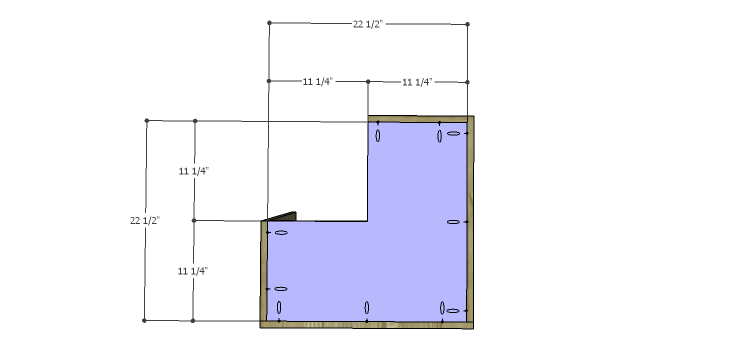
- 2 – 3/4″ plywood at 34-1/2″ x 34-1/2″ – Lower Bottom & Shelf
- 1 – 3/4″ plywood at 2-1/2″ x 13″ – Lower Stretchers
- 1 – 3/4″ plywood at 2-1/2″ x 13-3/4″ – Lower Stretchers
- 2 – 1×2 at 19-3/4″ – Shelf Supports
- 1 – 1×2 at 33-3/4″ – Shelf Supports
- 1 – 1×2 at 34-1/2″ – Shelf Supports
- 3 – 1×3 at 28-3/4″ – Door Stiles
- 1 – 1×3 (ripped to 1-3/4″ wide) at 28-3/4″ – Door Stile
- 4 – 1×3 at 8-1/4″ – Door Rails
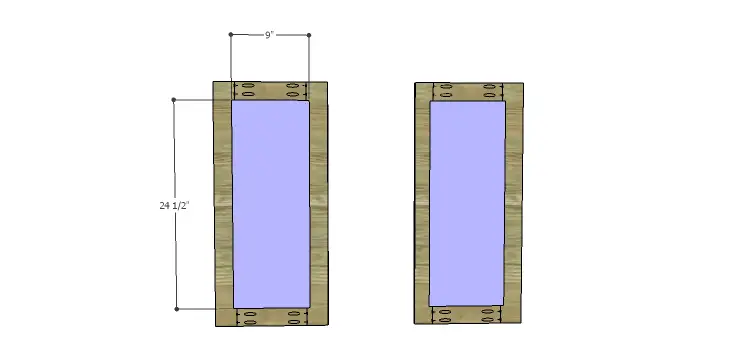
- 2 – 1/4″ plywood at 9″ x 24-1/2″ – Door Panels
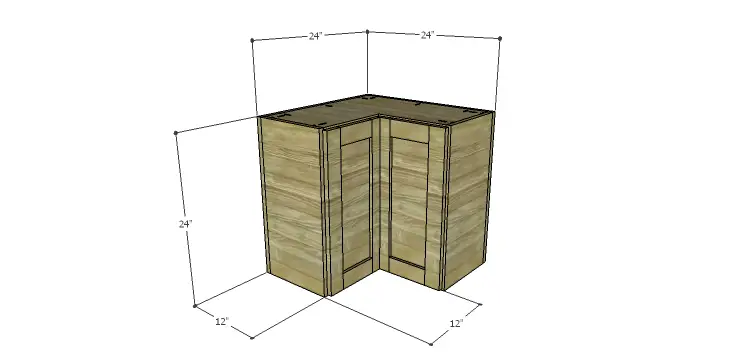
- 1 – 3/4″ plywood at 24″ x 24″ – Upper Back
- 1 – 3/4″ plywood at 23-1/4″ x 24″ – Upper Back
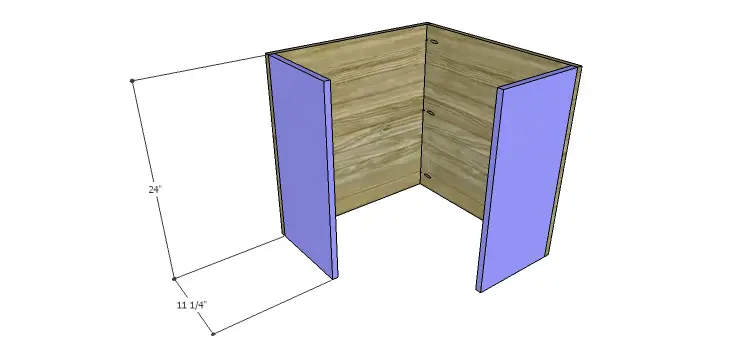
- 2 – 3/4″ plywood at 11-1/4″ x 24″ – Upper Sides
- 3 – 3/4″ plywood at 22-1/2″ x 22-1/2″ – Upper Top, Bottom, and Shelves
- 2 – 1×2 at 9-1/2″ – Shelf Supports
- 1 – 1×2 at 21-5/8″ – Shelf Supports
- 1 – 1×2 at 22-1/2″ – Shelf Supports
- 3 – 1×3 at 23-1/2″ – Door Stiles
- 1 – 1×3 (ripped to 1-3/4″ wide) at 23-1/2″ – Door Stile
- 4 – 1×3 at 6-1/2″ – Door Rails
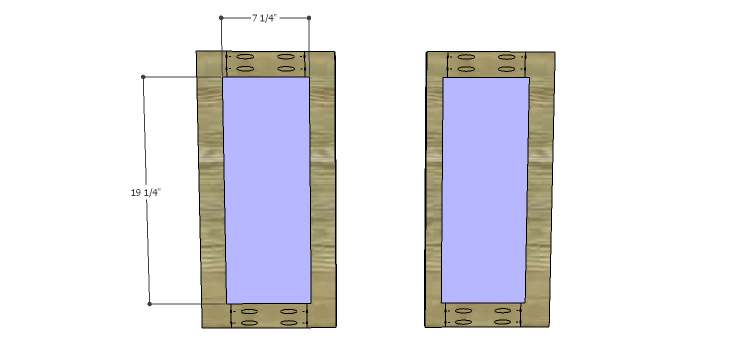
- 2 – 1/4″ plywood at 7-1/4″ x 19-1/4 – Door Panels
Notes:
The steps apply to both the upper and lower cabinets unless otherwise noted.
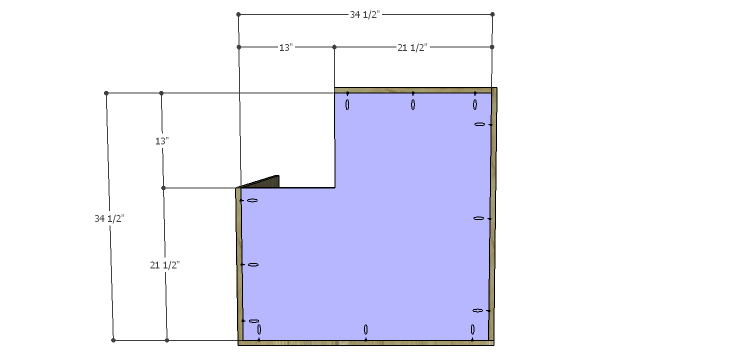
Step One
Cut the pieces for the back. With the pocket hole jig set for 3/4″ material, drill pocket holes in one edge of the shorter back piece as shown in the drawings. Secure the back piece using glue and 1-1/4″ pocket hole screws.
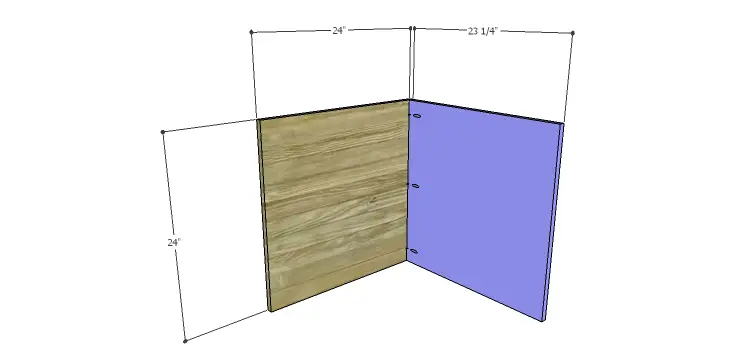
 Step Two
Cut the pieces for the sides and drill pocket holes in one long edge of each piece. Secure the to the back pieces using glue and 1-1/4″ pocket hole screws.
 Step Three
Cut the pieces for the bottom and shelves, as well as the top for the upper cabinet. Cut the notches as shown using a jigsaw or a bandsaw. Drill pocket holes as shown in the bottom pieces as well as the upper top. Secure the bottom pieces to the back and sides as shown using glue and 1-1/4″ pocket hole screws.
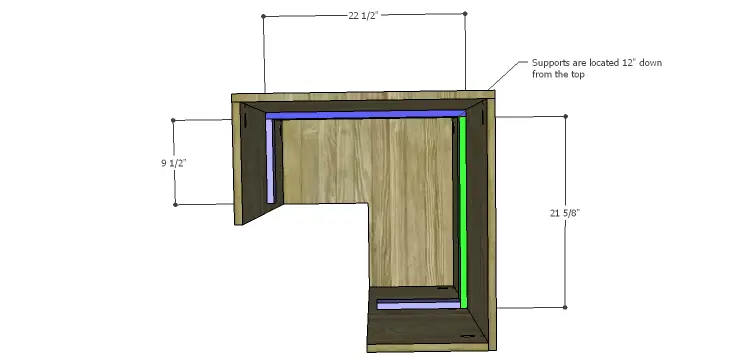
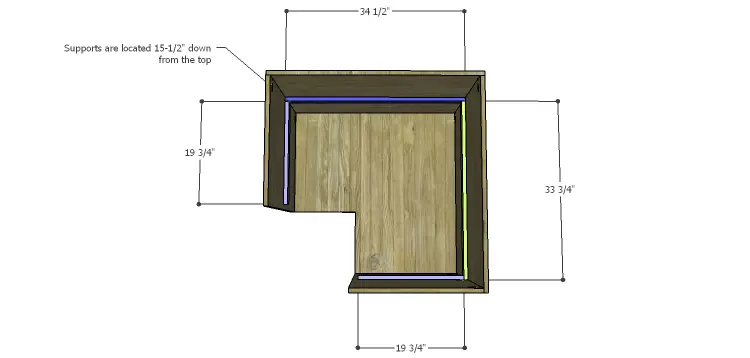
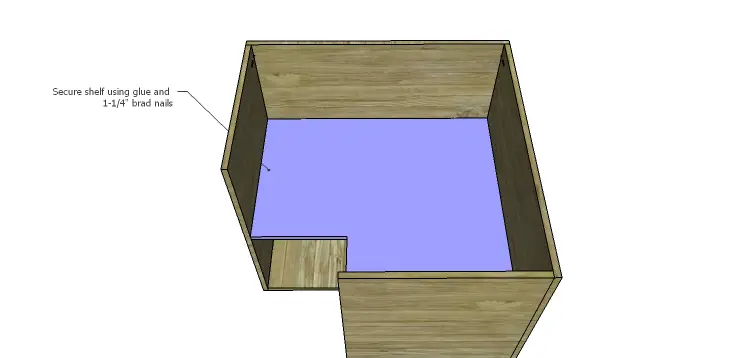
 Step Four
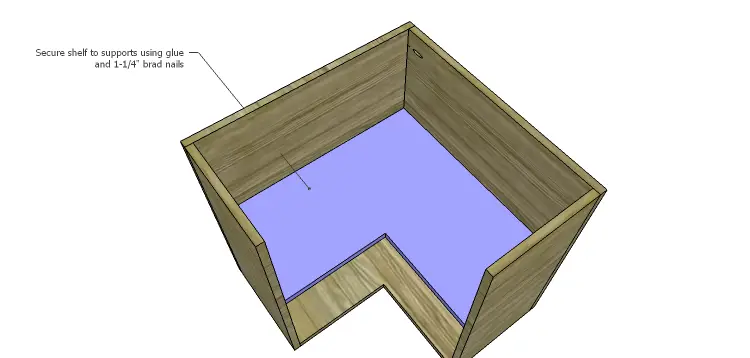
Cut the pieces for the shelf supports. Secure the longest support to the back first, using glue and 1-1/4″ brad nails, then attach the remaining pieces. The shortest pieces will be located 1″ back from the front edge of the sides. Position the shelves on the supports and secure in place using glue and 1-1/4″ brad nails.
 Step Five
For the upper cabinet – position the top as shown and secure to the back and sides using glue and 1-1/4″ pocket hole screws.
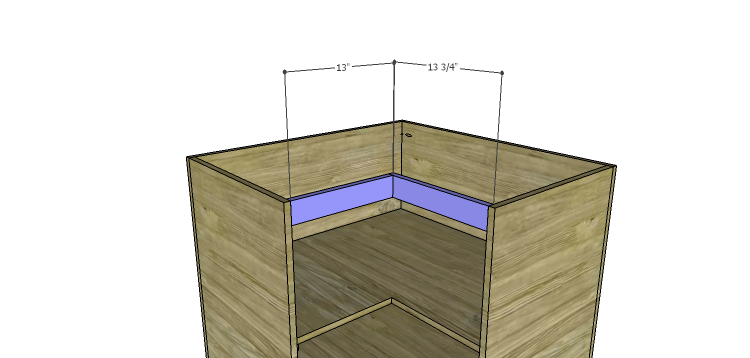
 Step Six
Cut the pieces for the stretchers. Drill pocket holes in each end of the shorter piece, and one end only of the longer piece. Assemble the pieces in an “L” shape using glue and 1-1/4″ pocket hole screws. Position the pieces at the upper part of the sides as shown. Secure in place using glue and 1-1/4″ pocket hole screws.
 Step Seven
Cut the pieces for the doors. One stile will be narrower than the other three for each set of doors – see the drawings. Drill pocket holes in each end of the shorter pieces locating the pocket holes so they will not interfere with the router bit when the recess is cut for the panels. Assemble the door frames using glue and 1-1/4″ pocket hole screws.
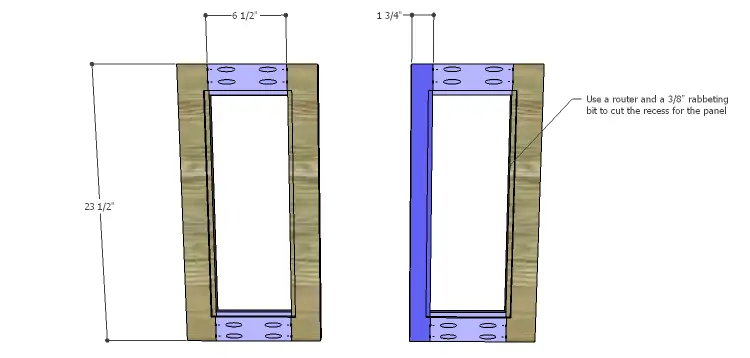
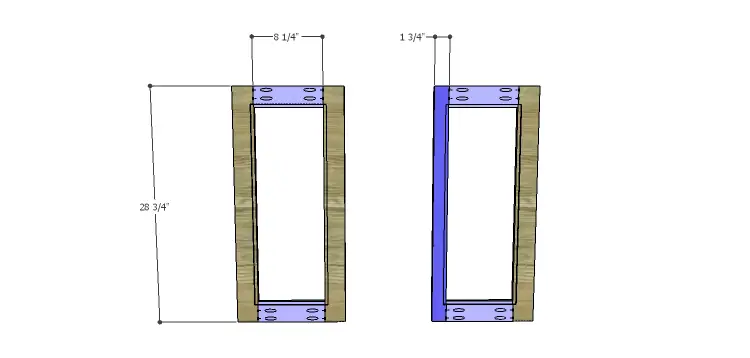 Step Eight
Use a 3/8″ rabbeting bit and a router to cut a 1/4″ deep recess on the inside of the frame for the door panels. Cut the panels for the doors, and secure in place with glue and clamps.
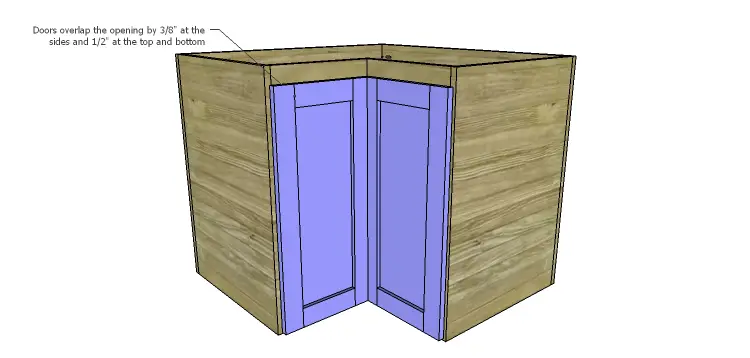
 Step Nine
If creating the “L” shaped doors, use 1-1/4″ brad nails and glue to attach the doors to each other. If using the corner cabinet hinges, install the hinges according to the manufacturer’s installation instructions. Attach the 3/8″ overlay hinges on the doors, then install the doors in the cabinet. The top and bottom of the doors will overlap the opening by 1/2″, and the sides will overlay by 3/8″. 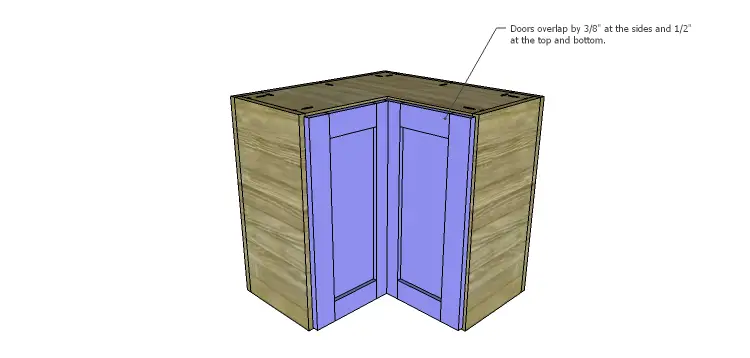
 Finish as desired. Building corner cabinet for a kitchen is very easy, and there are several different ways the cabinet can be built. This was the design I used in my own kitchen and has worked really well for me! Have any questions about the corner kitchen cabinet plans? Let me know at cher {at} designsbystudioc {dot} com!
Disclaimer:
This post contains affiliate links. What that means is that if the link is clicked and a purchase is made, I will receive a commission.
Originally posted 2014-06-13 08:00:37.


Comments are closed.