Step-by-Step Guide to Build a Fabulous Storage Chest
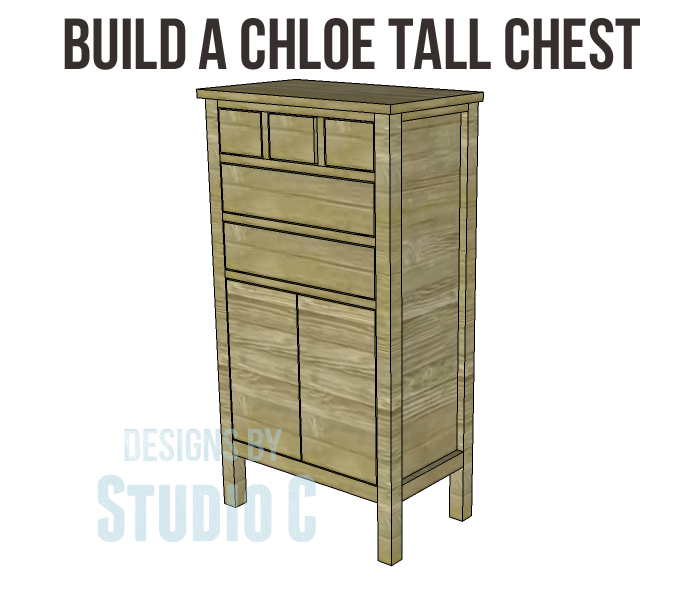
The inspiration piece is a tall chest with a chippy, distressed finish, but it would look equally as elegant with a stained finish! The plans to build a Grandin Road inspired Chloe chest have a thin profile but plenty of storage with three small drawers, two larger drawers, and a cabinet with two doors and a shelf. Fantastic in an entryway, dining room, or even a bedroom, this piece is sure to fit into any decor for years to come!
Materials:
- 1-1/4″ pocket hole screws
- 2″ pocket hole screws
- 1-1/4″ brad nails
- Two sets of 10″ drawer slides (<– affiliate link!)
- Two sets of hinges
- Five drawer handles
- Two door handles
- Glue
- Finishing supplies
Lumber:
- Two 2×2 at 8′
- One 2×2 at 6′
- One 1×2 at 8′
- One 1×2 at 6′
- Two 1×3 at 8′
- One quarter sheet of 1/4″ plywood
- One sheet of 3/4″ plywood
Cut List:
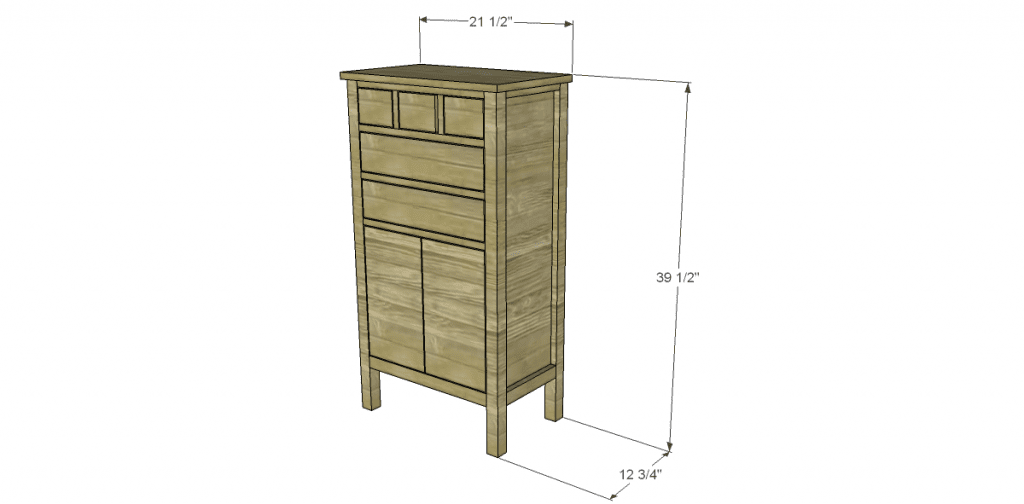
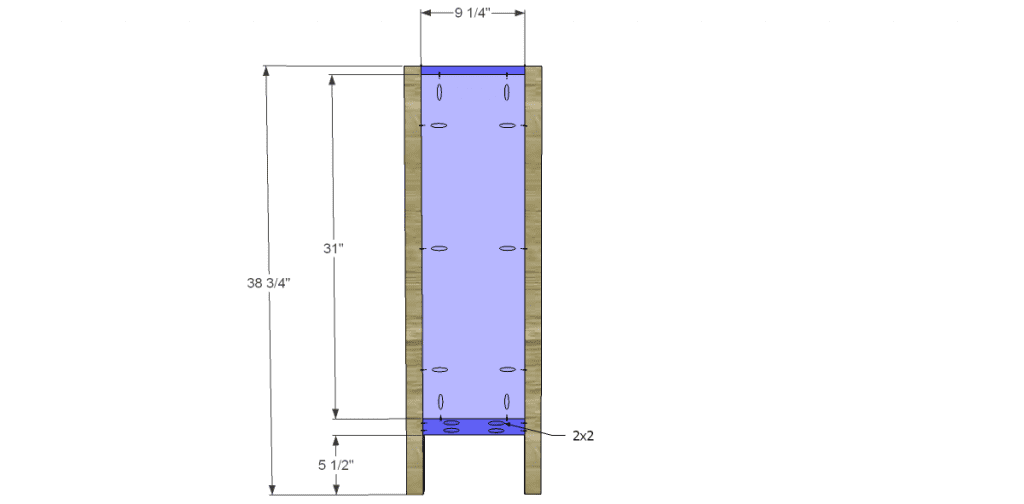
- Four 2×2 at 38-3/4″ – Legs
- Two 1×2 at 9-1/4″ – Side Frames
- Two 2×2 at 9-1/4″ – Side Frames
- Two 3/4″ plywood at 9-1/4″ x 31″ – Side Panels
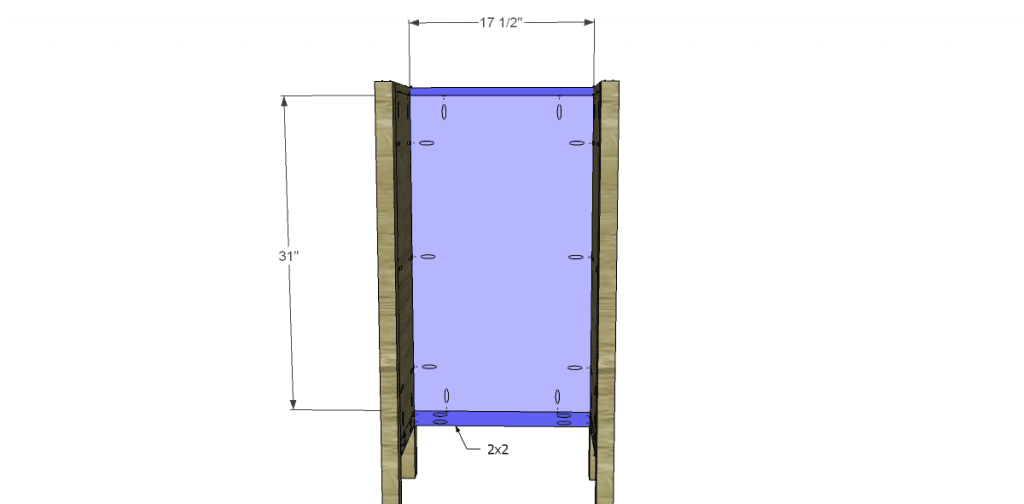
- One 1×2 at 17-1/2″ – Back Panel
- One 2×2 at 17-1/2″ – Back Panel
- One 3/4″ plywood at 17-1/2″ x 31″ – Back Panel
- Four 1×2 at 17-1/2″ – Stretchers
- One 2×2 at 17-1/2″ – Stretcher
- Three 3/4″ plywood at 9-1/4″ x 17-1/2″ – Shelves
- One 3/4″ plywood at 10″ x 17-1/2″ – Center Shelf
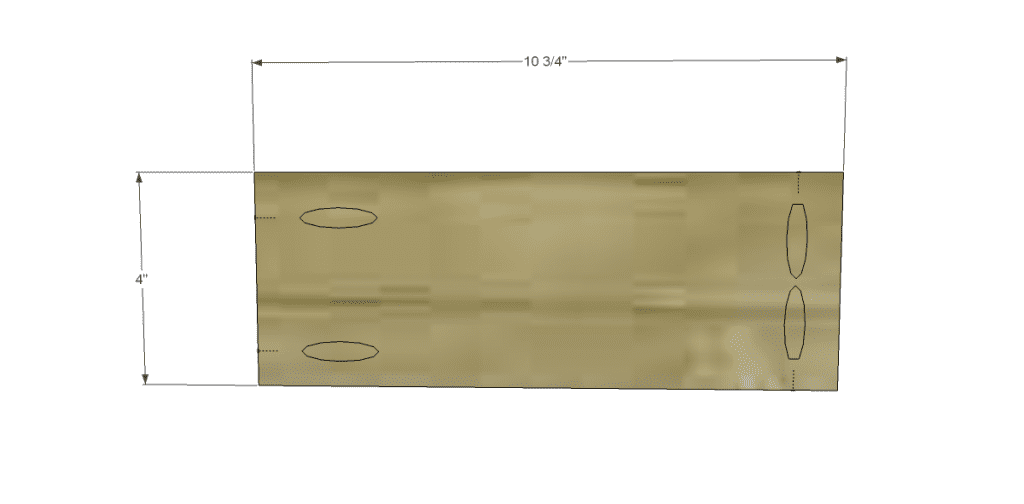
- Two 3/4″ plywood at 4″ x 10-3/4″ – Dividers
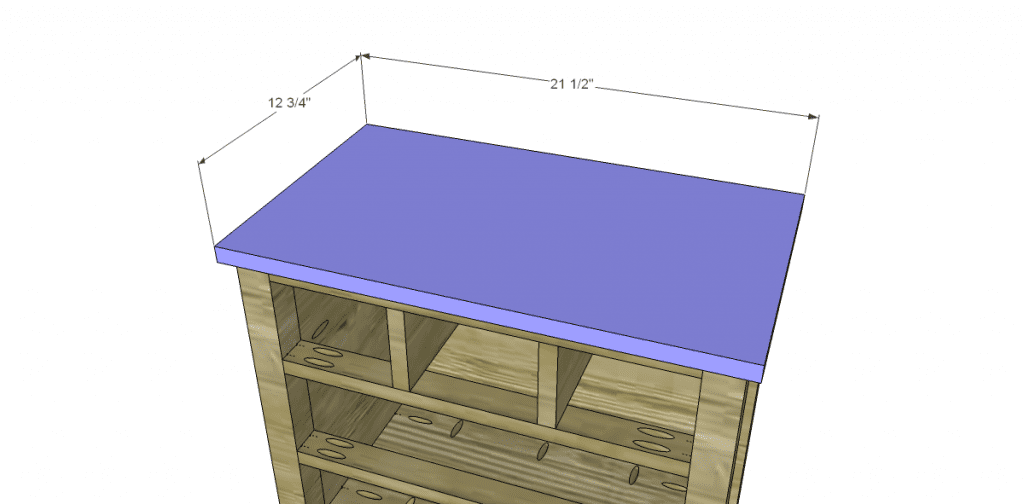
- One 3/4″ plywood at 12-3/4″ x 21-1/2″ – Top
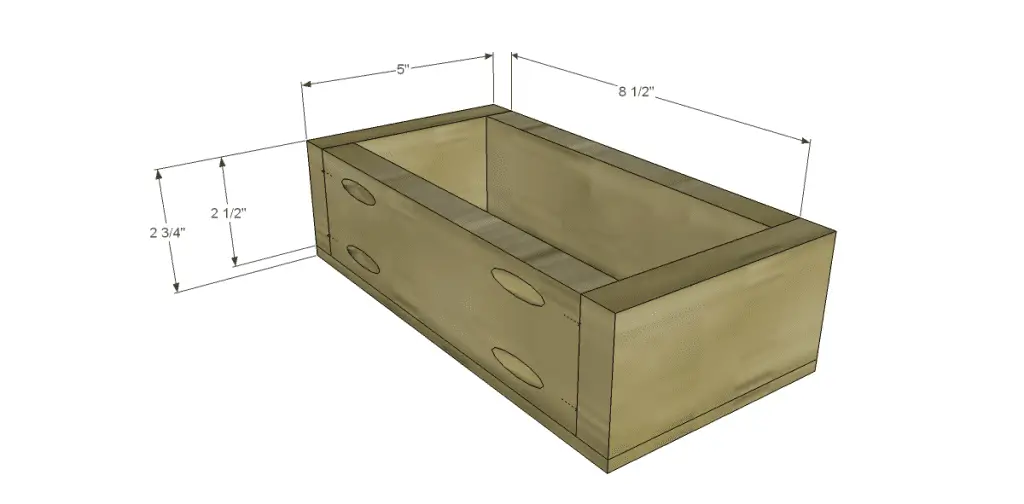
- Four 1×3 at 5″ – Small Drawer Boxes
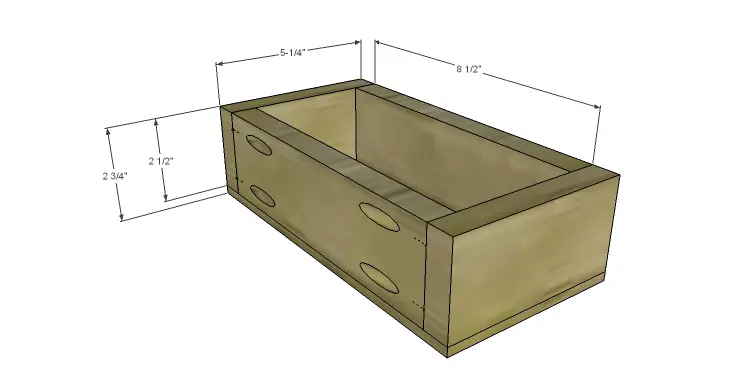
- Two 1×3 at 5-1/4″ – Center Drawer Boxes
- Ten 1×3 at 8-1/2″ – Drawer Box Sides
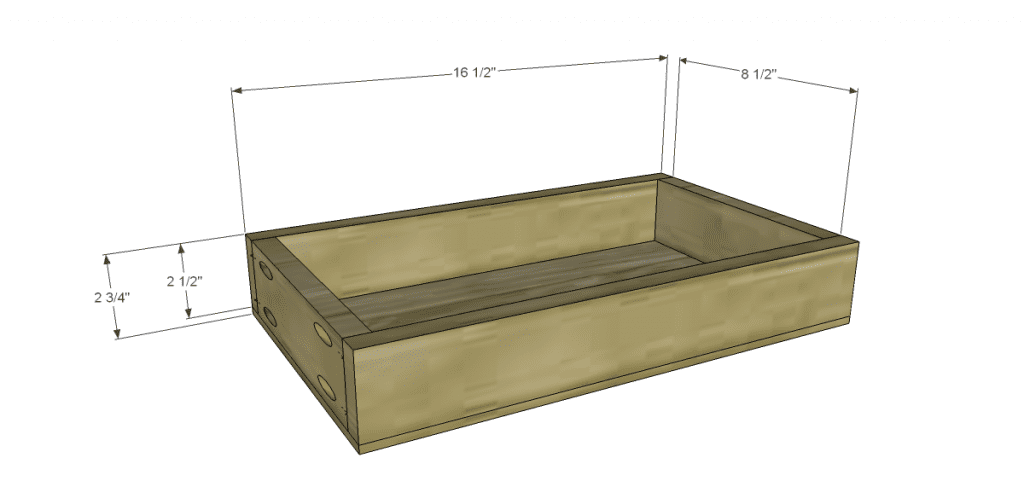
- Four 1×3 at 16-1/2″ – Large Drawer Boxes
- Two 1/4″ plywood at 5″ x 10″ – Small Drawer Bottoms
- One 1/4″ plywood at 5-1/4″ x 10″ – Center Drawer Bottom
- Two 1/4″ plywood at 10″ x 16-1/2″ – Large Drawer Bottoms
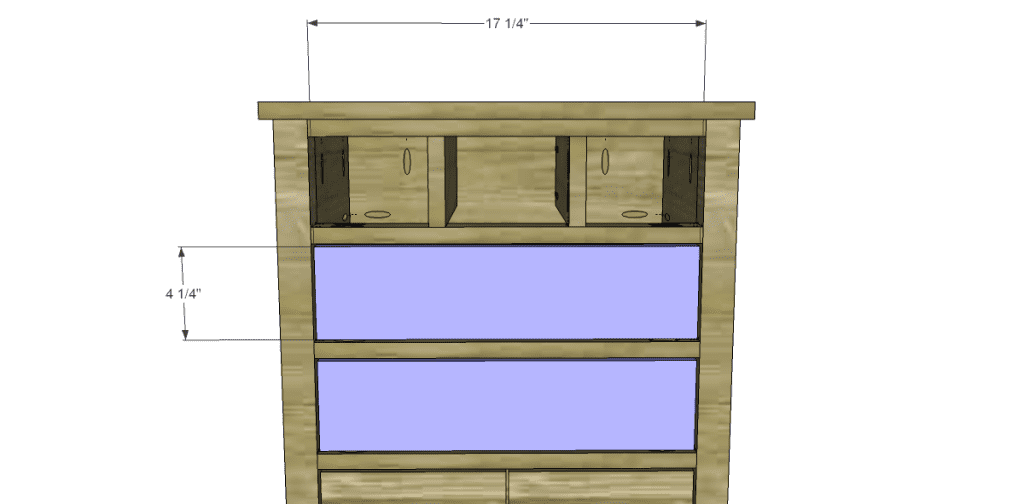
- Two 3/4″ plywood at 4-1/4″ x 17-1/4″ – Large Drawer Fronts
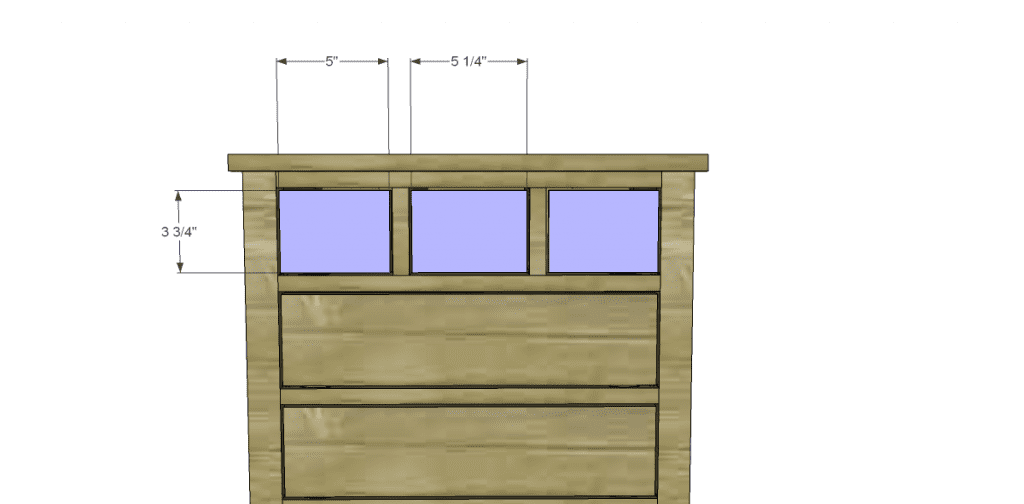
- Two 3/4″ plywood at 3-3/4″ x 5″ – Drawer Fronts
- One 3/4″ plywood at 3-3/4″ x 5-1/4″ – Center Drawer Front
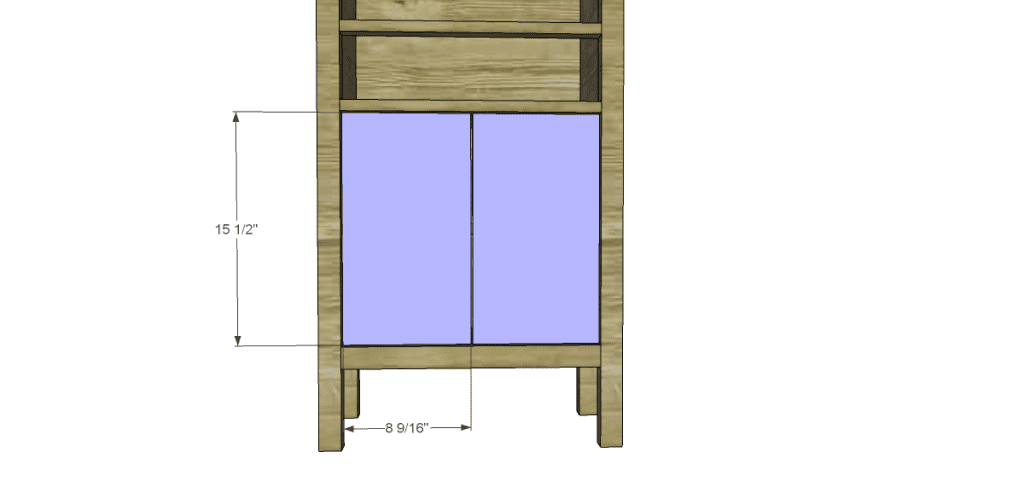
- Two 3/4″ plywood at 8-9/16″ x 15-1/2″ – Doors
Step One
Cut the pieces for the legs, side frames, and side panels. Drill pocket holes in the panels as shown as well as in each end of the frame pieces. Attach the frame pieces to the panels using glue and 1-1/4″ pocket hole screws. Attach the assembly to the legs using glue and pocket hole screws. Use 1-1/4″ pocket hole screws at the top of the frame and for the panel, and use 2″ pocket hole screws at the bottom of the frame.
Step Two
Cut the pieces for the back. Drill pocket holes in the back panel as well as in each end of the frame pieces. Attach to the legs in the same manner as the sides.
Step Three
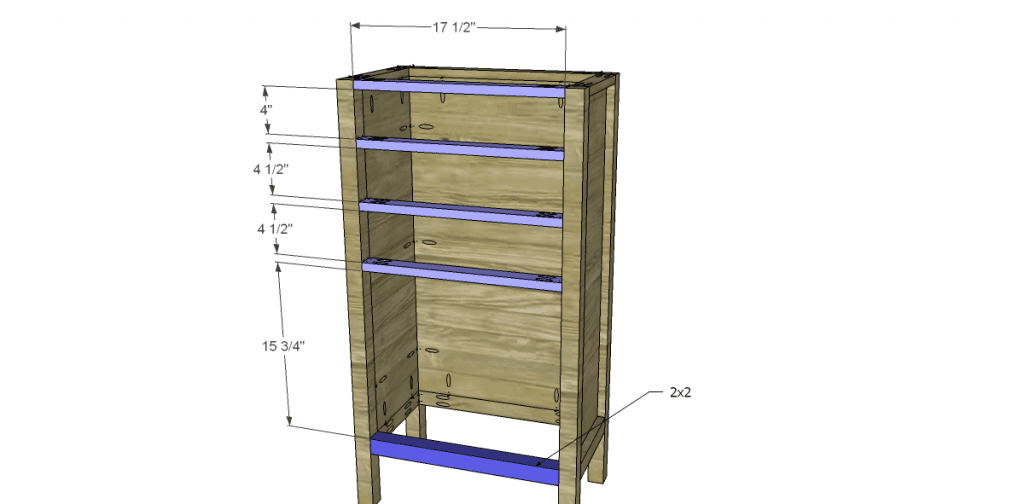
Cut the pieces for the stretchers. Drill pocket holes in each end. Attach as shown using glue and 1-1/4″ pocket hole screws.
Step Four
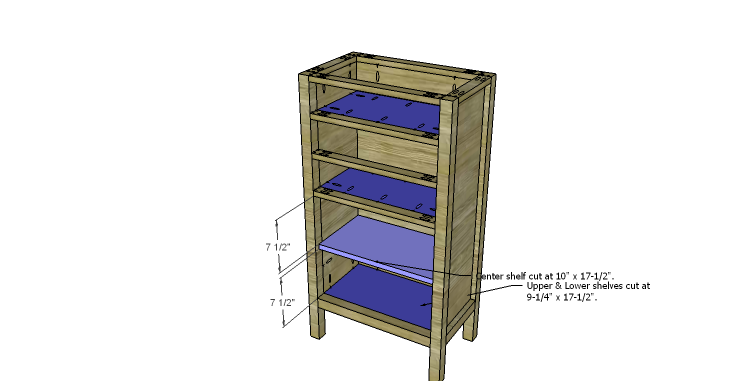
Cut the pieces for the upper and lower shelves. Drill pocket holes in all edges and attach to the stretcher, side panels, and back panel using glue and 1-1/4″ pocket hole screws.
Cut the piece for the center shelf. Drill pocket holes in three edges only. Attach to the side panels and back panel using glue and 1-1/4″ pocket hole screws. The center shelf will be set back 3/4″ from the front face of the chest.
Step Five
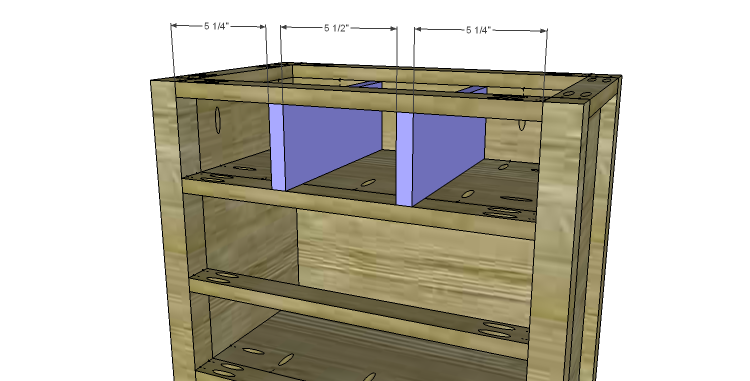
Cut the pieces for the drawer dividers. Drill pocket holes as shown. Attach to the chest using glue and 1-1/4″ pocket hole screws.
Step Six
Cut the piece for the top. Attach using glue and 1-1/4″ brad nails through the top into the stretcher, side frame, and back frame.
Step Seven
Cut the pieces for the drawer boxes. Drill pocket holes in each end of the sides. Assemble the drawer boxes as shown using glue and 1-1/4” pocket hole screws. Attach the bottom using glue and 1-1/4″ brad nails. Install the drawer slides (for the lower drawers) according to the manufacturer’s installation instructions, locating them ¾” back from the front edge of the sides. See my post on how to install drawer slides for an easy tutorial! Make any necessary adjustments.
Step Eight
Cut the pieces for the drawer fronts. Mark the position for the drawer pulls and drill the holes. Shim the drawer front in the opening – there will be a 1/8” gap around all sides – then drive screws through the holes for the drawer pulls into the drawer box. Open the drawer, and secure the drawer front using countersunk 1-1/4” screws from the inside. Remove the screws from the holes for the drawer pull then finish drilling the holes. Install the drawer pull. Easily install drawer fronts, with this great tutorial.
Step Nine
Cut the pieces for the doors. There will be a 1/8″ gap at the top, bottom, sides, and center of the doors. Install the hinges according to the manufacturer’s instructions.
Finish as desired and apply a coat of paste wax to the bottom of the smaller drawers to hole them slide smoothly in the openings.
There is also another plan for the Eliza Chest, which is the “little sister” to the plans to build a Grandin Road inspired Chloe chest. Together, they make a great pair! Have any questions about the plans? Leave a comment below or contact me at cher {at} designsbystudioc {dot} com!
Originally posted 2014-08-08 08:00:43.

Comments are closed.