
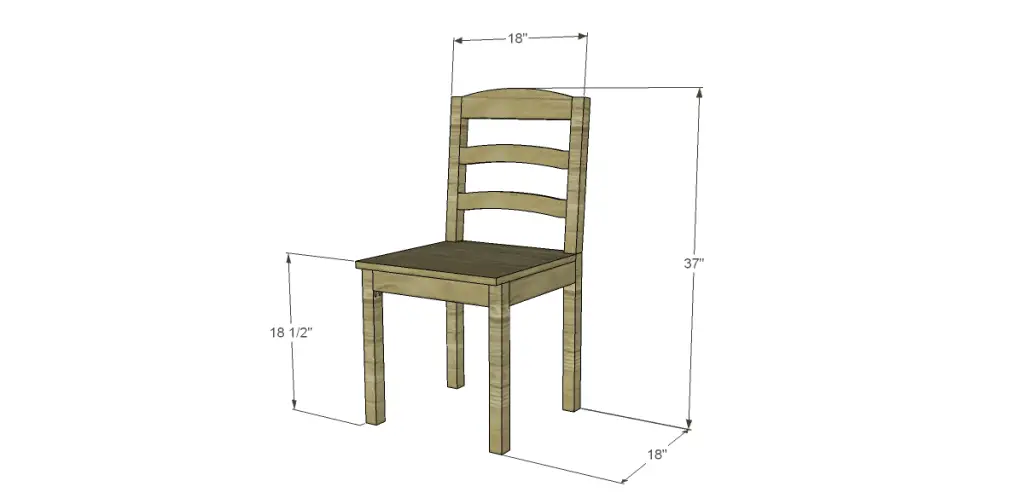
How To Make a Dining Chair: A Step-By-Step Guide
Over the next couple of weeks, I will be posting plans for a few different chairs. The final plan in this “series” is a really cool project that I am building for myself and this way, it gives me time to finish it – providing the weather cooperates!
Anyway, the free plans to build a dining chair (#1) is really easy and this chair (as well as the others) will be perfect at the dining table, desk, or just as a side chair. If constructed out of treated wood or cedar, or even painted with exterior paint, it would be perfect for the front porch!
When I construct chairs like this, I like to purchase 2x4s and 1x6s then rip them down on the table saw. It is much more economical, for me anyway, and I don’t have to hunt for 2x2s that are straight!
Materials:
- 1-1/4″ pocket hole screws (<–affiliate link!)
- 2″ pocket hole screws
- 1-1/4″ brad nails
- Edge banding for seat, if desired (<–affiliate link!)
Lumber:
- 1 – 2×4 at 6′
- 1 – 1×6 at 6′
- Scrap of 3/4″ plywood for the seat
Cut List:
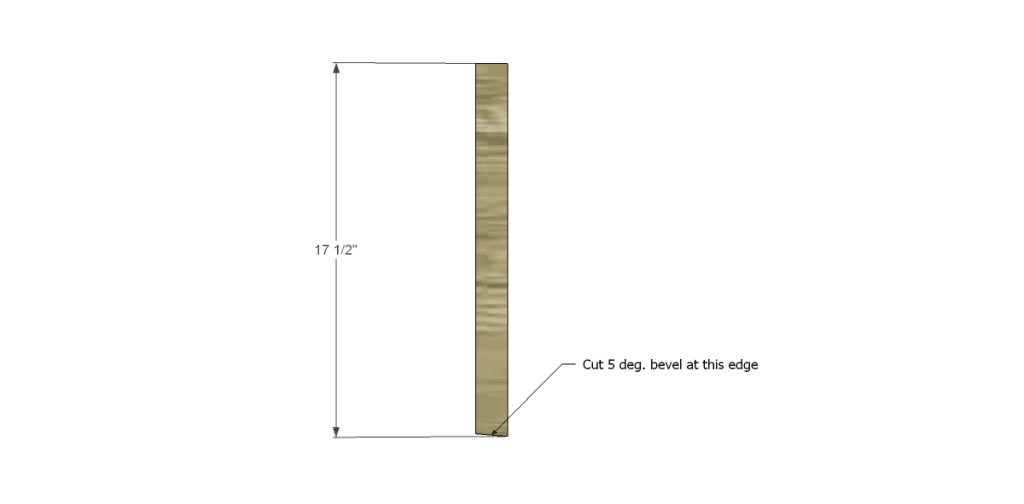
- 2 – 2×2 at 17-1/2″ – Upper Back Legs
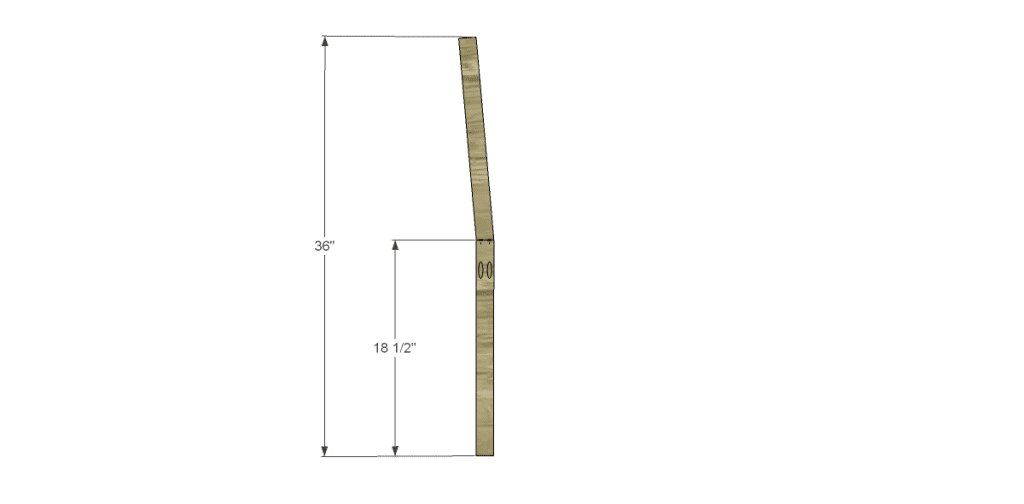
- 2 – 2×2 at 18-1/2″ – Lower Back Legs
- 2 – 2×2 at 17-3/4″ – Front Legs
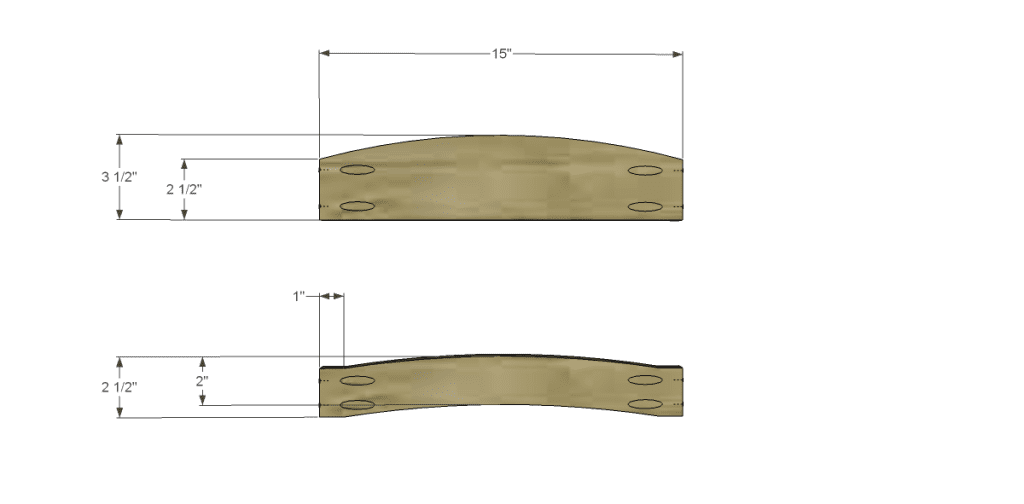
- 4 – 1×3 at 15″ – Front & Back Aprons, Back Slats
- 1 – 1×4 at 15″ – Upper Back Slat
- 2 – 1×3 at 14″ – Stretchers
- 1 – 3/4″ plywood at 18″ x 18″ – Seat
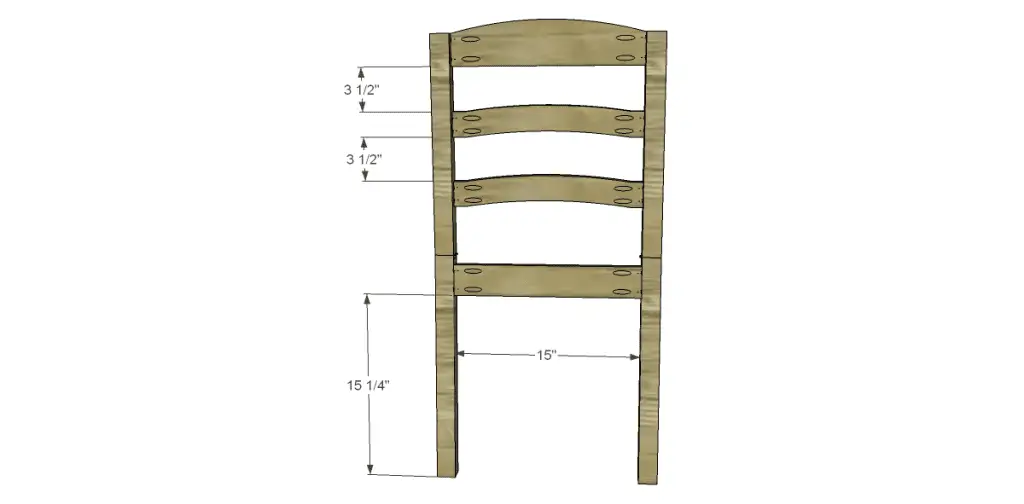
Step One
Cut the pieces for the legs. Cut a 5 degree bevel in the bottom of each upper piece. The angle allows the back to “recline” so to speak! Drill pocket holes in the top edge only of the lower leg pieces then attach the top using glue and 2-1/2″ pocket hole screws.
Step Two
Cut the pieces for the back apron and the back slats. For the upper slat, draw the arc as shown and cut out using a jigsaw or a bandsaw. For the lower slats, draw the curves as shown on one piece and cut out. Clamp this board to the second board and trace the curves, then cut out. Keeping the boards clamped together, sand both at the same time. (I am incredibly OCD about this and tend to get frustrated if the pieces don’t match!) Drill pocket holes in each end of each piece. Secure using glue and 1-1/4″ pocket hole screws. The front faces of the slats will be flush with the front faces of the legs.
Drill pocket holes in each end of the back apron. Secure the piece as shown, the outer face will be flush with the back face of the lower legs.
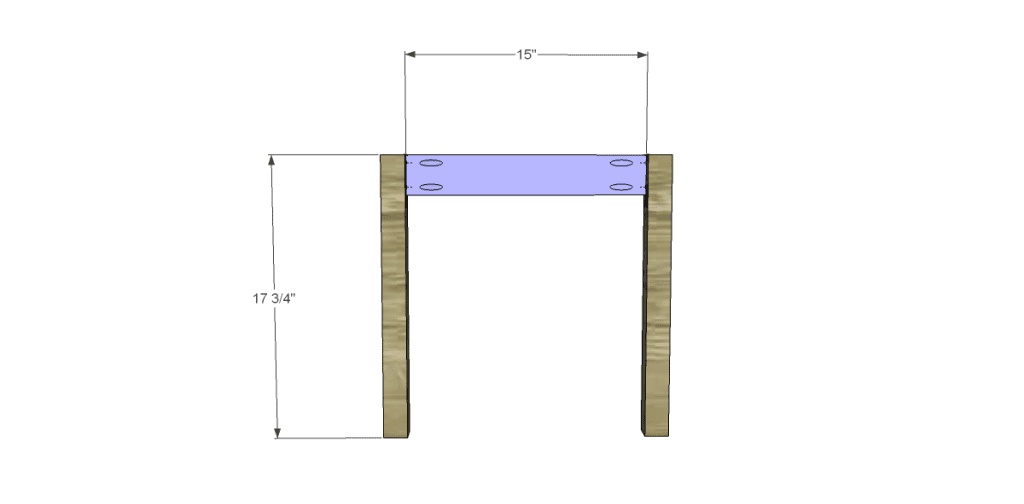
Step Three
Cut the pieces for the front frame. Drill pocket holes in each end of the apron. Secure using glue and 1-1/4″ pocket hole screws. The front faces of the apron will be flush with the front faces of the legs.
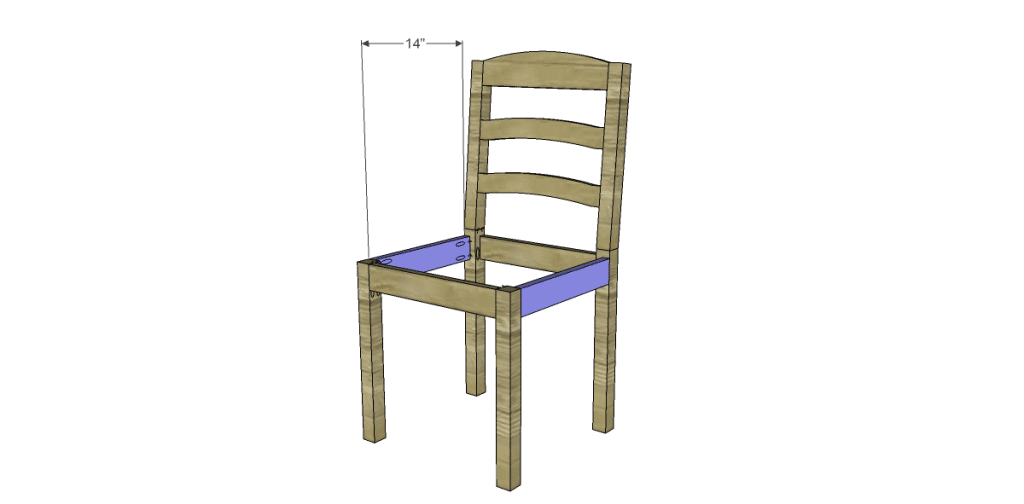
Step Four
Cut the pieces for the stretchers and drill pocket holes in each end. Secure as shown using glue and 1-1/4″ pocket hole screws in the front leg, and 2″ pocket hole screws in the back legs.
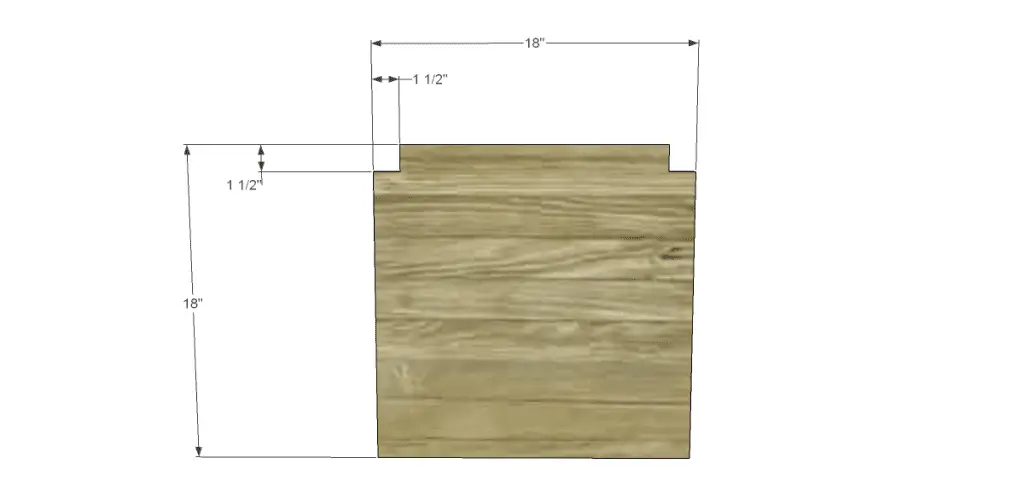
Step Five
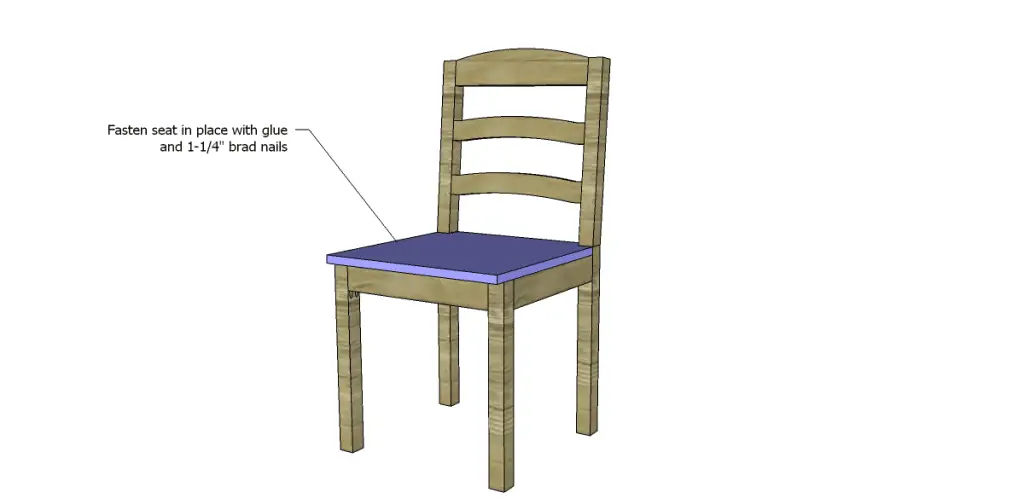
Cut the piece for the seat. Cut the notches for the legs as shown and apply edge banding if desired. Secure the seat to the frame using glue and 1-1/4″ brad nails.
Finish as desired.
Have questions about the free plans to build a dining chair (#1)? Leave a comment below!
Originally posted 2013-01-30 08:00:28.


17 Comments
I’m totally passing this along to my husband! I don’t know if I would build a chair, but I know a tutorial like this will be really beneficial to him. Thanks so much for the post!
Thank you very much! I am really addicted to building chairs.. They are so fun and are really easy to construct! Thank you for stopping by!
I love the look of this chair! I need to make about 6 of these! Thanks for sharing your talent! I do have a question,what kinds of modifications would need to be made to make this taller for the counter height table? thanks!
Hi, Stacy!
Thank you so much! For counter height, the front legs and the lower back legs would be lengthened by 6″ – that’s it! If you build these, please share photos, I would love to see them!! Good luck!
How to do the pocket hole joints for the back support hold up when the chairs are used? I know pocket holes make strong joints, but do you think the chairs will support the weight if someone leans back in them. Most people do this by habit…. Including me! Thanks! – Will
Hi, Will! In all honesty, they hold up pretty well. My daughter uses a chair I built and the side stretcher separated from the back leg from leaning back in it. Longer screws solved that problem (I need to go back and change all of the chair plans!) and it hasn’t been an issue since. As far as the back leg being two pieces, the only time I’ve had them separate is when I put the pocket holes in the upper back leg with the screws going down. Once I changed that around (with the pocket hole screws going up into the upper back leg), it hasn’t been a problem! Hope this helps, and thank you for asking!
Awesome!!! Thank you very much!
If you have any other questions, please do not hesitate to let me know! Good luck with your build!
Thank you for the plans – these are great. My 2 x 2s are splitting when attaching the back slats with 1 1/4 pocket hole screws. Do you have any advice? Thanks again!
Hi, Michael! I hate it when the wood splits – it happens to me all the time! The only thing I can suggest is to drive the screws slowly with short bursts from the drill. Or maybe you could start the screw through the pocket hole in the slat, then back it out. Then pre-drill the hole with a drill bit a tad smaller than the diameter of the screw – it may work! Hope this helps, and good luck with your project! 🙂
If you move the boards to the center point of the 2×2’s you eliminate the issues with splitting the wood.
I did not do it with the first set I made but I will with the next set.
Made with southern yellow pine boards, sanded to 220, and finished with amber shellac.
For the seats, I used some craft batting from the fabric store and an old table cloth from the thrift store.
Very, very beautiful chairs, Todd! They came out great and I love that you used a tablecloth for the upholstery! Thanks for the tip on the splitting… It will come in handy! 🙂
I also used a set of 2 single screw L-brackets to attach the seats. So if I wanted, I can take the seat off and replace it.
When my wife saw them she said “Great, now make me 4 more and we will need a set of covered seats for each season.” lol.
Love the design, thank you for sharing it.
I like the idea of interchangeable covered seats!
I was wondering if you had a recommendation on how to bevel out the seat portion a little to form more to your legs and butt while sitting, rather than sitting on a flat piece of plywood. Thanks!!
Hi, Seth! I think traditional chair builders use a sort of plane to form the seat or “saddle” as it is called. Here’s a great article I found on the subject: http://www.popularwoodworking.com/woodworking-blogs/chris-schwarz-blog/saddle-a-chair-seat Hope this helps!
Yes this really does help. I’ll have to try this out when I finish building my chairs. Thanks for your help and thanks for all of your plans you offer.