
An Easy to Build Faux Apothecary Cabinet
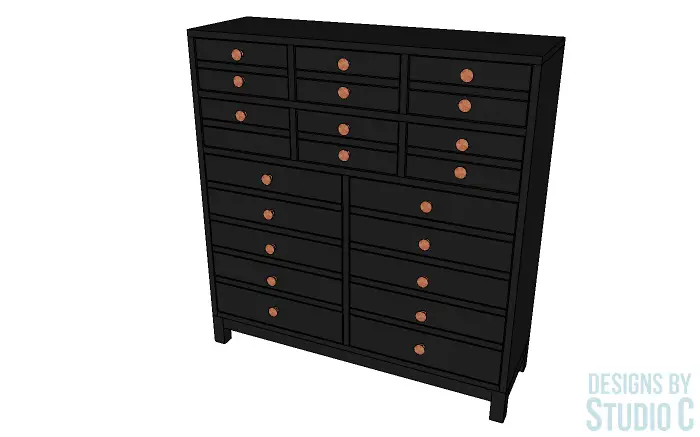
This is an easy cabinet to build without a lot of effort. The DIY furniture plans to build a Nina Apothecary Cabinet (inspired by Ballard Designs) feature faux detailing on the fronts of the doors and drawers to mimic many more drawers but actually has six drawers and two doors with adjustable shelves. Each “drawer” section will have a knob or handle, and is comprised of kerfs cut into a 3/4″ piece of plywood to mimic drawers with spacers.
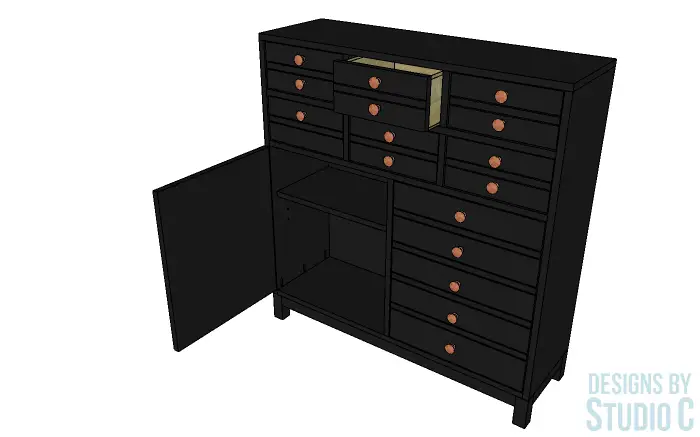

A shelf pin jig will come in handy so that holes can be drilled to make the inner shelves adjustable. The drawers do not require drawer slides… They will slide along the shelves and will fit the space a little tighter than regular drawers. This is a piece that can be finished in a variety of ways, and be completed in a weekend!
Materials:
- 1-1/2″ pocket hole screws (<– affiliate link!)
- 2-1/2″ pocket hole screws (<– affiliate link!)
- 1″ brad nails
- 1-1/2″ brad nails
- 1-1/2″ screws
- Edge Banding (<– affiliate link!)
- Shelf Pin Jig (<– affiliate link!)
- A variety of drawer handles or knobs
- Wood glue
- Sandpaper (80, 120, 220 grits)
- Paste Wax
- Finishing supplies
Lumber:
- 2 – 2×2 at 8′
- 1 – 4′ x 8′ sheet of 1/4″ plywood
- 1 – 4′ x 4′ sheet of 3/4″ plywood
- 1 – 4′ x 8′ sheet of 3/4″ plywood
Cut List:
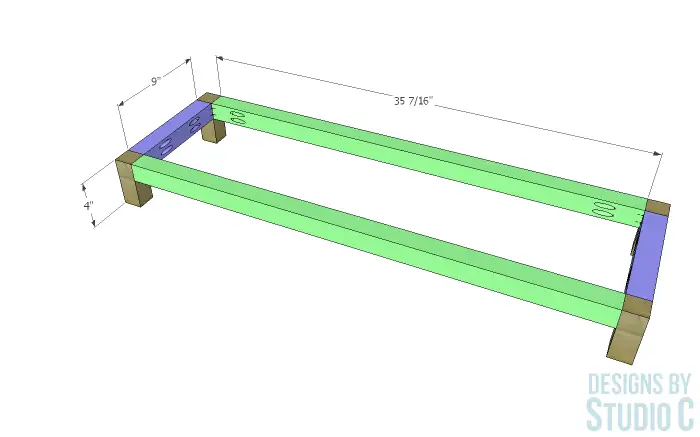
- 2 – 2×2 at 9″ – Base Frame
- 2 – 2×2 at 35-7/16″ – Base Frame
- 4 – 2×2 at 4″ – Legs
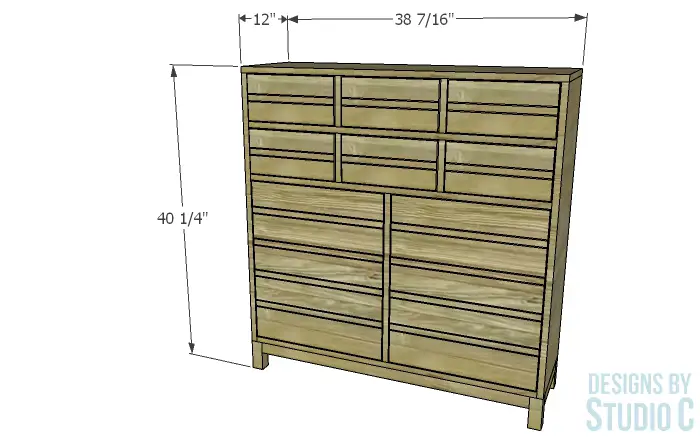
- 2 – 3/4″ plywood at 12″ x 35-1/2″ – Sides
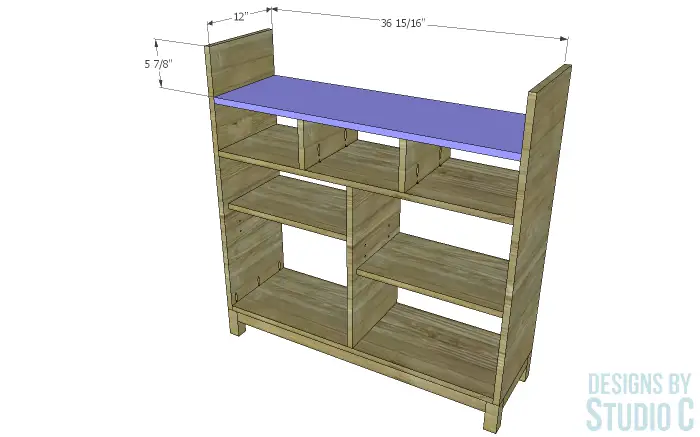
- 3 – 3/4″ plywood at 12″ x 36-15/16″ – Bottom, Upper and Lower Shelf
- 1 – 3/4″ plywood at 12″ x 21-1/2″ – Center Divider
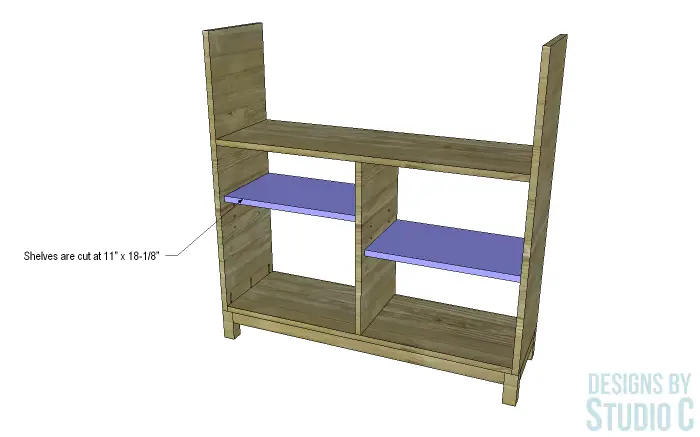
- 2 – 3/4″ plywood at 11″ x 18-1/8″ – Shelves
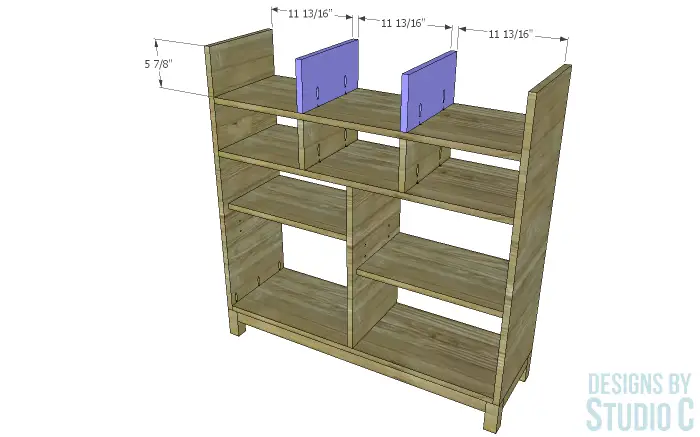
- 4 – 3/4″ plywood at 5-7/8″ x 12″ – Drawer Dividers
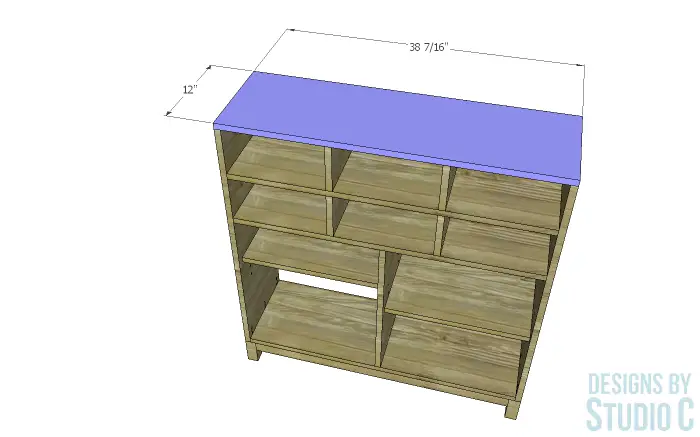
- 1 – 3/4″ plywood at 12″ x 38-7/16″ – Top
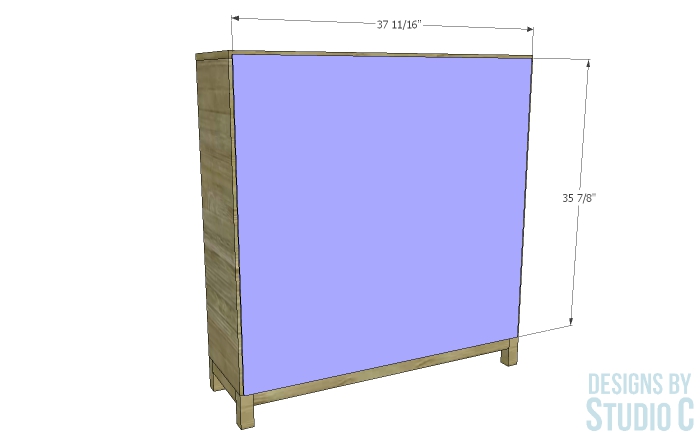
- 1 – 1/4″ plywood at 35-7/8″ x 37-11/16″ – Back
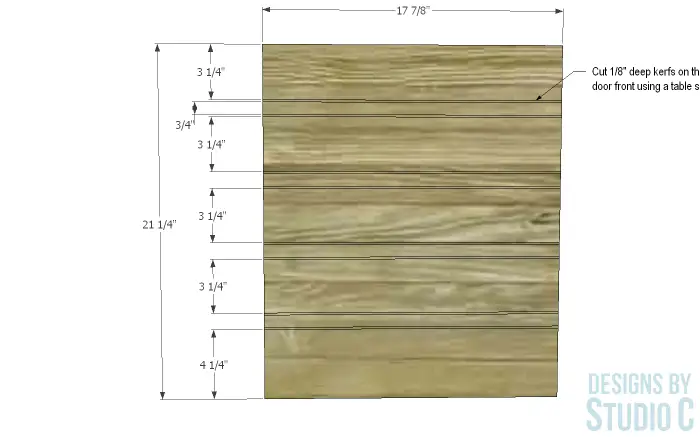
- 2 – 3/4″ plywood at 17-7/8″ x 21-1/4″ – Doors
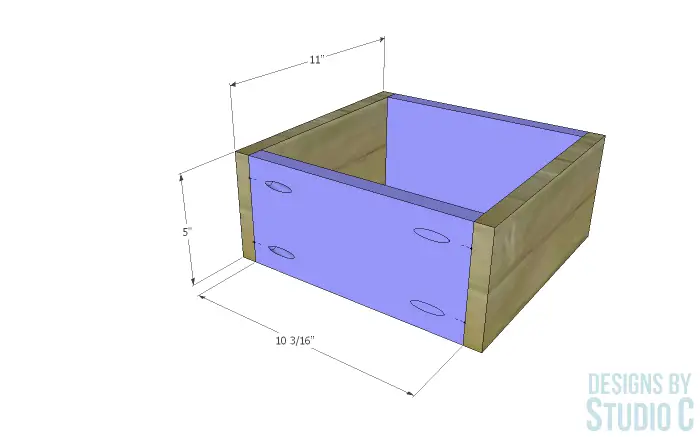
- 12 – 3/4″ plywood at 5″ x 10-3/16″ – Drawer Boxes
- 12 – 3/4″ plywood at 5″ x 11″ – Drawer Boxes
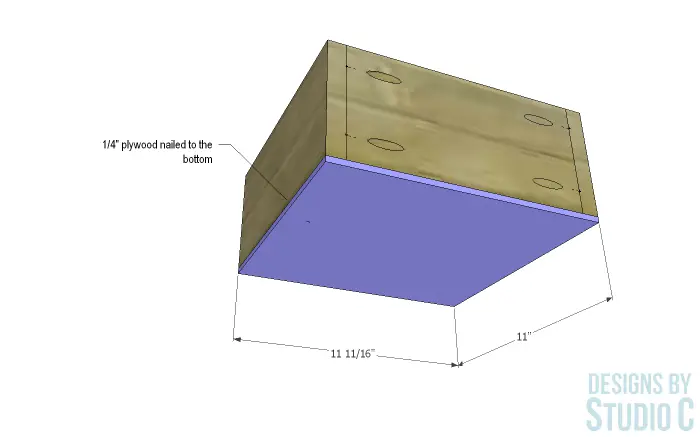
- 6 – 1/4″ plywood at 11″ x 11-11/16″ – Drawer Box Bottoms
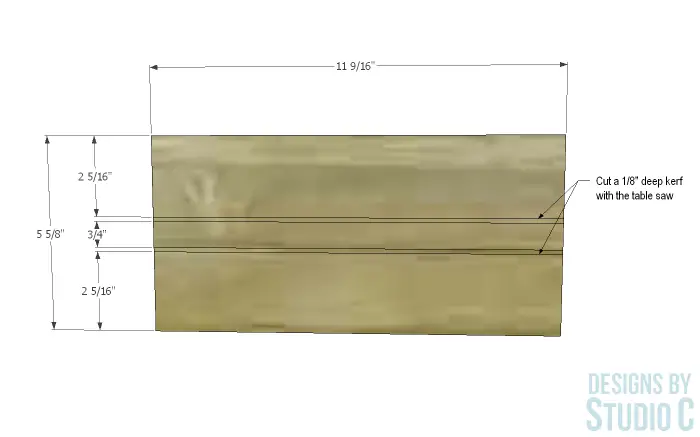
- 6 – 3/4″ plywood at 5-5/8″ x 11-9/16″ – Drawer Fronts
Notes About the Project:
- Edge banding will be applied to the exposed edges of the plywood prior to assembly.
- Paste wax will be applied to the bottom of each drawer to help it slide in and out of the opening. If the drawers sit too far back into the cabinet, a small spacer can be secured to the back of the drawer box to keep it flush with the front of the cabinet.
Step One
Cut the pieces for the base frame. With the pocket hole jig set for 1-1/2″ material, drill pocket holes in each end of the framing pieces. Secure the framing to the legs using glue and 2-1/2″ pocket hole screws.
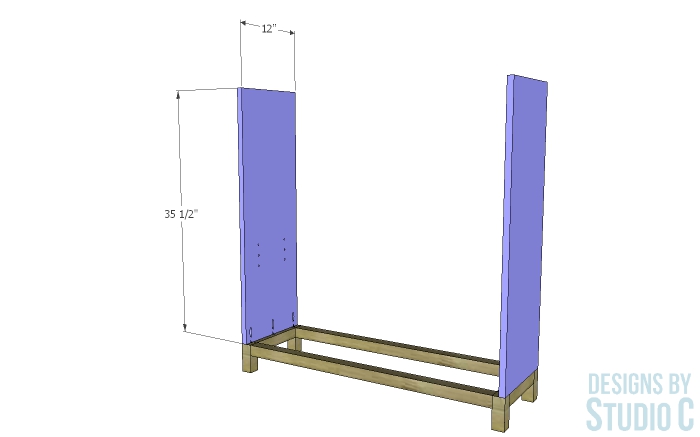
Step Two
Cut the pieces for the sides. Using the pocket hole jig set for 3/4″ material, drill pocket holes in the lower edge only. Use the shelf pin jig to drill 1/4″ deep holes for the shelf pins. Secure the sides to the base, with the outside faces flush, using glue and 1-1/2″ pocket hole screws.

Step Three
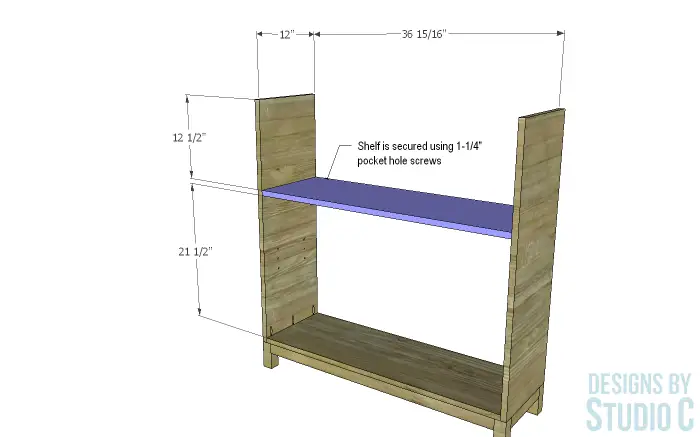
Cut the pieces for the bottom as well as the upper and lower shelves. Secure the bottom to the base, between the sides, using glue and 1-1/2″ brad nails.
Drill pocket holes in each end of the upper and lower shelf. Secure the lower shelf to the sides as shown in the drawing, using glue and 1-1/2″ pocket hole screws. Set the upper shelf aside.

Step Four
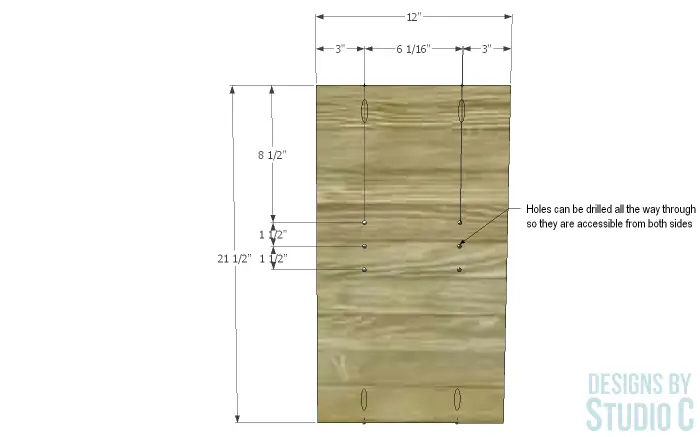
Cut the piece for the center divider and drill pocket holes in each end. Use the shelf pin jig to drill holes for the shelf pins all the way through the piece so the holes can be accessed from both sides. Secure the divider to the bottom and the lower shelf, as shown in the drawing, using glue and 1-1/2″ pocket hole screws.
Step Five
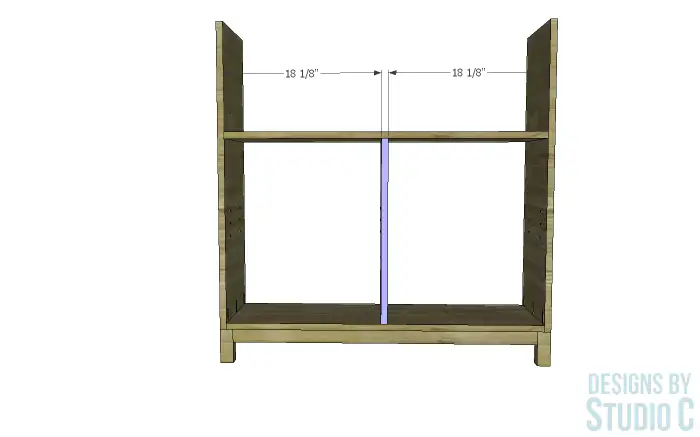
Cut the pieces for the shelves. The shelves will rest on shelf pins installed in the holes in the sides and center divider.
Step Six
Cut the pieces for the drawer dividers and drill pocket holes in the lower edges only. Secure three of the dividers to the top of the lower shelf using glue and 1-1/2″ pocket hole screws.

Step Seven
Secure the upper shelf to the sides using glue and 1-1/2″ pocket hole screws, then drive 1-1/2″ brad nails through the upper shelf into the tops of the lower dividers.
Secure the upper dividers to the upper shelf in the same manner as the lower dividers, using glue and 1-1/2″ pocket hole screws.
Step Eight
Secure the top to the sides and upper dividers using glue and 1-1/2″ brad nails.
Step Nine
Cut the piece for the back. Secure the back in place using 1″ brad nails.
Step Ten
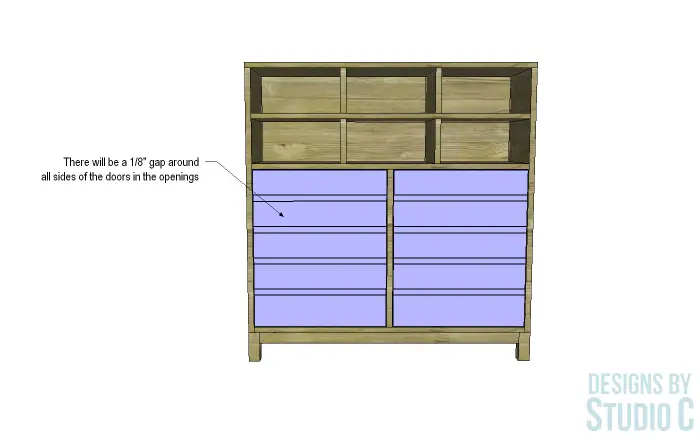
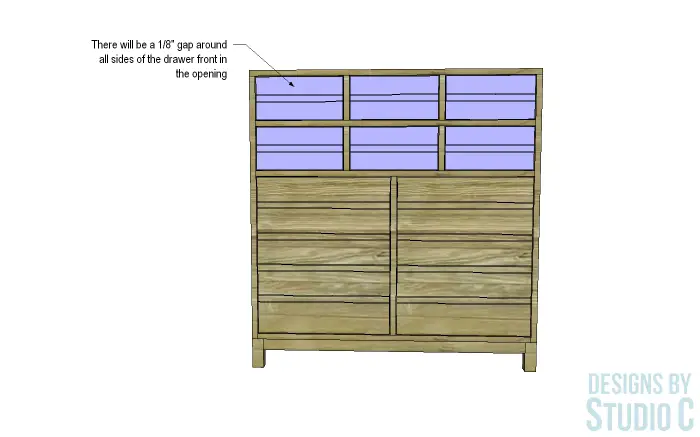
Cut the pieces for the doors. The faux drawers and spacers will be created by cutting kerfs along the pieces with a table saw or circular saw with a bade depth of 1/8″. Cut the kerfs along the width of the door pieces as shown in the drawing. Install hinges on the doors, then install the doors in the openings. There will be a 1/8″ gap around all sides of the doors.
Step Eleven
Cut the pieces for the drawer boxes. Drill pocket holes in each end of the shorter pieces. Assemble the drawer box using glue and 1-1/2″ pocket hole screws.
Cut the pieces for the drawer bottoms and secure to the drawer box using glue and 1″ brad nails. Slide the drawer boxes into the openings.
Step Twelve
Cut the pieces for the drawer fronts. The faux drawers and spacers will be created in the same manner as the doors. Cut the kerfs along the length of the drawer pieces as shown in the drawing. Position the drawer fronts over the drawer boxes in the openings with a 1/8″ gap around all sides, then secure the drawer fronts to the boxes using glue and 1-1/2″ brad nails. Carefully pull the drawers out then secure the drawer fronts from the inside using 1-1/2″ screws.
Finish the cabinet, doors and drawers as desired! Apply a coat of paste wax to the bottom of each drawer to help it easily slide in the openings.
This cabinet is a great piece for any room, and is truly an easy build! Have questions about the DIY furniture plans to build a Nina Apothecary Cabinet inspired by Ballard Designs? Leave a comment below!


Comments are closed.