
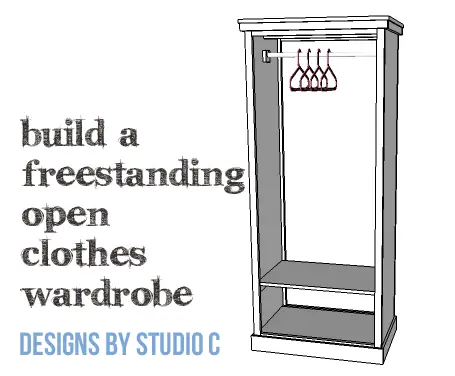
Short on Storage? Here’s a DIY Option for Clothing…
Sometimes there just isn’t enough storage for stuff – or maybe we just have too much stuff! Anyway, this open wardrobe is the perfect addition for an area where there is no closet and you don’t mind having clothes on display! The DIY furniture plans to build a Freestanding Open Clothes Wardrobe feature an opening at the front and back (access from either side), as well as a fixed shelf on the bottom, and trim at the top and bottom. This is the perfect piece for costumes or dress-up, too!
Materials:
- 1-1/4″ pocket hole screws (<– affiliate link!)
- 1-1/4″ brad nails
- 2″ brad nails
- 1-1/2″ screws
- Edge banding for the top
- Wood glue
- Sandpaper (100, 150, 220 grits)
- Finishing supplies (primer & paint, or stain, sealer)
Tools Needed:
- Table saw
- Miter saw or circular saw
- Drill
- Pocket hole jig
- 1″ paddle bit or hole saw
- Jigsaw
- Pneumatic brad nailer with compressor
- Sander
Lumber:
- 5 – 1×2 at 6′
- 1 – 1×3 at 6′
- 1 – 1×3 at 8′
- 1 – 1×6 at 6′
- 1 – 2′ x 4′ sheet of 3/4″ plywood
- 1 – 4′ x 8′ sheet of 3/4″ plywood
- 1″ dowel or closet rod at 3′
- Trim for the top and bottom as desired
Cut List:
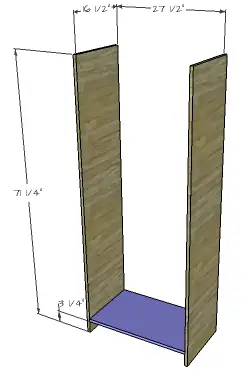
- 2 – 3/4″ plywood at 16-1/2″ x 71-1/4″ – Sides
- 1 – 3/4″ plywood at 16-1/2″ x 27-1/2″ – Bottom
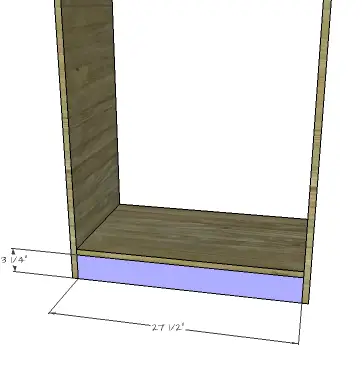
- 2 – 1×3 (ripped to 3-1/4″ wide) at 27-1/2″ – Front & Back Lower Supports
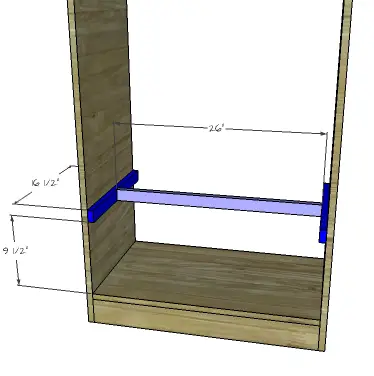
- 2 – 1×2 at 16-1/2″ – Shelf Supports
- 1 – 1×2 at 26″ – Shelf Support
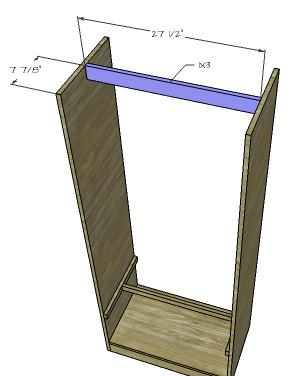
- 1 – 1×3 at 27-1/2″ – Upper Stretcher
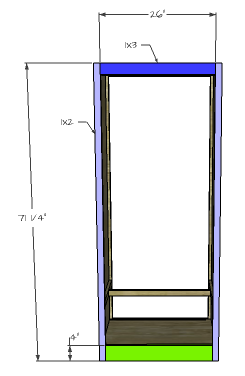
- 4 – 1×2 at 71-1/4″ – Face Frames
- 2 – 1×3 at 26″ – Face Frames
- 2 – 1×6 (ripped to 4″ wide) at 26″ – Face Frames
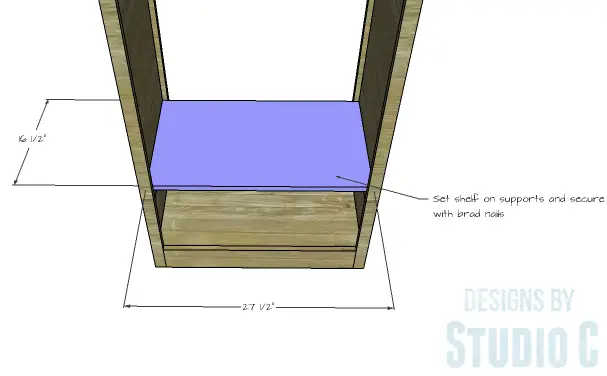
- 1 – 3/4″ plywood at 16-1/2″ x 27-1/2″ – Shelf
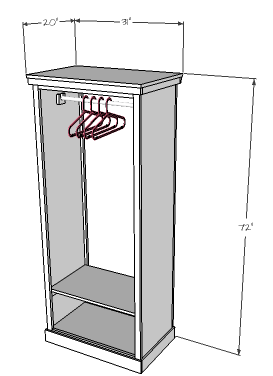
- 1 – 3/4″ plywood at 20″ x 31″ – Top
- 2 – 1×3 at 2-1/2″ – Closet Rod Supports
- 1 – 1″ dowel or closet rod cut to fit
- Trim for the top and bottom cut to fit
Click on the drawings for a larger view!
Step One
Cut the pieces for the sides and bottom. With the pocket hole jig set for 3/4″ material, drill pocket holes in each end of the bottom piece. Secure the bottom to the sides using glue and 1-1/4″ pocket hole screws.
Step Two
Cut the pieces for the lower supports. Secure the supports to the sides and bottom (under the bottom shelf) using glue and 2″ brad nails.
Step Three
Cut the pieces for the shelf supports. Secure the shorter 1×2 pieces to the sides using glue and 1-1/2″ screws. Drill pocket holes in each end of the longer piece, securing to the shorter pieces using glue and 1-1/4″ pocket hole screws.
Step Four
Cut the piece for the upper stretcher and drill pocket holes in each end. Secure the stretcher in the center of the sides (the top edge will be flush with the top) using glue and 1-1/4″ pocket hole screws.
Step Five
Cut the pieces for the face frames. Drill pocket holes in each end of the 1×3 and 1×6 (which is ripped to 4″ wide) pieces securing them to the 1×2 side pieces using glue and 1-1/4″ pocket hole screws. Secure the face frames to the front and back of the sides securing in place using glue and 2″ brad nails. Secure the lower part of the face frame to the bottom.
Step Six
Cut the piece for the shelf. If using edge banding, apply it to the side edges. Set the shelf on the supports behind the face frames, securing in place with glue and 2″ brad nails.
Step Seven
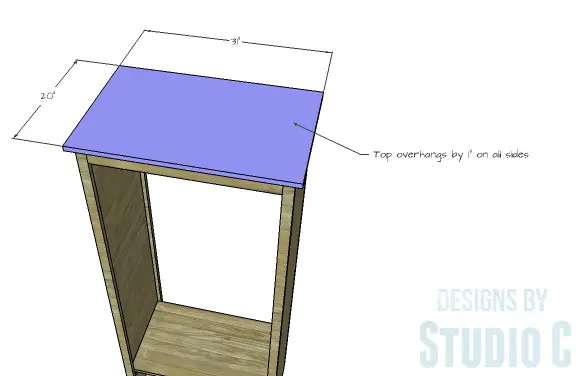
Cut the piece for the top. If using edge banding, it will be applied to the exposed edges of the plywood prior to securing the top. The top will overhang by 1″ on each side. Secure the top in place using glue and 2″ brad nails.
Step Eight
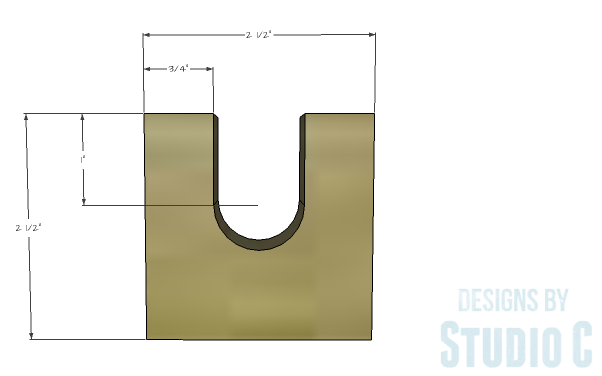
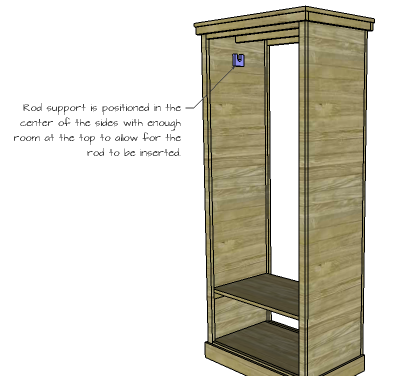
Cut the pieces for the closet rod supports. Mark each piece for the center of the hole and cut the hole using a paddle bit or hole saw. Draw lines from the side edges of the holes to one end of the supports and cut with a jigsaw. Secure the supports to the sides using glue and 1-1/2″ screws low enough to easily install the closet rod.

Step Nine
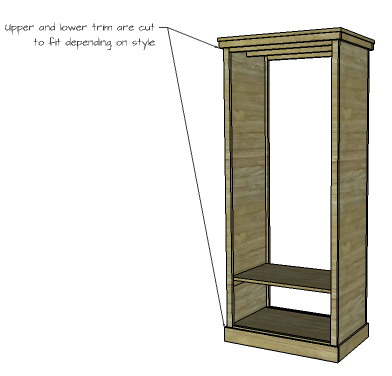
Cut the trim to fit under the top and around the bottom. There are no dimensions given to cut the trim because it will depend on the type of trim used. Secure the trim using glue and 1-1/4″ brad nails.
Finish the wardrobe as desired.
The sides of this fabulous wardrobe can be fitted with mirrors, corkboards or stenciled to dress it up a bit! Have any questions about the DIY furniture plans to build a Freestanding Open Clothes Wardrobe? Leave a comment below!
Originally posted 2016-07-25 08:00:53.


Comments are closed.