
Build a Shallow Corner Cabinet EDITED
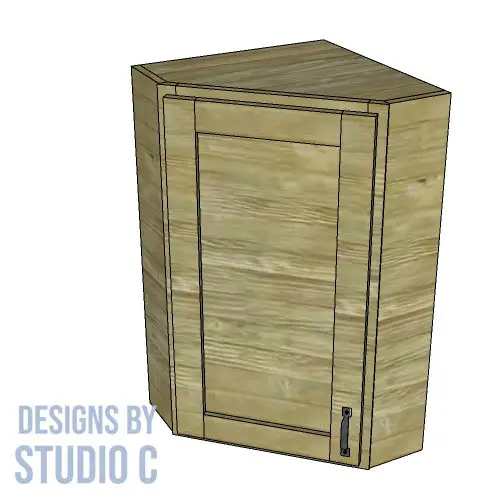
A Corner Cabinet Perfect for a Small Space!
Since I built the shallow wall cabinet that was inspired by IKEA, I decided that I wanted to continue the cabinets all the way around my kitchen and get rid of the open shelving. The plans to build a shallow wall cabinet feature a diagonal opening on the front of the cabinet making it large enough to hold plates while following the shallow line of the wall cabinet. The inside shelves can be fixed or shelf pin holes can be drilled to make them adjustable.
** After some thinking, I had to edit the plan so that the shallow wall cabinet I previously posted would work with this corner cabinet. The edits have been highlighted in bold text. The images have been updated to reflect the changes.
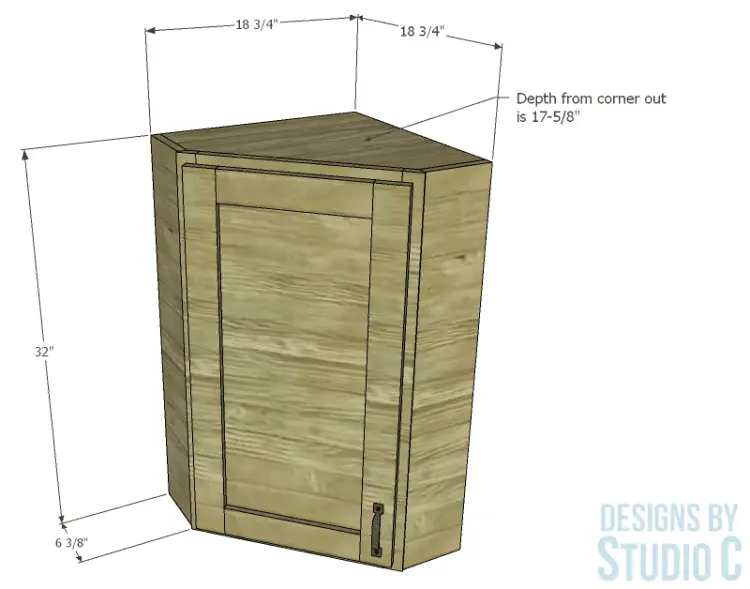
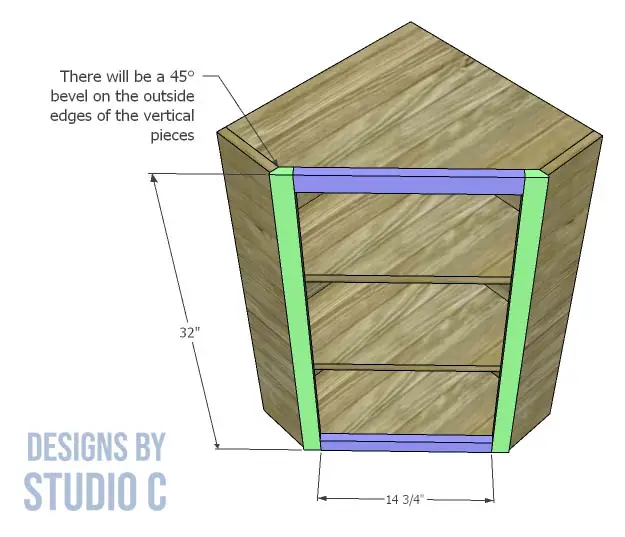
This corner cabinet uses about 3/4 of a sheet of plywood, so the 2′ x 4′ project panels can be used for those who don’t want to wrestle a full sheet. The sides can be cut from the plywood or 1x6s, especially if a wall cabinet will be on either side. The face frame will have a 45° bevel cut along the outside edge of each vertical piece.

The door is a frame and panel style, and the panel can be replaced with punched aluminum or whatever your DIY heart desires! This plan is suitable for all skill levels.
Materials:
- 1-1/2″ screws
- 3″ screws for mounting to the wall (<– affiliate link!)
- 2″ brad nails and pneumatic nailer
- 1-1/4″ pocket hole screws
- 1 set of hinges
- 1 cabinet knob or pull
- 1 – magnetic catch (<– affiliate link!)
- Sandpaper (80, 120, 220 grits)
- Finishing supplies
Lumber:
- 1 – 1×2 at 8′
- 1 – 1×3 at 8′
- 1 – 2′ x 4′ sheet of 1/4″ plywood
- 4 – 2′ x 4′ sheets of 3/4″ plywood OR
- 1 – 4′ x 8′ sheet of 3/4″ plywood
Cut List:
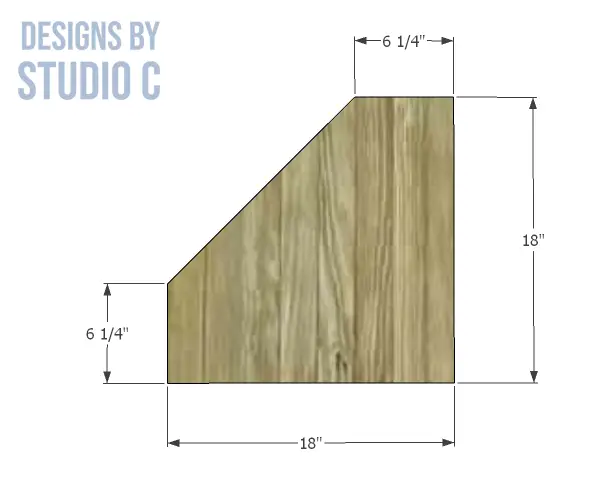
- 2 – 3/4″ plywood at 18″ x 18″ – Top and Bottom
- 1 – 3/4″ plywood at 18″ x 30-1/2″ – Back
- 1 – 3/4″ plywood at 17-1/4″ x 30-1/2″ – Back
- 2 – 3/4″ plywood at 17-1/4″ x 17-1/4″ – Shelves
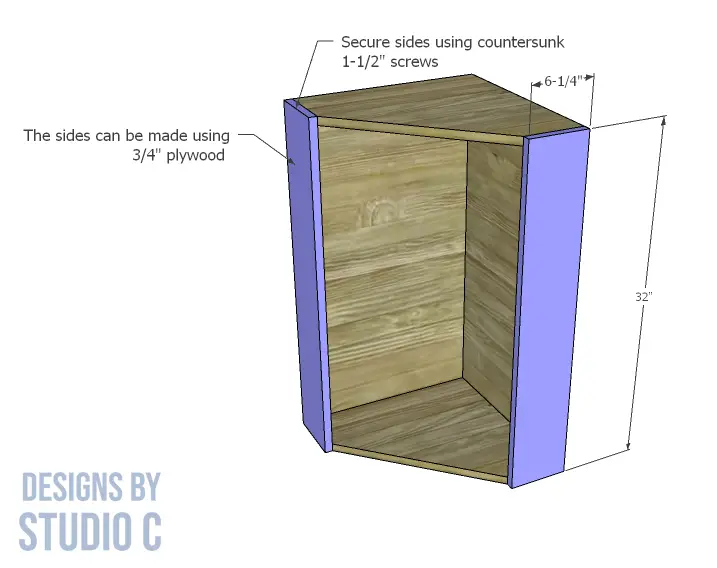
- 2 – 3/4″ plywood at 6-1/4″ x 32″ – Sides
- 2 – 1×2 at 32″ – Face Frame
- 2 – 1×2 at 14-3/4″ – Face Frame
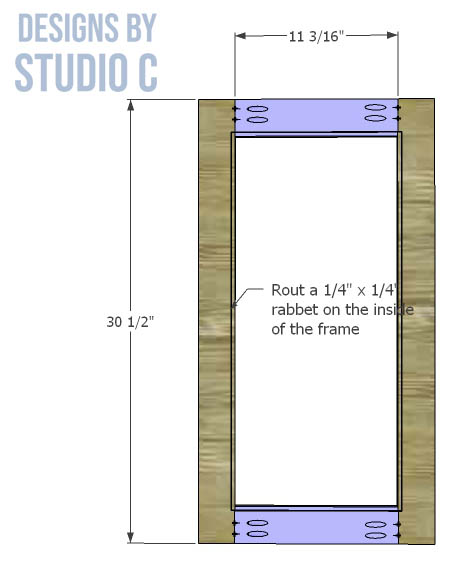
- 2 – 1×3 at 11-3/16″ – Door Frame
- 2 – 1×3 at 30-1/2″ – Door Frame
- 1 – 1/4″ plywood at 11-11/16″ x 26″ – Door Panel
Notes About the Project:
- Sand all pieces prior to assembly.
- This project requires very little finishing: only the face frame and the door.
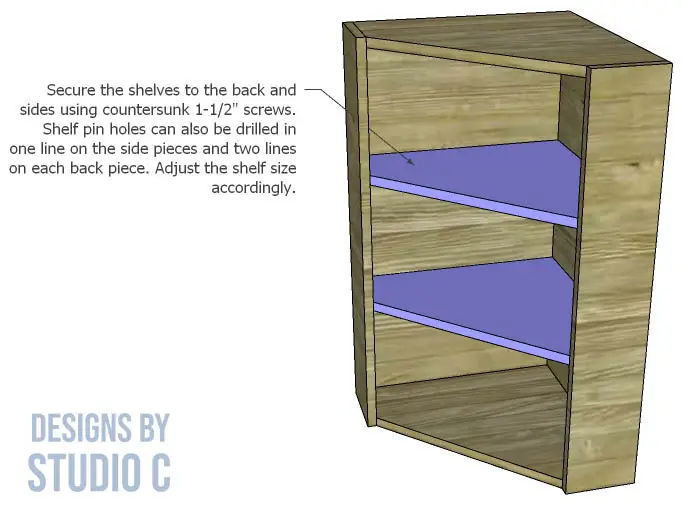
- If using a shelf pin jig to make the shelves adjustable, drill shelf pin holes in a single line along the center of the side pieces, and drill two rows along the length of the back pieces locating the holes about 2″ in from each outer edge.
- Drive mounting screws through the cabinet into the wall studs.
- Have fun with it!
Step One
Cut the pieces for the top and bottom.
Step Two
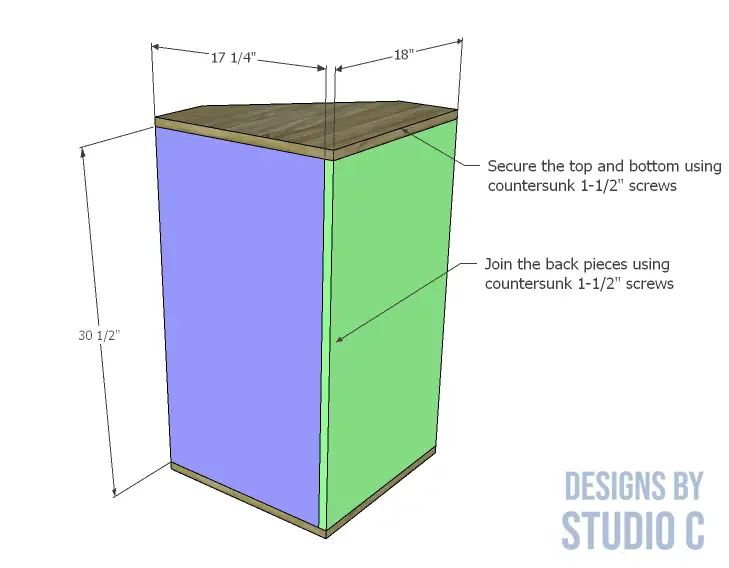
Cut the pieces for the back. Note that one piece is wider than the other. Secure the pieces together at a 90° angle, with the wider piece on the outside, using glue and 1-1/2″ countersunk screws.
Secure the top and bottom pieces to the back using glue and countersunk 1-1/2″ screws.
Step Three
Cut the pieces for the sides. Secure the sides to the top, bottom and back using glue and countersunk 1-1/2″ screws.
Step Four
Cut the pieces for the shelves. Follow the directions in the notes above for the adjustable option. If using the fixed shelf option, mark the position of the shelves on the sides and back. Secure the shelves to the sides and back using glue and countersunk 1-1/2″ screws.

Step Five
Cut the pieces for the face frame. Cut a bevel in one long edge of each vertical piece using a table saw or a chamfer bit on a router table. Secure the vertical pieces to the sides, top and bottom using glue and 2″ brad nails. It’s possible that the vertical pieces will be slightly higher than the sides. This will be fine, and is the nature of the beast!
Secure the horizontal pieces of the face frame between the vertical pieces. The outside edges will be flush with the top and bottom faces. Secure in place using glue and 2″ brad nails.
Step Six
Cut the pieces for the door frame and drill pocket holes in each end of the shorter pieces. Make sure they are close to one edge to allow for the rabbet (the groove for the center panel). Assemble the door frame using glue and 1-1/4″ pocket hole screws.
With a router and a rabbeting jig, cut a rabbet (a groove) along the inside of the frame on the back face. Need help? Check out this tutorial!
Step Seven
Cut the piece for the door panel. The corners can be rounded to fit in the frame or the corners of the rabbet on the frame can be squared using a chisel.
Apply a thin bead of glue along the rabbet and insert the door panel. Clamp it in place or apply a few weighted objects to keep it in place until the glue dries.

Step Eight
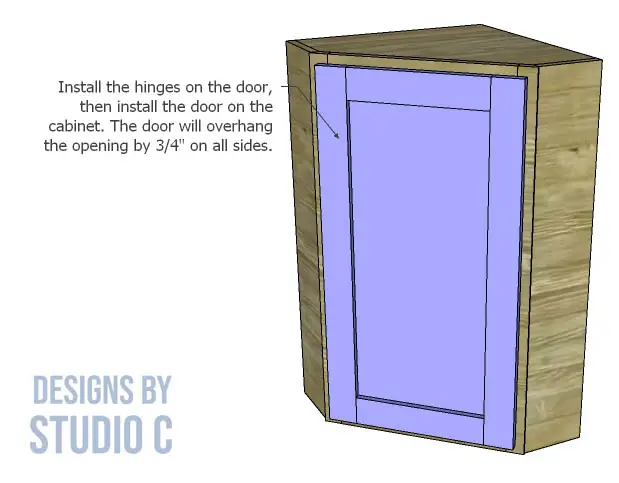
Install the hinges on the door according to the manufacturer’s instructions, then install the door in the cabinet. Install the magnetic catch either at the top or bottom (or both!) of the door, then install the knob or handle.
Finish the cabinet as desired.
Hang the cabinet on the wall using 3″ screws through the cabinet into the wall studs (the location of the studs may vary!)
Obviously, my cabinets are still a work in progress and I cannot wait to share the results! Have questions about the shallow corner cabinet? Leave a comment below!