Plans to Build a Hi-Lo End Table
Build a Super-Easy End Table with Two Levels and Plenty of Storage!
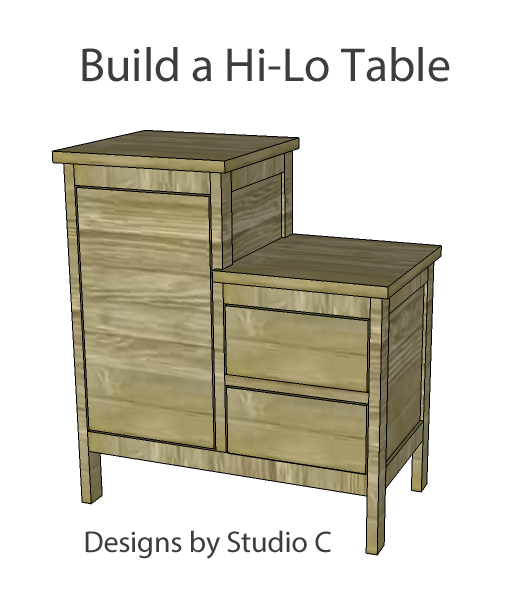
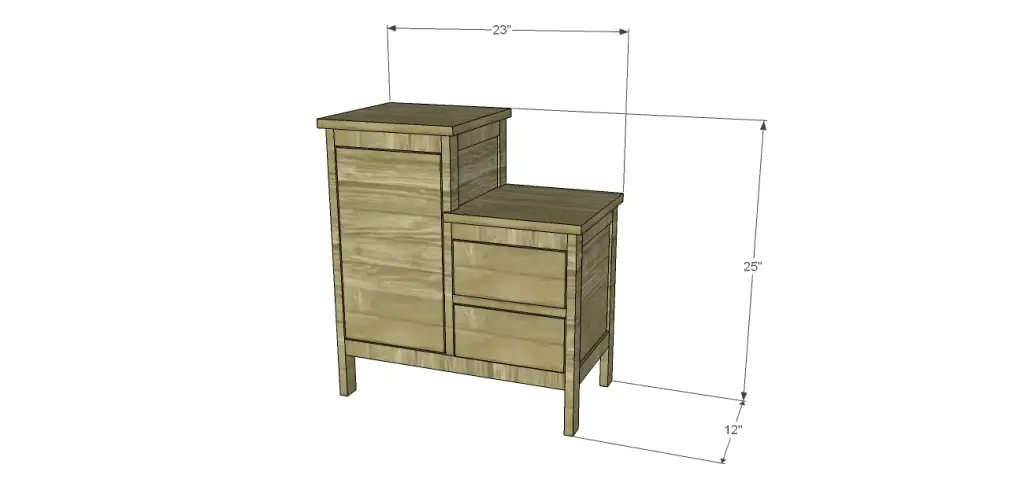
This table features two drawers and a cubby with a shelf, plus it features a top at two levels! Plus, it is as easy as it is inexpensive to build the Hi-Lo End Table!
Materials:
- 1″ pocket hole screws
- 1-1/4″ pocket hole screws
- 1-1/4″ brad nails
- Edge banding, optional
- 1 set of hinges
- 3 cabinet pulls
- Wood glue
- Sandpaper (100, 150, 220 grits)
- Finishing supplies (primer & paint or stain, paste wax)
Lumber:
- 3 – 1×2 at 8′
- 1 quarter sheet of 1/2″ plywood (2′ x 4′)
- 1 half sheet of 3/4″ plywood (4′ x 4′)
Cut List:
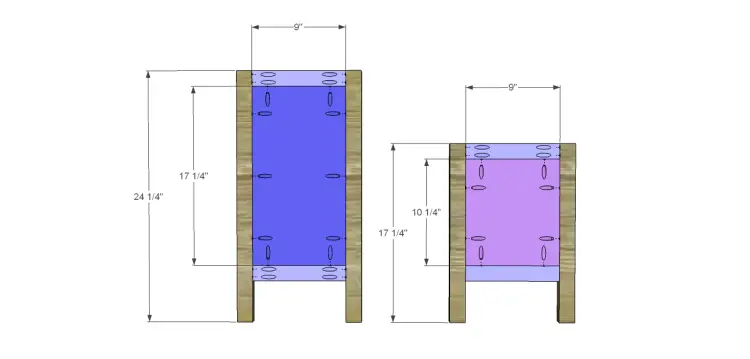
- 2 – 1×2 at 24-1/4″ – Legs
- 2 – 1×2 at 17-1/4″ – Legs
- 5 – 1×2 at 9″ – Side & Divider Frames
- 2 – 1/2″ plywood at 9″ x 17-1/4″ – Taller Side & Divider Panels
- 1 – 1/2″ plywood at 9″ x 10-1/4″ – Shorter Side Panel
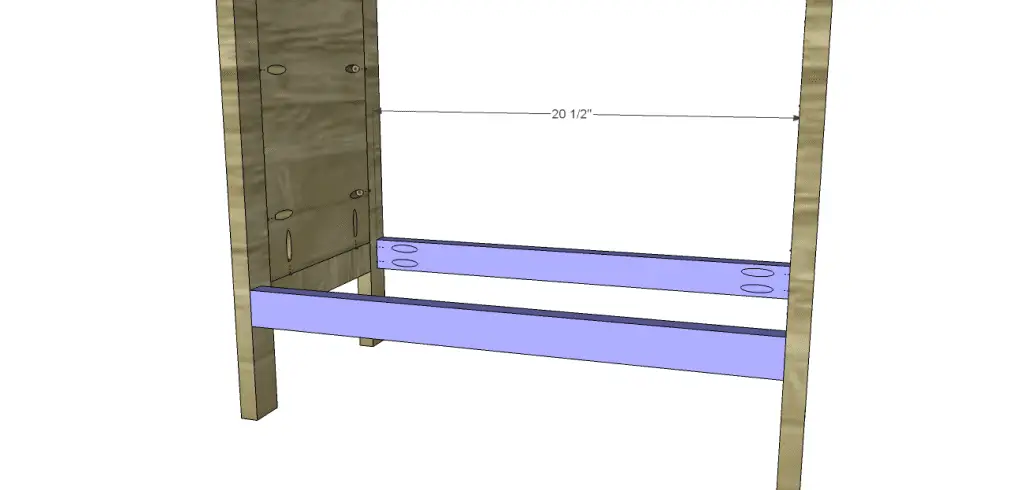
- 2 – 1×2 at 20-1/2″ – Lower Stretchers
- 1 – 3/4″ plywood at 10-1/2″ x 20-1/2″ – Bottom
- 2 – 1×2 at 18-3/4″ – Divider Frame
- 4 – 1×2 at 9-7/8″ – Back Frames & Front Stretchers
- 1 – 1/2″ plywood at 9-7/8″ x 17-1/4″ – Taller Back Panel
- 1 – 1/2″ plywood at 9-7/8″ x 10-1/4″ – Shorter Back Panel
- 1 – 3/4″ plywood at 9-7/8″ x 10-1/2″ – Upper Shelf
- 1 – 3/4″ plywood at 9-7/8″ x 11-1/4″ – Lower Drawer Shelf
- 1 – 3/4″ plywood at 11-5/8″ x 12-1/2″ – Lower Top
- 1 – 3/4″ plywood at 12-3/8″ x 12-1/2″ – Upper Top
- 2 – 3/4″ plywood at 8-1/8″ x 9-3/4″ – Drawer Bottoms
- 4 – 3/4″ plywood at 4-5/8″ x 9-3/4″ – Drawer Sides
- 4 – 3/4″ plywood at 4-5/8″ x 9-5/8″ – Drawer Front & Back
- 1 – 3/4″ plywood at 9-5/8″ x 17″ – Door
Notes About the Project:
It would be easier to sand each piece before assembly. This makes finishing the piece much quicker! If using edge banding, it will be applied before assembly.
Step One
Cut the pieces for the side frames and panels. With the pocket hole jig set for 3/4″ material, drill pocket holes in each end of the frame pieces. Attach to the legs using glue and 1-1/4″ pocket hole screws.
Set the pocket hole jig for 1/2″ material and drill pocket holes in all four edges of the panels. Insert the panels into the frames, then secure using glue and 1″ pocket hole screws. The back face of the panels will be flush with the inside face of the frames.
Step Two
Cut the pieces for the stretchers. Set the pocket hole jig for 3/4″ material and drill pocket holes in each end. Secure to the side panels using glue and 1-1/4″ pocket hole screws.
Step Three
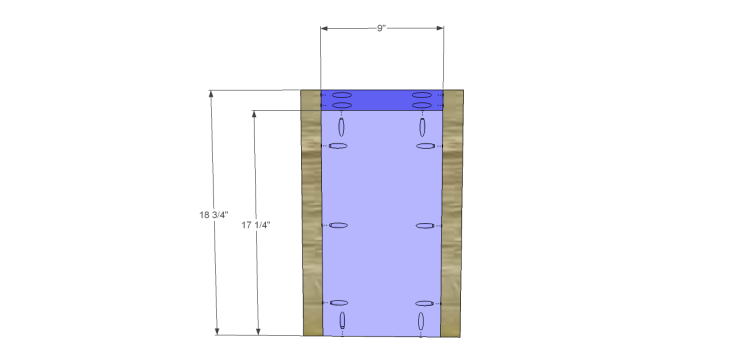
Cut the pieces for the divider frame. Drill pocket holes in each end of the shorter frame piece, as well as one end of each longer piece. Attach to the longer frame pieces using glue and 1-1/4″ pocket hole screws. The pocket holes in the longer pieces will be positioned at the bottom.
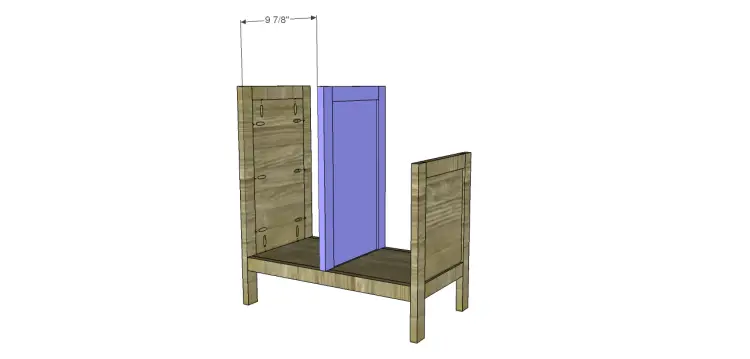
Set the pocket hole jig for 1/2″ material and drill pocket holes in all four edges of the panel. Insert the panel into the frames, then secure using glue and 1″ pocket hole screws. The back face of the panel will face the taller side. Secure the divider with 1-1/4″ pocket holes through the frame pieces into the bottom, and 1″ pocket hole screws through the panel into the bottom.
Step Four
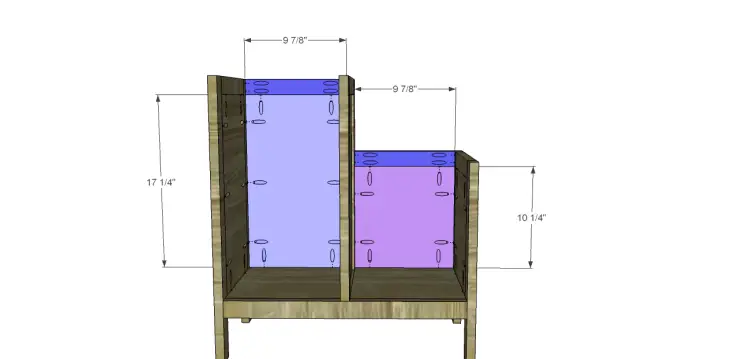
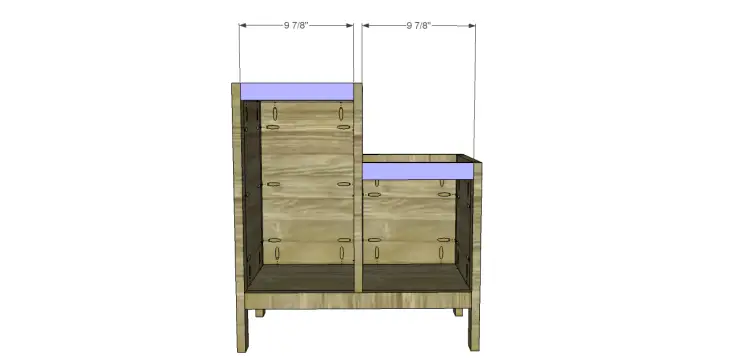
Cut the pieces for the front and back stretchers, and the panels. Set the pocket hole jig for 3/4″ material and drill pocket holes in each end. Secure to the side panels and divider using glue and 1-1/4″ pocket hole screws.
Set the pocket hole jig for 1/2″ material and drill pocket holes in all four edges of the panels. Insert the panels into the frames, then secure using glue and 1″ pocket hole screws. The back face of the panels will be flush with the inside face of the frames.
Secure the front stretchers to the side frames and divider as shown using glue and 1-1/4″ pocket hole screws.
Step Five
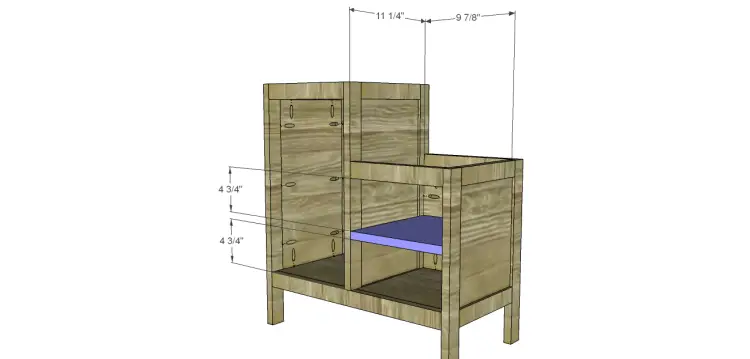
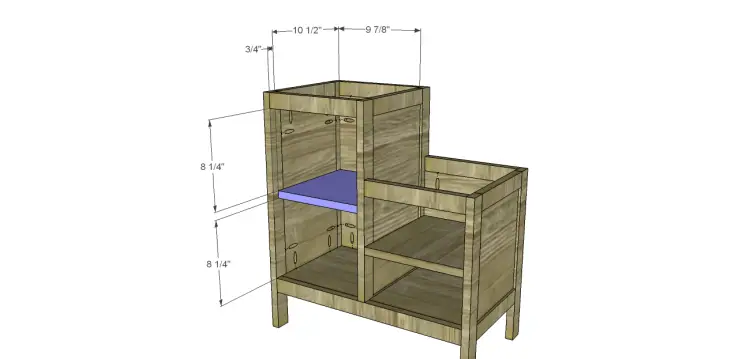
Cut the pieces for the upper shelf and the drawer shelf. Secure the shelves as shown using glue and 1-1/4″ brad nails. The upper shelf will be located 3/4″ back from the front edge of the side and divider.
Step Six
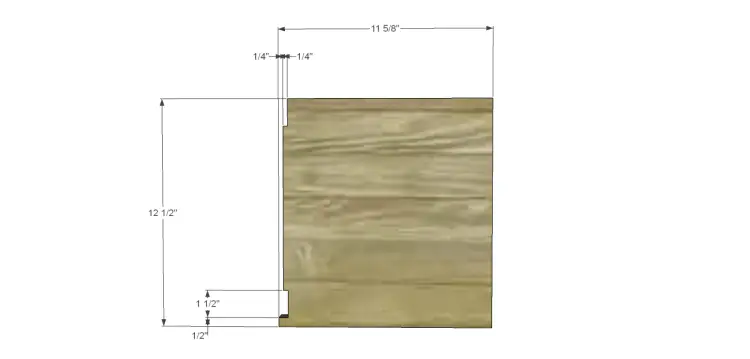
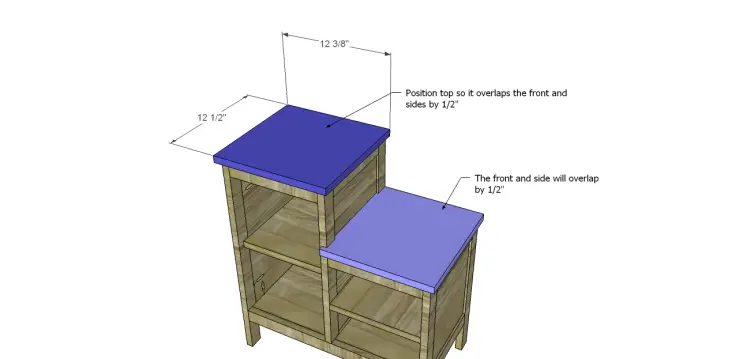
Cut the pieces for the tops. Cut the lower top piece as shown. The notches are so that the top will fit snugly around the divider frame. The side and front of the lower top will overlap by 1/2″. Secure in place using glue and 1-1/4″ brad nails.
Cut the piece for the upper top. The front and sides will overlap by 1/2″ also. Secure in place using glue and 1-1/4″ brad nails.
Step Seven
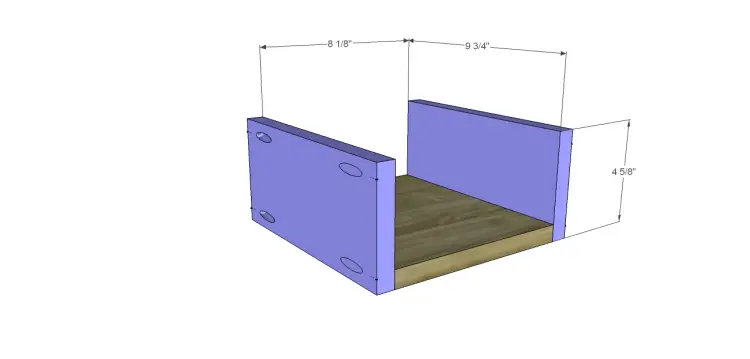
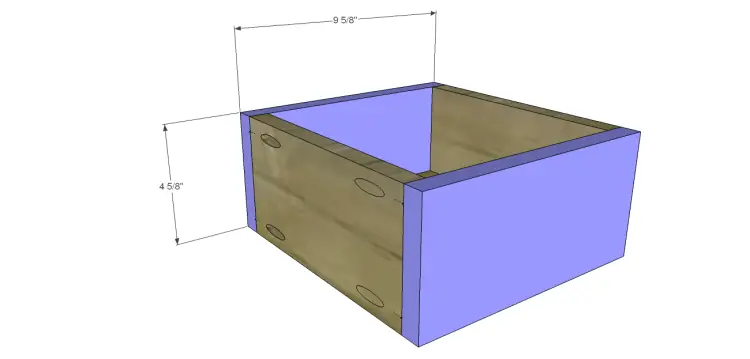
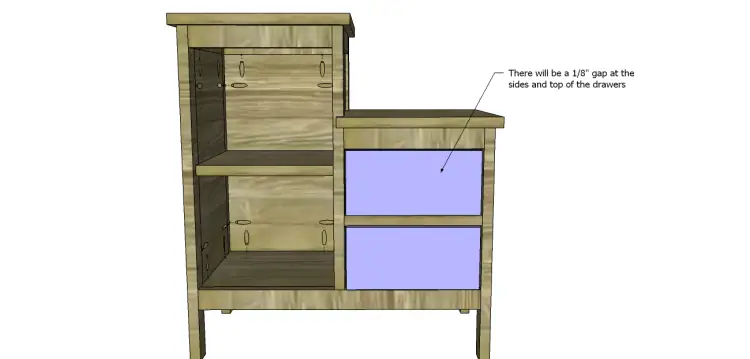
Cut the pieces for the drawers. Set the pocket hole jig for 3/4″ material and drill pocket holes in each end of the side pieces, as well as all four edges of the bottoms. Assemble the drawers as shown using glue and 1-1/4″ pocket hole screws. Install the cabinet pulls as desired.
Step Eight
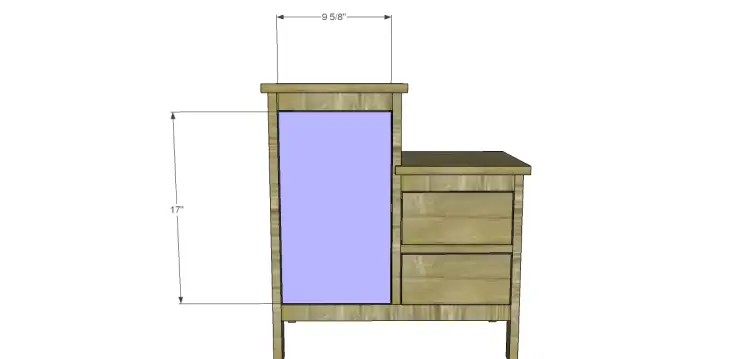
Cut the piece for the door. Apply the hinges to the door, then install the hinges on the cabinet. Make any necessary adjustments, then install the cabinet pull.
Finish as desired, then apply a coat of paste wax to the bottom of each of the drawers to help them slide smoothly.
Build the Hi-Lo table and create a gorgeous piece of storage to fit any style. Want other end table plans with storage? I have plenty of fabulous plans to choose from and will continue to create many more! Contact me at cher {at} designsbystudioc {dot} com!
