DIY Plans to Build this Whimsical Chest
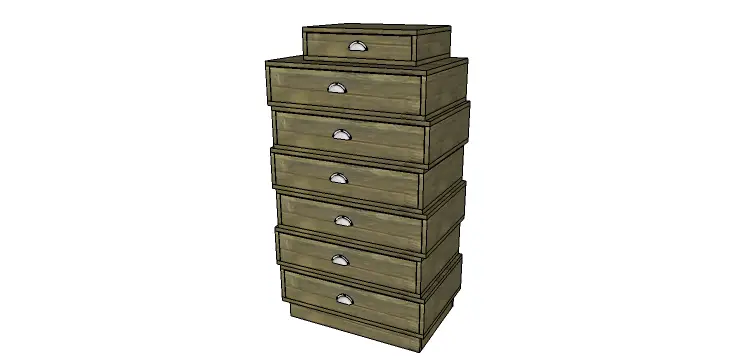
This chest of drawers is constructed by basically building a box that houses each drawer. The boxes are then stacked in either a straight line or offset for a bit of whimsy, and can be stacked as low or as tall as desired! The DIY plans to build the Ava Chest of Drawers are really easy to construct and require no drawer slides, though they can be added.
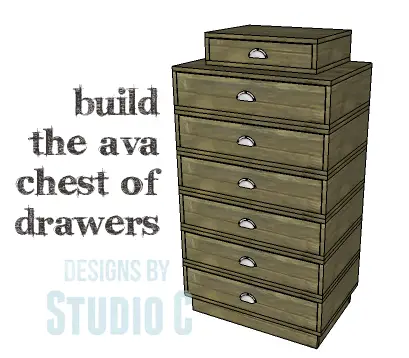
These free chest of drawers plans are suitable for all skill levels, and require only basic tools to construct it.
Materials:
- 1-1/4″ pocket hole screws
- 1-1/4″ brad nails
- Edge banding, optional (<– affiliate link!)
- Drawer pulls
- Wood glue
- Sandpaper (100, 150, 220 grits)
- Finishing supplies (primer & paint, or stain, sealer)
- Paste wax (<– affiliate link!)
Lumber:
- 1 – 1×4 at 8′
- 3 – 4′ x 8′ sheets of 3/4″ plywood
Cut List:
- 2 – 1×4 at 15-1/2″ – Base Frame
- 2 – 1×4 at 26″ – Base Frame
- 12 – 3/4″ plywood at 19″ x 28″ – Drawer Box Bottom & Top
- 12 – 3/4″ plywood at 5-3/4″ x 19″ – Drawer Box Sides
- 6 – 3/4″ plywood at 5-3/4″ x 26-1/2″ – Drawer Box Back
- 2 – 3/4″ plywood at 15″ x 20″ – Small Drawer Box Bottom & Top
- 2 – 3/4″ plywood at 3-3/4″ x 15″ – Small Drawer Box Sides
- 1 – 3/4″ plywood at 3-3/4″ x 18-1/2″ – Small Drawer Box Back
- 6 – 3/4″ plywood at 16-3/4″ x 24-7/8″ – Large Drawer Bottom
- 12 – 3/4″ plywood at 5-5/8″ x 16-3/4″- Large Drawer Sides
- 12 – 3/4″ plywood at 5-5/8″ x 26-3/8″- Large Drawer Front & Back
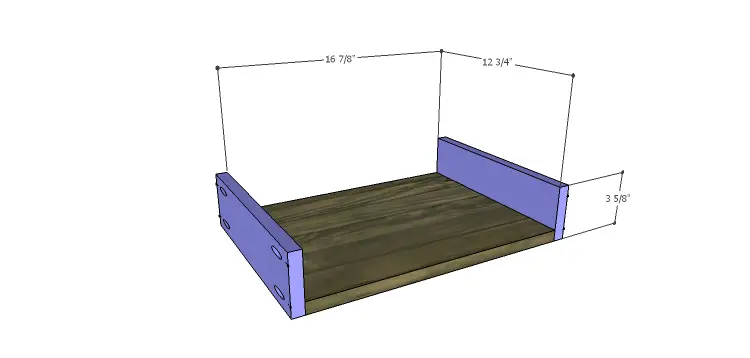
- 1 – 3/4″ plywood at 12-3/4″ x 16-7/8″ – Small Drawer Bottom
- 2 – 3/4″ plywood at 3-5/8″ x 12-3/4″ – Small Drawer Sides
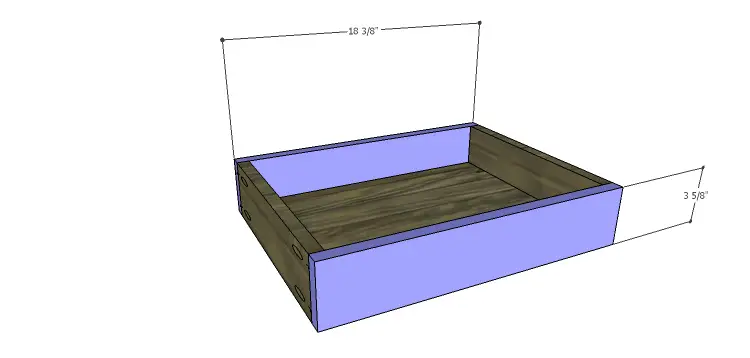
- 2 – 3/4″ plywood at 3-5/8″ x 18-3/8″ – Small Drawer Front & Back
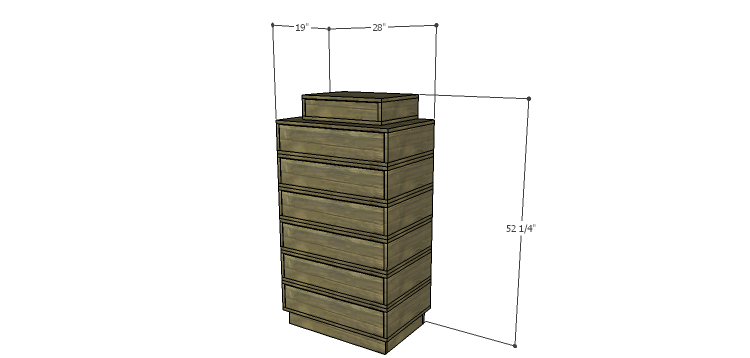
Click on the drawings for a larger view!
Step One
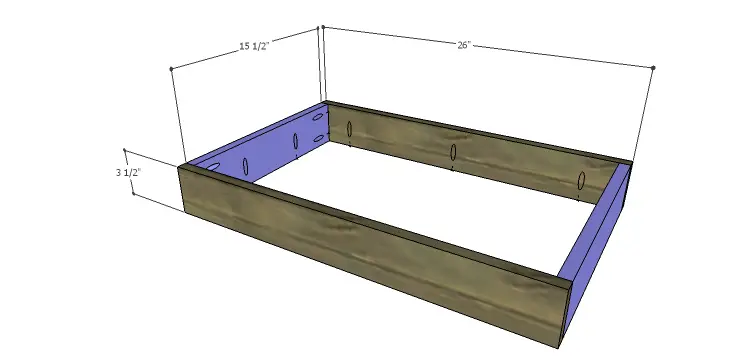
Cut the pieces for the base. With the pocket hole jig set for 3/4″ material, drill pocket holes in each end of the shorter pieces as well as one long edge of each piece. Assemble the frame using glue and 1-1/4″ pocket hole screws.
Step Two
Cut the pieces for the drawer boxes – these are the pieces that the drawers fit into and will be stacked to create the chest. The first box will be assembled on the base frame and the remaining boxes will be layered on the previous box.
If using edge banding, it will be applied to all of the exposed edges of the plywood prior to assembly.
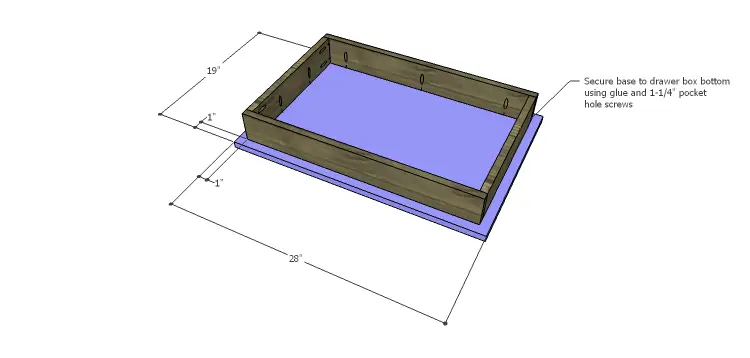
Starting with the first bottom piece, position the base frame on the bottom so that there is a 1″ border around all sides. Secure the base frame to the bottom using glue and 1-1/4″ pocket hole screws.
Step Three
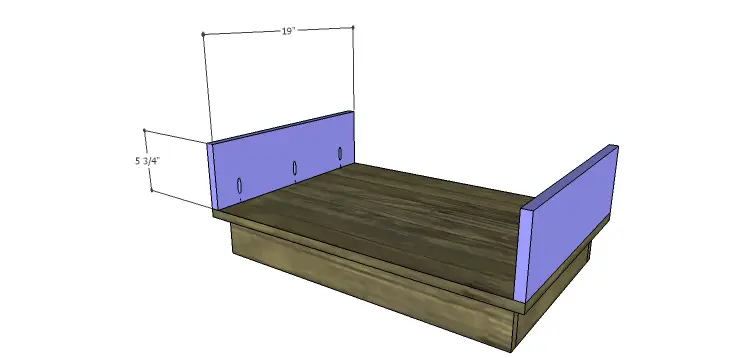
Drill pocket holes in the lower edge of each of the side pieces. Secure the sides to the bottom piece using glue and 1-1/4″ pocket hole screws.
Step Four
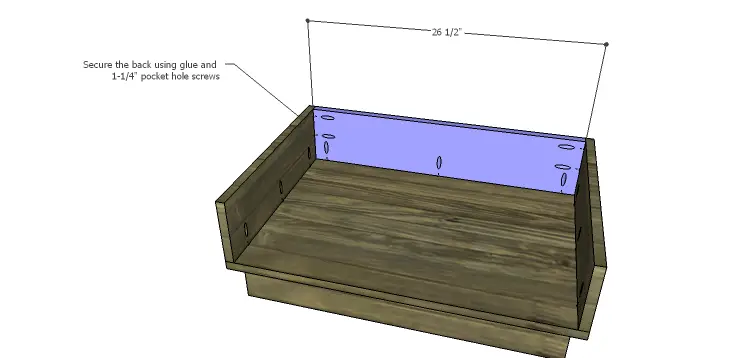
Drill pocket holes in each end of the back piece as well as one long edge of each piece. Secure the back to the sides and the bottom using glue and 1-1/4″ pocket hole screws.
Step Five
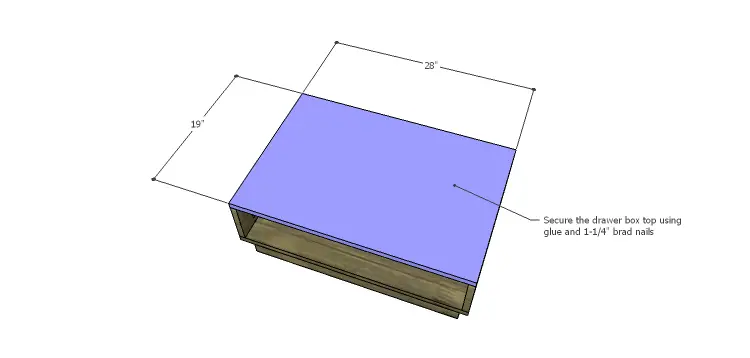
Position a top piece on the sides and back securing in place with glue and 1-1/4″ brad nails.
Step Six
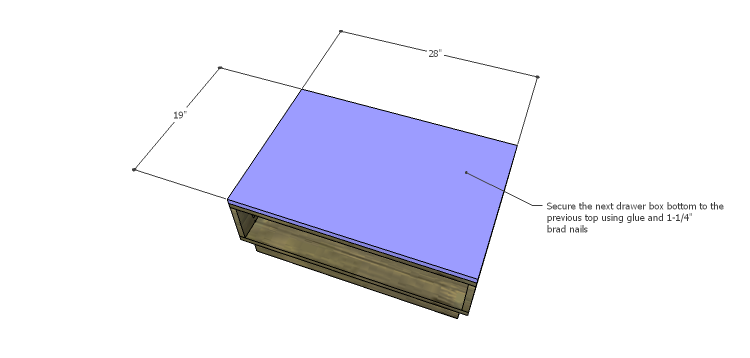
Position the bottom for the second drawer box on the top. It can be lined up, or staggered – purely a matter of personal preference! Secure the bottom to the top of the previous box using glue and 1-1/4″ brad nails.
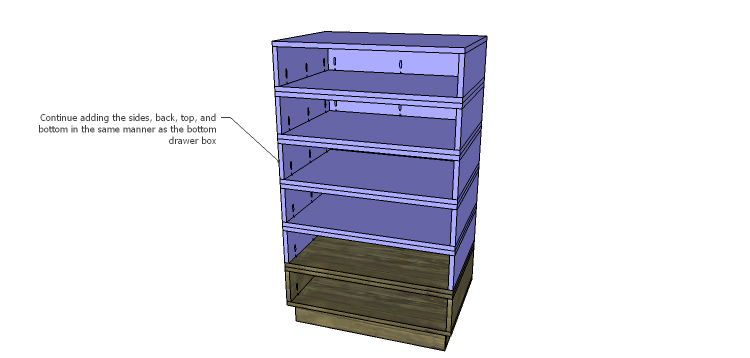
Continue layering the pieces to construct each drawer box as in the previous steps.
Step Seven
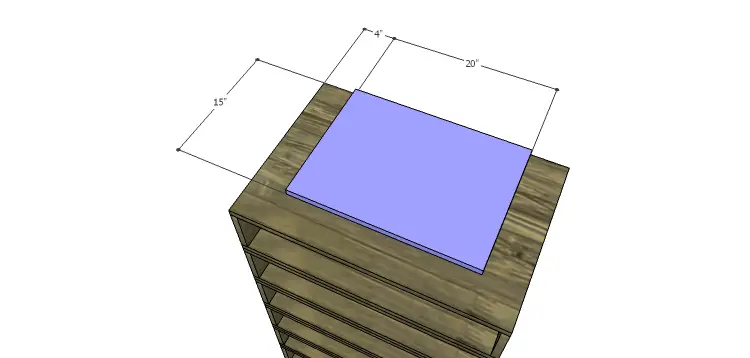
For the small box on the top, secure the bottom to the top of the last drawer box using glue and 1-1/4″ pocket hole screws. The piece is positioned with the back edge flush with the top of the last drawer box, and 4″ in from each side.
Step Eight
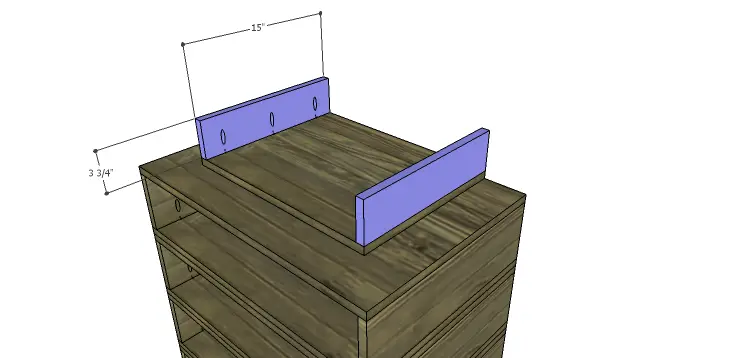
Drill pocket holes in one long edge of the sides, and secure to the bottom using glue and 1-1/4″ pocket hole screws.
Step Nine
Drill pocket holes in one long edge of the back piece. Secure the back to the bottom using glue and 1-1/4″ pocket hole screws. Secure the sides of the box to the back using 1-1/4″ brad nails through the sides into the ends of the back.
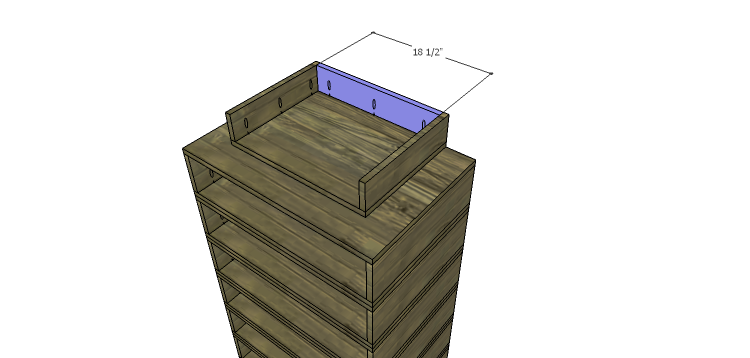
Step Ten
Position the top on the sides and back securing in place with glue and 1-1/4″ brad nails.
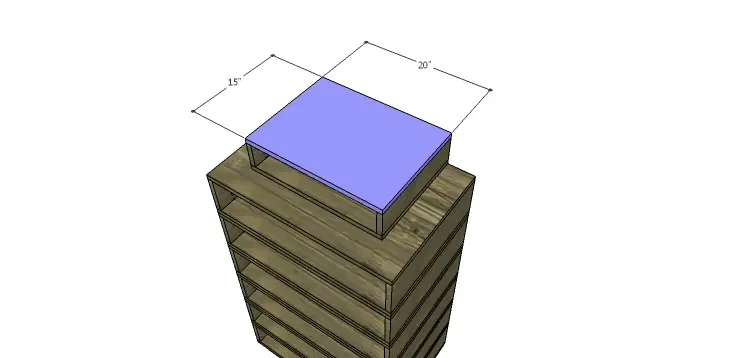
Step Eleven
Cut the pieces for the drawers. Drill pocket holes in all four edges of the bottom as well as each end of the sides. Secure the sides to the bottom using glue and 1-1/4″ pocket hole screws. Secure the front and back to the sides and bottom using glue and 1-1/4″ pocket hole screws.
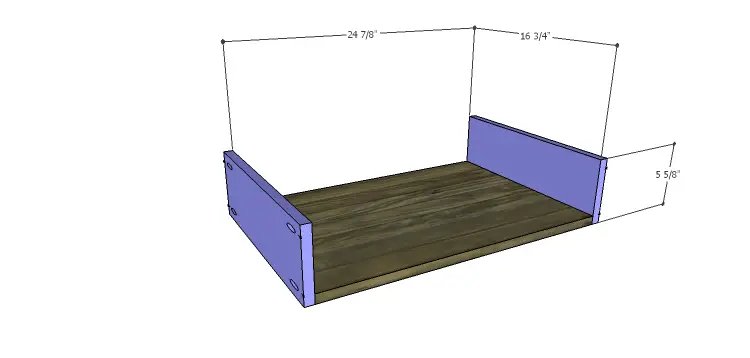
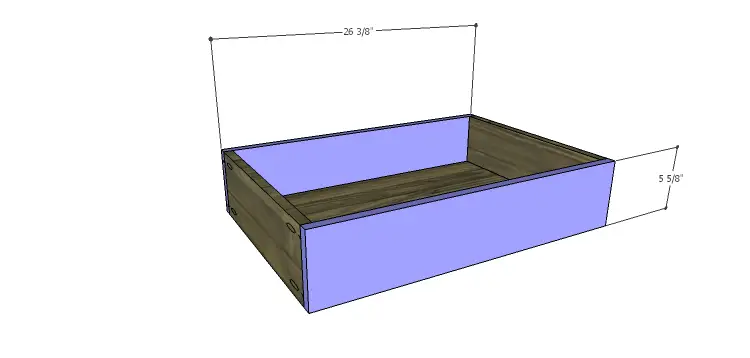
Finish the chest and drawers as desired, then apply a coat of paste wax to the bottom of each drawer to help them slide smoothly in the openings. Install the drawer pulls.
This is a chest that can be used in any room and provides plenty of storage! I think it would look awesome stained a dark color with a nifty stenciled design painted on the front… This DIY chest of drawers is the perfect weekend project!
Have any questions about the DIY plans to build the Ava Chest of Drawers? Leave a comment below or contact me at cher {at} designsbystudioc {dot} com!
Originally posted 2014-10-27 08:00:29.


Comments are closed.