
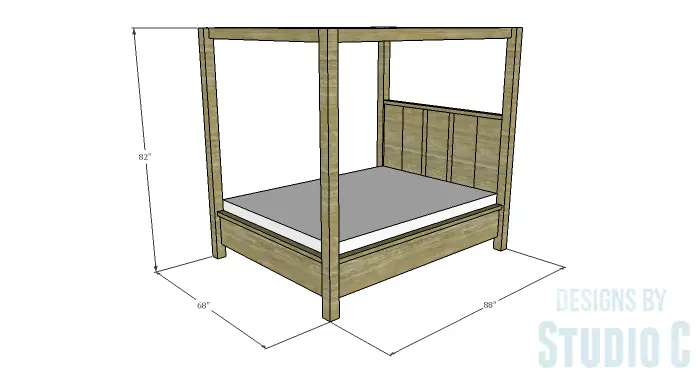
A Chunky Rustic Queen Bed That is Easy to Build!
This chunky, rustic bed is an easy build using straight off-the-shelf boards. The DIY plans to build a Waterton Queen Bed feature 2×12 rails, 4×4 posts, and 2×4 canopy stretchers. The side rails can be attached using pocket hole screws or bed hardware – your choice – and can be completed in a weekend!

Materials:
- 1-1/4″ pocket hole screws (<– affiliate link!)
- 2-1/2″ pocket hole screws
- 1-1/4″ screws
- Wood glue
- Sandpaper (100, 150, 220 grits)
- Finishing supplies (primer & paint, or stain, sealer)
Lumber:
- 2 – 1×2 at 8′
- 1 – 1×3 at 6′
- 1 – 1×12 at 6′
- 2 – 1z12 at 8′
- 1 – 2×2 at 4′
- 1 – 2×2 at 8′
- 2 – 2×3 at 6′
- 2 – 2×3 at 8′
- 2 – 2×4 at 6′
- 2 – 2×4 at 8′
- 2 – 2×12 at 4′
- 2 – 2×12 at 8′
- 4 – 4×4 posts at 8′
Cut List:
- 4 – 4×4 at 82″ – Posts
- 2 – 2×12 at 61″ – Headboard & Footboard
- 2 – 2×3 at 61″ – Headboard & Footboard
- 2 – 2×4 at 61″ – Upper Canopy Stretchers
- 5 – 1×12 at 33-1/4″ – Headboard Planks
- 2 – 1×3 (ripped to 2-3/8″ wide) at 33-1/4″ – Headboard Planks
- 2 – 2×12 at 81″ – Side Rails
- 2 – 2×3 at 81″ – Side Rails
- 2 – 1×2 at 81″ – Slat Supports
- 1 – 2×2 at 81″ – Center Support
- 2 – 2×2 at 10-1/2″ – Center Support Legs
- 13 – 1×3 at 61″ – Slats
Click on the drawings for a larger view!
Step One
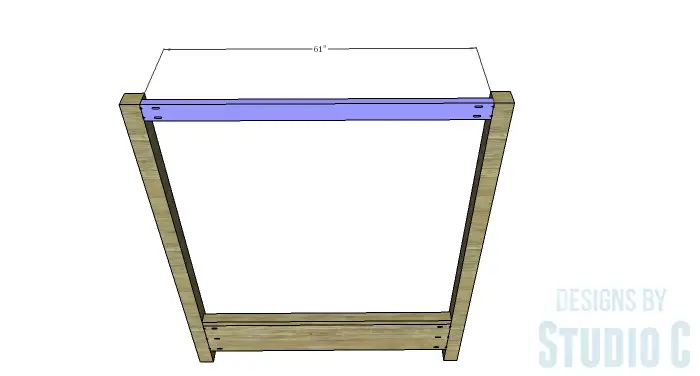
Cut the pieces for the posts and the footboard. With the pocket hole jig set for 1-1/2″ material, drill pocket holes in each end as well as one long edge of each piece. Secure the 2×3 piece to the top of the 2×12 (with the back edges flush) using glue and 2-1/2″ pocket hole screws. The back face of the footboard assembly will be flush with the inside face of the legs.

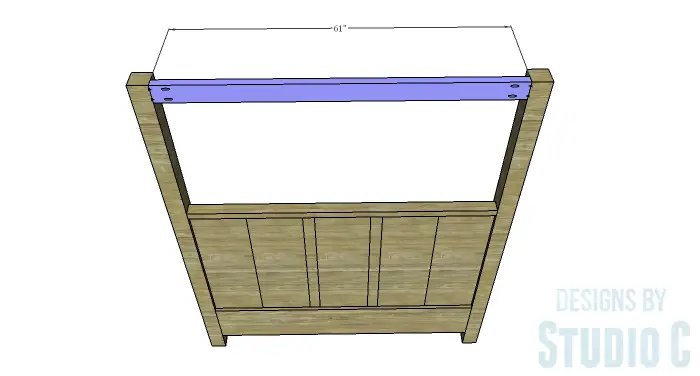
Step Two
Cut the piece for the upper canopy stretcher and drill pocket holes in each end. Secure to the top of the posts using glue and 2-1/2″ pocket hole screws. The back face will be flush with the inside face of the legs.
Step Three
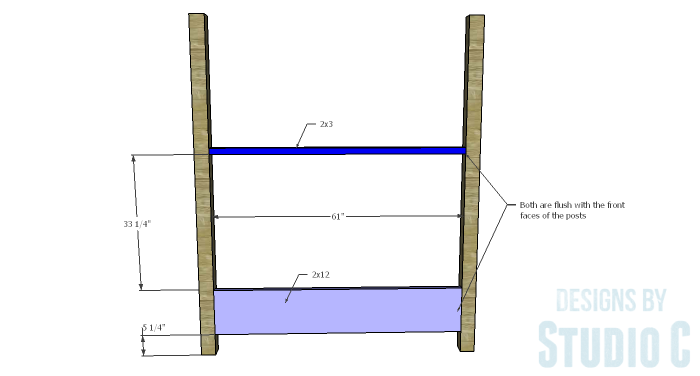
Cut the pieces for the headboard. Drill pocket holes in each end of the 2×3 and the 2×12 pieces. Secure the 2×3 and 2×12 pieces to the posts using glue and 2-1/2″ pocket hole screws. The front faces of the 2×3 and 2×12 pieces will be flush with the front faces of the legs.
Step Four
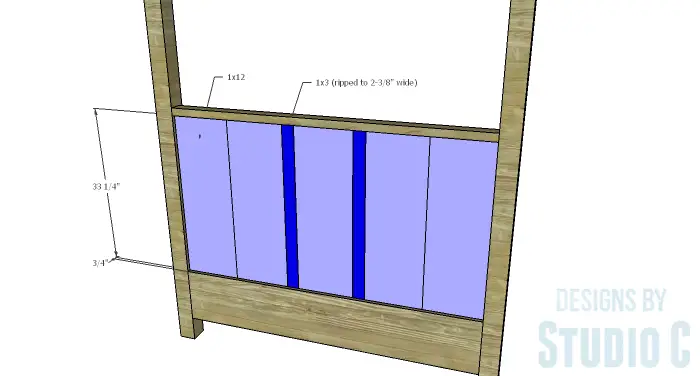
Cut the pieces for the 1×3 (ripped to 2-3/8″ wide) and 1×12 headboard planks. Set the pocket hole jig for 3/4″ material and drill pocket holes in each end of the headboard plank pieces. Secure the plank pieces between the 2×3 and 2×12 pieces using glue and 1-1/4″ pocket hole screws. The back face of the planks will be flush with the back faces of the 2×3 and 2×12 pieces.
Step Five
Cut the piece for the upper canopy stretcher and drill pocket holes in each end. Secure to the top of the posts using glue and 2-1/2″ pocket hole screws. The back face will be flush with the front face of the legs.
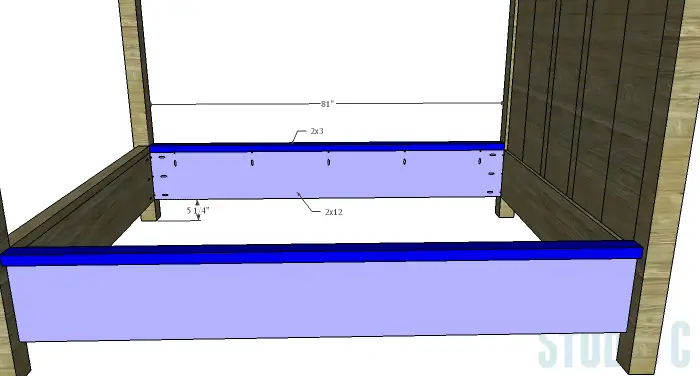
Step Six
Cut the 2×3 and 2×12 pieces for the side rails. Set the pocket hole jig for 1-1/2″ material and drill pocket holes in each end as well as one long edge of the 2×12 pieces. Secure the 2×3 piece to the top of the 2×12 (with the back edges flush) using glue and 2-1/2″ pocket hole screws. Secure the side rails to the posts using 2-1/2″ pocket hole screws. DO NOT USE GLUE!
If using bed hardware, pocket holes will not have to be drilled in each end of the 2×12 pieces.
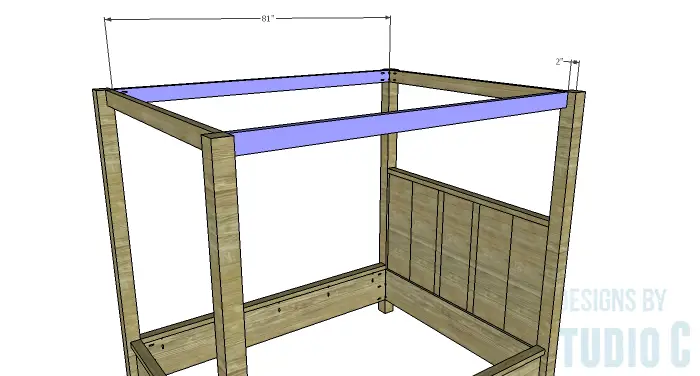
Step Seven
Cut the piece for the upper canopy stretchers and drill pocket holes in each end. Secure to the top of the posts using 2-1/2″ pocket hole screws. DO NOT USE GLUE! The back face will be flush with the inside face of the legs.
Step Eight
Cut the pieces for the slat supports. Secure the supports to the side rails as shown (6″ down from the top) using countersunk 1-1/4″ screws. DO NOT USE GLUE!
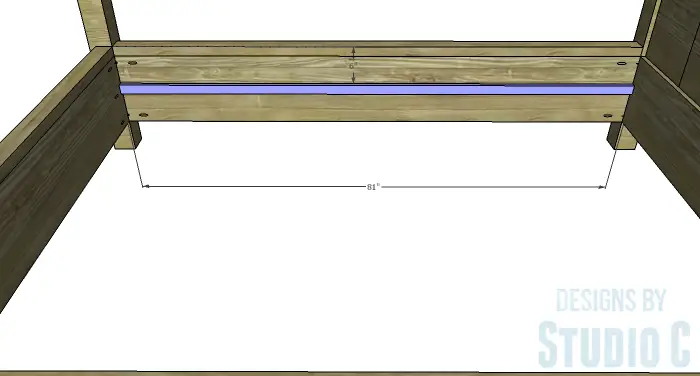
Step Nine
Cut the pieces for the center support and the support legs. Drill pocket holes in each end of the support piece and one end only of each leg. Secure the legs to the support using glue and 2-1/2″ pocket hole screws.
Secure the support assembly to the headboard and footboard using 2-1/2″ pocket hole screws. DO NOT USE GLUE!

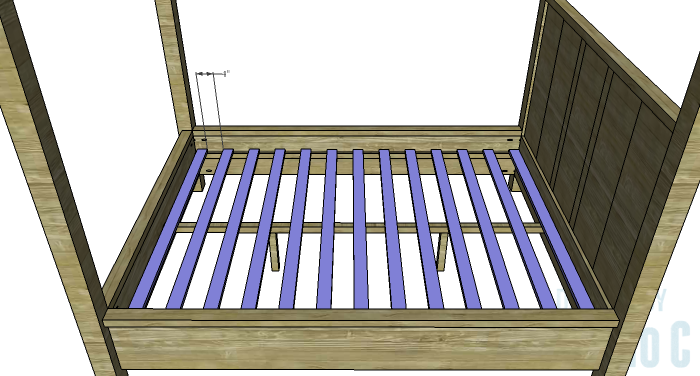
Step Ten
Cut the pieces for the slats. The slats are spaced approximately 4″ apart. Secure the slats to the slat supports and the center support using countersunk 1-1/4″ screws. DO NOT USE GLUE!
Finish as desired.
This bed would be easy to adjust for other mattress sizes, if necessary. Have any questions about the DIY plans to build a Waterton Queen Bed? Leave a comment below!
Originally posted 2015-12-02 08:00:13.


Comments are closed.