
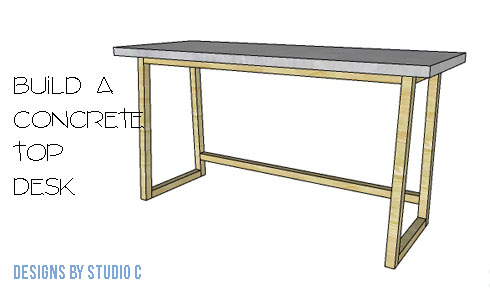
A Simple and Easy to Build Modern Desk
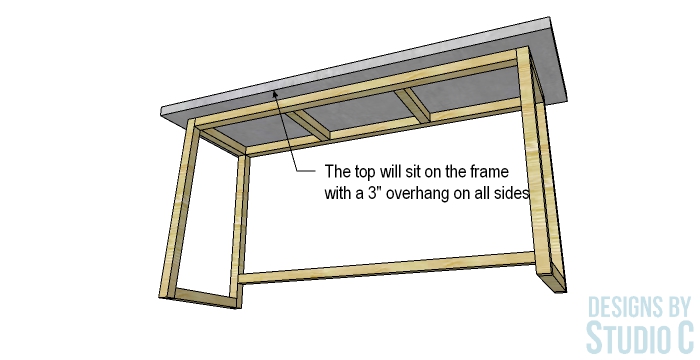
This desk is truly one of the simplest, most inexpensive desks to create with an ultra modern look. In fact, I’m building this one to add to my newly expanded laundry room! The DIY furniture plans to build a concrete top desk is inspired by West Elm, and features a 2×2 frame with a rectangular concrete top. The frame can be constructed using pocket holes, countersunk screws or for a seriously modern/industrial look, washer head lag screws. I think I’m going to use the lag screws! The front legs on the frame angle toward the back at about 5°, and the top just sits on the frame. It is heavy enough to stay in place without being secured.
The top is extremely simple to create, as well… Three bags of concrete, a frame built using 1x2s and a flat surface is all that is needed. Plus, the concrete can be stained in nearly any color imaginable for a unique look. Let’s get to the plan to build the concrete top desk, shall we?
Materials:
-
- 2-1/2″ pocket hole screws (<– affiliate link!) OR
- 2-1/2″ screws OR
- 1/4 x 3″ Spax Washer Head Lag Screws (<– affiliate link!)
- Wood glue
- Sandpaper (80, 120, 220 grits)
- Finishing Supplies
- 3 bags of quick-setting concrete
Lumber:
- 2 – 1×2 at 8′ – Concrete Frame
- 6 – 2×2 at 8′
Cut List:
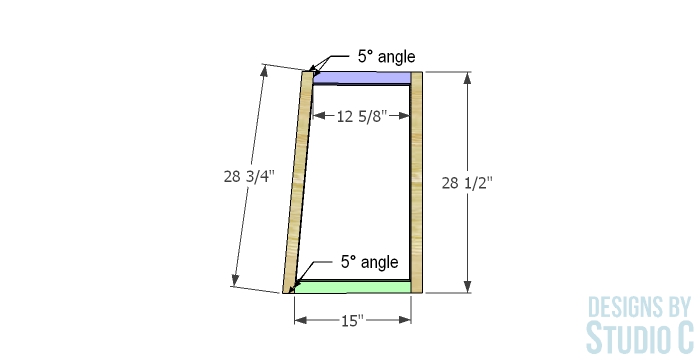
- 2 – 2×2 at 12-5/8″ – Side Frame*
- 2 – 2×2 at 15″ – Side Frame*
- 2 – 2×2 at 28-1/2″ – Side Frame
- 2 – 2×2 at 28-3/4″ – Side Frame**
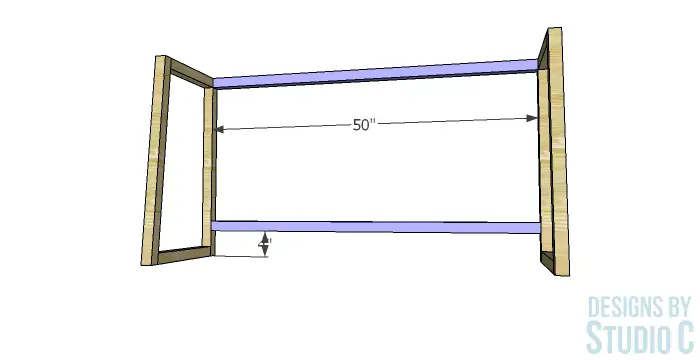
- 3 – 2×2 at 50″ – Front & Rear Stretchers
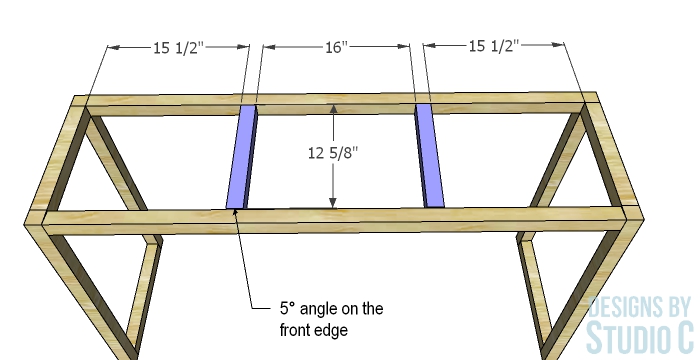
- 2 – 2×2 at 12-5/8″ – Center Supports*
For the Concrete Frame:
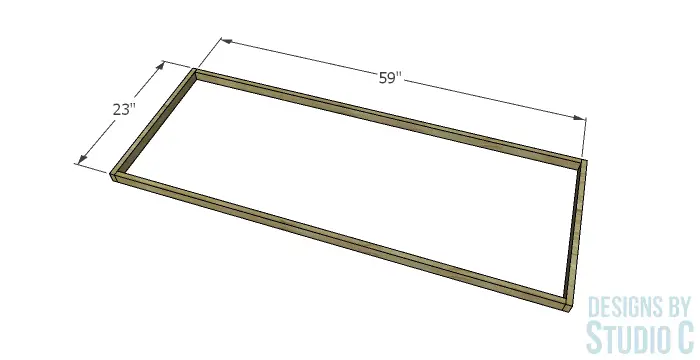
- 2 – 1×2 on end at 59″
- 2 – 1×2 on end at 23″
Notes About the Project:
- * Each of these pieces will have a 5° angle cut in one end
- ** This piece will have a 5° angle cut in each end
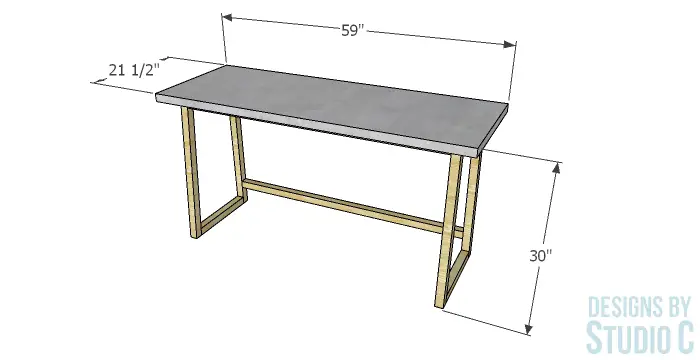
- The top overhangs the frame by 3″ on each side and does not need to be secured to the frame. Trust me, it won’t randomly fall off – that will take some effort!
Step One
Cut the pieces for the side frames. Cut the angles in the pieces as indicated with the dimensions representing the longest point of each piece. Assemble the frame as shown using glue and pocket hole screws (with the holes drilled on each end of the shorter framing pieces), countersunk screws through the legs or Lag Screws with pre-drilled holes through the outside of the legs into the framing.
Step Two
Cut the pieces for the front and back stretchers and secure to the legs using glue and the fastening method you choose from the previous step. Note that the front face of the front stretcher will follow the angled face of the front legs.

Step Three
Cut the pieces for the center supports and secure to the front and back stretchers.
Finish the desk frame as desired.
Pouring the Concrete Top
Step Four
Cut the 1×2 pieces for the mold frame. Use 2-1/2″ screws from the outside of the shorter pieces and do not use glue. Mix the three bags of quick-setting concrete with water according to the manufacturer’s instructions (it should be the consistency of peanut butter!)
Place the mold frame on a flat surface, and pour the concrete mix into the frame. Smooth out the top and tap the frame with a rubber mallet to settle the concrete and remove any bubbles. Let it dry thoroughly which may take a few days.
Once the concrete is dry, remove the mold frame by removing the screws holding it together. Lightly sand any rough edges on the top, then position the top on the desk frame.
I am super excited about this plan and cannot wait to build it! If you build it, let me know – I would love to see it! Have questions about the DIY furniture plans to build a concrete top desk? Leave a comment below!
Originally posted 2019-11-26 08:00:24.


Comments are closed.