
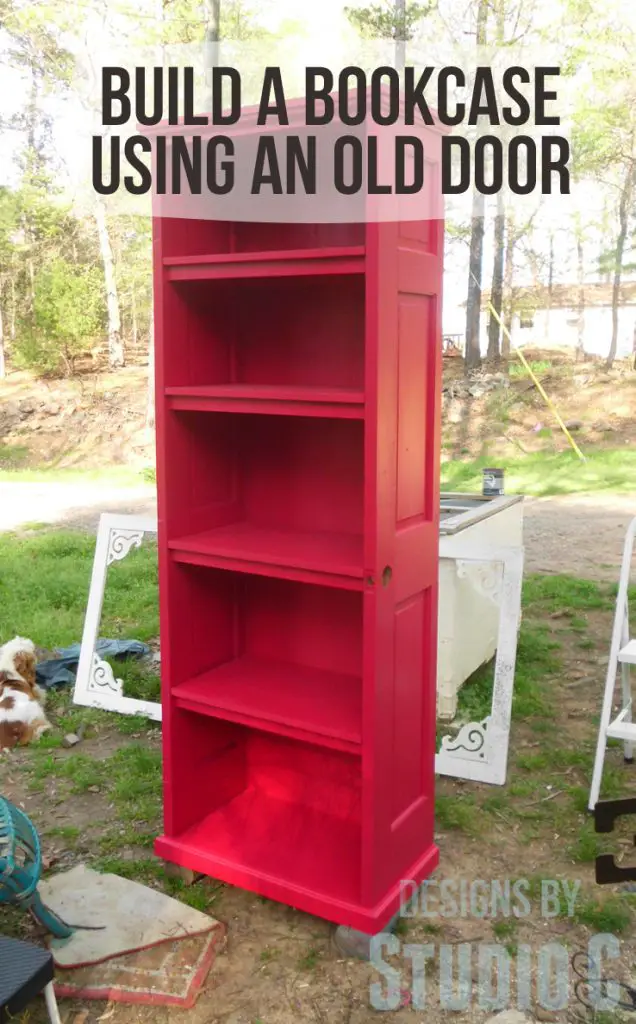
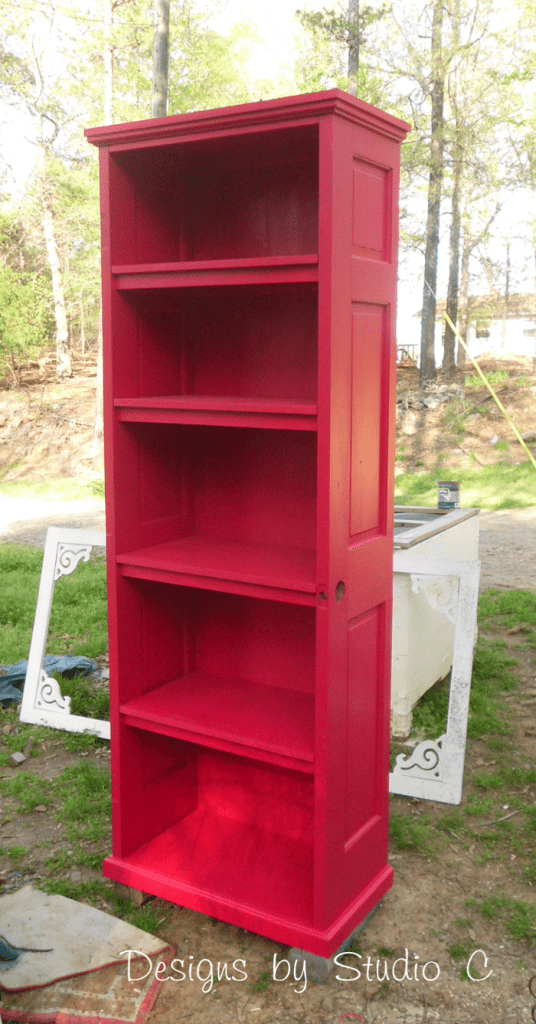
How to Build a Bookcase Using an Old Door
An Old Door Becomes a Fabulous Piece of Furniture!
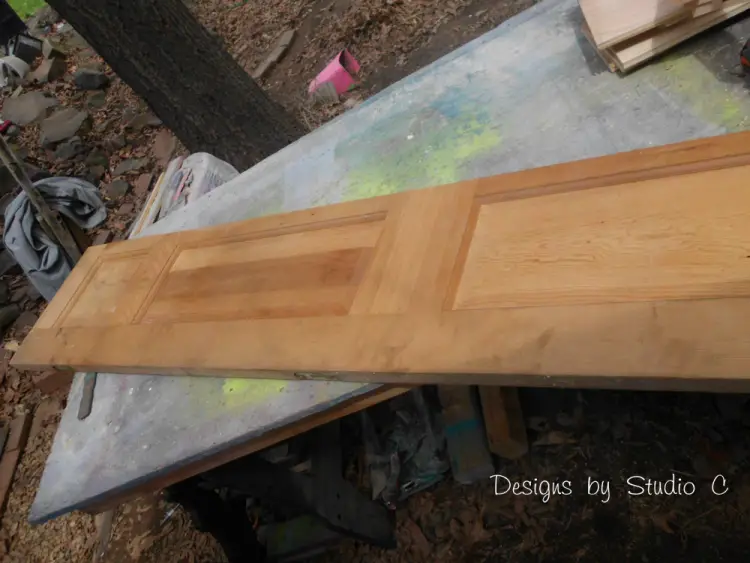
The folks at PureBond Plywood posted a picture of a bookcase made with an old door on the PureBond Facebook page and I thought it was a fabulous idea! That particular bookcase was created by Gail at My Repurposed Life ~ how fantastic! I searched for an old door and finally found one at one of our local flea markets for $45 ~ not too bad since it was in fabulous condition and was bare wood which meant less work for me (no paint to strip)!
I read Gail’s “how to” on the project and created instructions on how to build a bookcase using an old door with a few modifications. I added frames under the shelves, and a few more shelves but that was only because I can’t read my own instructions ~ lesson learned (I created them, too, which makes it really sad!!).
Materials:
- Solid wood door (mine was 30″ wide)
- 1-1/4″ brad nails (<– affiliate link!)
- 5 – 1×2 at 8′ (for 24″ wide frames)
- 1 sheet of 3/4″ plywood (I used Purebond in Birch)
- 1 sheet of 1/4″ lauan, plywood, or hardboard (for a continuous piece on the back – the back can be pieced if the seam is hidden behind a shelf!)
- Trim for the top and bottom (I made mine with a routed edge on 1x material)
The drawings show dimensions – they are based on a 30″ door. Adjust the dimensions for a wider or narrower door!
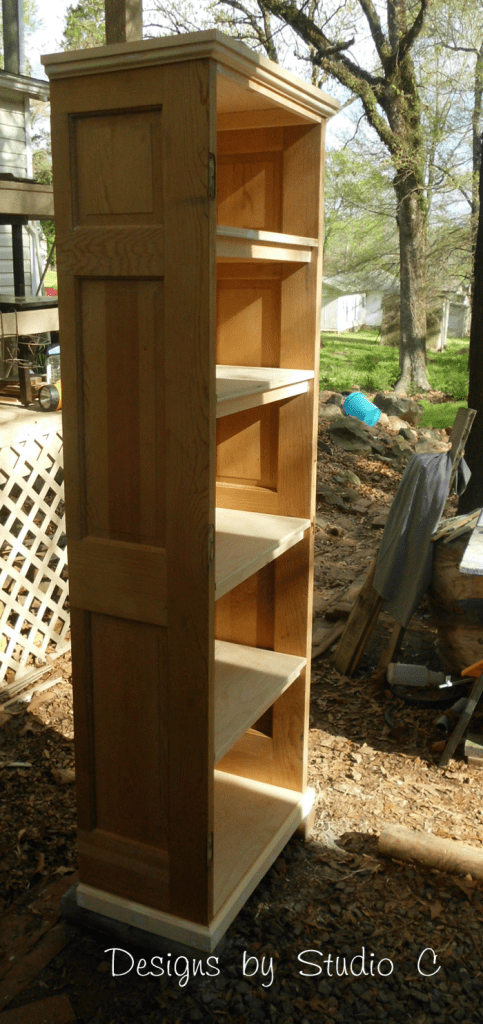
Start by cutting the door in half lengthwise using a table saw or a circular saw and a helper!
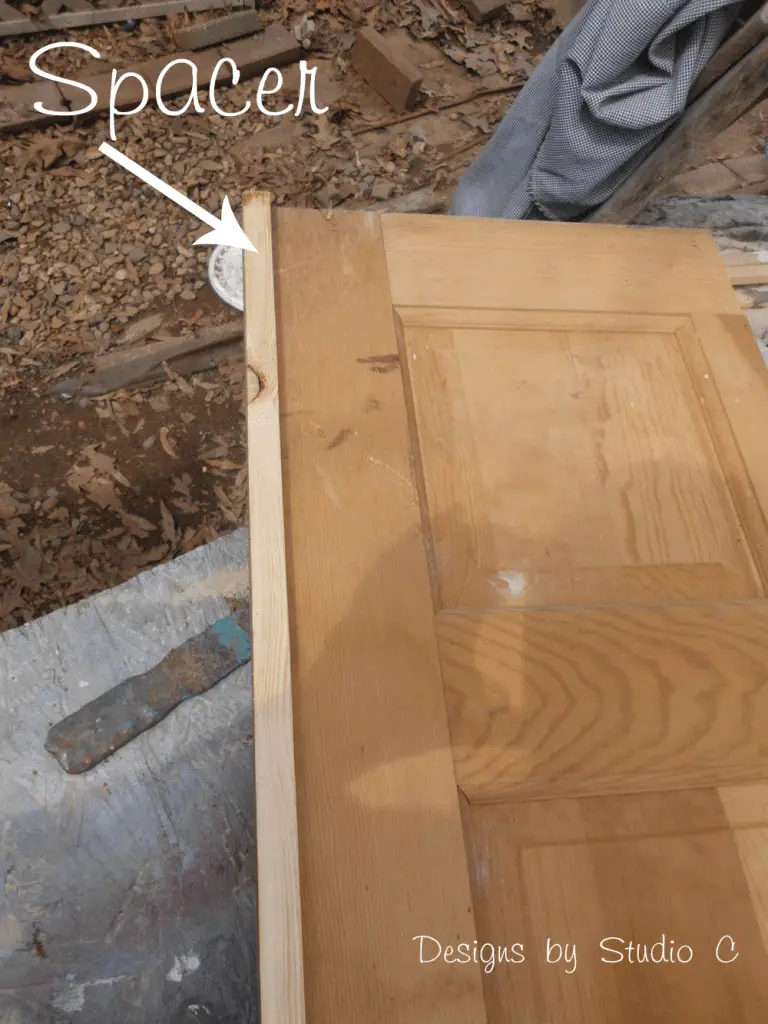
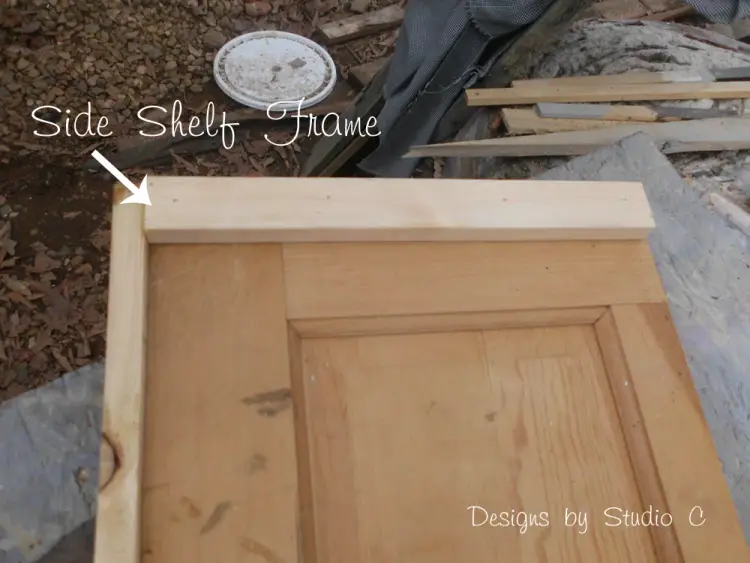
Cut the pieces for the shelf frames. Start with the side pieces ~ the top and bottom side pieces will be longer than the middle side pieces. Measure the width of the door. The top and bottom side pieces will be 1-3/4″” shorter than the width of the door. Position the pieces so that they are flush with the top edge and bottom edge of the door, and are 3/4″ back from the front edge (I used a spacer flush with the front edge). This will allow the front and back frame pieces to fit flush with the edges of the side pieces, as well as allow for the 1/4″ thick back to fit inside. (My side pieces are different in the photo because I didn’t read my own directions ~ doh!!)
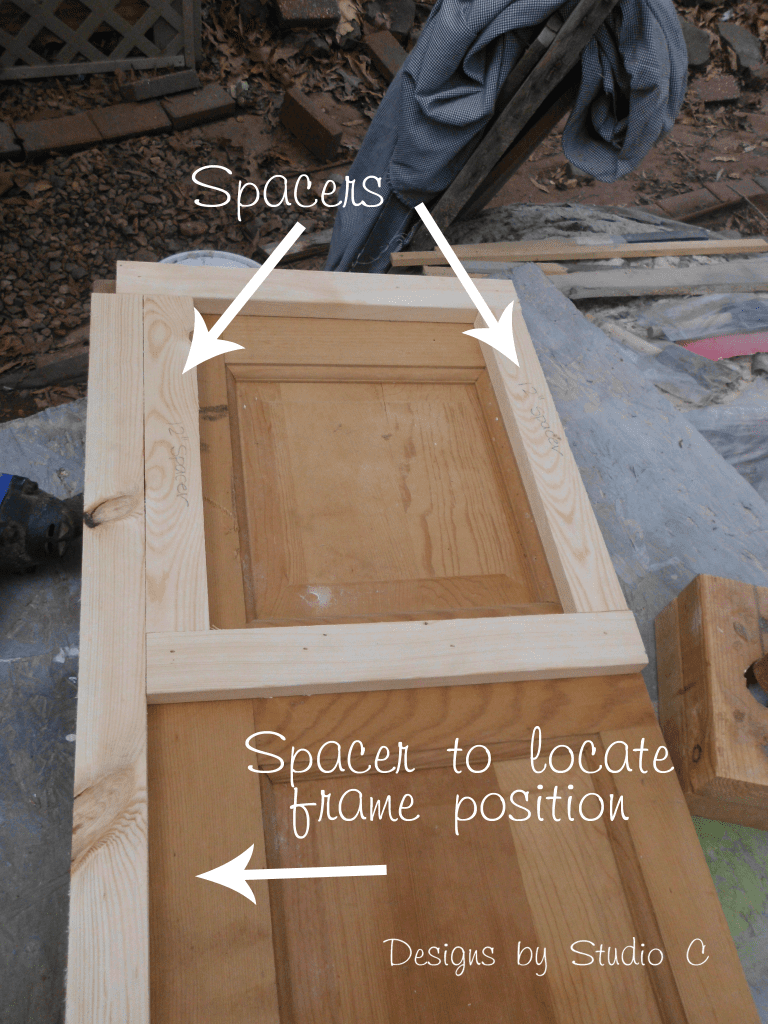
The middle side pieces will be 2-1/2″ shorter than the width of the door. This allows the front frame pieces to be set farther back so the shelf overlaps them which I think looks a lot nicer! Cut two spacers equal to the distance between the side frame pieces for the shelf position. This will allow the side pieces to be positioned at exactly the same distance without having to mark and measure everything. This is where I realized I screwed up ~ I wanted more space between the shelves and well, Gorilla Wood Glue is really strong so I couldn’t remove the side pieces I’d already installed… I also used a 1-1/2″ spacer at the front edge so that the distance was where I wanted it to be!
Cut the pieces for the front and back stretchers (I forgot to take a picture of this step, so drawings will have to do!). Fasten them to the front and back of the side spacers to join the sides together using glue and 1-1/4″ brad nails.
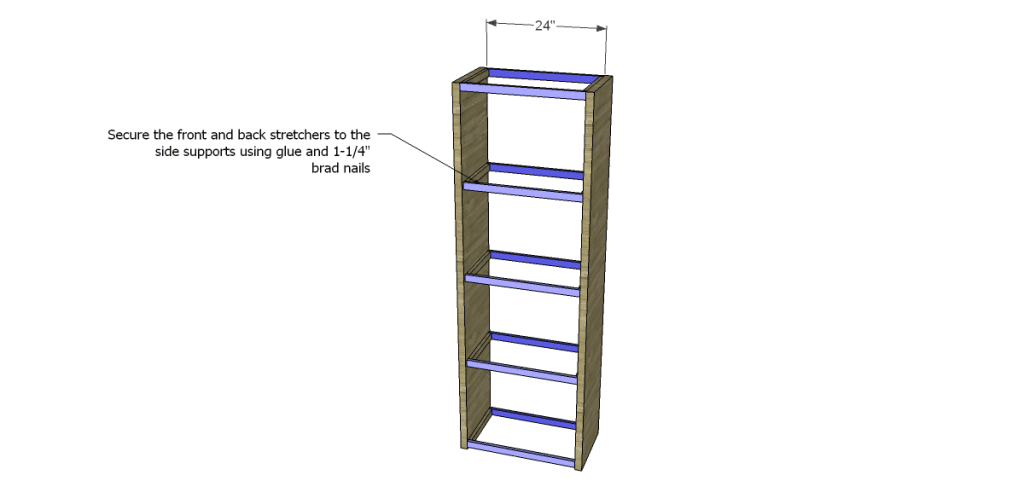
Cut the pieces for the shelves. They will all be the same size but the middle shelves will overlap the frames by 3/4″. The front edge of the bottom shelf will be flush with the edge of the frame. It looks nicer this way! Secure them to the frames using glue and 1-1/4″ brad nails.

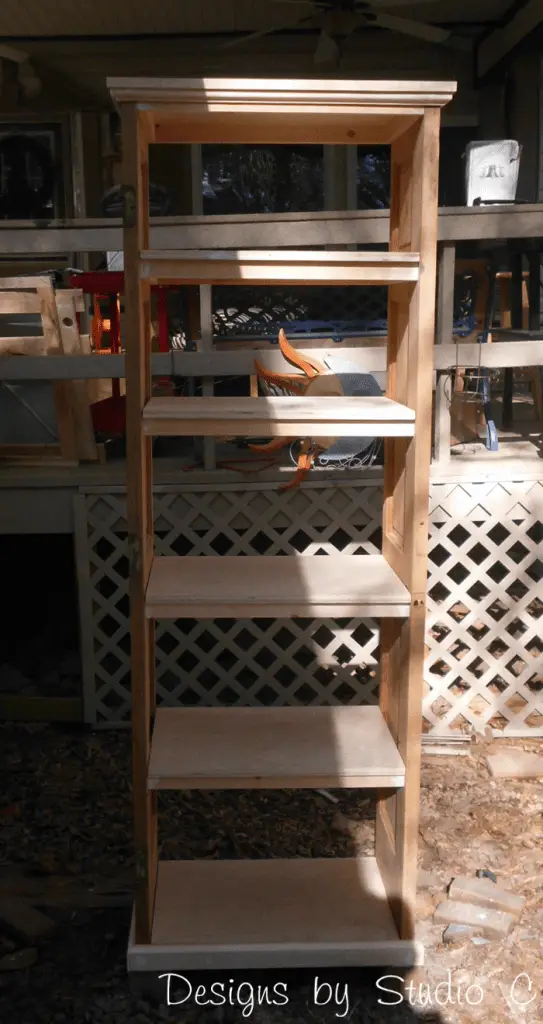
Cut the piece for the top. It will overlap by 1″ at the sides and front. Secure using glue and 1-1/4″ brad nails.

I created my own trim by routing both edges of a 1×6 board, then ripping the board on the table saw. The upper trim is approximately 7/8″ wide, and the lower trim is approximately 2-1/4″ wide. I cut mitered corners on the pieces, then attached them to the bookcase using 1-1/4″ brad nails. I cut the top to overlap the trim by 1/4″ on each side, as well as the front. The top was attached using 1-1/4″ brad nails.
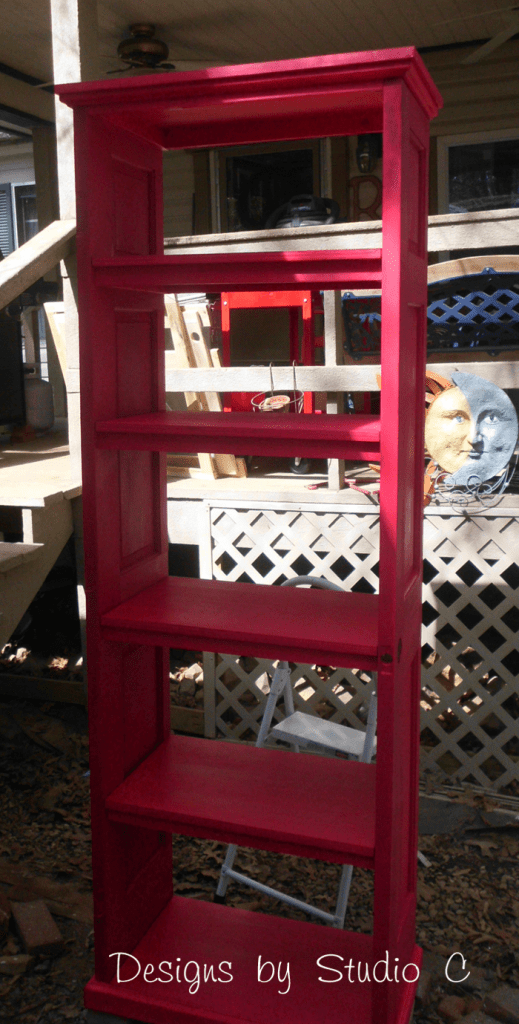
The color I chose is Strawberry Daquiri in Behr Premium Plus Ultra (which is now my new fave!!). I applied three coats. I cut a piece of 1/4″ lauan to fit inside the back then painted it also. Once everything was dry, I secured the back to the bookcase using brad nails.

I have a small plate to put over the hole for the door knob but I haven’t put it on yet. I may put half of the hinges back in the mortises. They are rusty and will look cool!!
She has already been sold! Woo hoo!! I’m so excited to have her go to a great new home!
The tutorial on how to build a bookcase using an old door is very easy to follow and I hope it inspires you to build your own. If you have any questions, contact me at cher {at} designsbystudioc {dot} com!
Sharing with Savvy Southern Style, My Romantic Home Show & Tell Friday, DIY Show Off, Funky Junk Interiors
Originally posted 2013-04-19 08:00:33.
Your bookcase turned out great! I would leave the hole, or put an old fashioned door knob in it. I think it gives it character 🙂
Thanks so much! I have a small rusty-looking plate that I might add to it… Thank you for stopping by!
Looks great! Sometime, in my next life, I’ll do something creative like this!
Happy SITS Saturday Sharefest!
Thank you so much! It is so addicting! Thank you for stopping by!
Wow! That’s super crafty. I love it. I wish I still had my garage and work bench. Now I’m in a condo with tools and no space. It’s my dream to make some shelves one day. Thanks for this excellent idea. I love the red.
Thank you so much! “She” was so fun to build and now has a new home! Thank you for stopping by!!
Wow, this is an awesome project! Your directions are great, wish I weren’t so afraid of a saw! The finished piece is beautiful!
I know what you mean… I was scared to death of my dad’s table saw and I’m still petrified of my circular saw! Thank you so much for the kind words and for stopping by!
Wow, what an awesome project! I have yet to attempt too many wood-based projects, probably because most of them need a lot of space and I don’t have a backyard! One day though, one day 🙂
Thank you, Sarah! Woodworking is highly addicting… Thank you for stopping by!!
Love this idea!! This is a definitely something I (The Hubby) will be doing! 🙂
Thanks so much! I just bought another door today to build another one! Thank you for stopping by!
[…] Cher was inspired by my Red Door Bookcase, and made her own bookcase […]
This is beautiful! Great work.
Thank you very much! It was a lot of fun to build and I’m hoping to build another soon! Thanks for stopping by!
[…] you remember the Old Door bookcase? I loved that project and was happy to see her go to a new home. But her absence left me wanting to […]
[…] guess it can be said that I love to use old doors in projects! So far, I have created plans on How to Build a Bookcase Using an Old Door, How to Build a Bench Using an Old Door, and How to Build a Side Table Using Parts from an Old […]
[…] Decided this was the month I was going to make this from an old door. […]
[…] of my most favorite bookcases ever was built using an old wood door as the sides. Inspired by an example at My Repurposed Life, I built this bookcase and painted it a very vibrant […]
[…] DIY Bookcase From An Old Door – Turn an old door into a stylish bookcase and have something completely different from what you see in the stores. […]
[…] 2. An old door can be used to build a custom bookcase. […]
[…] Cher was inspired by my Red Door Bookcase, and made her own bookcase […]
[…] 2. An old door can be used to build a custom bookcase. […]
[…] Cher was inspired by my Red Door Bookcase, and made her own bookcase […]
[…] from an old Door free project.Recycle an old solid wood door into a fabulous bookcase. Here is how to do […]
[…] 44. Make an Antique Bookcase using Vintage Doors […]
[…] you remember the Old Door bookcase? I loved that project and was happy to see her go to a new home. But her absence left me wanting to […]
[…] by another blogger’s project, I built this old door bookcase and painted it a shocking pink color (then immediately sold it!). The door is split in half and I […]
[…] guess it can be said that I love to use old doors in projects! So far, I have created plans on How to Build a Bookcase Using an Old Door, How to Build a Bench Using an Old Door, and How to Build a Side Table Using Parts from an Old […]
[…] of my most favorite bookcases ever was built using an old wood door as the sides. Inspired by an example at My Repurposed Life, I built this bookcase and painted it a very vibrant […]