
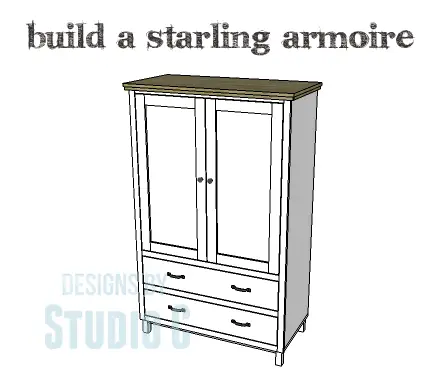
DIY Plans to Build a Starling Armoire
Build a Beautiful Armoire with Lots of Storage!
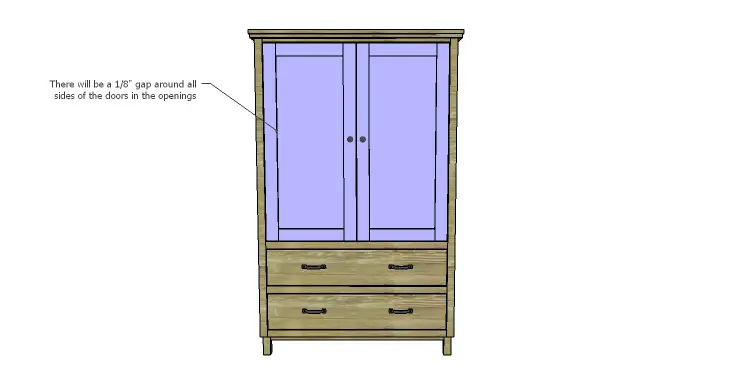
I absolutely adore armoires! They are so spacious, stunning, and offer endless storage options. The DIY plans for creating a Starling armoire are simply fantastic! It includes two drawers, two doors with two shelves, and the best part is, it’s super easy to build! You can even customize the door panels by replacing them with decorative punched aluminum or glass, giving it a whole new appearance that matches your unique style perfectly!
Materials:
-
- 1″ pocket hole screws
- 1-1/4″ pocket hole screws (<– affiliate link!)
- 1-1/4″ brad nails
- 1-1/2″ screws
- Edge banding, optional
- 2 sets of 18″ Drawer slides
- 2 sets of hinges
- Cabinet pulls
- Wood glue
- Sandpaper (100, 150, 220 grits)
- Finishing supplies (primer & paint, or stain, sealer)
Lumber:
- 8 – 1×2 at 8′
- 4 – 1×3 at 6′
- 1 – 1×6 at 4′
- 2 – 1×6 at 8′
- Scrap of 2×2 measuring 20″
- 1 – 4′ x 4′ sheet of 1/2″ plywood
- 3 – 4′ x 8′ sheets of 3/4″ plywood
- 1 – 8′ piece of 3/4″ trim
Cut List:
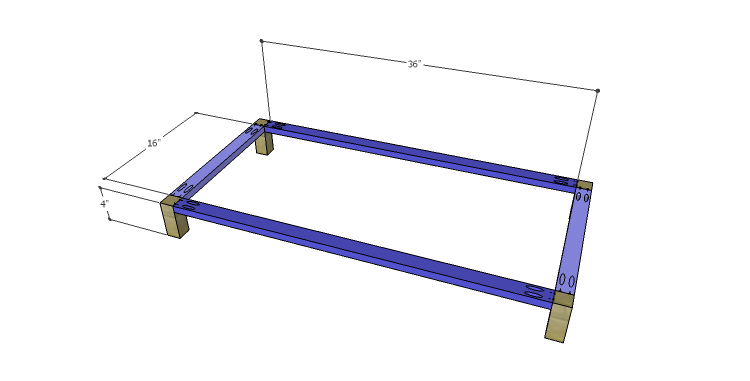
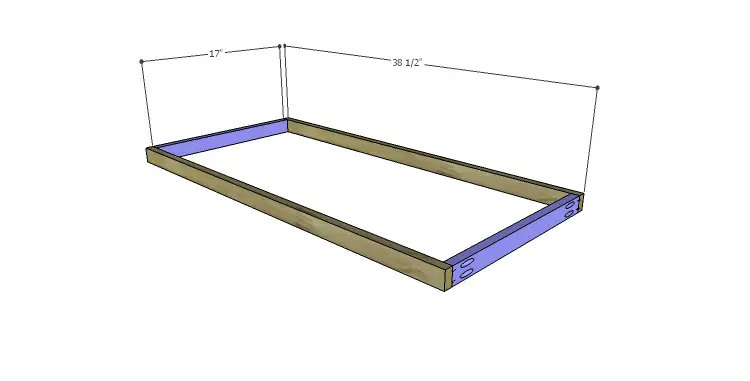
- 4 – 2×2 at 4″ – Base Legs
- 2 – 1×2 at 16″ – Base Frame
- 2 – 1×2 at 36″ – Base Frame
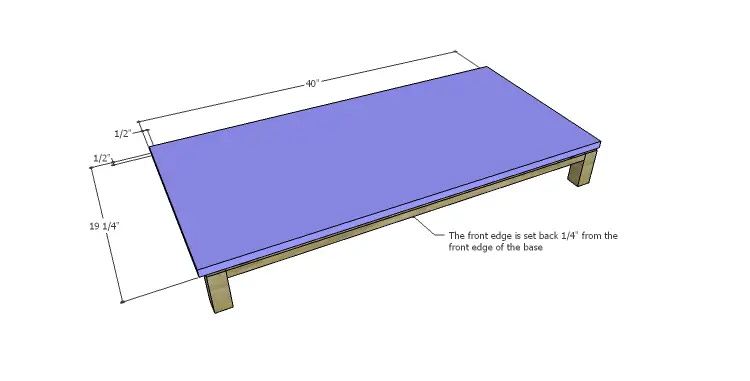
- 1 – 3/4″ plywood at 19-1/4″ x 40″ – Bottom
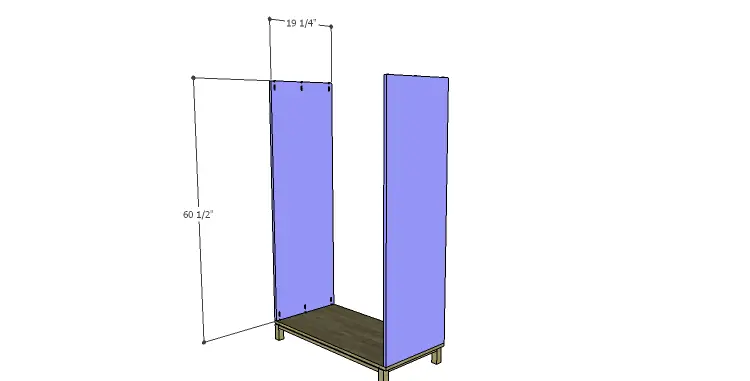
- 2 – 3/4″ plywood at 19-1/4″ x 60-1/2″ – Sides
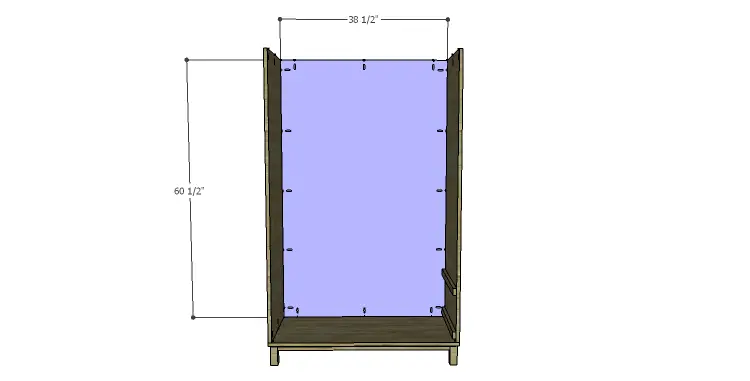
- 1 – 3/4″ plywood at 38-1/2″ x 60-1/2″ – Back
- 4 – 1×2 at 18-1/2″ – Drawer Slide Spacers
- 4 – 1×2 at 17″ – Shelf Frames
- 4 – 1×2 at 38-1/2″ – Shelf Frames
- 3 – 3/4″ plywood at 18-1/2″ x 38-1/2″ – Shelves
- 4 – 1×2 at 37″ – Front Frame
- 2 – 1×2 at 61-1/4″ – Front Frame
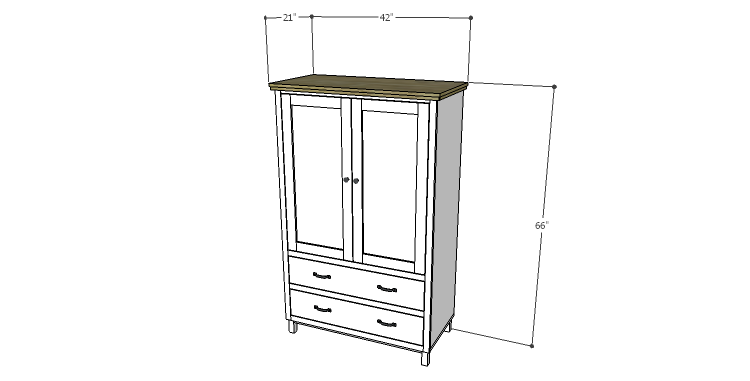
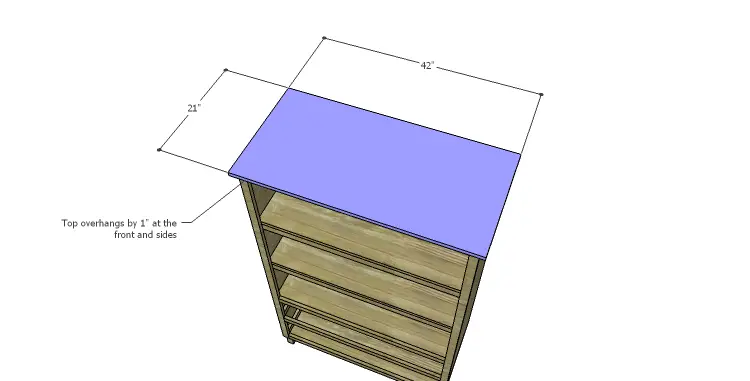
- 1 – 3/4″ plywood at 21″ x 42″ – Top
- 3/4″ trim cut to fit under the top at the sides and front
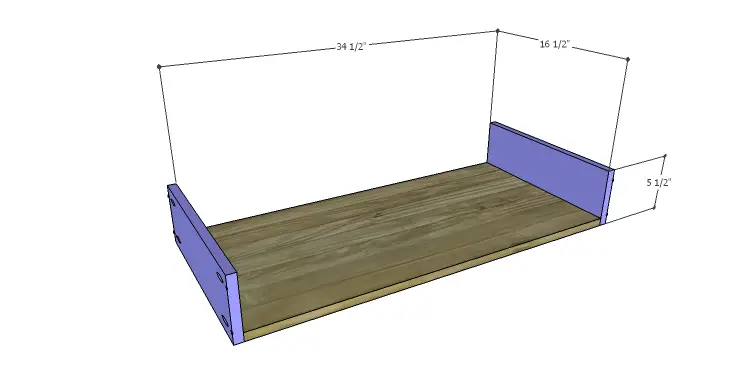
- 2 – 3/4″ plywood at 16-1/2″ x 34-1/2″ – Drawer Box Bottoms
- 4 – 1×6 at 16-1/2″ – Drawer Box Sides
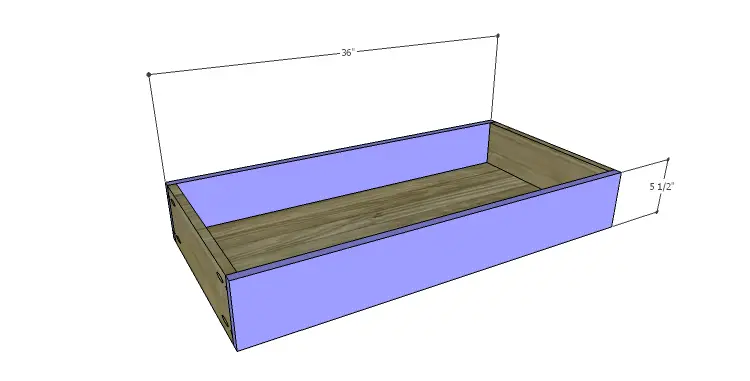
- 4 – 1×6 at 36″ – Drawer Box Front & Back
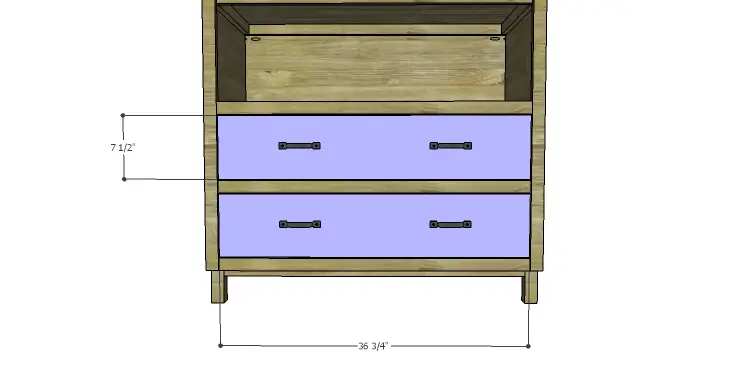
- 2 – 3/4″ plywood at 7-1/2″ x 36-3/4″ – Drawer Fronts
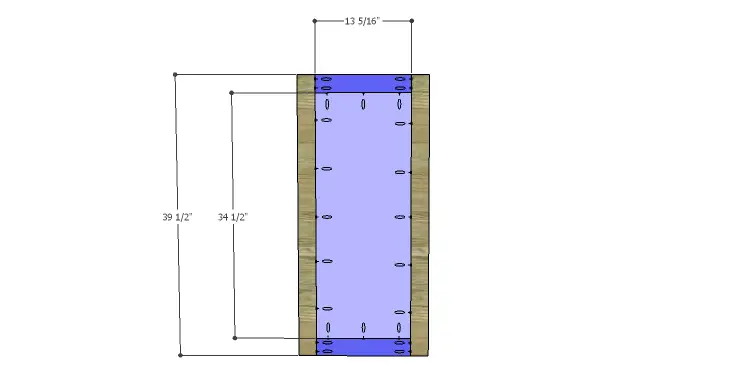
- 4 – 1×3 at 13-5/16″ – Door Rails
- 4 – 1×3 at 39-1/2″ – Door Stiles
- 2 – 1/2″ plywood at 13-5/16″ x 34-1/2″ – Door Panels
Click on the drawings for a larger view!
Step One
Edge banding will be applied to the exposed edges of the plywood prior to assembly!
Cut the pieces for the legs and the base frame. With the pocket hole jig set for 3/4″ material, drill pocket holes in each end of the frame pieces. Assemble the base frame as shown in the drawing using glue and 1-1/4″ pocket hole screws.
Step Two
Cut the piece for the bottom. The side and back edges will overhang the base by 1/2″ while the front is positioned 1/4″ back from the front edge of the base. The front frame will rest on this part of the base. Secure the bottom on the base using glue and 1-1/4″ brad nails.
Step Three
Cut the pieces for the sides and drill pocket holes in each end. Secure the sides to the bottom using glue and 1-1/4″ pocket hole screws.
Step Four
Cut the piece for the back and drill pocket holes in all four edges. Secure the back to the sides and bottom using glue and 1-1/4″ pocket hole screws.
Step Five
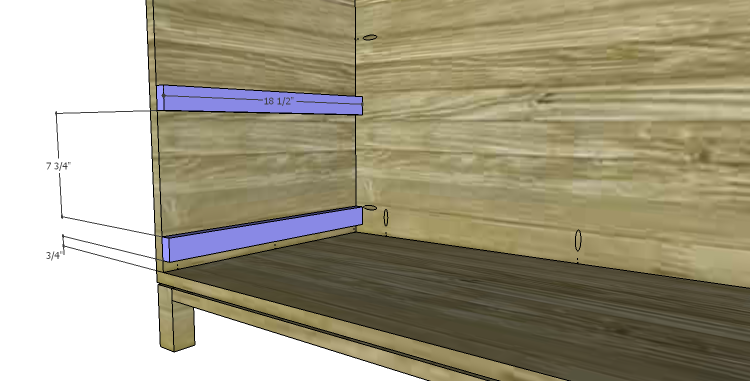
Cut the pieces for the drawer slide supports. Secure the supports as shown (noting that the lower support is positioned 3/4″ up from the bottom) using glue and 1-1/4″ brad nails.
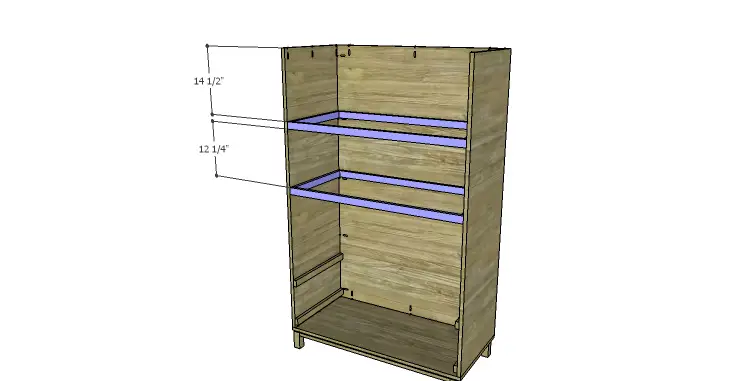
Step Six
Cut the pieces for the shelf frames and drill pocket holes in each end of the shorter pieces. Assemble the frames using glue and 1-1/4″ pocket hole screws.
Position the frames inside the cabinet as shown securing in place using glue and 1-1/2″ screws.
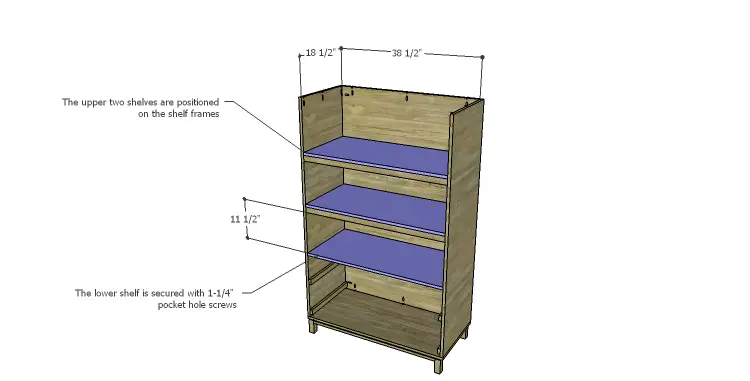
Step Seven
Cut the pieces for the shelves. There are three shelves – one is the divider between the drawers and the doors. Drill pocket holes in the side and back edges of ONE shelf. Secure the shelf inside the cabinet as shown using glue and 1-1/4″ pocket hole screws.
The other two shelves will rest on the frames. Secure in place using glue and 1-1/4″ brad nails.
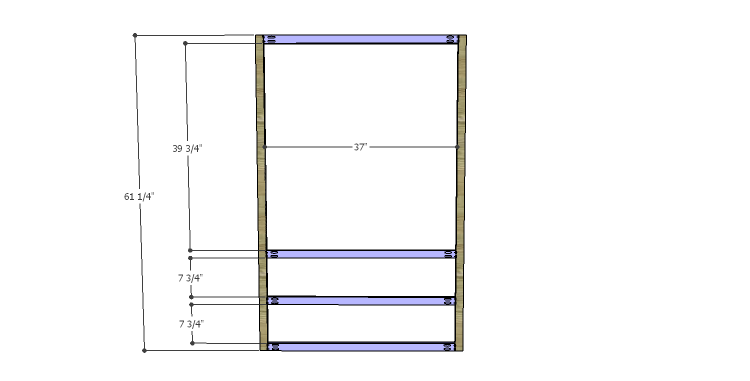
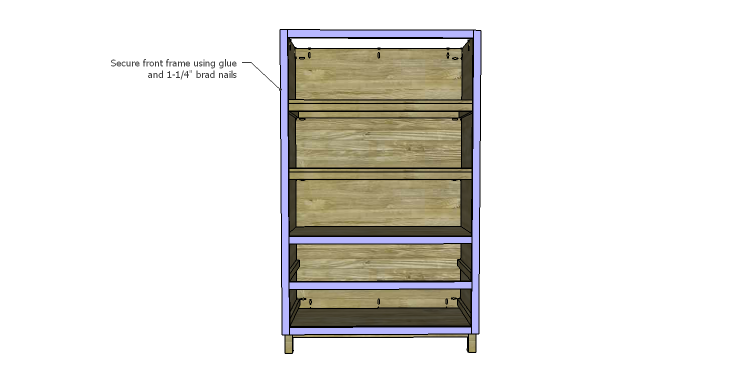
Step Eight
Cut the pieces for the front frame and drill pocket holes in each end of the shorter pieces. Assemble the front frame as shown using glue and 1-1/4″ pocket hole screws.
Position the frame on the front of the cabinet, resting the bottom on the base at the 1/4″ gap created by the bottom. Secure the frame to the sides and the lower shelve (the divider between the drawers and doors) using glue and 1-1/4″ brad nails.
Step Nine
Cut the piece for the top. The front and sides will overhang by 1″. Secure the top using glue and 1-1/4″ pocket hole screws through the pocket holes already drilled in the upper sides and back.
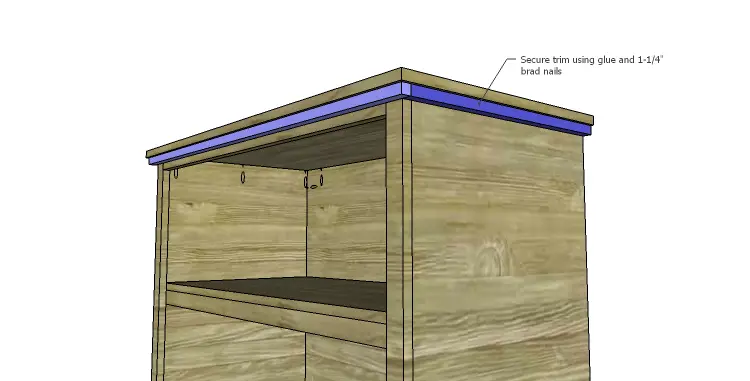
Cut the pieces for the trim. There are no dimensions given because it will depend on the type of trim selected. Secure the sides first using glue and 1-1/4″ brad nails, then secure the front in the same manner.
Step Ten
Cut the pieces for the drawer boxes. Drill pocket holes in all four edges of the bottom as well as each end of the sides. Assemble the drawer boxes as shown using glue and 1-1/4” pocket hole screws. Install the drawer slides according to the manufacturer’s installation instructions, locating them ¾” back from the front edge of the front frame. This easy tutorial on installing drawer slides will be helpful! Make any necessary adjustments.
Step Eleven
Cut the pieces for the drawer fronts. Mark the position for the drawer pulls and drill the holes. Shim the drawer front in the opening – there will be a 1/8” gap around all sides – then drive screws through the holes for the drawer pulls into the drawer box. Open the drawer, and secure the drawer front using countersunk 1-1/4” screws from the inside. Remove the screws from the holes for the drawer pull then finish drilling the holes. Install the drawer pull. Try this easy tutorial on installing drawer fronts.
Step Twelve
Cut the pieces for the doors and the door panels. Drill pocket holes in each end of the door rails (the shorter pieces) and assemble the doors as shown using glue and 1-1/4″ pocket hole screws.
Set the pocket hole jig for 1/2″ material and drill pocket holes in all four edges of the panels. Insert the panels into the door frames securing in place using glue and 1″ pocket hole screws.
Install the hinges on the doors, then install the doors in the cabinet. Drill holes for the cabinet pulls, and install the pulls.
Finish as desired.
This armoire would be the perfect piece in a variety of spaces – holding linens in a bathroom, pantry items in a kitchen, or even clothing in a bedroom! Have any questions about the DIY plans to build a Starling armoire? Leave a comment below or contact me at cher {at} designsbystudioc {dot} com!
Originally posted 2014-09-12 08:00:33.
[…] of as a bedroom piece of furniture, these days it can be found in any room of the house. Here are free plans to build this […]
could you forward photos with the steps for sterling armoire? thank you
Hal
Hi, Hal!
I’m not entirely sure what you mean… How can I help you?
Thanks!
I’m needing one that is no taller than 60 inches. Do you have plans for one that height?
Hi, Clark! Thank you for checking out the plans! Currently, I do not have plans for an armoire that is 60″ tall or less but most of them can be shortened by changing the dimensions in the cut list for the sides, back, doors and dividers, if applicable. I hope this helps!