
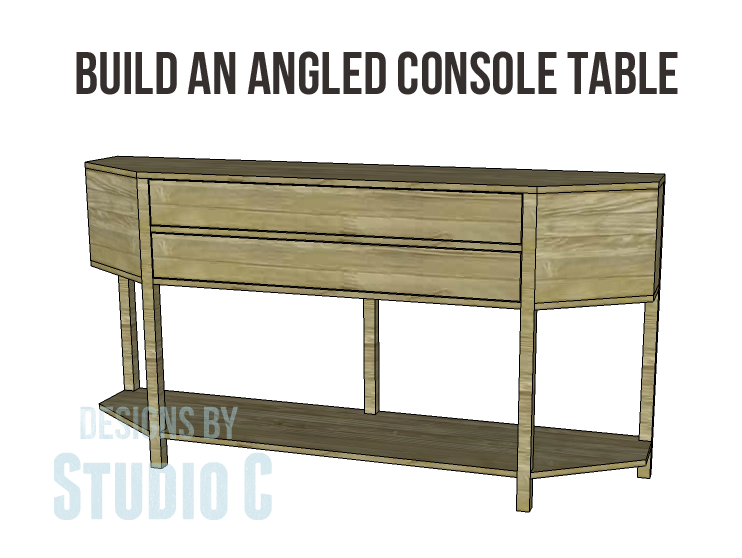
Build an Angled Console Table
DIY Plans for a Large Angled Console Table with Plenty of Storage!
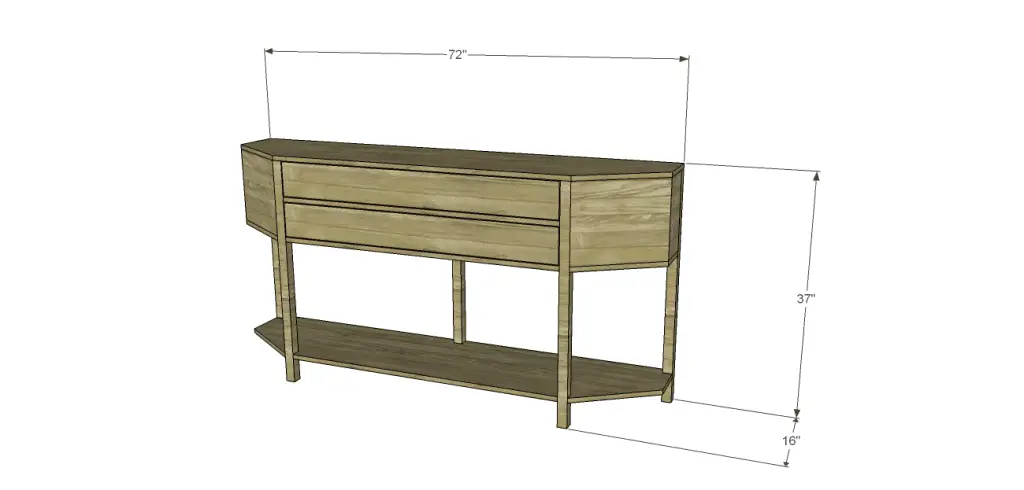
Do you love the look of demilune tables but are not ready to tackle the curved front edges? The plans for this angled console table are the perfect fit! While this table is quite long, it is also big on storage featuring two long drawers and a roomy shelf at the bottom creating an excellent way to display a favorite collection!
Materials:
- 1-1/4″ pocket hole screws
- 1-1/4″ brad nails
- Edge banding, optional
- 2 sets of 16″ drawer slides
- 2 drawer pulls
- Wood glue
- Sandpaper (100, 150, 220 grits)
- Finishing supplies (primer & paint, or stain, sealer)
Lumber:
- 1 – 1×4 at 6′
- 2 – 1×4 at 8′
- 1 – 2×2 at 4′
- 2 – 2×2 at 8′
- 2 sheets of 3/4″ plywood
Cut List:
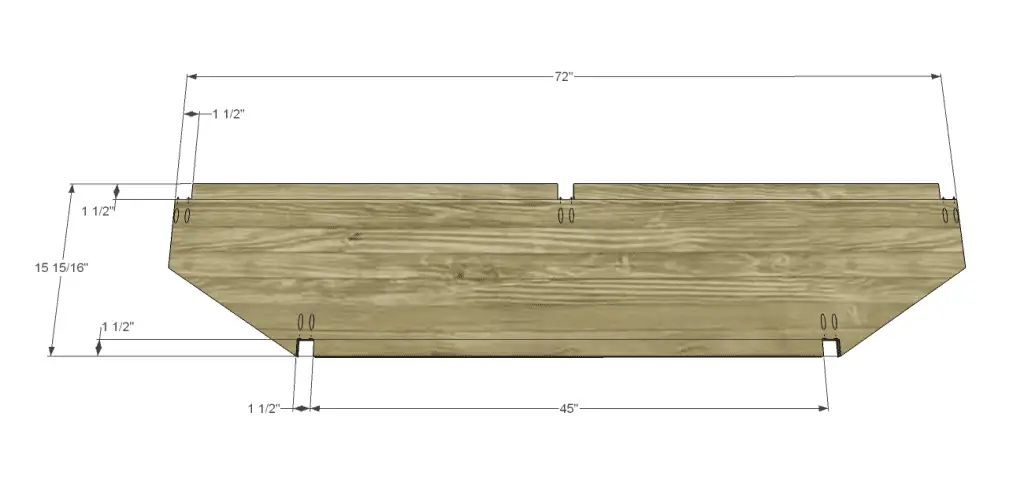
- 3 – 3/4″ plywood at 15-15/16″ x 72″ – Top, Bottom, & Shelf
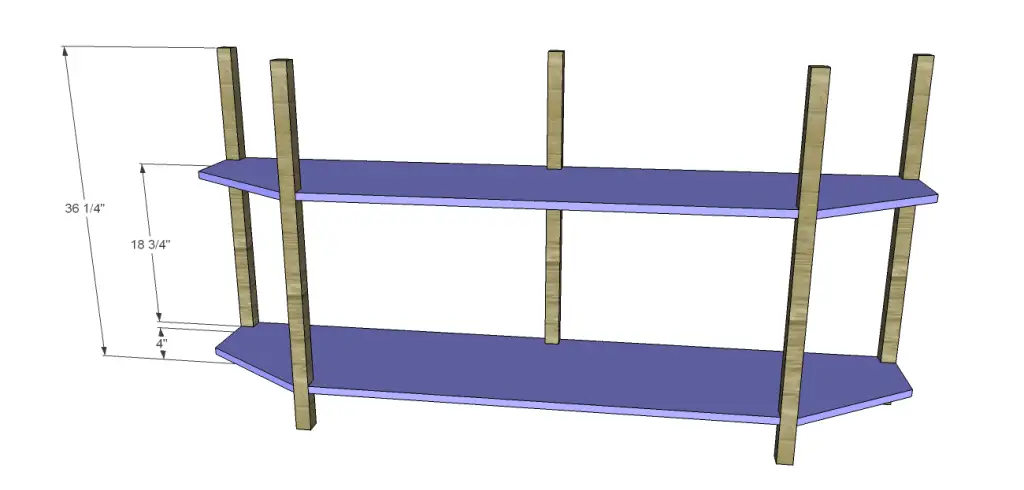
- 5 – 2×2 at 36-1/4″ – Legs
- 2 – 3/4″ plywood at 12″ x 33-3/4″ – Backs
- 2 – 3/4″ plywood at 6-1/8″ x 12″ – Sides
- 2 – 3/4″ plywood at 12″ x 15″ – Fronts
- 2 – 3/4″ plywood at 12″ x 13-3/4″ – Dividers
- 1 – 3/4″ plywood at 1-1/2″ x 45″ – Stretcher
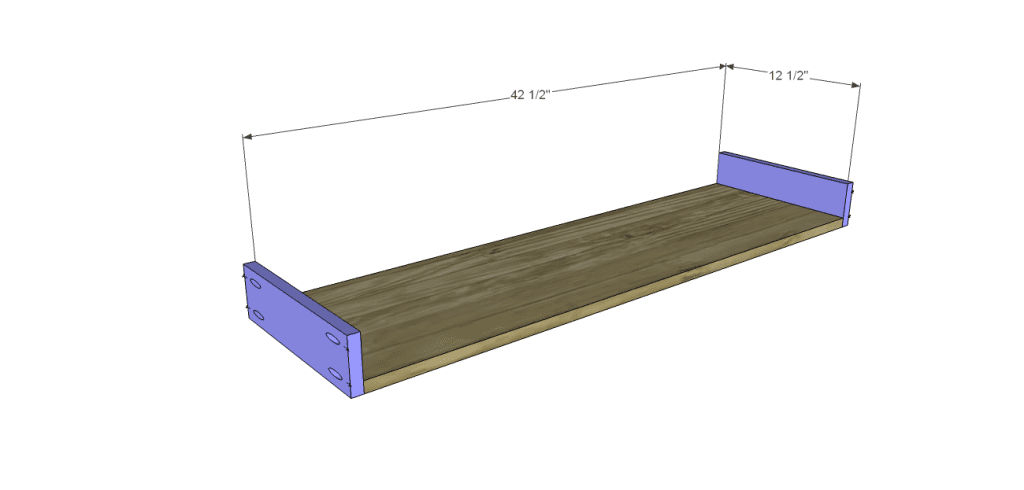
- 2 – 3/4″ plywood at 12-1/2″ x 42-1/2″ – Drawer Box Bottoms
- 4 – 1×3 at 12-1/2″ – Drawer Box Sides
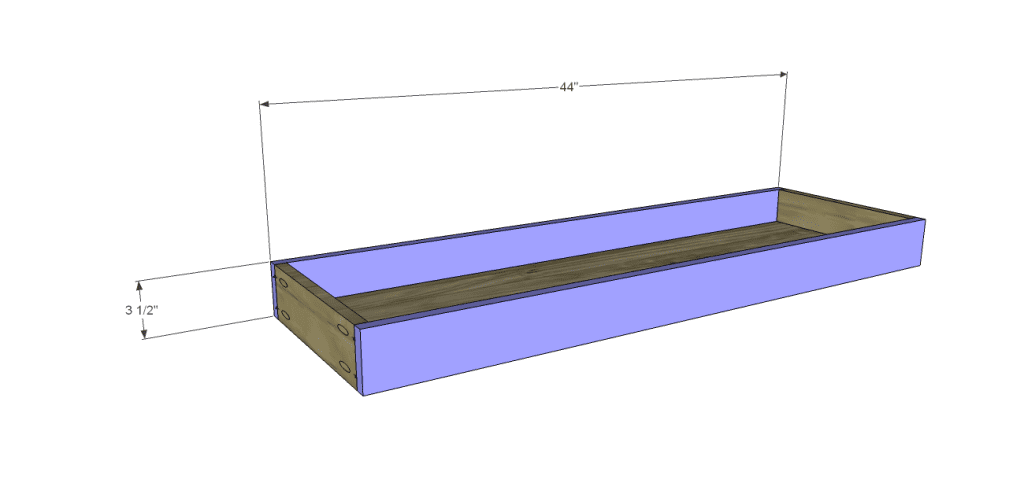
- 4 – 1×3 at 44″ – Drawer Box Front & Back
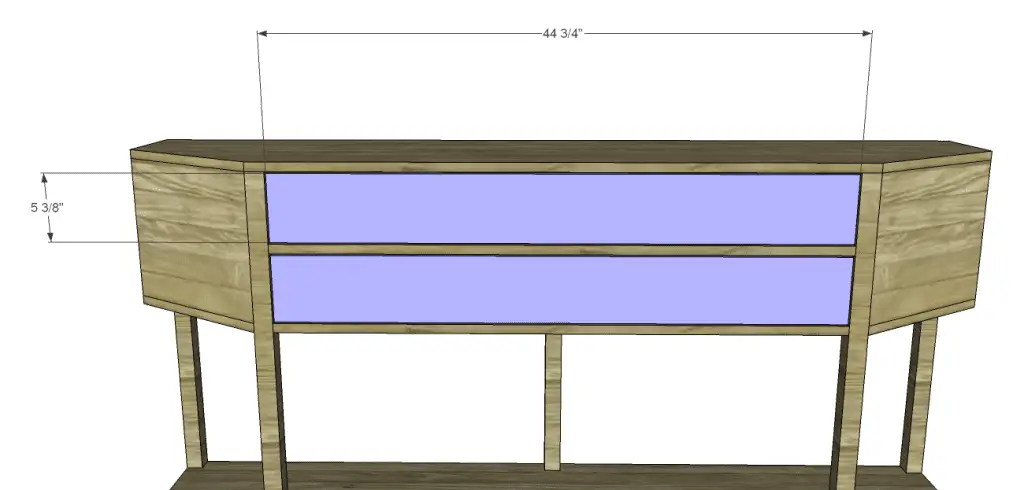
- 2 – 3/4″ plywood at 5-3/8″ x 44-3/4″ – Drawer Fronts
Step One
Cut the pieces for the top, bottom, and the shelf. One of the sheets of plywood can be ripped lengthwise into three equal pieces, then cut to length. Cut the angled portions in the pieces as shown, then apply the edge banding. Cut the notches in the bottom and the shelf using a jigsaw, then with the pocket hole jig set for 3/4″ material, drill pocket holes as shown.
Secure the bottom and the shelf to the legs using glue and 1-1/4″ pocket hole screws.
Step Two
Cut the pieces for the back and drill pocket holes in all four edges. Attach to the bottom and the legs using glue and 1-1/4″ pocket hole screws.

Step Three
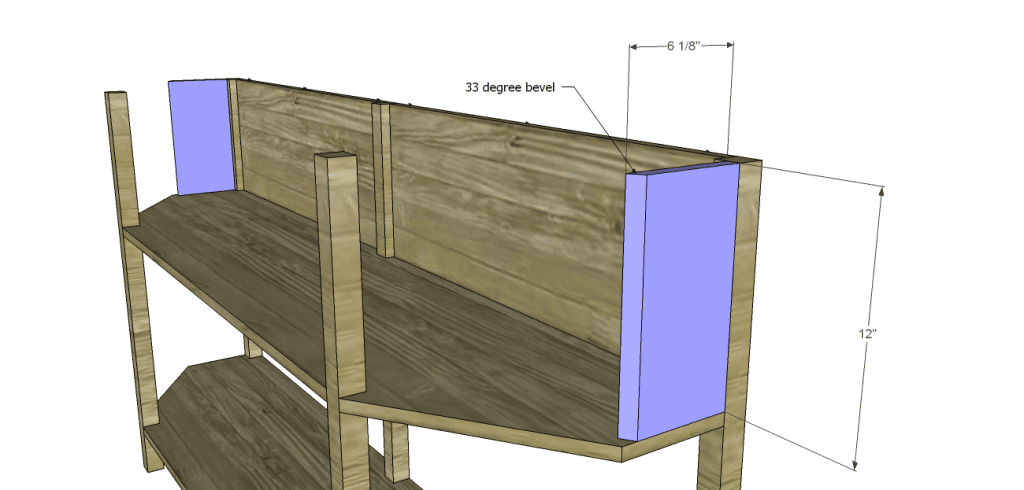
Cut the pieces for the sides. Cut a 33 degree bevel in one of the 12″ edges of each piece, drill pocket holes in the other 12″ edge. Secure to the legs using glue and 1-1/4″ pocket hole screws.
Step Four
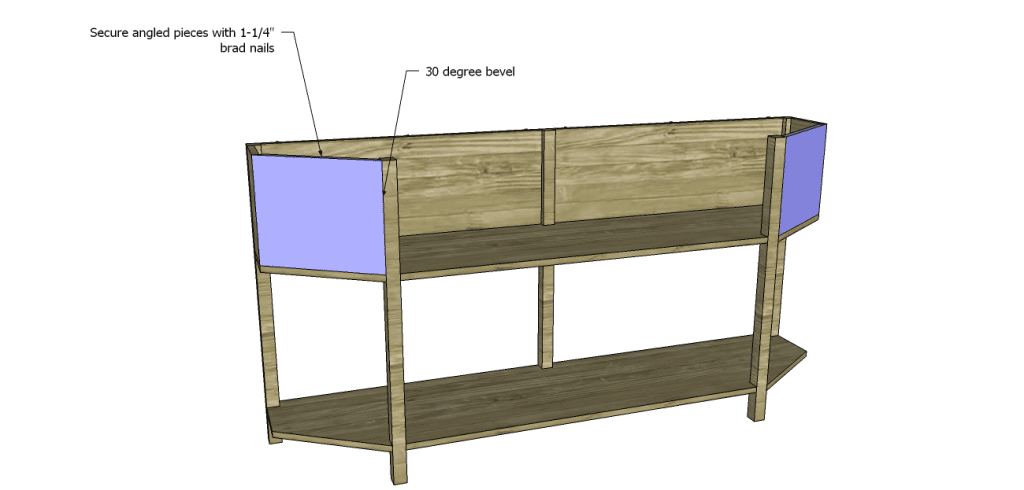
Cut the pieces for the fronts. Cut a 30 degree bevel in one 12″ edge of each piece and a 26 degree bevel in the other 12″ edge of each piece. Position the pieces with the 30 degree bevel resting on the front leg, the 26 degree bevel will attach to the side piece. Secure the fronts in place using glue and 1-1/4″ brad nails.
Step Five
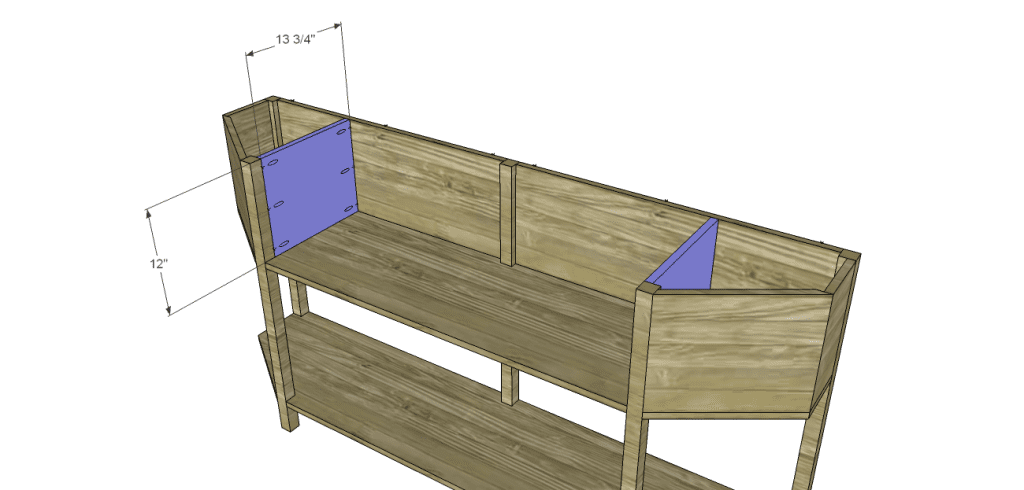
Cut the pieces for the dividers and drill pocket holes in the 12″ edges. Secure to the front legs and the back as shown using glue and 1-1/4″ pocket hole screws.
Step Six
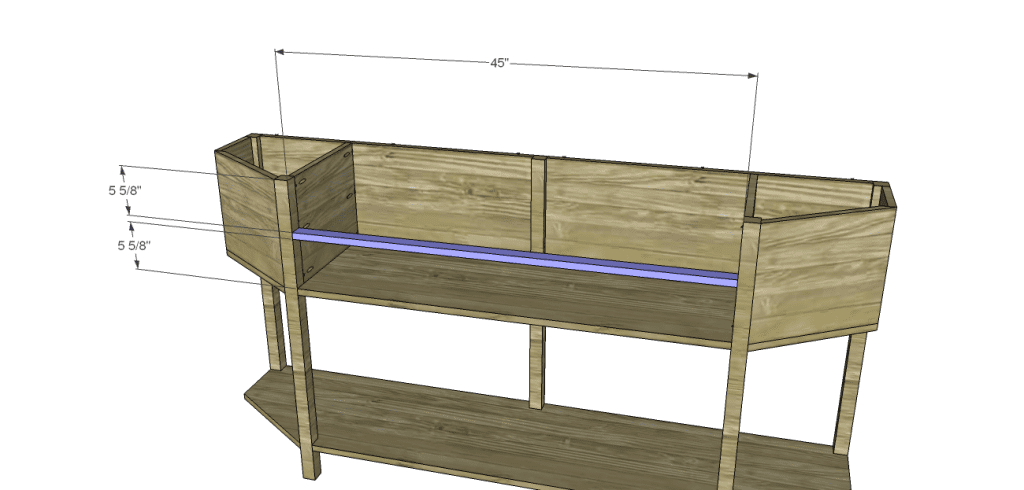
Cut the piece for the stretcher and apply edge banding to one edge, then drill pocket holes in each end. Secure to the front legs as shown using glue and 1-1/4″ pocket hole screws.
Step Seven
Position the top on the entire cabinet assembly then secure in place using glue and 1-1/4″ pocket hole screws through the back into the underside of the top. 1-1/4″ brad nails will be used to secure the sides and front of the top.

Step Eight
Cut the pieces for the drawers and drill pocket holes in each end of the side pieces as well as all four edges of the bottom. Assemble the drawers as shown using glue and 1-1/4″ pocket hole screws. Install the drawer slides according to the manufacturer’s installation instructions. They will be positioned 3/4″ back from the front face of the legs to allow for the drawer front. This easy tutorial on installing drawer slides will be quite helpful! Make any necessary adjustments.
Step Nine
Cut the pieces for the drawer fronts. There will be a 1/8″ gap around all sides in the opening. Mark the position for the drawer pulls, then drill the holes. Shim the drawer front in the opening (with the drawer box installed) then drive screws through the holes for the drawer pulls into the drawer box. Open the drawer, then secure the drawer front using countersunk 1-1/4″ screws from the inside. Remove the screws from the holes for the drawer pull then make any necessary adjustments. Finish drilling the holes for the drawer pulls. This tutorial on installing drawer fronts makes it a lot less frustrating!
Finish as desired.
These angled console table plans are well suited for those newly bitten by the woodworking bug or those that have been thoroughly obsessed for a long time! Whatever your skill level, the table is quick and easy to build, plus it will impress any visitors to your home!
Originally posted 2013-10-03 08:00:55.
[…] angled console table features two long drawers and a lower shelf for displays. Build it with these free […]