
Easy to Build Rustic Wine Cabinet Plans!
A Rustic Wine Cabinet for a Fabulous Collection
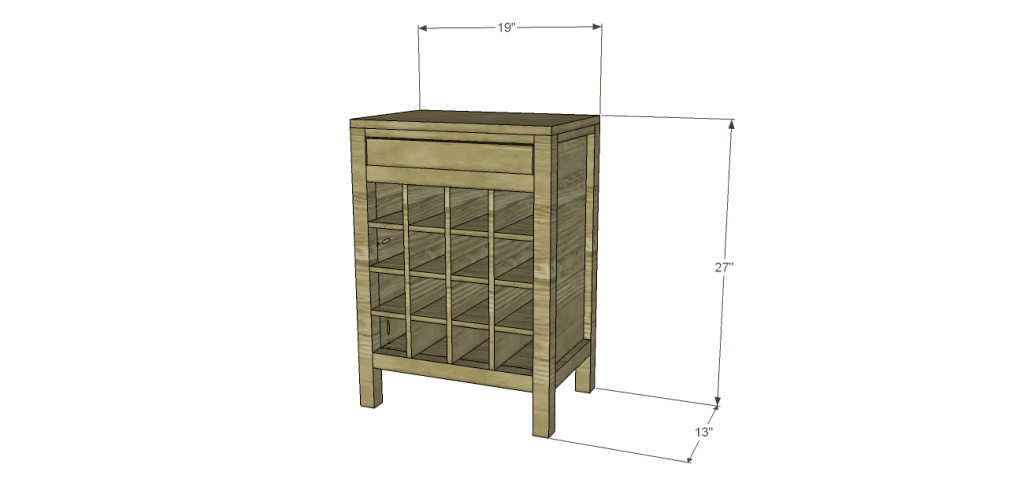
This is a neat little cabinet… The Rustic Wine Cabinet plans feature sixteen cubbies for those fabulous bottles that are being saved for a special occasion and a smaller drawer for the opener or even stashing corks! Plus, the cabinet can double as an end table so it isn’t taking up any unnecessary space!

Materials:
- 1-1/4″ pocket hole screws (<– affiliate link!)
- 2-1/2″ pocket hole screws
- 1-1/4″ brad nails
- Edge banding
- Cabinet pull
- Wood glue
- Sandpaper (100, 150, 220 grits)
- Finishing supplies (primer & paint, or stain, sealer)
- Paste Wax
Lumber:
- 1 – 1×2 at 6′
- 3 – 2×2 at 6′
- Half sheet of 1/2″ plywood
- 1 sheet of 3/4″ plywood
Cut List:
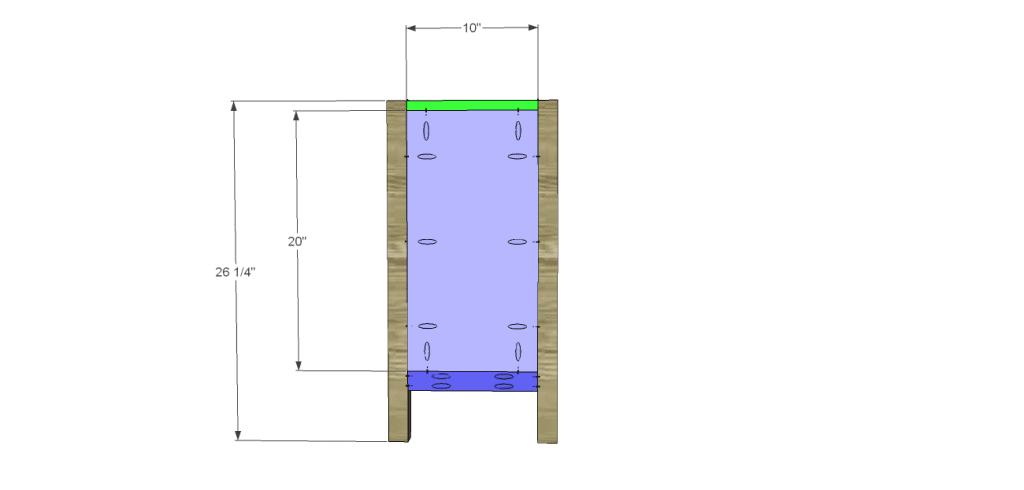
- 4 – 2×2 at 26-1/4″ – Legs
- 2 – 1×2 at 10″ – Side Frames
- 2 – 2×2 at 10″ – Side Frames
- 2 – 3/4″ plywood at 10″ x 20″ – Side Panels
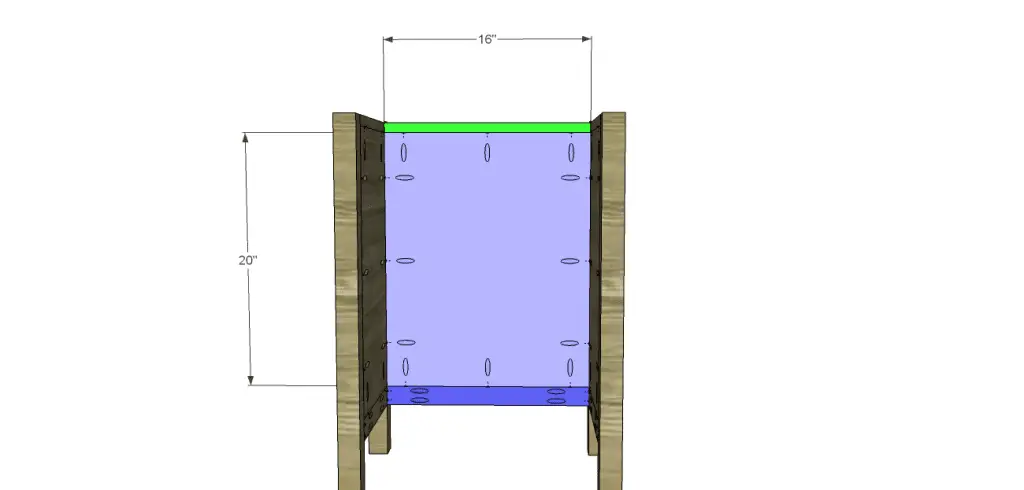
- 2 – 1×2 at 16″ – Back Frame, Upper Stretcher
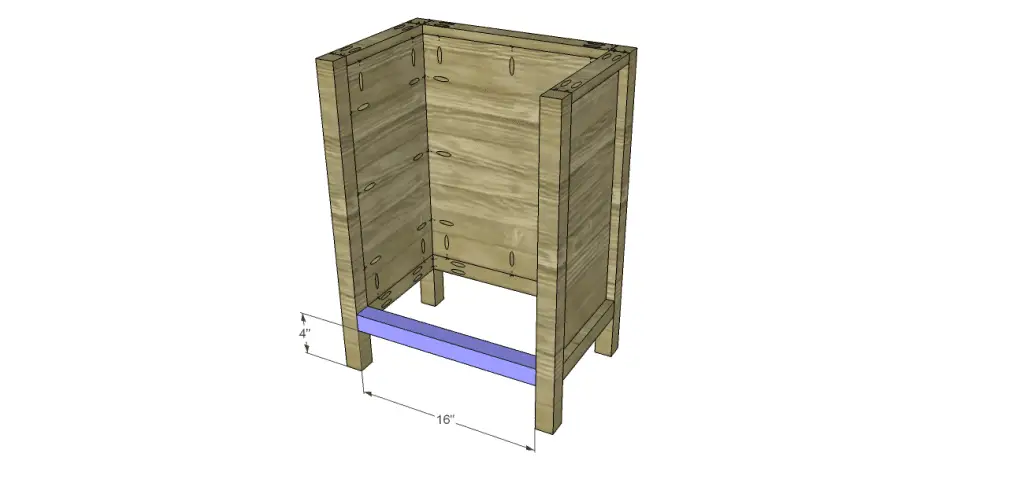
- 3 – 2×2 at 16″ – Back Frame, Lower Stretcher, Upper Stretcher
- 1 – 3/4″ plywood at 16″ x 20″ – Back Panel
- 2 – 3/4″ plywood at 10″ x 16″ – Bottom, Upper Shelf
- 3 – 1/2″ plywood at 11-1/2″ x 16″ – Cubby Dividers
- 3 – 1/2″ plywood at 11-1/2″ x 16-3/4″ – Cubby Dividers
- 1 – 3/4″ plywood at 13″ x 19″ – Top
- 1 – 3/4″ plywood at 10″ x 14-1/4″ – Drawer Bottom
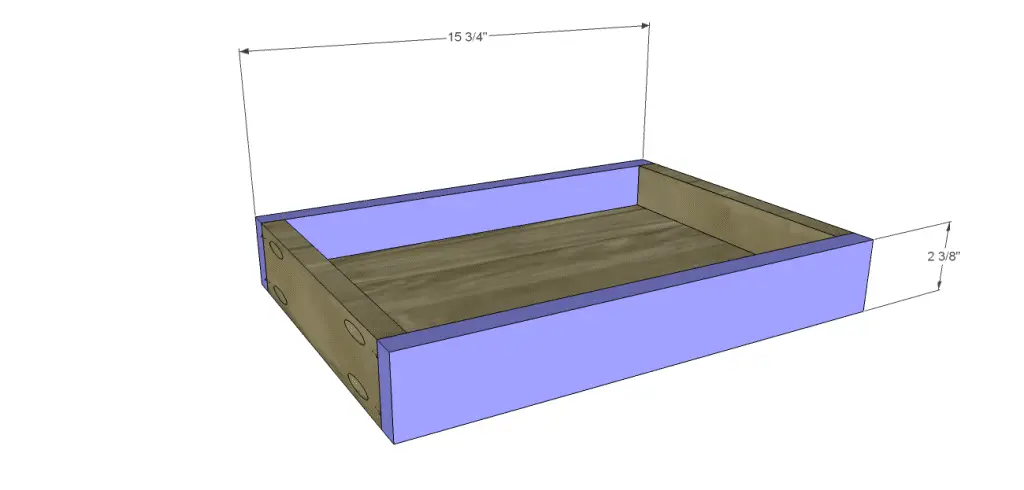
- 2 – 3/4″ plywood at 2-3/8″ x 10″ – Drawer Sides
- 2 – 3/4″ plywood at 2-3/8″ x 15-3/4″ – Drawer Front & Back
Click on the drawings for a larger view!
Step One
Edge banding will be applied to the exposed edges of the plywood prior to assembly.
Cut the pieces for the legs, side frames, and side panels. With the pocket hole jig set for 1-1/2″ material, drill pocket holes in each end of the 2×2 pieces. Reset the pocket hole jig for 3/4″ material and drill pocket holes in each end of the 1×2 frame pieces as well as all four edges of the panel. Secure the frame pieces to the panel using glue and 1-1/4″ pocket hole screws. The back face of the panel will be flush with the back face of the 2×2 frame piece. Orient the pocket holes on the 1×2 piece so they face up and will be hidden by the top. Secure the panel assembly to the legs using glue and the appropriate pocket hole screw for the material – 1-1/4″ pocket hole screws through the 3/4″ material, and 2-1/2″ pocket hole screws through the 1-1/2″ material.
Step Two
Cut the pieces for the back frame pieces and back panel. Set the pocket hole jig for 1-1/2″ material and drill pocket holes in each end of the 2×2 piece. Reset the pocket hole jig for 3/4″ material and drill pocket holes in each end of the 1×2 frame piece as well as all four edges of the panel. Secure the frame pieces to the panel using glue and 1-1/4″ pocket hole screws. The back face of the panel will be flush with the back face of the 2×2 frame piece. Orient the pocket holes on the 1×2 piece so they face up and will be hidden by the top. Secure the panel assembly to the legs using glue and the appropriate pocket hole screw for the material – 1-1/4″ pocket hole screws through the 3/4″ material, and 2-1/2″ pocket hole screws through the 1-1/2″ material.
Step Three
Cut the piece for the lower stretcher. Set the pocket hole jig for 1-1/2″ material and drill pocket holes in each end. Secure to the legs as shown using glue and 2-1/2″ pocket hole screws.
Step Four
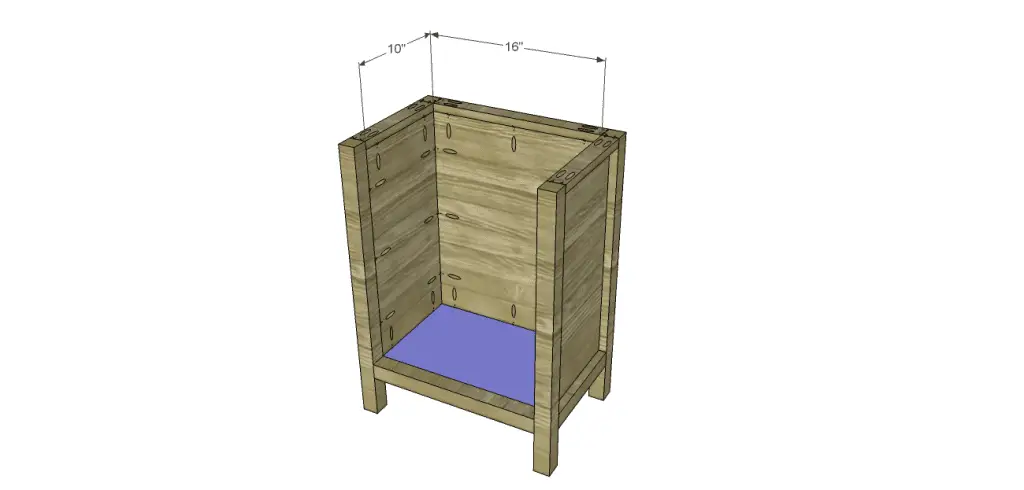
Cut the piece for the bottom. Set the pocket hole jig for 3/4″ material and drill pocket holes in all four edges. Secure the bottom to the lower stretcher and 2×2 frame pieces using glue and 1-1/4″ pocket hole screws. The top face of the bottom will be flush with the top face of the lower stretcher.
Step Five
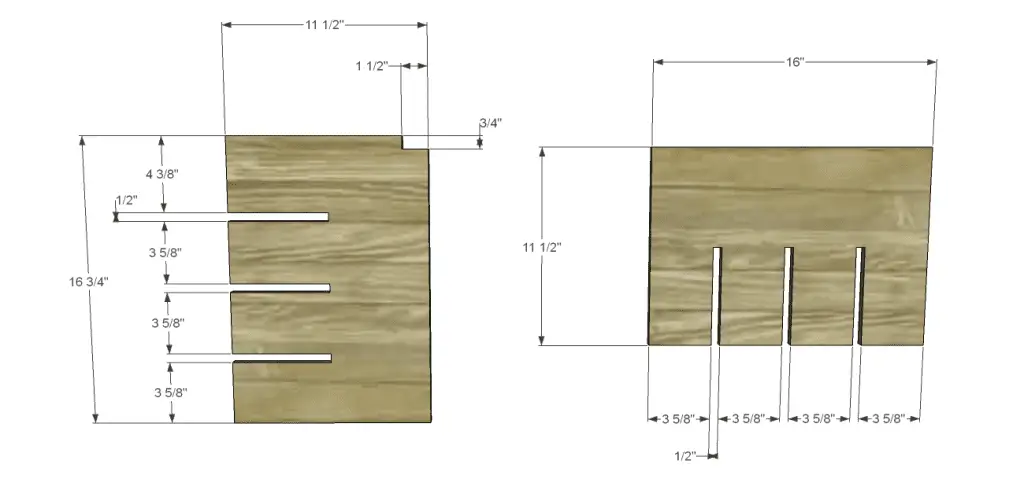
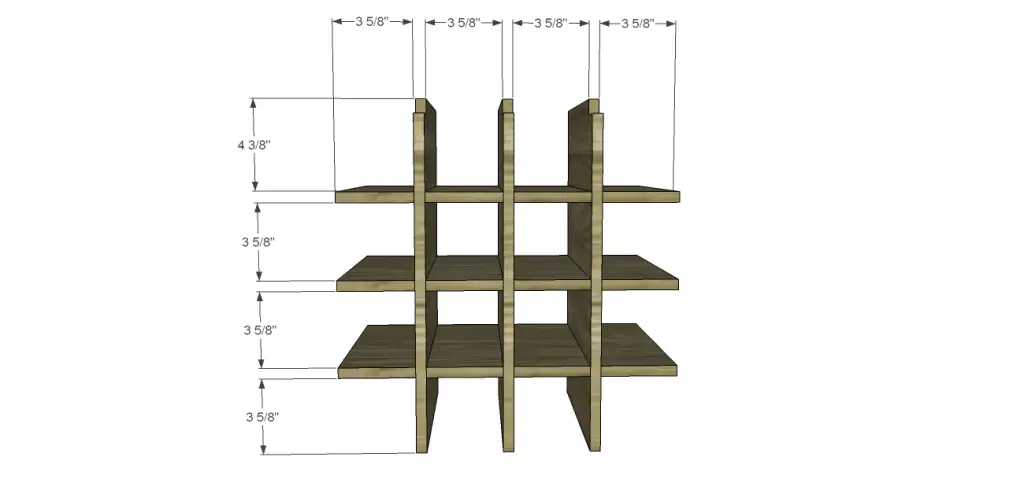
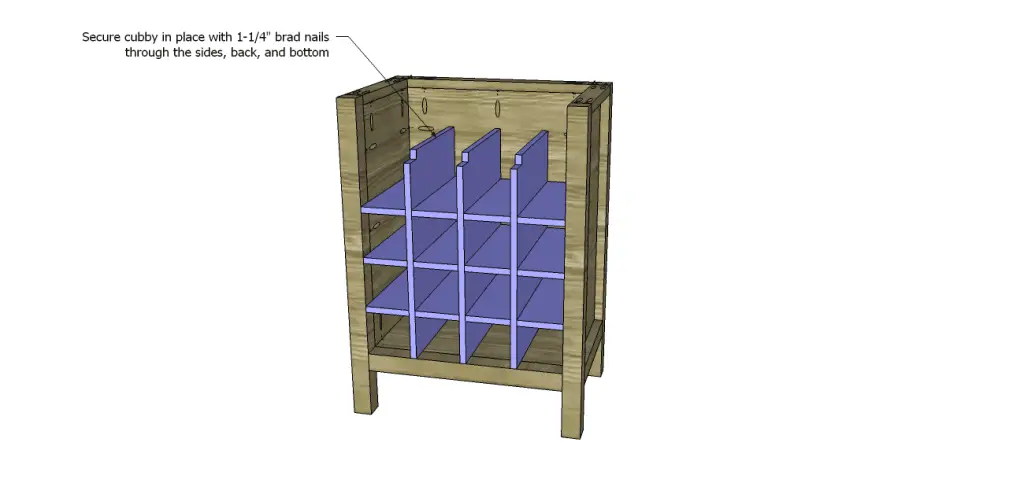
Cut the pieces for the cubby. Cut the notches using a jigsaw. Assemble the cubby as shown, then position inside the cabinet. Secure in place using glue and 1-1/4″ brad nails through the bottom, sides, and back into the cubby ends.
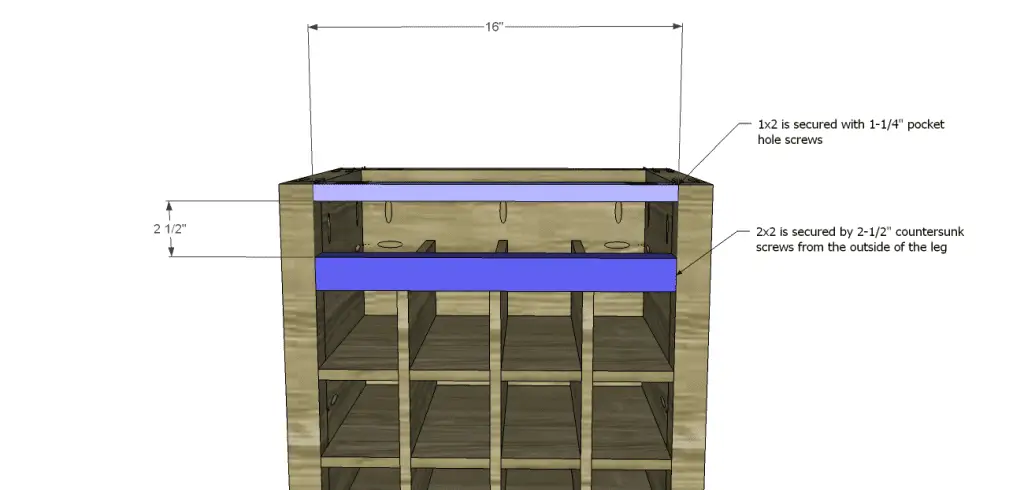
 Step Six
Cut the piece for the upper 2×2 stretcher. It will fir in the upper L-shaped notches of the cubby. Secure using countersunk 2-1/2″ screws through the outside of the legs into the ends of the stretcher.
Cut the piece for the upper 1×2 stretcher and drill pocket holes in each end. Secure to the legs as shown using glue and 1-1/4″ pocket hole screws. Orient the pocket holes so they face up and will be hidden by the top.
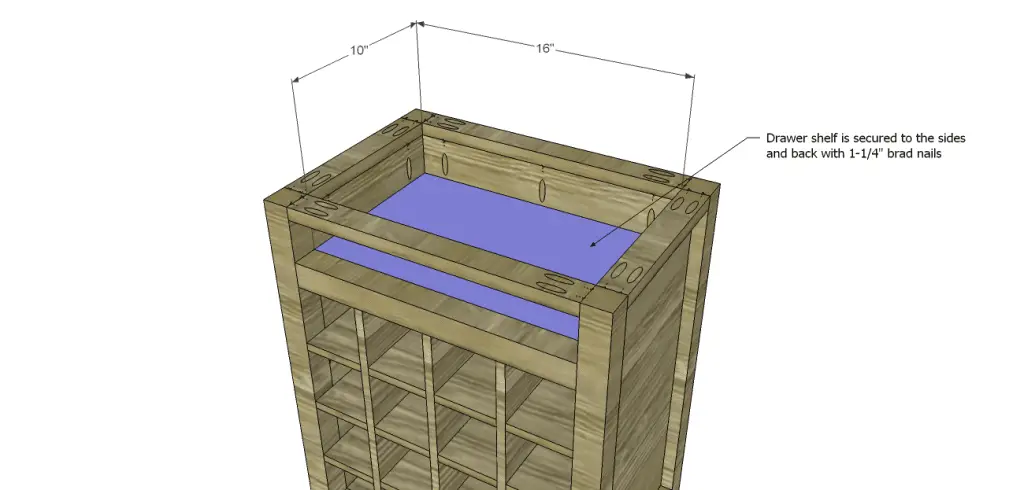
Step Seven
Cut the piece for the drawer shelf. Secure to the cabinet using 1-1/4″ brad nails through the sides and back into the ends of the shelf. Place a few brad nails through the shelf into the top of the pieces for the cubby.
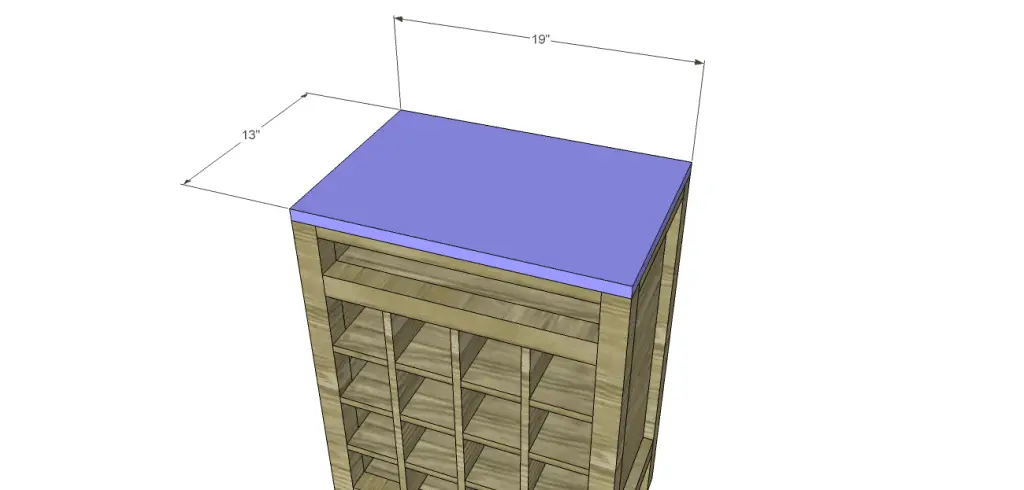
Step Eight
Cut the piece for the top. Secure in place using glue and 1-1/4″ brad nails through the legs and all of the upper 1×2 pieces.
Step Nine
Cut the pieces for the drawer box. Drill pocket holes in all four edges of the bottom as well as each end of the sides. Assemble the drawer box as shown using glue and 1-1/4” pocket hole screws.
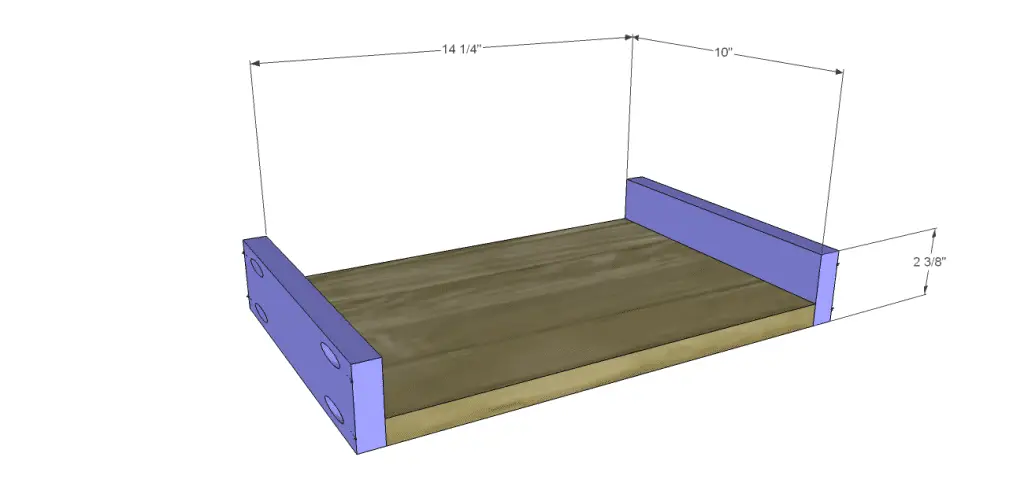
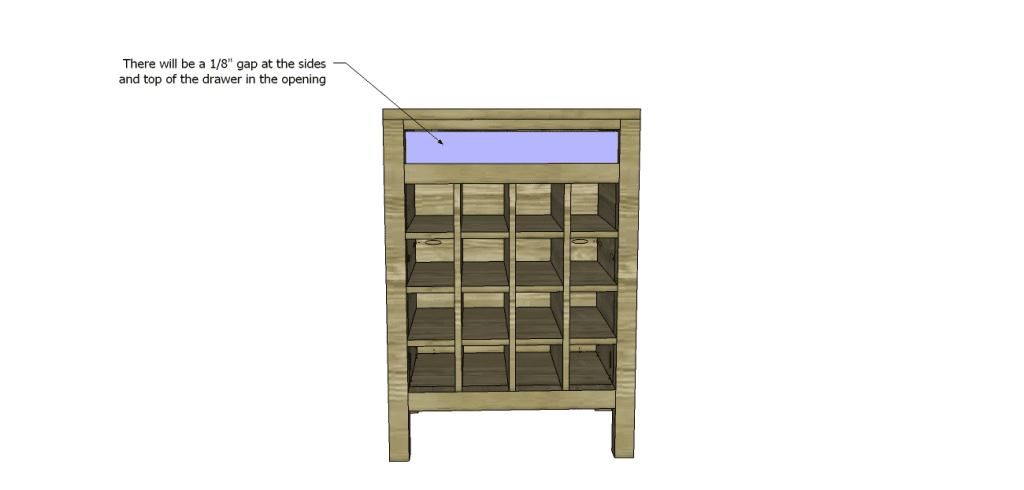
Finish as desired, then apply a coat of paste wax on the bottom of the drawer to help it slide smoothly.
The finished piece can also be used in a craft room to store yarn, fabric, or vinyl, as well as in a kiddo’s room as a nightstand or to store small toys or shoes! The possibilities for storage are endless with the Rustic Wine Cabinet plans! Let me know if there are any questions – contact me at cher {at} designsbystudioc {dot} com!
Originally posted 2014-03-28 08:00:21.