
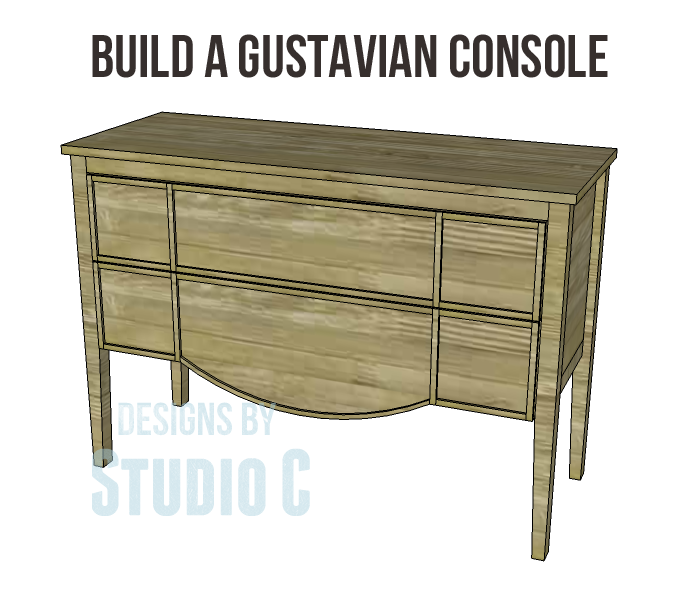
Build a Gustavian Console
Craft Your Own Gustavian Console: A Stylish Addition to Your Home
I absolutely adore this console! The curved lower drawer front is such a cool and unique detail. Plus, the drawers are super spacious, offering plenty of storage. If you’re looking to add some serious style to any room, you can’t go wrong with these fantastic furniture plans to build your very own Gustavian Console!
Materials:
- 1-1/4″ pocket hole screws
- 2″ pocket hole screws
- 1/2″ brad nails
- 1-1/4″ brad nails
- Two sets of 12″ drawer slides (<– affiliate link!)
- Six drawer pulls
- Edge banding, optional
- Wood glue
- Sandpaper (100, 150, 220 grits)
- Finishing supplies (primer & paint, or stain, sealer)
Lumber:
- 2 – 2×2 at 8′
- 1 – 1×2 at 6′
- 1 – 1×2 at 8′
- 1 – 1×6 at 4′
- 2 – 1×6 at 8′
- One quarter sheet of 1/4″ plywood
- One quarter sheet of 1/2″ plywood
- One half sheet of 3/4″ plywood
- 7 – 1/4″ x 1/2″ x 3′ – “craft boards” (found with the boards in most home improvement stores)
- 1 – 1/4″ x 4″ x 3′ – “craft board”
Cut List:
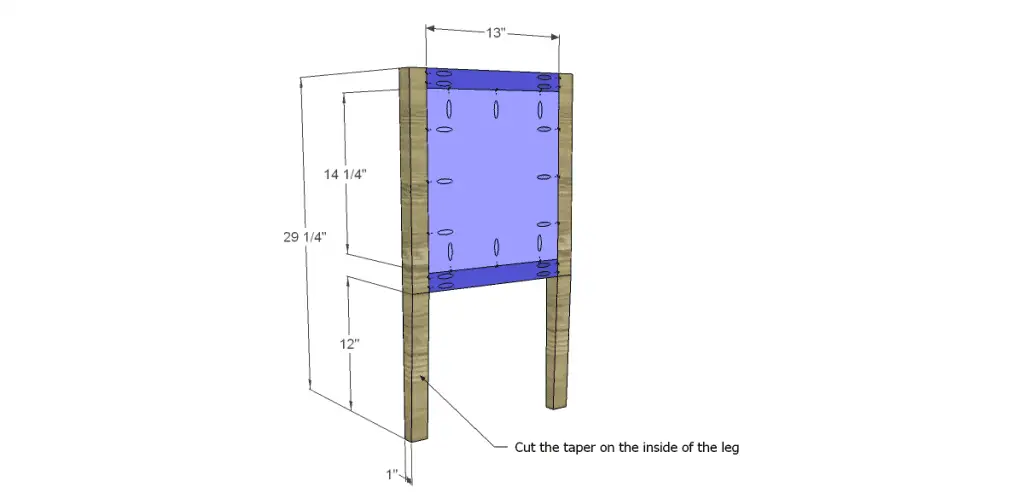
- 4 – 2×2 at 29-1/4″ – Legs
- 4 – 2×2 at 13″ – Side Frames
- 2 – 3/4″ plywood at 13″ x 14-1/4″ – Side Panels
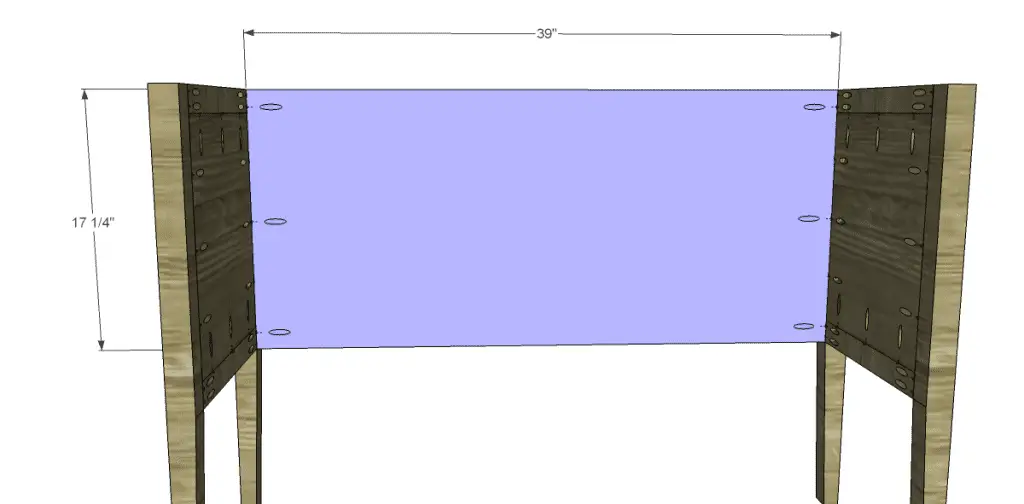
- 1 – 3/4″ plywood at 17-1/4″ x 39″ – Back
- 3 – 1×2 at 39″ – Front Stretchers
- 1 – 1×2 at 12-1/4″ – Lower Support
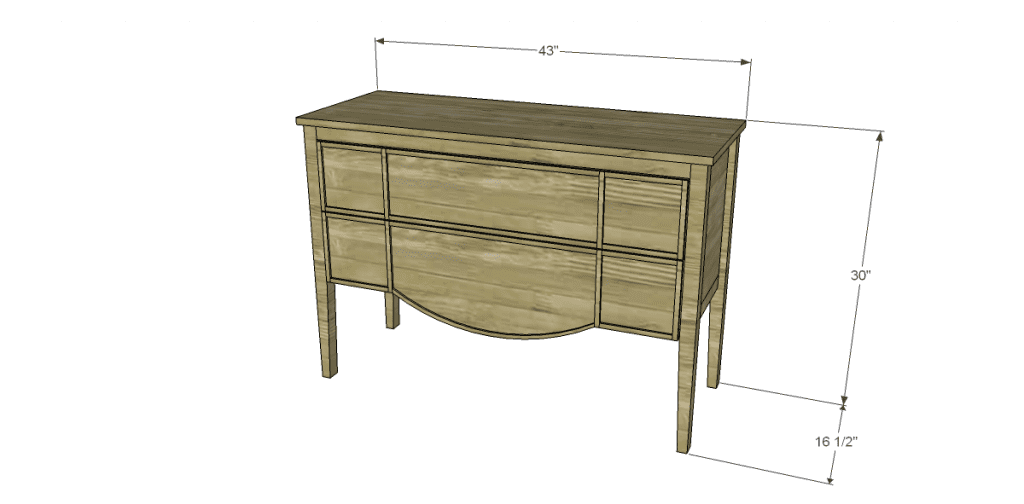
- 1 – 3/4″ plywood at 16-1/2″ x 43″ – Top
- 4 – 1×6 at 10-1/2″ – Drawer Box Sides
- 4 – 1×6 at 38″ – Drawer Box Front & Back
- 2 – 1/4″ plywood at 12″ x 38″ – Drawer Bottoms
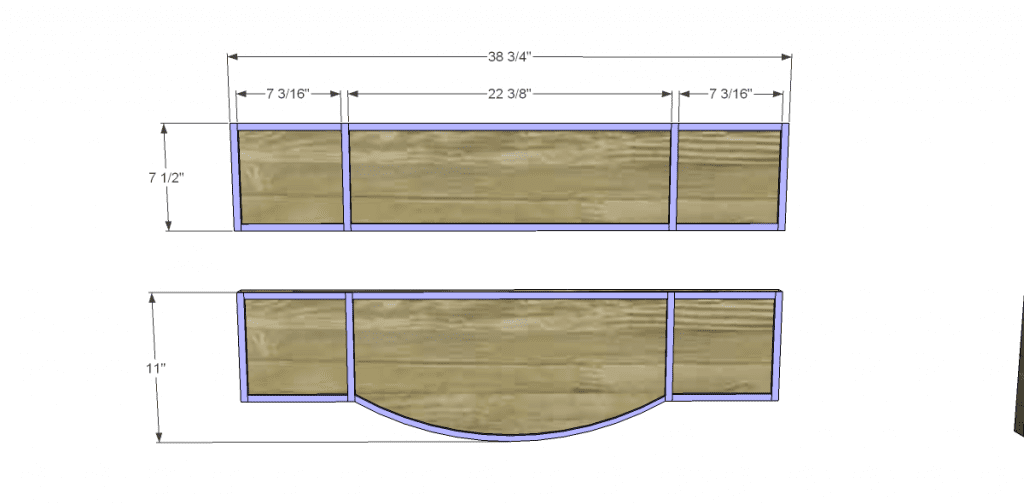
- 1 – 1/2″ plywood at 7-1/2″ x 38-3/4″ – Upper Drawer Front
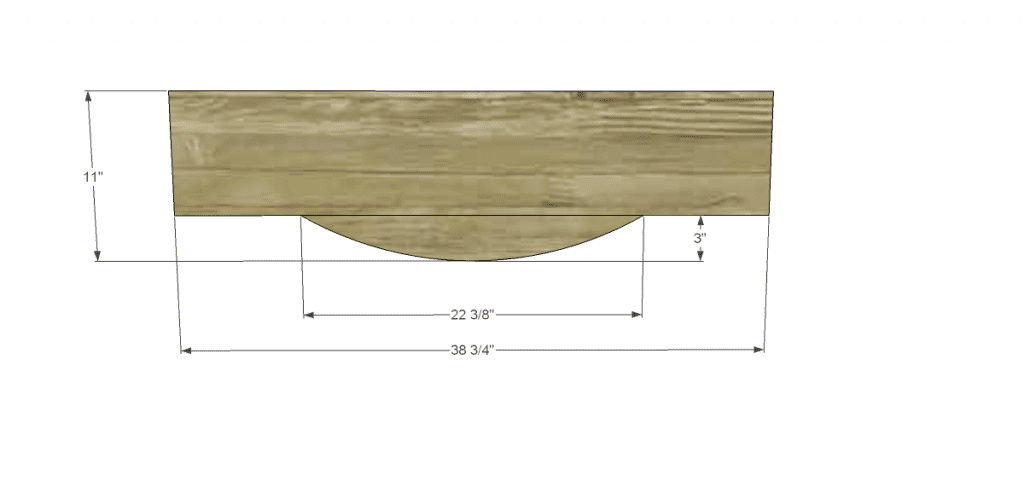
- 1 – 1/2″ plywood at 11″ x 38-3/4″ – Lower Drawer Front
- 8 – 1/4″ trim at 1/2″ x 7-1/2″ – Drawer Fronts
- 8 – 1/4″ trim at 1/2″ x 7-3/16″ – Drawer Fronts
- 3 – 1/4″ trim at 1/2″ x 22-3/8″ – Drawer Fronts
- 1 – 1/4″ trim at 1/2″ x the curve in the bottom of the lower drawer
Notes:
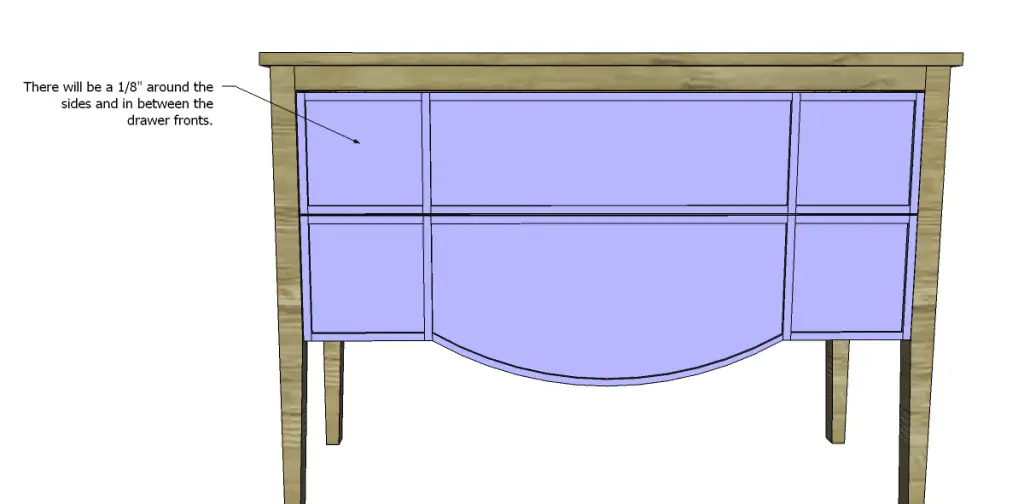
Edge banding will be applied to the exposed edges of the plywood prior to assembly.
Step One
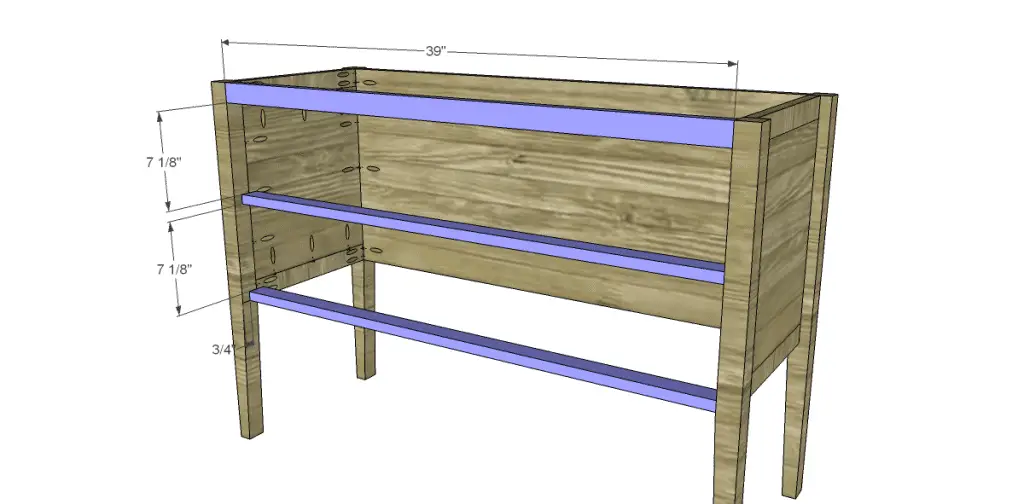
Cut the pieces for the legs, side frames, and side panels. Cut the tapers in the legs using a tapering jig on a table saw or by using a jigsaw. Drill pocket holes in each end of the frame pieces, as well as all four edges of the panels. Attach the frame pieces to the panels using glue and 1-1/4″ pocket screws. The back side of the panels should be flush with the back side of the frame pieces.
Attach the side panel assembly to the legs using glue and pocket hole screws. Use 2″ screws through the frame pieces into the legs, and 1-1/4″ screws through the panels into the legs.
Step Two
Cut the piece for the back. Drill pocket holes in each of the shorter edges. Attach to the legs using glue and 1-1/4″ pocket hole screws. The back side of the panel should be flush with the back side of the legs.
Step Three
Cut the pieces for the stretchers. Drill pocket holes in each end. The top stretcher will be placed vertically with the face flush with the face of the legs. The other two stretchers will be placed horizontally and placed 3/4″ back from the front of the legs.
Step Four
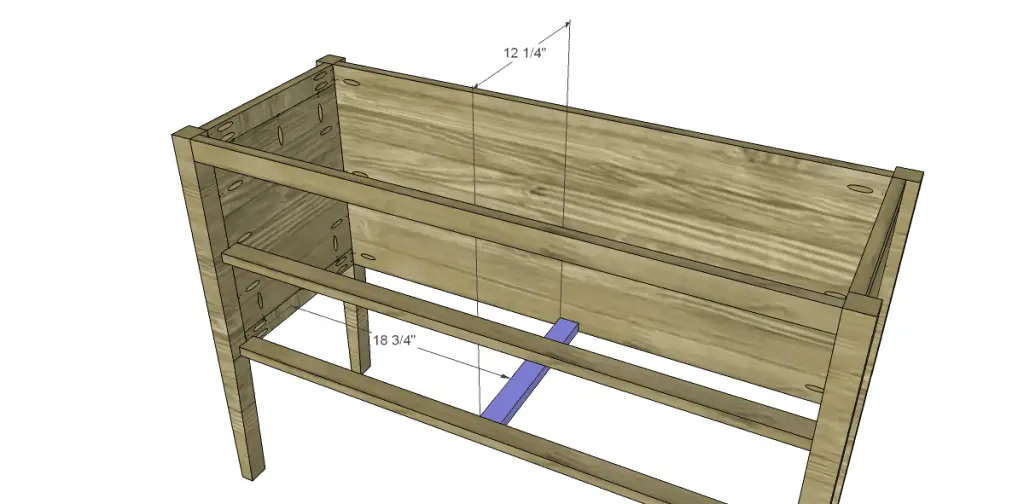
Cut the piece for the lower support. Drill pocket holes in each end. The top of the support should be flush with the top of the lowest stretcher.
Step Five
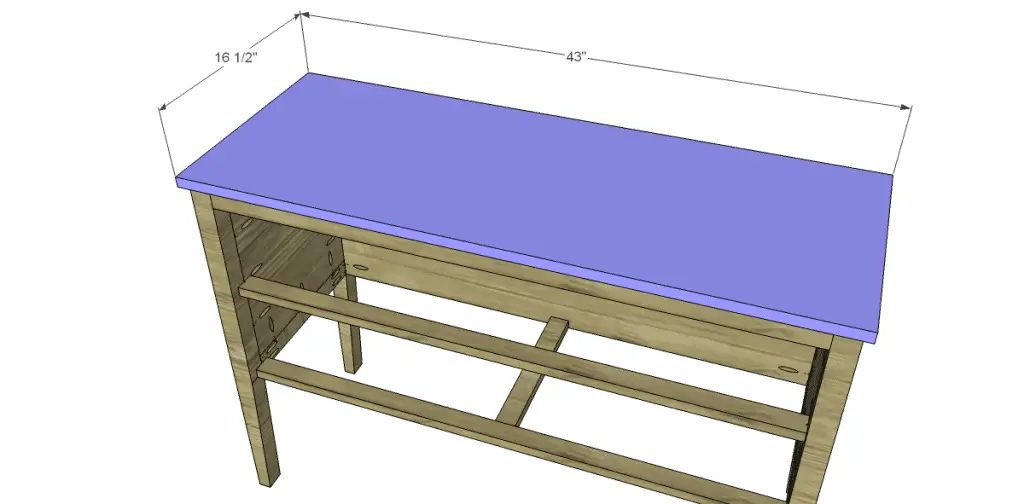
Cut the piece for the top. The front and sides will overlap by 1/2″. Attach to the cabinet using glue and 1-1/4″ brad nails through the top into the sides, back, legs, and stretchers.
Step Six
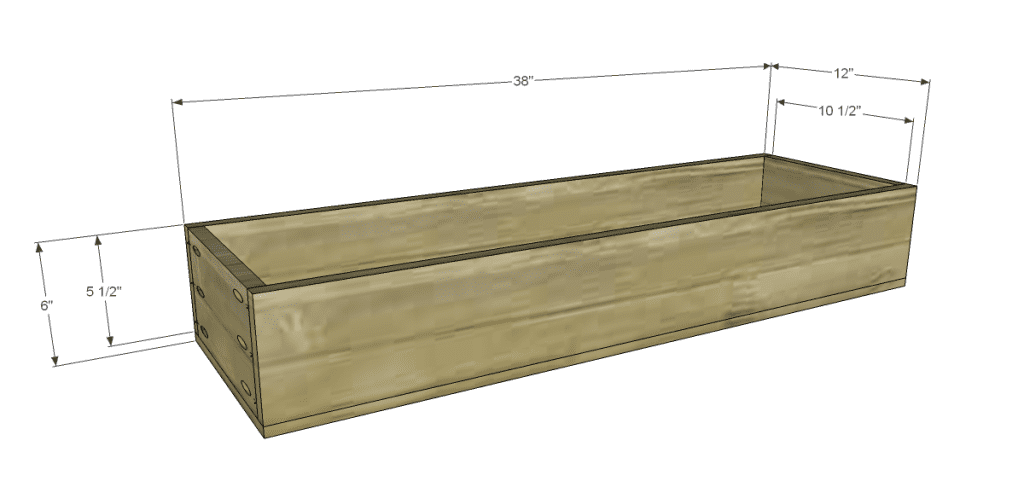
Cut the pieces for the drawer boxes. Drill pocket holes in each end of the sides. Attach to the fronts and backs using glue and 1-1/4″ pocket hole screws.
Cut the pieces for the drawer bottoms. Attach using glue and 1-1/4″ brad nails through the bottom into the drawer box.
Attach the drawer slides according to the manufacturer’s instructions. This easy tutorial on installing drawer slides will be helpful! Make any necessary adjustments.
Step Seven
Cut the pieces for the drawer fronts. Cut the pieces for the trim as shown. Attach to the drawer fronts using glue and 1/2″ brad nails.
The trim for the curved drawer can be made by cutting the drawer front first, then tracing the curve onto the 1/4″ piece of lumber. Offset the curve by 1/2″, then cut out the trim piece. Drill holes for the drawer hardware. Take a look at this tutorial on installing the drawer fronts.
Finish as desired.
I hope the free furniture plans to build a Gustavian Console help you build a fabulous piece of furniture! Remember – you can always share pictures of your hard work with me at designsbystudioc {at} gmail {dot} com!
Thank you so much! I really is an easy build and I really like the look of this piece myself! Thank you for stopping by!
[…] console table is extra special with the curve front on the lower drawer. Build it with these free step-by-step […]