
Build a Wall Craft Organizer
An Easy to Build Wall Mounted Craft Organizer
With all of the projects we do, we can all certainly use a place to organize the pretty paper, bows, and ribbons (among other “items”) that we are going to use! The free plans to build a Pottery Barn inspired Wall Craft Organizer is constructed out of 1/2″ plywood with routed channels for the dowels to store the rolls of paper. If you are not comfortable with the router, another option for cutting the grooves for the dowels would be to use a jigsaw and cut all the way through the board. Use a longer dowel that will extend at least an inch outside of the organizer sides.

Materials:
- 1-1/4″ brad nails
- 4 – 5/8″ dowel rods at 3′
- Finishing Supplies
Lumber:
- Half sheet of 1/2″ plywood
Cut List:
- 2 – 7-1/2″ x 34″ – Sides
- 1 – 31-1/2″ x 34″ – Back
- 2 – 7″ x 31-1/2″ – Shelves
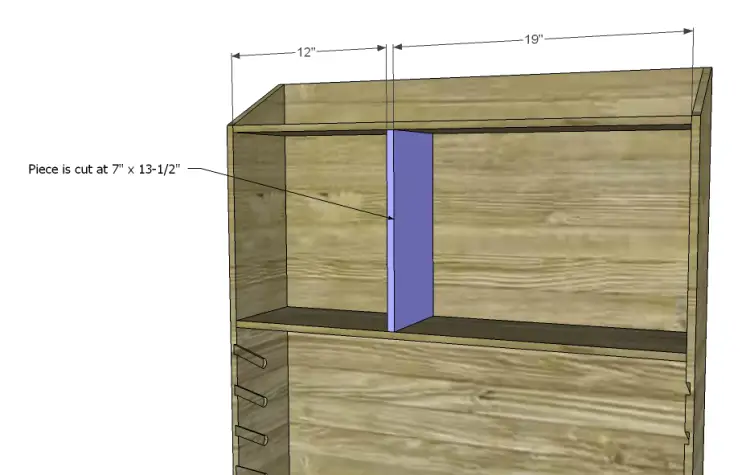
- 1 – 7″ x 13-1/2″ – Divider
- 1 – 7″ x 19″ – Small Shelf
- 1 – 1″ x 12″ – Book Holder
- 4 – 6″ x 6-3/8″ – Small & Large Box Sides
- 2 – 6-3/8″ x 6-3/8″ – Small Box Front & Back
- 1 – 5-3/8″ x 6″ – Small Box Bottom
- 2 – 6-3/8″ x 11-7/8″ – Large Box Front & Back
- 1 – 6″ x 10-7/8″ – Large Box Bottom
- Cut dowel rods to fit
Click on the drawings to enlarge them!
Step One
Cut the sides to length. Cut the angle as shown using the saw of your choice. Cut the notches using a router and a 3/4″ wide straight bit at 1/4″ deep or cut the notches all the way through the boards using a jigsaw.

Step Two
Cut the piece for the back. Fasten the sides to the back using glue and 1-1/4″ brad nails.

Step Three
Cut the pieces for the large shelves. Attach to the sides and back as shown using glue and 1-1/4″ brad nails.

Step Four
Cut the piece for the divider. Attach to the shelves as shown using glue and 1-1/4″ brad nails.
Step Five
Cut the piece for the small shelf. Attach as shown using glue and 1-1/4″ brad nails.

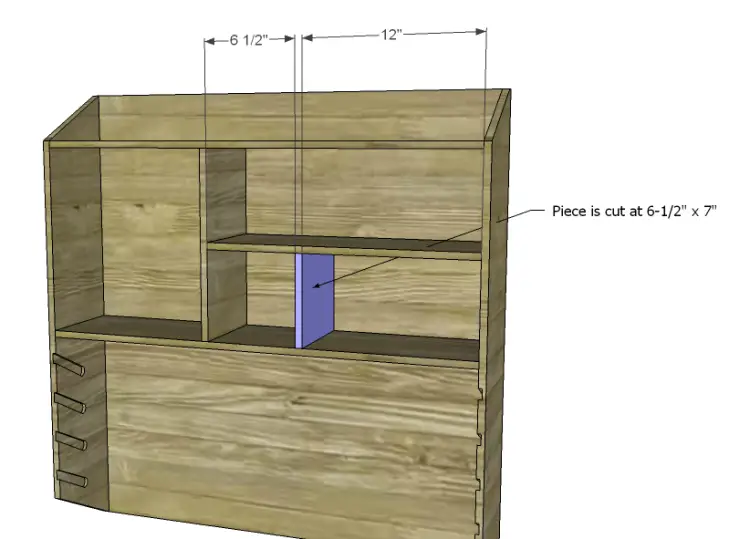
Step Six
Cut the piece for the small divider. Insert as shown and secure using glue with 1-1/4″ brad nails.
Step Seven
Cut the piece for the book holder and attach as shown using glue and 1-1/4″ brad nails.

Step Eight
Cut the pieces for the small drawer box. Cut the notch in the front piece as shown. Attach the sides to the bottom using glue and 1-1/4″ brad nails, then attach the front and back in the same manner.


Step Nine
Cut the pieces for the large drawer box. Cut the notch and assemble the box in the same manner as the small drawer box.


Finish as desired!
Have any questions about the free plans to build a Pottery Barn inspired Wall Craft Organizer? Leave a comment below!
Originally posted 2012-10-13 08:00:54.