
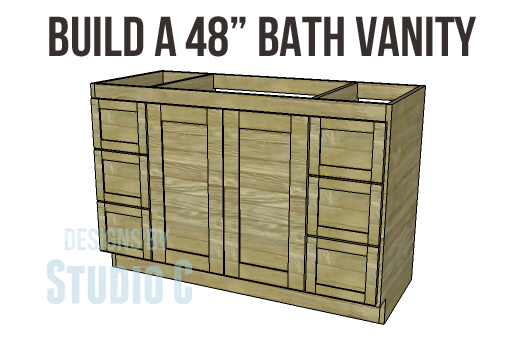
DIY Woodworking Plans to Build a 48 Inch Bath Vanity
A Custom Vanity with Lots of Storage!
I was contacted by a reader who really liked the custom vanity designed for a home remodel but the reader asked that the vanity be longer, with more drawers. These plans to build a 48 inch bath vanity were based on the custom vanity I built but feature six drawers instead of three, and two doors. This vanity is also designed to be on the tall side.
Note: Before constructing this vanity, make sure it will fit around the plumbing lines and pipe without interference! We had to cut a notch in the divider to allow for the cold water line which therefore shortened the upper drawer. It wasn’t that big of a deal to make such alterations but had I paid attention to the location of the plumbing beforehand, this could have been avoided! The same will apply to the adjustable shelf!
Also, to maintain the consistency of the wood species, we cut all of the pieces out of plywood and used edge banding on the exposed edges. The drawers can be cut out of cabinet grade plywood, which is a little cheaper than oak or birch. This makes the project very economical and reduces the amount of waste.
Materials:
- 1″ pocket hole screws
- 1-1/4″ pocket hole screws
- 6 sets of 18″ drawer slides (<– affiliate link!)
- Edge banding, if desired (<– affiliate link!)
- 8 cabinet pulls
- 2 sets of hinges
- Finishing supplies
Lumber:
- Half sheet of 1/2″ plywood
- 1 sheet of 3/4″ cabinet grade plywood
- 2 sheets of 3/4″ plywood
Cut List:
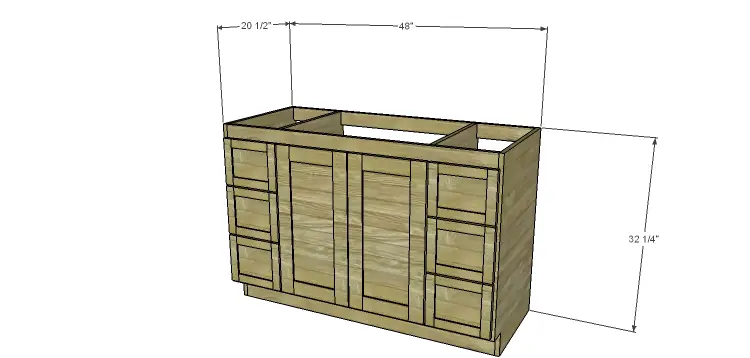
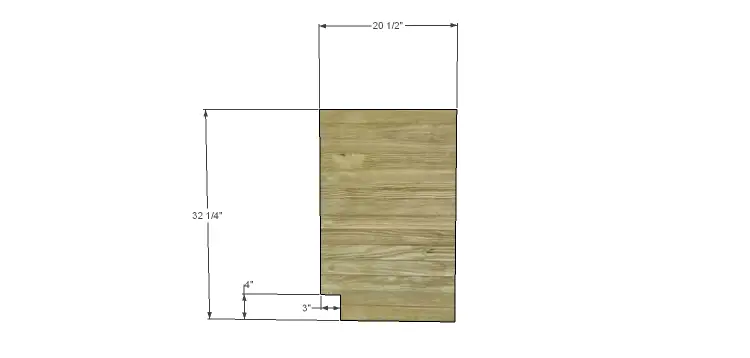
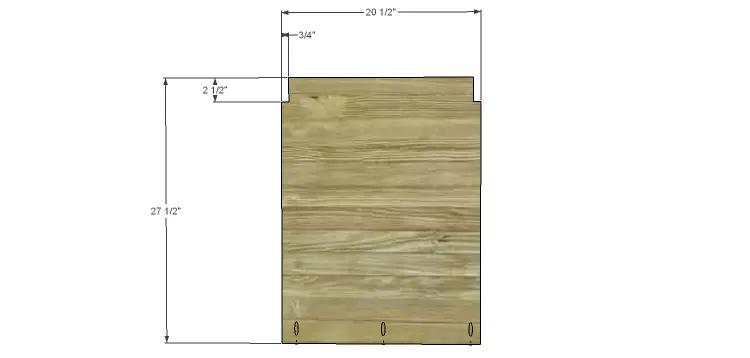
- 2 – 3/4″ plywood at 20-1/2″ x 32-1/4″ – Sides
- 1 – 3/4″ plywood at 20-1/2″ x 46-1/2″ – Bottom
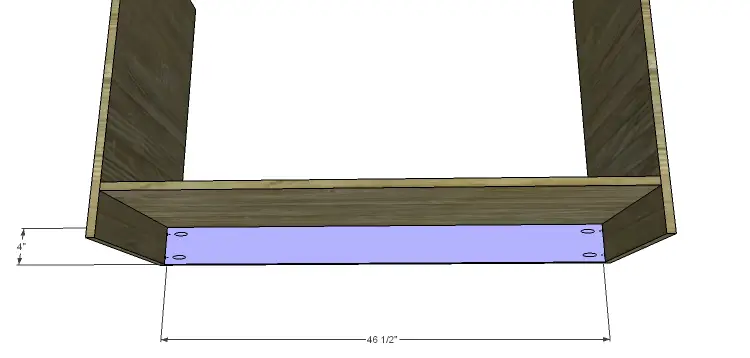
- 1 – 3/4″ plywood at 4″ x 46-1/2″ – Kickplate
- 2 – 3/4″ plywood at 20-1/2″ x 27-1/2″ – Dividers
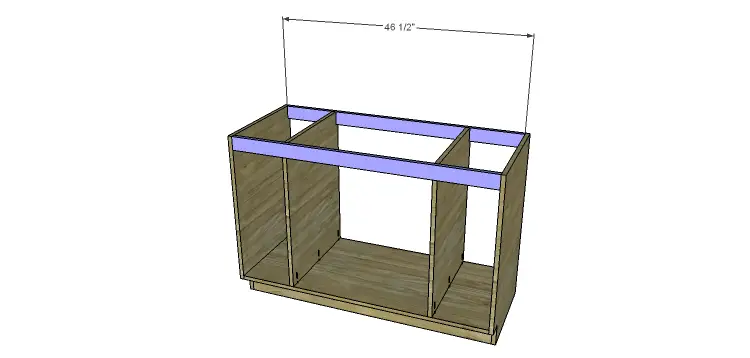
- 2 – 3/4″ plywood at 2-1/2″ x 46-1/2″ – Upper Stretchers
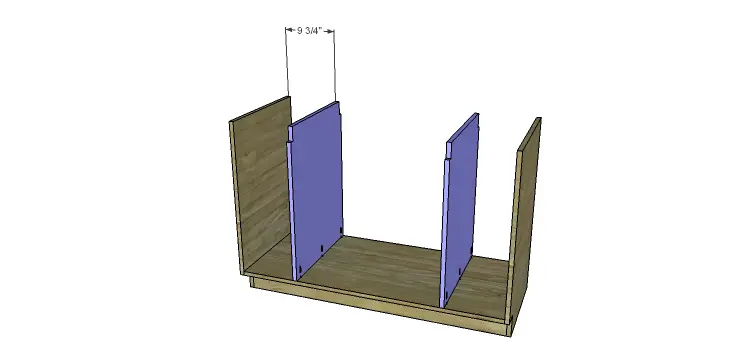
- 6 – 3/4″ plywood at 1-1/2″ x 9-3/4″ – Drawer Stretchers
- 1 – 3/4″ plywood at 20-1/2″ x 25-3/8″ – Shelf
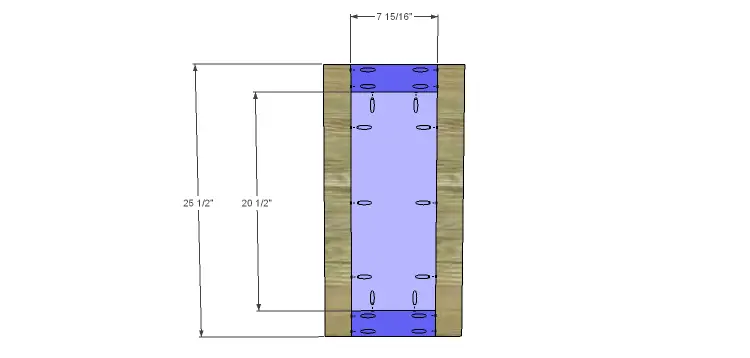
- 4 – 3/4″ plywood at 2-1/2″ x 7-15/16″ – Door Rails
- 4 – 3/4″ plywood at 2-1/2″ x 25-1/2″ – Door Stiles
- 2 – 1/2″ plywood at 7-15/16″ x 20-1/2″ – Door Panels
- 6 – 3/4″ plywood at 7-1/4″ x 16-1/2″ – Drawer Bottoms
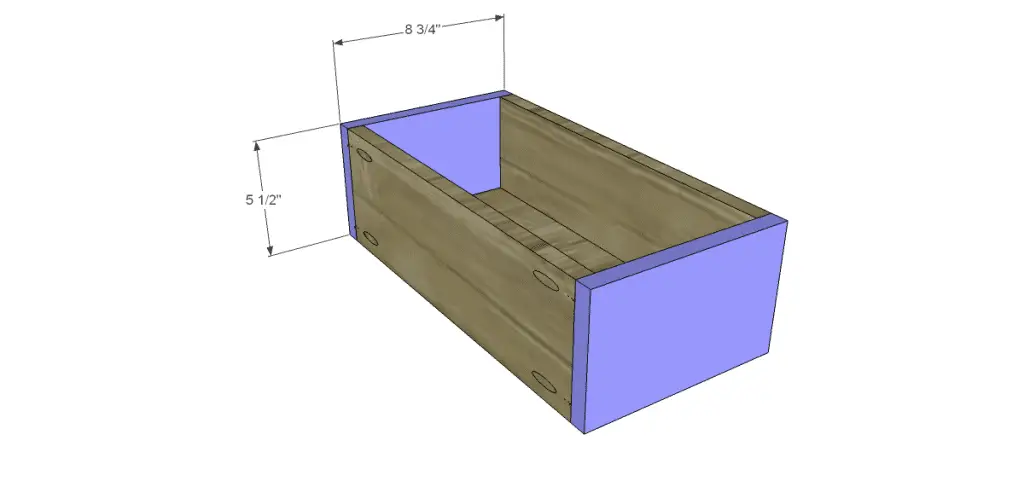
- 12 – 3/4″ plywood at 5-1/2″ x 16-1/2″ – Drawer Sides
- 12 – 3/4″ plywood at 5-1/2″ x 8-3/4″ – Drawer Front & Back
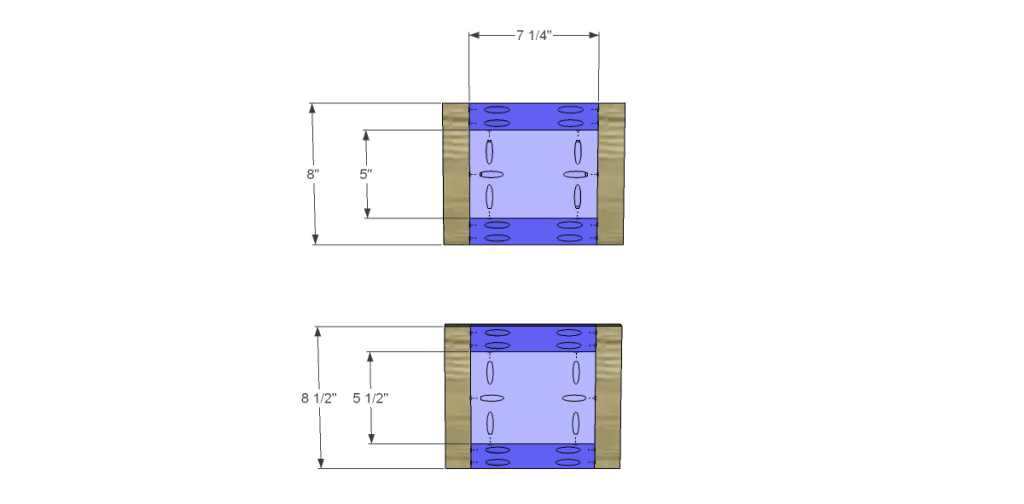
- 12 – 3/4″ plywood at 1-1/2″ x 7-1/4″ – Drawer Front Rails
- 4 – 3/4″ plywood at 1-1/2″ x 8″ – Upper Drawer Front Stiles
- 8 – 3/4″ plywood at 1-1/2″ x 8-1/2″ – Drawer Front Stiles
- 2 – 1/2″ plywood at 5″ x 7-1/4″ – Upper Drawer Front Panel
- 4 – 1/2″ plywood at 5-1/2″ x 7-1/4″ – Drawer Front Panels
Step One
Edge banding will be applied to the exposed edges of the plywood prior to assembly!
Cut the pieces for the sides. Cut the notch for the kickplate using a jigsaw.
Step Two
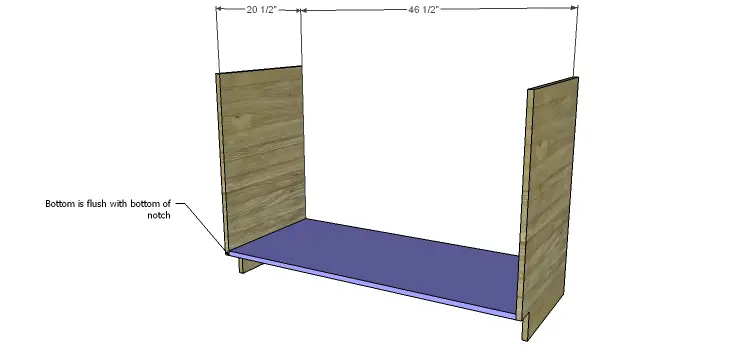
Cut the piece for the bottom and drill pocket holes at each end. Attach to the sides just above the horizontal line for the kickplate using glue and 1-1/4″ pocket hole screws.
Step Three
Cut the piece for the kickplate and drill pocket holes at each end. Secure as shown using glue and 1-1/4″ pocket hole screws.
Step Four
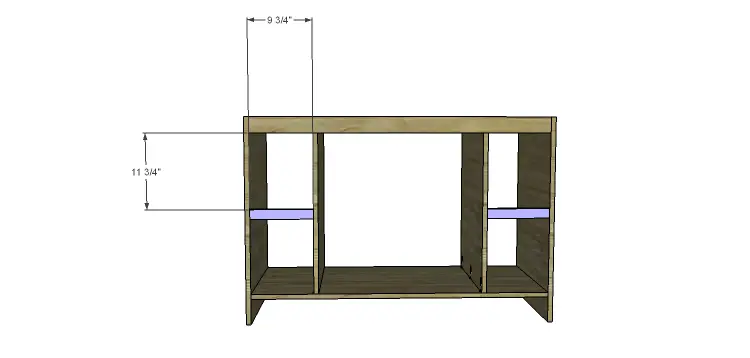
Cut the piece for the divider. Cut the notches as shown using a jigsaw. Drill pocket holes in the lower edge. Secure the divider to the bottom as shown using glue and 1-1/4″ pocket hole screws.
Step Five
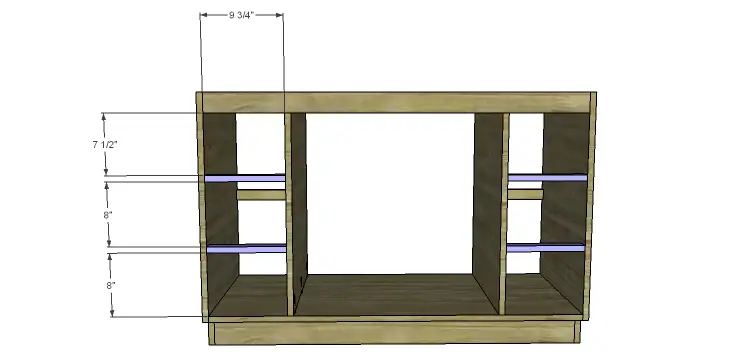
Cut the pieces for the upper stretchers. Drill pocket holes in each end as well as one pocket hole as shown to secure the divider. Position as shown, then secure to the sides and the divider using glue and 1-1/4″ pocket hole screws.
Step Six
Cut the pieces for the stretchers and drill pocket holes in each end. Position at the center of the dividers and attach using glue and 1-1/4″ pocket hole screws.
Step Seven
Position the front stretchers as shown then secure using glue and 1-1/4″ pocket hole screws.
Step Eight
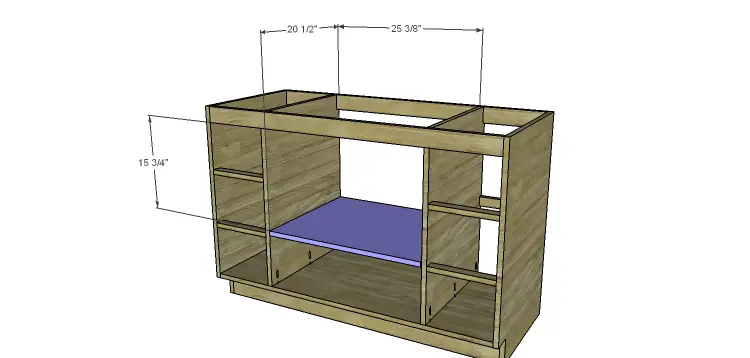
Cut the piece for the shelf and drill pocket holes in each side edge. Attach to the dividers using glue and 1-1/4″ pocket hole screws.
Step Nine
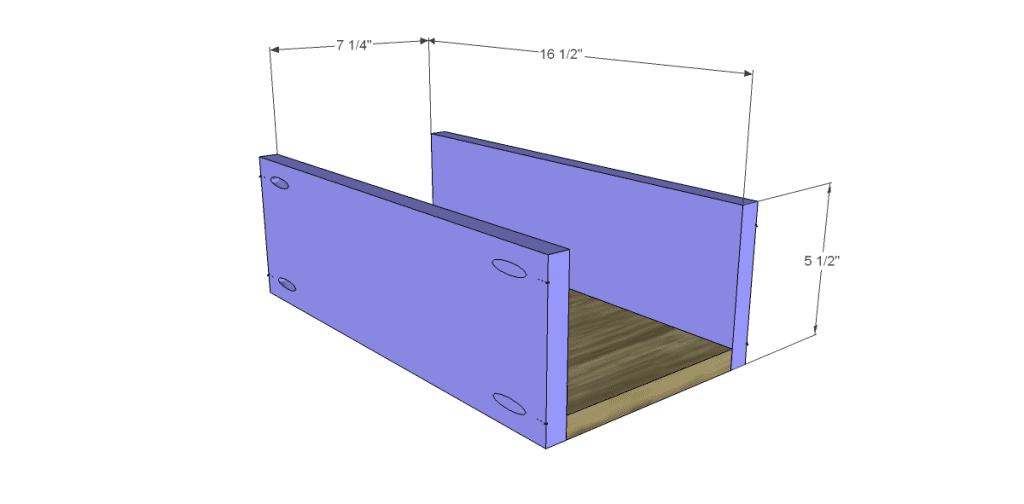
Cut the pieces for the drawers. Drill pocket holes in each end of the side pieces as well as all four edges of the bottom. Assemble as shown using glue and 1-1/4″ pocket hole screws.
Install the drawer slides according to the manufacturer’s instructions. Follow this easy tutorial on installing drawer slides. Make any necessary adjustments, then install the drawer boxes.
Step Ten
Cut the pieces for the drawer fronts. Drill pocket holes as shown. Attach the rails to the center panels using glue and 1″ pocket hole screws. The back face of the panel will be flush with the back face of the rails. Attach the stiles to the assembly using glue and 1-1/4″ pocket hole screws through the rails and 1″ pocket hole screws through the panel. Locate and drill holes for the cabinet pull. The drawer fronts will overlap the opening by 1/4″ on all sides. Drive screws through the holes drilled for the cabinet pull into the drawer box. Open the drawer, then secure the front from the inside of the box. This tutorial on installing drawer fronts will be quite helpful!

Step Eleven
Cut the pieces for the door and assemble in the same manner as the drawer fronts. Attach the hinges according to the manufacturer’s instructions.

Finish as desired!
The DIY plans to build a 48 inch bath vanity are easily customizable to fit your needs and can be constructed from any species of lumber. The plans are also suitable to use as a cabinet or media stand – just add a top and a back! Contact me at cher {at} designsbystudioc {dot} com if you have any questions!
Originally posted 2014-06-30 08:00:10.
[…] vanities can be found here, here, and […]
[…] Build this bathroom vanity which measures 48 inches wide when complete. Here are the free woodworking step-by-step instructions. […]
[…] 48″ Bath Vanity […]