
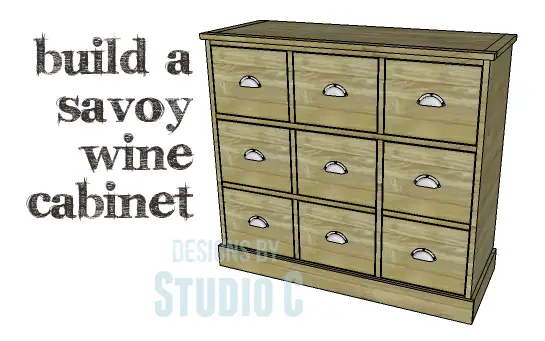
DIY Plans to Build a Savoy Wine Cabinet
An Easily Customizable Wine and Liquor Cabinet
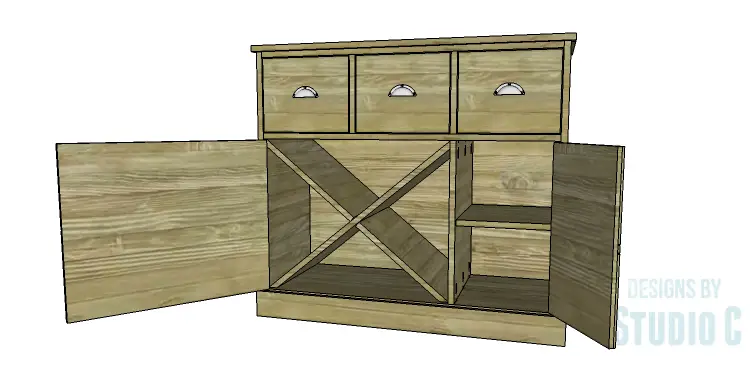
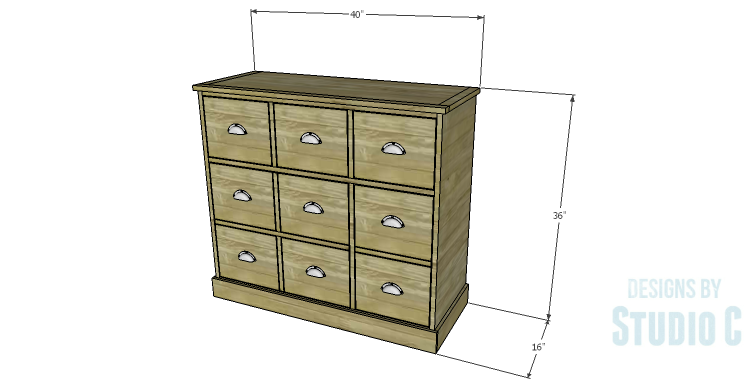
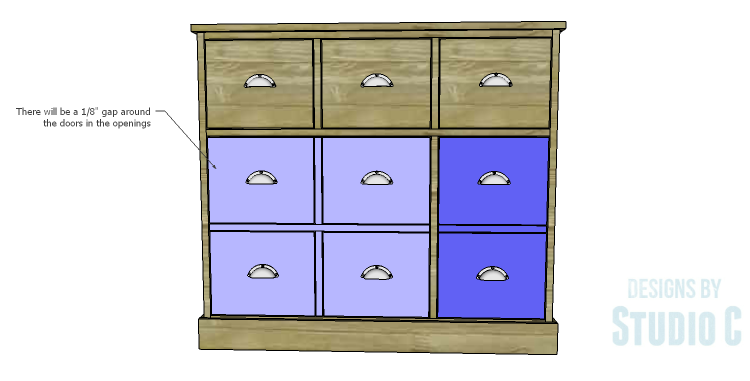
Hey there! You won’t believe how amazing this plain wine cabinet is once you see it in action! The DIY plans for the Savoy Wine Cabinet are absolutely fantastic. It comes with three handy drawers and two cabinets that have panels on the doors, giving them the appearance of drawers too. One of the cabinets even has an X frame designed specifically for holding your precious wine bottles, while the other cabinet has a convenient shelf for storing other accessories. Trust me, this cabinet is a breeze to build and can be finished in just one weekend!
Materials:
- 1-1/4″ pocket hole screws (<– affiliate link!)
- 1-1/4″ brad nails
- Edge banding, optional
- 3 sets of 14″ drawer slides
- 2 sets of hinges
- Cabinet pulls
- Magnetic catches
- Wood glue
- Sandpaper (100, 150, 220 grits)
- Finishing supplies (primer & paint, or stain, sealer)
Lumber:
- 1 – 1×2 at 8′
- 1 – 1×4 at 6′
- 1 – 1×4 at 8′
- 1 – 4′ x 8′ sheet of 1/4″ plywood
- 1 – 2′ x 4′ sheet of 1/2″ plywood
- 2 – 4′ x 8′ sheets of 3/4″ plywood
Cut List:
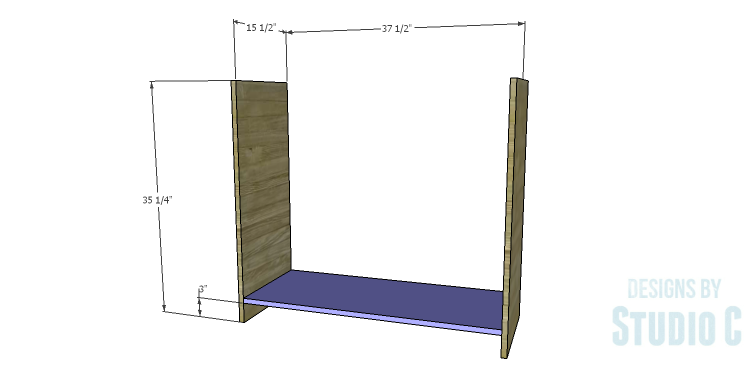
- 2 – 3/4″ plywood at 15-1/2″ x 35-1/4″ – Sides
- 2 – 3/4″ plywood at 15-1/2″ x 37-1/2″ – Bottom & Upper Shelf
- 2 – 1×4 (ripped to 3″ wide) at 37-1/2″ – Bottom Supports
- 2 – 1×2 at 37-1/2″ – Upper Stretchers
- 1 – 3/4″ plywood at 15-1/2″ x 20-1/4″ – Cabinet Divider
- 2 – 3/4″ plywood at 10-1/2″ x 15-1/2″ – Upper Dividers
- 1 – 3/4″ plywood at 12″ x 14-3/4″ – Lower Shelf
- 1 – 3/4″ plywood at 14-1/2″ x 37″ – Top Panel
- 2 – 1×2 at 14-1/2″ – Top Side Trim
- 1 – 1×2 at 40″ – Top Front Trim
- 1 – 1/4″ plywood at 35-1/2″ x 38-1/2″ – Back
- 2 – 3/4″ plywood at 14-3/4″ x 32″ – Bottle Holder
- 2 – 1×4 at 15-1/2″ – Lower Trim
- 1 – 1×4 at 40″ – Lower Trim
- 3 – 3/4″ plywood at 9-1/2″ x 12-1/2″ – Drawer Bottoms
- 6 – 3/4″ plywood at 8-1/2″ x 12-1/2″ – Drawer Box Sides
- 6 – 3/4″ plywood at 8-1/2″ x 11″ – Drawer Box Front & Back
- 3 – 3/4″ plywood at 9-1/2″ x 11-3/4″ – Drawer Fronts
- 1 – 1/2″ plywood at 11-3/4″ x 20″ – Smaller Door Base
- 1 – 1/2″ plywood at 20″ x 24-1/2″ – Larger Door Base
- 6 – 1/4″ plywood at 9-1/2″ x 11-3/4″ – False Drawer Fronts
- 1 – 1/4″ plywood at 3/4″ x 11-3/4″ – Strips Between False Panels
- 2 – 1/4″ plywood at 3/4″ x 9-5/8″ – Strips Between False Panels
- 1 – 1/4″ plywood at 3/4″ x 24-1/2″ – Strips Between False Panels
Step One
Edge banding will be applied to the exposed edges of the plywood prior to assembly.
Cut the pieces for the sides and bottom. With the pocket hole jig set for 3/4″ material, drill pocket holes in each end of the bottom piece. Secure the bottom to the sides using glue and 1-1/4″ pocket hole screws.
Step Two
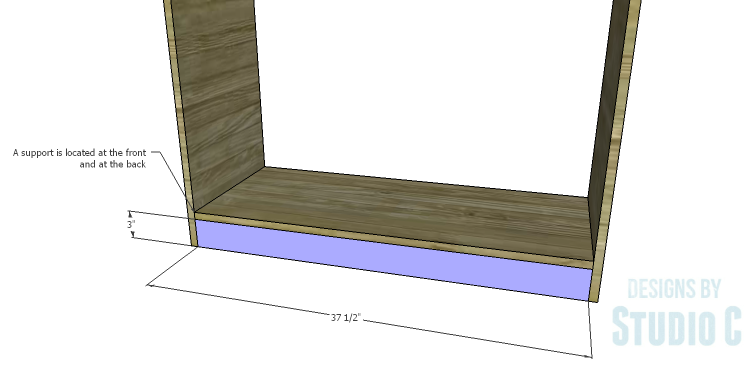
Cut the pieces for the bottom supports and drill pocket holes in each end. Secure the pieces to the sides under the bottom piece using glue and 1-1/4″ brad nails. Add a few brad nails through the bottom into the top of the supports.
Step Three
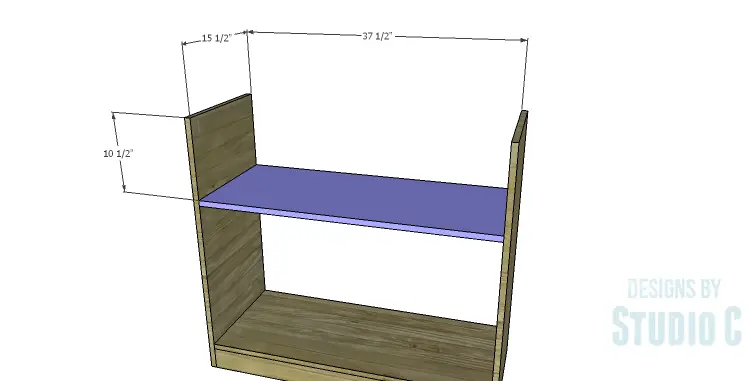
Cut the piece for the upper shelf and drill pocket holes in each end. Secure the shelf to the sides using glue and 1-1/4″ pocket hole screws.
Step Four
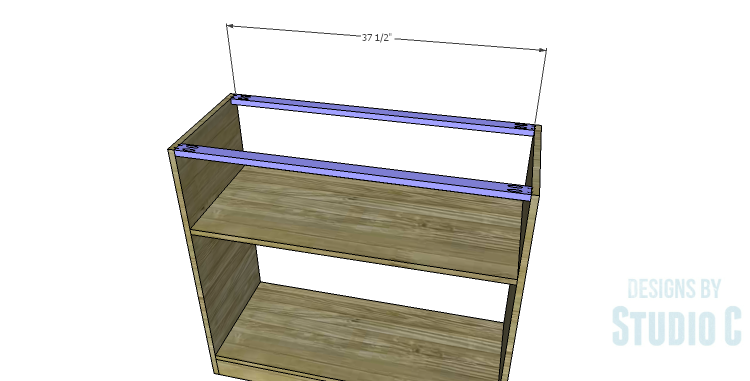
Cut the pieces for the upper stretchers and drill pocket holes in each end. Secure the stretchers to the sides using glue and 1-1/4″ pocket hole screws.
Step Five
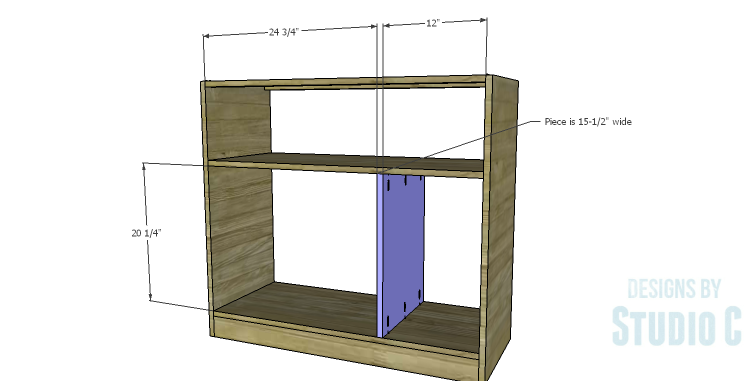
Cut the piece for the lower divider and drill pocket holes in each end. Secure the divider to the bottom and upper shelf using glue and 1-1/4″ pocket hole screws.
Step Six
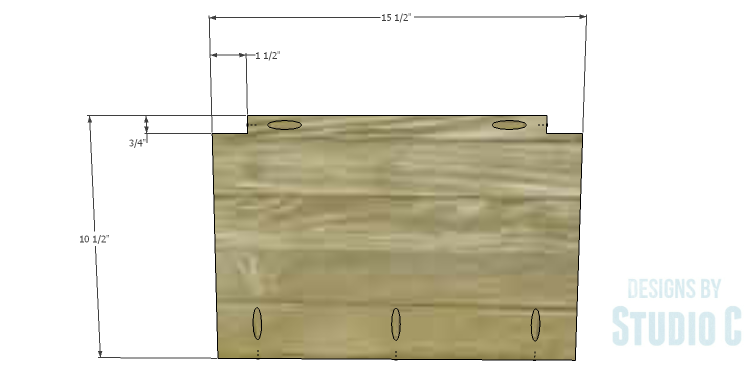
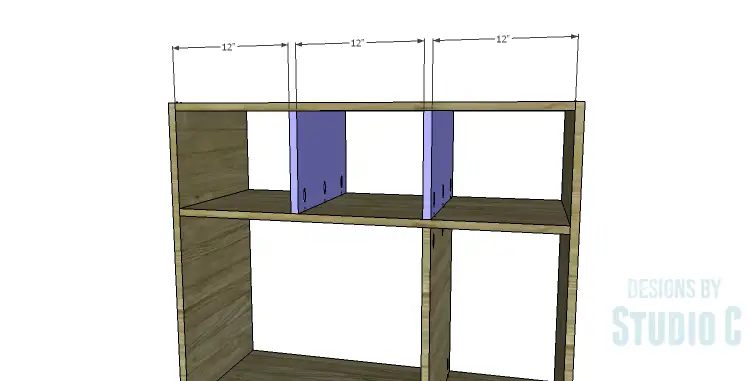
Cut the pieces for the upper dividers and cut the notches using a jigsaw. Drill pocket holes along the bottom edge as well as in the notches as shown. Secure the dividers to the upper shelf and stretchers using glue and 1-1/4″ pocket hole screws.
Step Seven
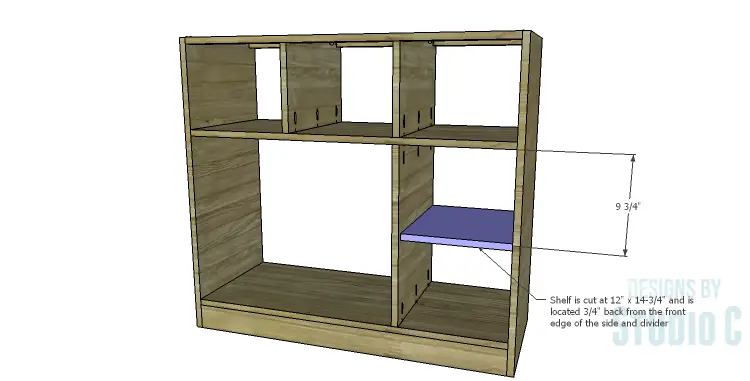
Cut the piece for the lower shelf. The shelf will sit flush with the back of the lower divider and the side, which will locate it 3/4″ back from the front edge of the lower divider and the side. Secure the shelf in place using glue and 1-1/4″ brad nails through the lower divider and side into the ends of the shelf.
Step Eight
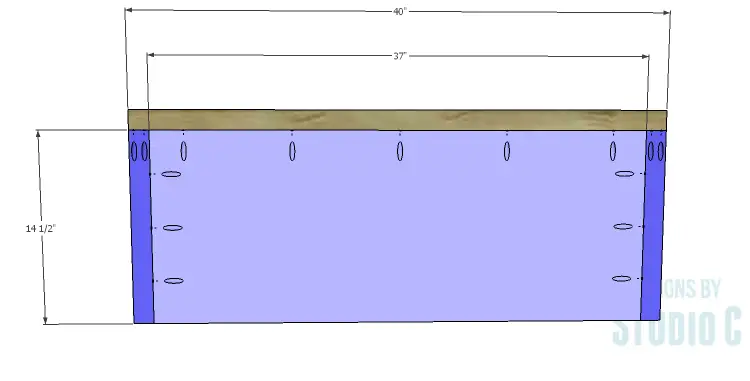
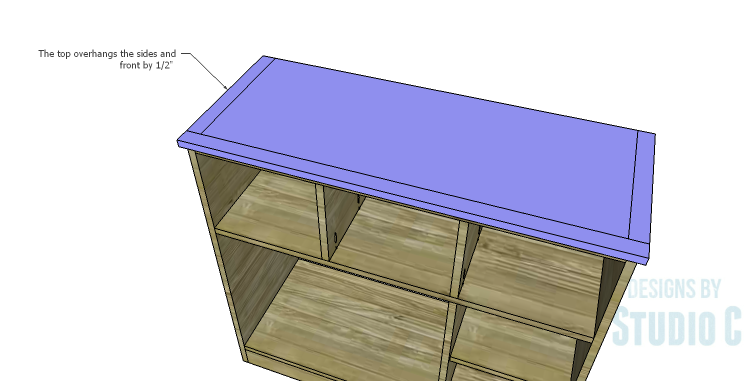
Cut the pieces for the top and the top trim. Drill pocket holes in the side and front edges of the top panel, as well as one end of the side trim pieces. Secure the sides to the panel using glue and 1-1/4″ pocket hole screws, then attach the front.
The top will overhang the sides and front of the cabinet by 1/2″. Secure the top in place using glue and 1-1/4″ brad nails.
Step Nine
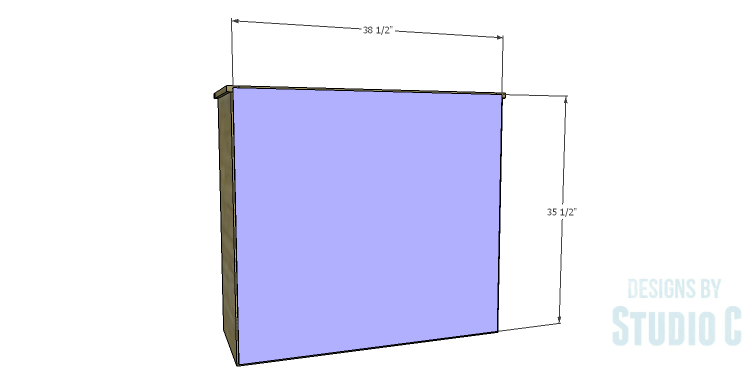
Cut the piece for the back. Center the piece on the back and secure in place using glue and 1-1/4″ brad nails.
Step Ten
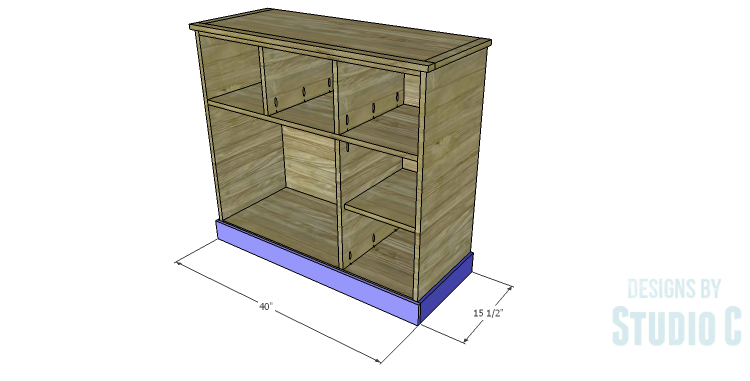
Cut the pieces for the lower trim. Secure the side pieces first, using glue and 1-1/4″ brad nails, then secure the front piece.
Step Eleven
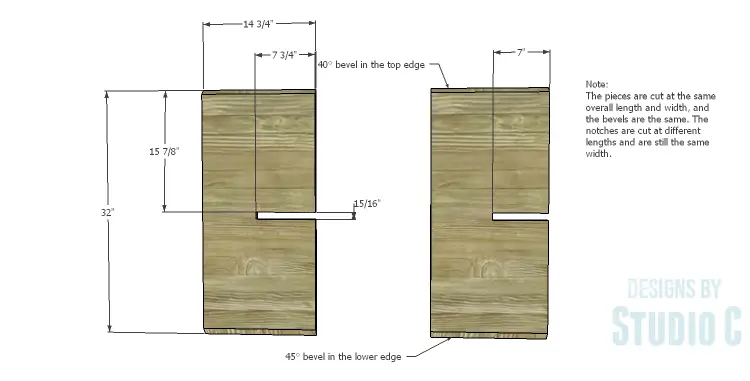
Cut the pieces for the bottle holder. Cut the notches using a jigsaw, noting that one notch on one piece is longer than the other, then cut the bevels in each end. (You may have to play with the angles a bit to get the piece to fit into the larger cabinet. In this case, “close enough” is OK!)
Insert the bottle holder into the opening. It will not be secured in place.

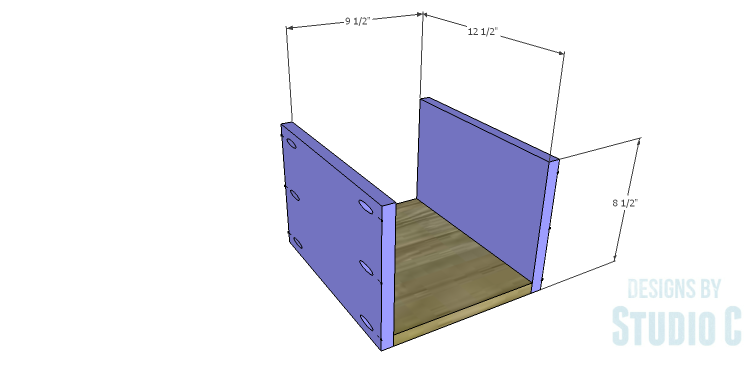
Step Twelve
Cut the pieces for the drawer boxes. Drill pocket holes in all four edges of the bottom as well as each end of the sides. Assemble the drawer boxes as shown using glue and 1-1/4” pocket hole screws. Install the drawer slides according to the manufacturer’s installation instructions, locating them ¾” back from the front edge of the sides and dividers. This easy tutorial on how to install drawer slides will be helpful! Make any necessary adjustments.

Step Thirteen
Cut the pieces for the drawer fronts. Mark the position for the drawer pulls and drill the holes. Shim the drawer front in the opening – there will be a 1/8” gap around all sides – then drive screws through the holes for the drawer pulls into the drawer box. Open the drawer, and secure the drawer front using countersunk 1-1/4” screws from the inside. Remove the screws from the holes for the drawer pull then finish drilling the holes. Install the drawer pull. Take a look at this easy tutorial on installing drawer fronts.

Step Fourteen
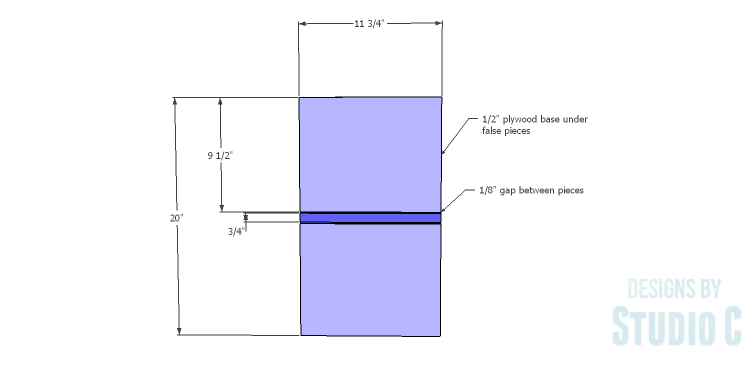
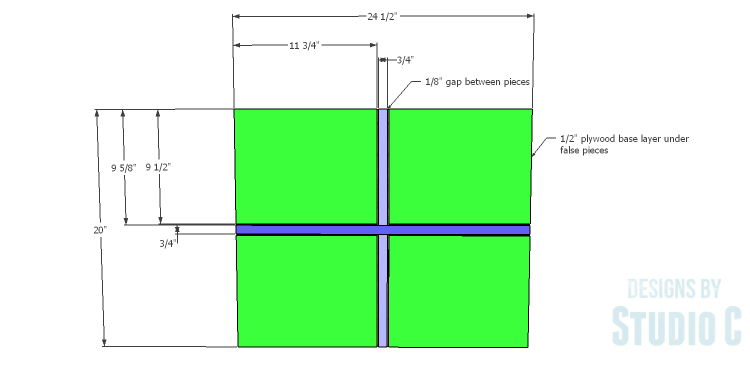
Cut the pieces for the doors. The doors are essential a 1/2″ base panel with 1/4″ false panels glued to the top to mimic the drawer fronts and dividers. Sand the edges of the 1/4″ pieces prior to attaching to the base panels.
Cut the pieces as shown, then glue the false drawer panels on, clamping in place until dry. Insert the strips, spacing them approximately 1/8″ away from the false drawer panels then glue in place.
There will be a 1/8″ gap around all sides of the doors in the openings. Install the hinges on the doors, then install the doors in the openings. Install the cabinet pulls, then attach the magnetic catches to keep the doors closed.
Finish as desired.
This cabinet can be finished in so many ways – wood numbers or letters can be glued to the drawer fronts and false panels prior to finishing, each panel can be individually stenciled (or one large stencil can be used!), it can be weathered or distressed, etc. The cabinet can also be used to store linens or towels in a bathroom, and the bottle holder can be replaced with a straight shelf. There are so many options for the DIY plans to build a Savoy Wine Cabinet! Have any questions? Leave a comment below!