
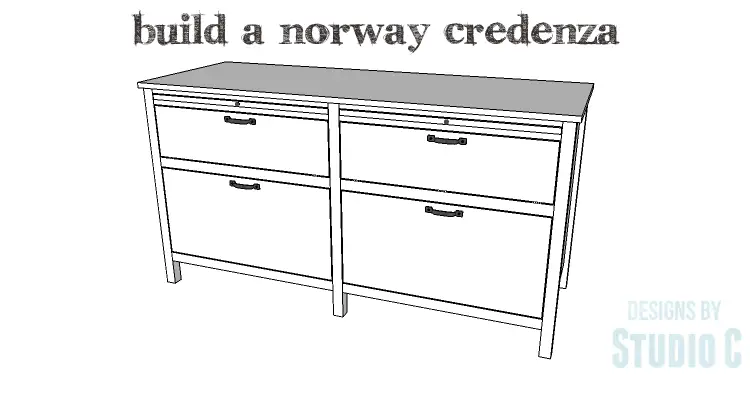
DIY Plans to Build a Norway Credenza
An Excellent Addition to a Home Office
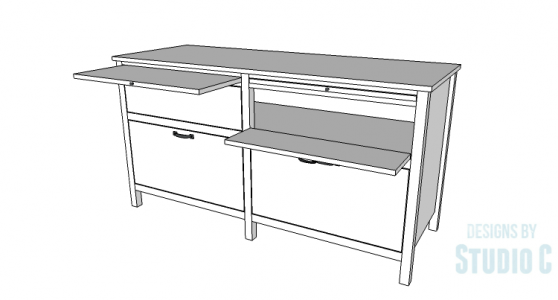
Hey there! I wanted to share something really cool with you – a gorgeous piece of furniture that can help you stay organized in your office. And guess what? I’m totally into it too! The DIY plans for building a Norway Credenza are just amazing. It has two lateral files, two cabinets with drop-down doors, and two pull-out shelves. The best part is, it’s super easy to build and won’t break the bank. Trust me, these plans are suitable for anyone, regardless of their skill level. So why not give it a shot? You won’t regret it!
Materials:
- 1-1/4″ pocket hole screws
- 2-1/2″ pocket hole screws
- 1-1/4″ brad nails
- 2″ screws
- Edge banding, optional
- 2 – sets of 14″ Ball Bearing drawer slides
- Cabinet pulls
- 2 sets of hinges
- 2 drop front supports
- 4 – 1/8″ x 1/2″ x 4′ aluminum strips
- 12 – 1/4″ nylon spacers
- 12 – 3/4″ screws
- Wood glue
- Sandpaper (100, 150, 220 grits)
- Finishing supplies (primer & paint, or stain, sealer)
Lumber:
- 1 – 1×2 at 6′
- 4 – 2×2 at 8′
- 1 – scrap of 2×3 at 19″
- 3 – 4′ x 8′ sheets of 3/4″ plywood
Cut List:
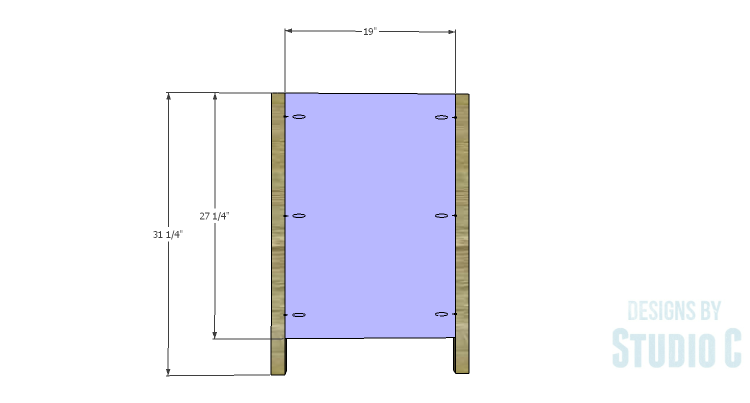
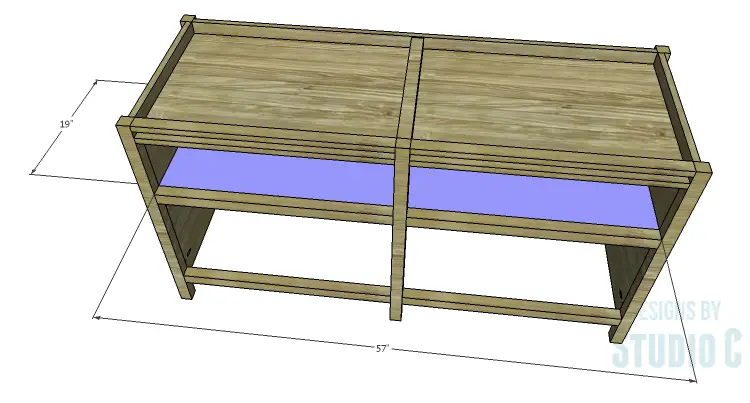
- 5 – 2×2 at 31-1/4″ – Legs
- 2 – 3/4″ plywood at 19″ x 27-1/4″ – Side Panels
- 1 – 3/4″ plywood at 27-1/4″ x 57″ – Back
- 2 – 1×2 at 27-3/4″ – Upper Front Framing
- 4 – 2×2 at 27-3/4″ – Front Framing
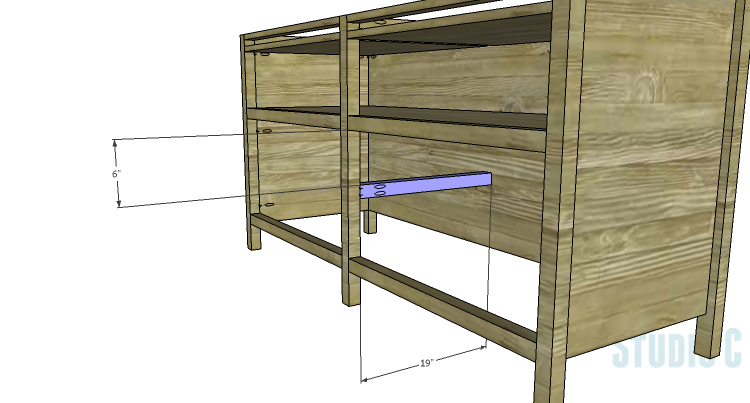
- 1 – 2×3 at 19″ – Pull-Out Shelf Divider
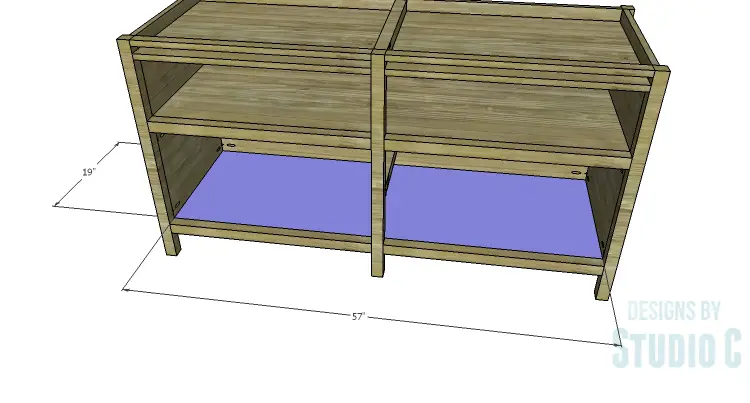
- 2 – 3/4″ plywood at 20-1/2″ x 27-3/4″ – Upper Shelves
- 1 – 3/4″ plywood at 19″ x 57″ – Center Shelf
- 1 – 2×2 at 19″ – Drawer Slide Support
- 1 – 3/4″ plywood at 19″ x 57″ – Bottom
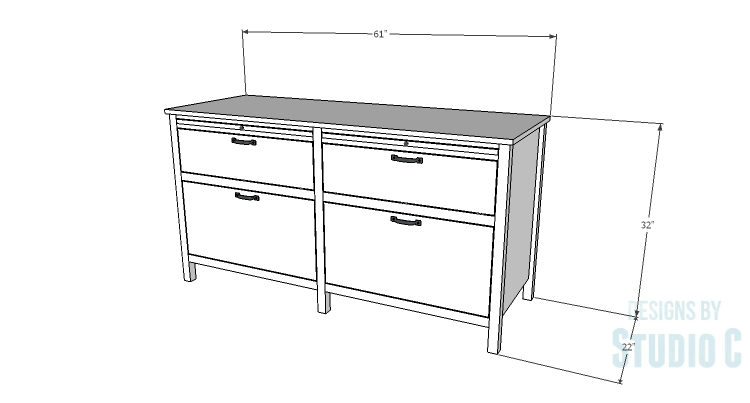
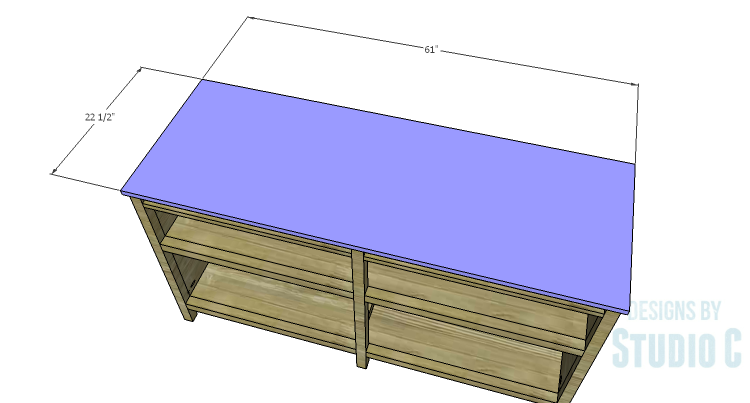
- 1 – 3/4″ plywood at 22-1/2″ x 61″ – Top
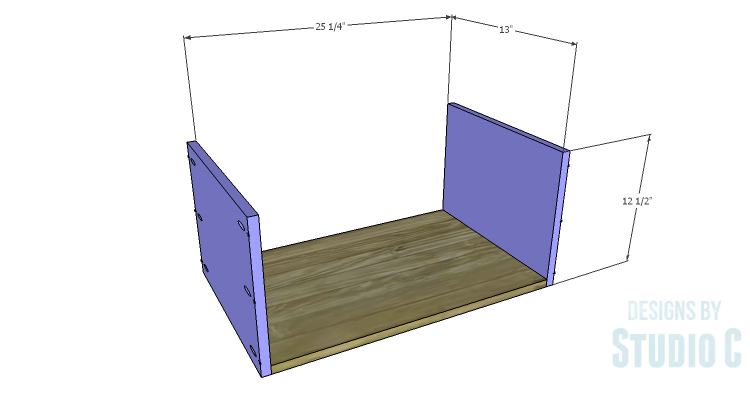
- 2 – 3/4″ plywood at 13″ x 25-1/4″ – Drawer Box Bottoms
- 4 – 3/4″ plywood at 12-1/2″ x 13″ – Drawer Box Sides
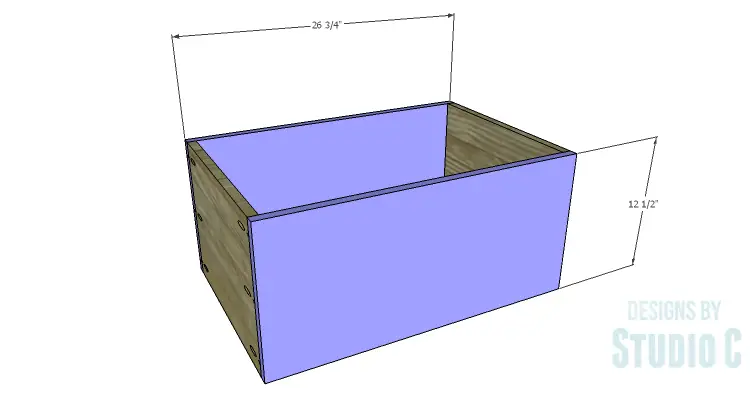
- 4 – 3/4″ plywood at 12-1/2″ x 26-3/4″ – Drawer Box Front & Back
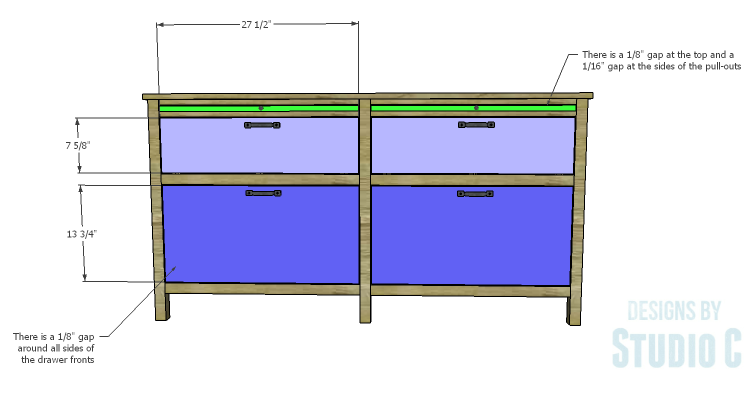
- 2 – 3/4″ plywood at 7-5/8″ x 27-1/2″ – Cubby Fronts
- 2 – 3/4″ plywood at 13-3/4″ x 27-1/2″ – Drawer Fronts
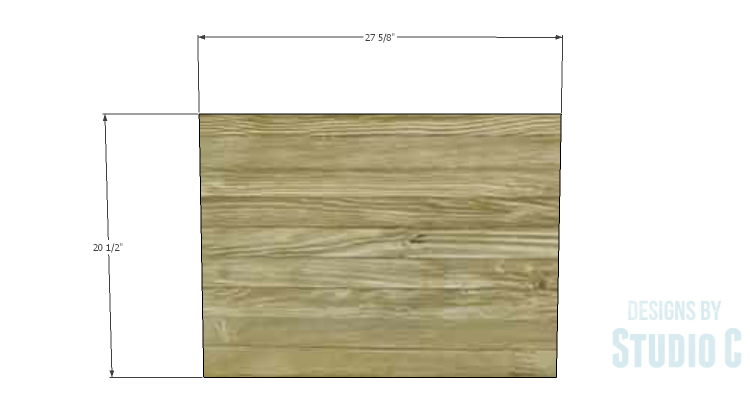
- 2 – 3/4″ plywood at 20-1/2″ x 27-5/8″ – Pull-Out Shelves
Step One
Edge banding will be applied to the exposed edges of the plywood prior to assembly.
Cut the pieces for the legs and the side panels. With the pocket hole jig set for 3/4″ material, drill pocket holes in each long edge of the side panels. Secure the panels to the legs using glue and 1-1/4″ pocket hole screws. The back face of the panel will be flush with the inside face of the legs.
Step Two
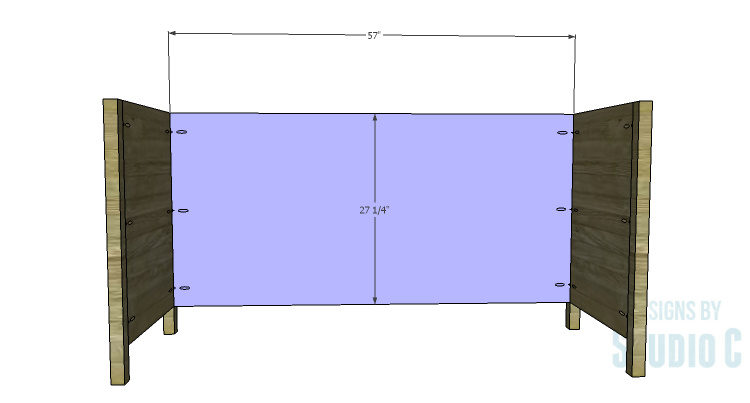
Cut the piece for the back and drill pocket holes in the shorter edges. Secure the panel to the legs using glue and 1-1/4″ pocket hole screws. The back face of the panel will be flush with the inside face of the legs.
Step Three
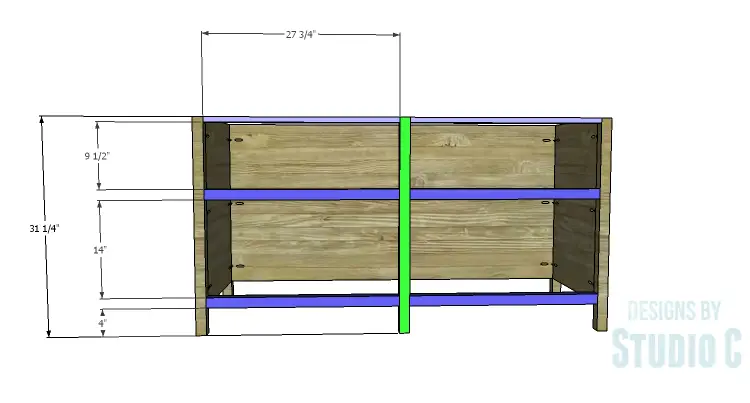
Cut the pieces for the front framing. Drill pocket holes in each end of the upper framing pieces (1×2). Secure the framing pieces to the legs, including the center leg, using glue and 1-1/4″ pocket hole screws. Orient the pocket holes so they face up and will be hidden by the top.
Set the pocket hole jig for 1-1/2″ material and drill pocket holes in each end of the lower framing pieces (2×2). Secure the lower framing pieces to the legs using glue and 2-1/2″ pocket hole screws.
Step Four
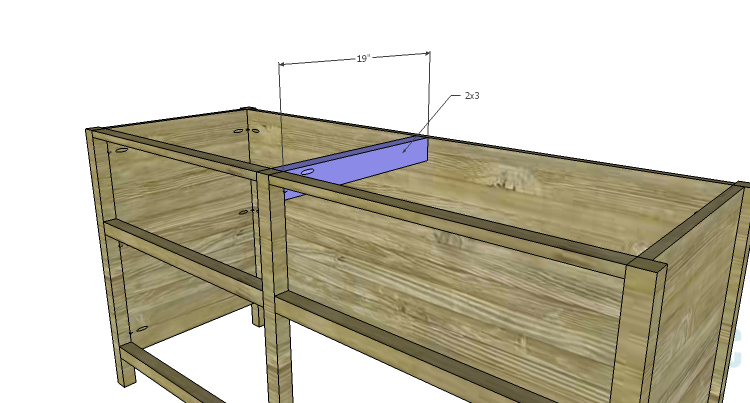
Cut the piece for the pull-out divider and drill pocket holes in one end only. Secure the divider to the center leg, flush with the top of the leg, using glue and 2-1/2″ pocket hole screws. Secure the back of the divider using countersunk 2″ screws through the back panel into the end of the divider.
Step Five
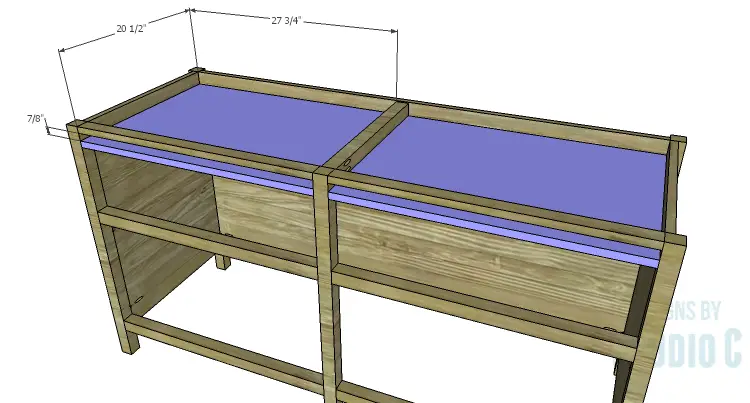
Cut the pieces for the upper shelves. Set the pocket hole jig for 3/4″ material and drill pocket holes in the side and back edges. Secure the shelves to the sides, back, and pull-out divider using glue and 1-1/4″ pocket hole screws.
Step Six
Cut the piece for the center shelf and drill pocket holes in all four edges of the panel. Secure the shelf to the sides, back, and front framing using glue and 1-1/4″ pocket hole screws. The top face of the shelf will be flush with the top face of the front framing.
Step Seven
Cut the piece for the lower drawer slide support. Set the pocket hole jig for 1-1/2″ material and drill pocket holes in one end only. Secure the support to the center leg using glue and 2-1/2″ pocket hole screws. Secure the back of the support using countersunk 2″ screws through the back panel into the end of the divider.
Step Eight
Cut the piece for the lower shelf. Set the pocket hole jig for 3/4″ material and drill pocket holes in all four edges. Secure the bottom to the sides, back, and front framing using glue and 1-1/4″ pocket hole screws. The top face of the bottom will be flush with the top face of the front framing.
Step Nine
Cut the piece for the top. The top will overhang by 1/2″ at the sides and the front. Secure in place using glue and 1-1/4″ brad nails.
Step Ten
Cut the pieces for the drawer boxes. Drill pocket holes in all four edges of the bottom as well as each end of the sides. Assemble the drawer boxes as shown using glue and 1-1/4” pocket hole screws. Install the drawer slides according to the manufacturer’s installation instructions, locating them ¾” back from the front edge of the sides. Take a look at this easy tutorial on installing drawer slides. Make any necessary adjustments.
This post on creating the hanging rails for the file folders will be helpful.
Step Eleven
Cut the pieces for the drawer fronts. Mark the position for the drawer pulls and drill the holes. Shim the drawer front in the opening – there will be a 1/8” gap around all sides – then drive screws through the holes for the drawer pulls into the drawer box. Open the drawer, and secure the drawer front using countersunk 1-1/4” screws from the inside. Remove the screws from the holes for the drawer pull then finish drilling the holes. Install the drawer pull. Take a look at this easy tutorial on installing drawer fronts.
Install the hinges on the fronts for the cubbies, then install the fronts in the openings. Install the drop-down support according to the manufacturer’s instructions.
Cut the pieces for the pull-out shelves. There will be a 1/16″ gap at the sides of the shelves, and a 1/8″ gap at the top.
Finish as desired.
This is a great piece that can be used in any room to organize paperwork and hide electronics! Have any questions about the DIY plans to build a Norway Credenza? Leave a comment below!
Originally posted 2015-02-04 08:00:47.