
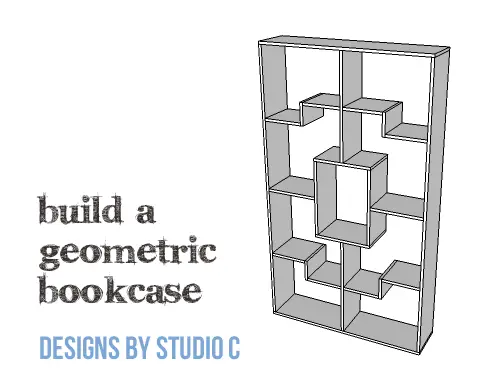
DIY Plans to Build a Geometric Bookshelf
A Quick and Easy Bookshelf to Build
This ultra simple bookshelf uses straight off-the-shelf lumber making it a quick way to add extra storage to a room. The DIY plans to build a Geometric Bookshelf features lots of shelves and is constructed using 1x12s. The straight shelves and dividers can be secured using pocket holes, countersunk screws or brad nails. The upper and lower angled shelves will be attached to the center divider using pocket hole screws while the outer edge can be secured however you’d like.
Materials:
- 1-1/4″ pocket hole screws (<– affiliate link!)
- 1-3/4″ brad nails or 2-1/2″ screws
- Wood glue
- Sandpaper (100, 150, 220 grits)
- Finishing supplies (primer & paint, or stain, sealer)
Lumber:
- 7 – 1×12 at 8′
Cut List:
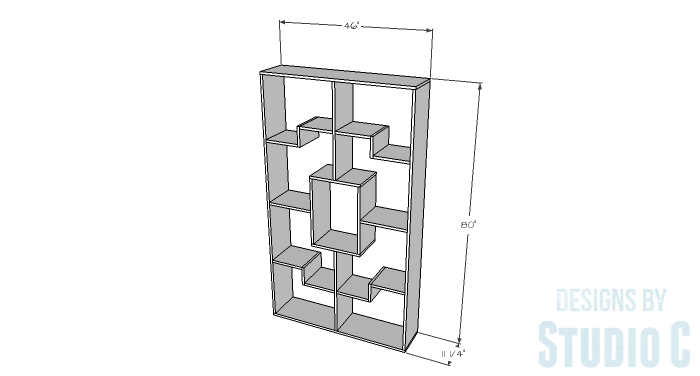
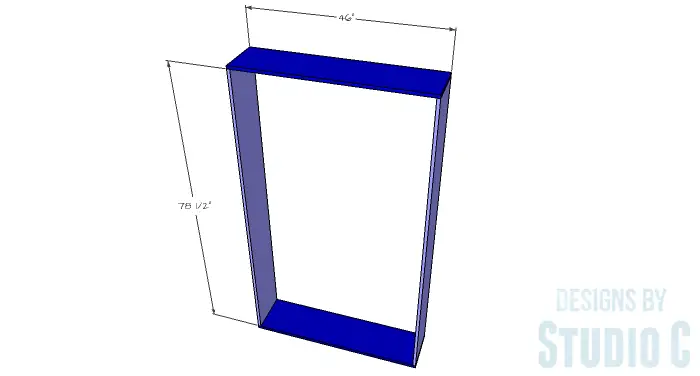
- 2 – 1×12 at 46″ – Outer Box Top & Bottom
- 2 – 1×12 at 78-1/2″ – Outer Box Sides
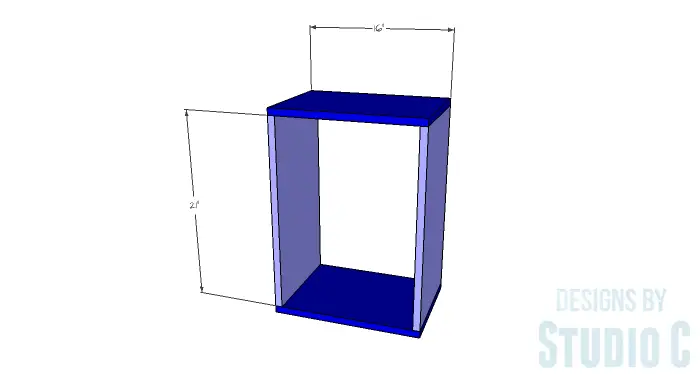
- 2 – 1×12 at 16″ – Inner Box Top & Bottom
- 2 – 1×12 at 21″ – Inner Box Sides
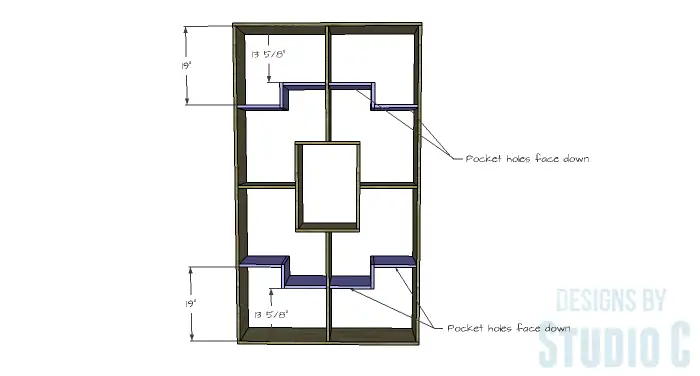
- 2 – 1×12 at 14-1/4″ – Horizontal Shelf Connectors
- 2 – 1×12 at 28″ – Vertical Divider Connectors
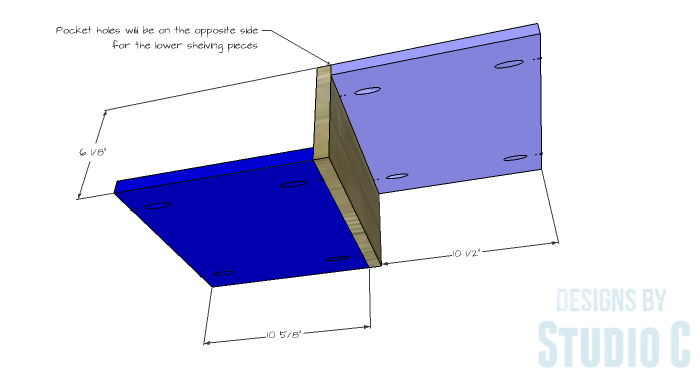
- 4 – 1×12 at 10-1/2″ – Angled Shelves (Inner Piece)
- 4 – 1×12 at 6-1/8″ – Angled Shelves (Vertical Divider)
- 4 – 1×12 at 10-5/8″ – Angled Shelves (Outer Piece)
Step One
Cut the pieces for the outer box. If using pocket holes, set the pocket hole jig for 3/4″ material and drill pocket holes in each end of the longer pieces. Assemble the box using glue and 1-1/4″ pocket hole screws.
If using countersunk screws, pre-drill the countersunk holes in the edges of the shorter pieces. Assemble the box using glue and 2-1/2″ countersunk screws.
If using brad nails, assemble the box using glue and 1-3/4″ brad nails.
Step Two
Cut the pieces for the inner box and assemble it in the same manner as the outer box.
Step Three
Cut the pieces for the horizontal shelves and the vertical dividers. The pieces can be secured using pocket holes, brad nails, or countersunk screws. If using pocket holes, drill pocket holes in each end of each piece. Secure the pieces to the box using glue and 1-1/4″ pocket hole screws.
If using countersunk screws, mark the position of the shelves on the outside of the outer box and the inside of the inner box. Pre-drill the countersunk holes and assemble the box using glue and 2-1/2″ countersunk screws.
If using brad nails, secure the shelves and dividers to the boxes using glue and 1-3/4″ brad nails.

Step Four
Cut the pieces for the angled shelves. Drill pocket holes in each end of the horizontal shelf pieces (the 10-1/2″ and 10-5/8″ long pieces). When assembling the angled shelves, note that the pocket holes will face down – this way they will not have to be filled – so the lower angled shelves will be opposite of the upper angled shelves. Secure the shelves to the inner and outer boxes using glue and 1-1/4″ pocket hole screws.
Finish as desired. Nail-on teflon glides can be added to the bottom.
This bookshelf is an excellent addition to any room but make sure the bookcase is secured to a wall stud with an angle bracket! Have any questions about the DIY plans to build a Geometric Bookshelf? Leave a comment below!
Originally posted 2015-12-18 08:00:36.