
DIY Furniture Plans to Build a Maya Bench
Another Fantastic Bench for Indoors or Outdoors
This easy to build bench is great addition to any area of the home. The DIY furniture plans to build a Maya Bench can be constructed out of regular lumber or treated lumber – all straight off the shelf boards. The bench can also accommodate two 24″ x 24″ cushions for the seat as well as a few pillows for the back. This is another easy project that can be completed in a weekend.
Materials:
- 1-1/4″ pocket hole screws* (<– affiliate link!)
- 2-1/2″ pocket hole screws*
- 2-1/2″ screws*
- 1-3/4″ brad nails
- Wood glue
- Sandpaper (100, 150, 220 grits)
- Finishing supplies (primer & paint, or stain, sealer
*If building the bench to use outdoors, exterior screws will be used
Tools Needed:
- Jigsaw or bandsaw
- Miter saw or circular saw
- Table saw
- Drill
- Pocket hole jig
- Pneumatic brad nailer with compressor
- Sander
Lumber:
- 6 – 1×3 at 6′
- 1 – 1×3 at 8′
- 1 – 1×6 at 4′
- 4 – 2×2 at 8′
- 1 – 2×4 at 8′
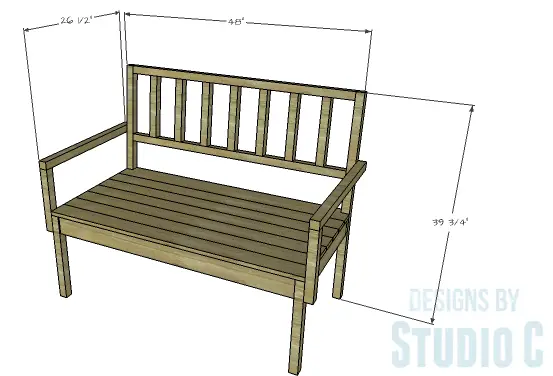
Cut List:
- 2 – 2×4 at 39-3/4″ – Back Legs
- 2 – 2×2 at 45″ – Back
- 7 – 2×2 at 12-1/2″ – Back
- 2 – 1×3 at 45″ – Front & Back Stretchers
- 2 – 2×2 at 17-1/4″ – Front Legs
- 2 – 1×3 at 22-1/2″ – Side Aprons
- 3 – 1×3 at 23-1/2″ – Seat Supports
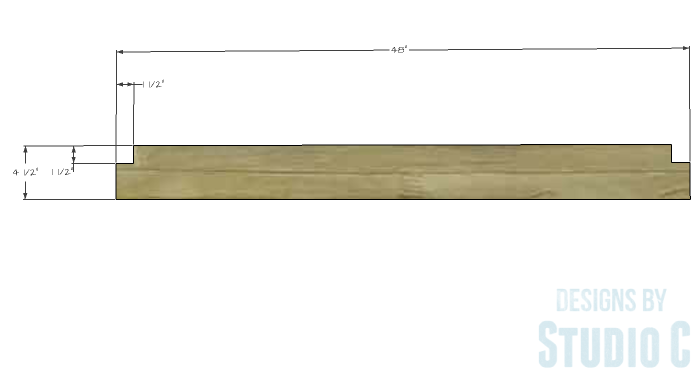
- 1 – 1×6 (ripped to 4-1/2″ wide) at 48″ – Rear Slat
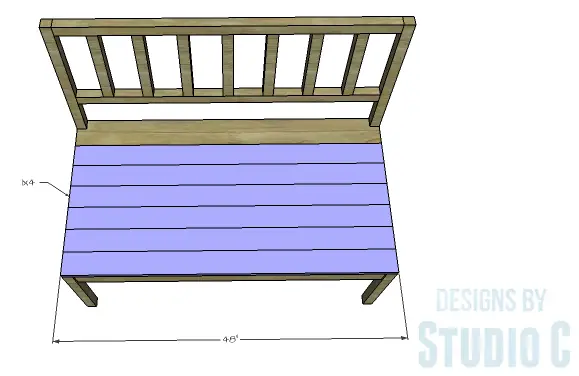
- 6 – 1×3 at 48″ – Seat Slats
- 2 – 2×2 at 12-1/4″ – Arms
- 2 – 2×2 at 26-1/2″ – Arms
Click on the drawings for a larger view!
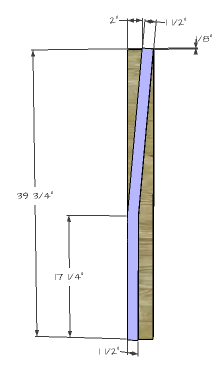
Step One
Cut the pieces to length for the back legs. Draw the back legs on the 2×4 pieces as shown in the drawing, then cut out using a jigsaw or a bandsaw.
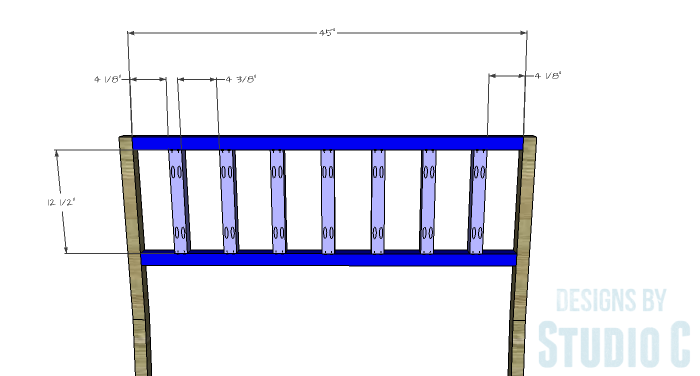
Step Two
Cut the pieces for the back. With the pocket hole jig set for 1-1/2″ material, drill pocket holes in each end of each piece. Secure the longer back pieces to the legs using glue and 2-1/2″ pocket hole screws. Orient the pocket holes so they face down.
Secure the shorter back pieces to the longer back pieces using glue and 2-1/2″ pocket hole screws at the spacing indicated in the drawing.
Step Three
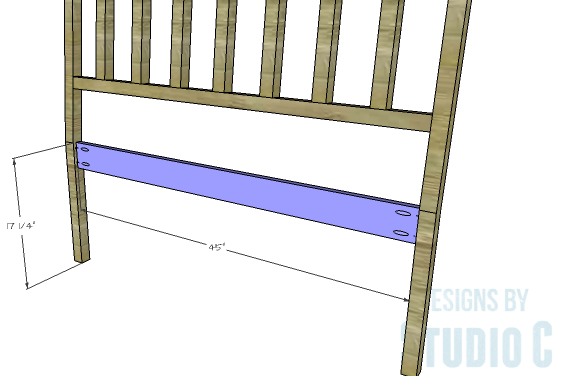
Cut the pieces for the front and back stretchers. Set the pocket hole jig for 3/4″ material and drill pocket holes in each end of each piece. Secure the back stretcher to the back legs using glue and 1-1/4″ pocket hole screws. The outside face of the stretcher will be positioned 1/4″ back from the back face of the legs.
Step Four
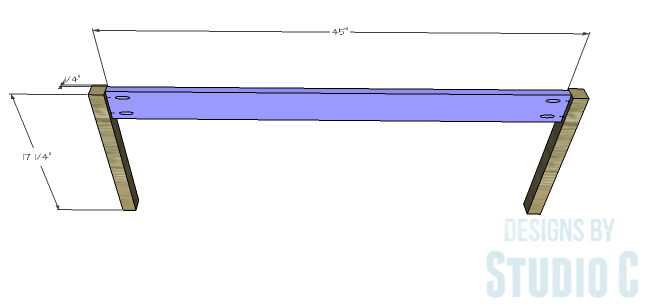
Cut the pieces for the front legs. Secure the front stretcher to the legs using glue and 1-1/4″ pocket hole screws. The outside face of the stretcher will be positioned 1/4″ back from the front face of the legs.
Step Five
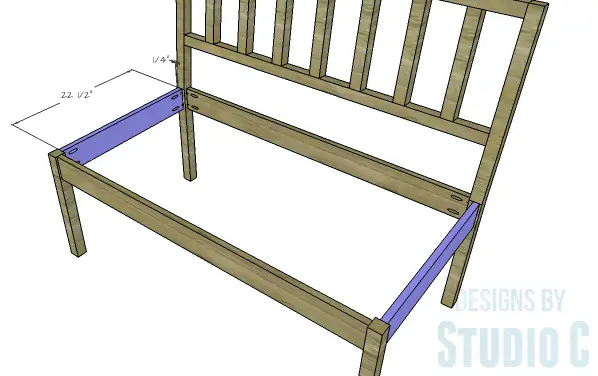
Cut the pieces for the side stretchers and drill pocket holes in each end. Secure the side stretchers to the front and back legs using glue and 1-1/4″ pocket hole screws. The outside face of the stretchers will be positioned 1/4″ back from the side faces of the legs.
Step Six
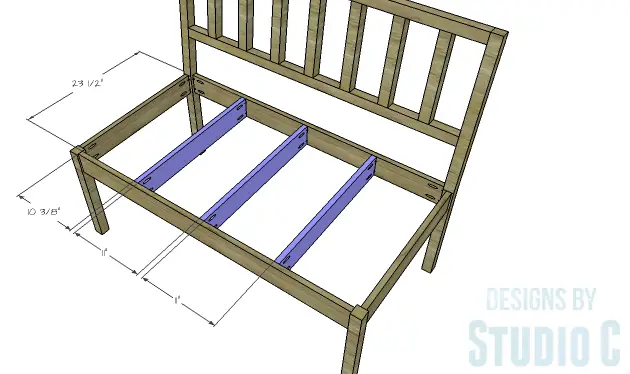
Cut the pieces for the seat supports. Secure the supports to the front and back aprons using glue and 1-1/4″ pocket hole screws.
Step Seven
Cut the piece for the back seat slat. Cut the notches using a jigsaw or bandsaw. Secure the back slat in place using glue and 1-3/4″ brad nails.
Cut the pieces for the remaining slats. Secure the slats in place using glue and 1-3/4″ brad nails.
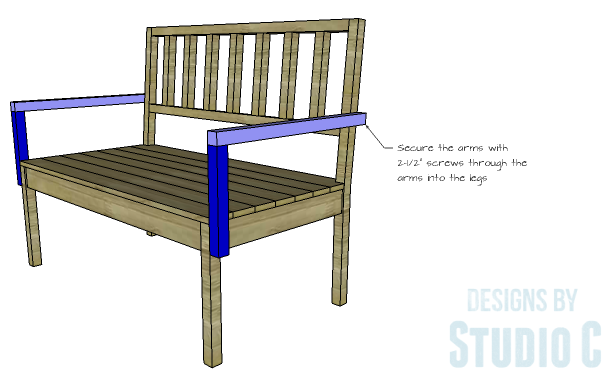
Step Eight
Cut the pieces for the arms. The longer pieces will have a 5° bevel cut in the back edge. Secure the longer arm piece to the shorter piece using glue and countersunk 2-1/2″ screws through the longer piece into the top of the shorter piece.
Secure the arms to the legs using glue and 2-1/2″ screws. The bottom edge of the vertical piece will be flush with the bottom edge of the aprons.

Finish as desired.
This would be a great bench as extra seating in any room or even at a dining table! Have any questions about the DIY furniture plans to build a Maya Bench? Leave a comment below!
Originally posted 2016-02-10 08:00:50.
[…] Build this bench using cedar or pressure treated wood for outdoors using these free woodworking plans. […]